- Синхронизация нескольких устройств на платформе Android
- Синхронизация устройств Android друг с другом
- Способ 1: Сервисы Google
- Способ 2: Dropsync
- How to Transfer Contacts from Android to Android
- Method 1: Sync Android Contacts to Google account
- Method 2: One-Click Transfer Contacts from Android to Android
- How to transfer Contacts from android to android?
- Step 1: Install and run Android Data Transfer
- Step 2: Select contacts to transfer to Android
- Best 6 Ways to Transfer Contacts Android to Android
- Part 1. How to Transfer Contacts from Android to Android with One Click
- MobileTrans — Phone Transfer
- Part 2. How to transfer contacts from Android to Android with a SIM card
- Part 3. How to Transfer Contacts from Android to Android via a VCF file
- Part 4. How to Transfer Contacts from Android to Android with Google Account and Sync
- Part 5. How to Transfer Contacts from Android to Android with SHAREit
- Part 6. How to Transfer Contacts from Android to Android via Bluetooth
Синхронизация нескольких устройств на платформе Android
На сегодняшний день мобильные телефоны и планшеты на платформе Android являются наиболее используемыми устройствами, в том числе и одновременно. Из-за этого часто возникает необходимость организовать синхронизацию данных между двумя девайсами в режиме реального времени. В ходе настоящей инструкции мы расскажем о методах реализации подобной задачи.
Синхронизация устройств Android друг с другом
Нами будет уделено внимание процессу синхронизации преимущественно в автоматическом режиме, требуя минимального вмешательства. Если же вас интересует тема переноса данных с одного устройства на другое без постоянного обмена ими, ознакомьтесь с другой статьей.
Способ 1: Сервисы Google
По умолчанию для использования всех возможностей платформы Android на любом девайсе требуется произвести авторизацию с использованием учетной записи Гугл. Именно за счет единого аккаунта можно синхронизировать практически любые личные данные. Если вы еще не успели авторизоваться, сделайте это по нашей инструкции.
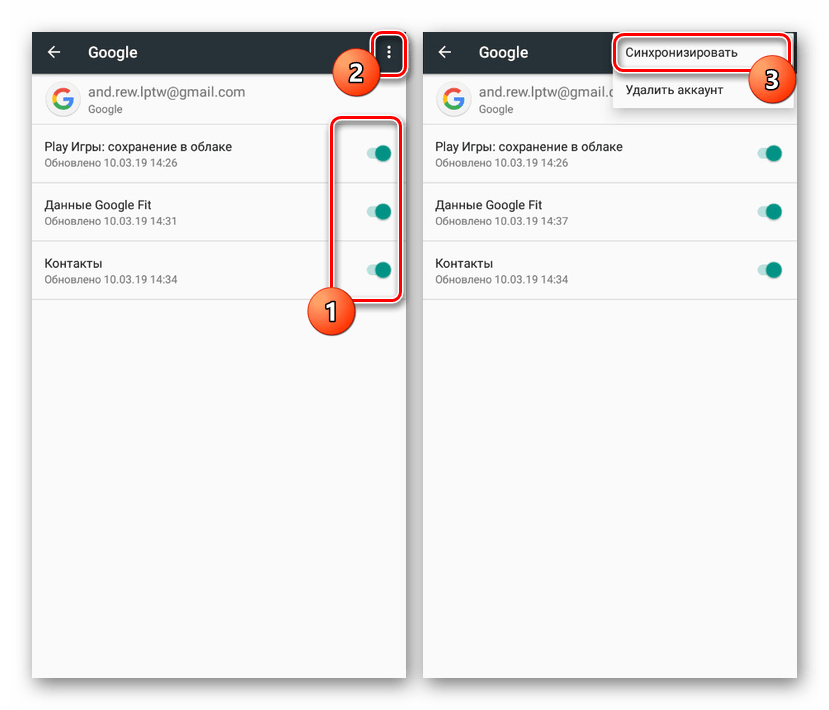
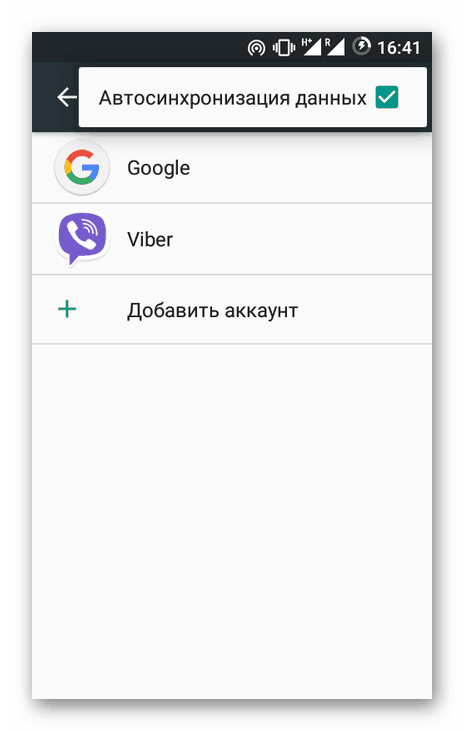
После подключения учетной записи обязательно посетите раздел «Аккаунты» в настройках устройства, выбрав «Google». Здесь нужно открыть меню с тремя точками в правом верхнем углу и воспользоваться пунктом «Синхронизировать». В результате отмеченные на той же странице данные обновятся в соответствии с информацией на сервере.
В «Настройках» любого смартфона на Андроид предусмотрена функция резервного копирования данных о работе установленных приложений. При активации этой возможности все сведения о параметрах ПО будут автоматически сохраняться в облаке. Недостатком здесь выступает отсутствие синхронизации непосредственно самих приложений.
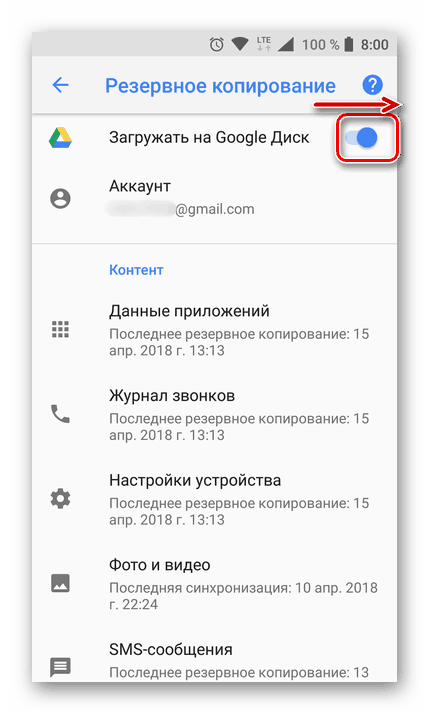
Для включения функции зайдите в «Настройки» и найдите пункт «Восстановление и сброс». Нажмите по переключателю «Автовосстановление», и на этом процедура завершена. Учтите, что как и любые другие виды синхронизации, передача данных требует действующее соединение с интернетом.
Контакты
Телефонная книга на смартфоне является одним из наиболее важных приложений, синхронизировать которое с облаком можно не только для личного удобства, но и безопасности на случай выхода устройства из строя. И хотя перенос контактов выполняется в ранее упомянутом разделе, также есть несколько других нюансов. О процедуре работы с контактами и синхронизации мы рассказали в отдельной статье.
Google Фото
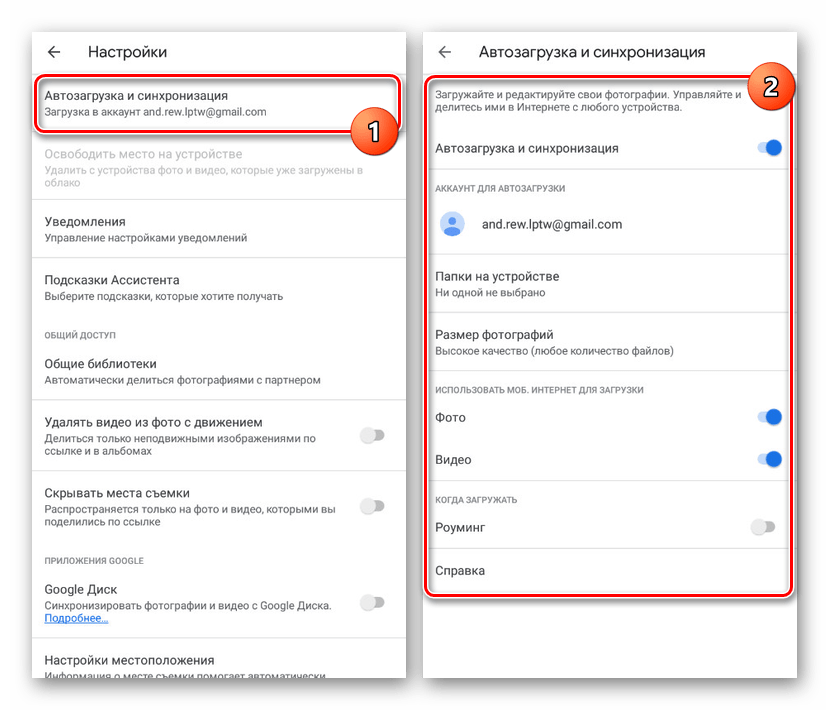
Если на устройстве находится много изображений или вы часто фотографируете, но не всегда используете такие приложения, как Instagram, можно воспользоваться сервисом Google Фото. С его помощью после подключения аккаунта Гугл все снимки на смартфоне будут синхронизироваться с облаком и станут доступны на всех девайсах, где используется этот сервис и ваша учетная запись.

Произвести настройку синхронизации можно при первом запуске приложения, и в будущем не потребуются какие-либо корректировки. Однако, несмотря на это, изменить работу автозагрузки все же можно во внутренних параметрах приложения в разделе «Автозагрузка и синхронизация».
Синхронизация приложений
Этот вариант синхронизации нельзя назвать автоматическим, но упомянуть его все же важно. Стандартное и, наверное, самое используемое приложение Google Play запоминает список установленного ПО вне зависимости от версии Андроид и модели устройства. Таким образом, используя одну учетную запись на нескольких девайсах, можно всегда узнать какие приложения были недавно установлены и по необходимости произвести повторную инсталляцию. В сочетании с резервным копированием можно организовать перенос данных с минимальными потерями.

Для просмотра списка откройте Google Play Маркет, разверните главное меню и выберите пункт «Мои приложения и игры». С помощью верхней панели перейдите на вкладку «Библиотека». Именно здесь находится информация об установленном ПО. Историю можно очистить или восстановить любое приложение кнопкой «Установить».
Мы постарались рассказать обо всех наиболее удобных вариантах синхронизации двух девайсов на платформе Android с использованием учетной записи Гугл. Иногда некоторые функции могут быть недоступны или, наоборот, расширены из-за версии прошивки.
Способ 2: Dropsync
В отличие от сервисов Google, где основной возможностью является синхронизация данных о работе, приложение Dropsync позволяет организовать полноценный обмен файлами между двумя девайсами посредством облачного хранилища Dropbox. Как не трудно догадаться, вам придется завести учетную запись на этом ресурсе и по возможности приобрести дополнительное дисковое пространство.
Примечание: Похожие программы есть и для других облачных сервисов, но именно здесь синхронизация реализована лучше всего.
- Загрузите и откройте приложение по выше представленной ссылке. На стартовой странице нажмите кнопку «Подключение к Dropbox аккаунту».
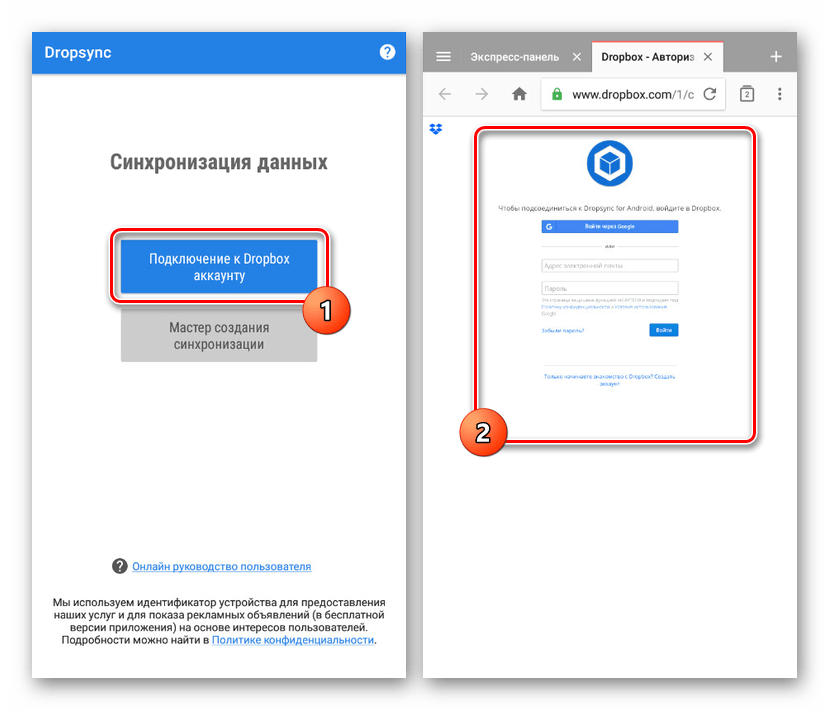
После этого вы будете перенаправлены в браузер по умолчанию или к авторизации через приложение Dropbox. Вне зависимости от варианта произведите авторизацию, предоставив Dropsync разрешение на управление файлами на устройстве.
После успешной авторизации произойдет перенаправление обратно в приложение и, когда появится подпись «Dropbox аккаунт подключен», нажмите кнопку «Мастер создания синхронизации».

Дальше тапните по ссылке «Создать свою синхронизацию». В соответствии со встроенной справкой можете опробовать приложение с помощью тестовой синхронизации, но мы эту процедуру рассматривать не будем, переходя сразу к настройкам файлов.

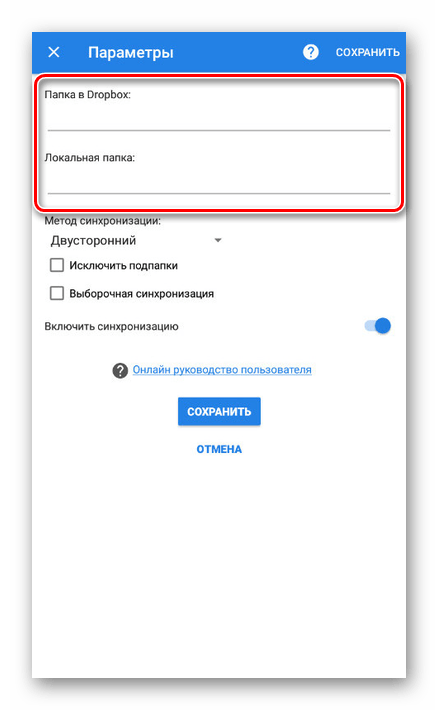
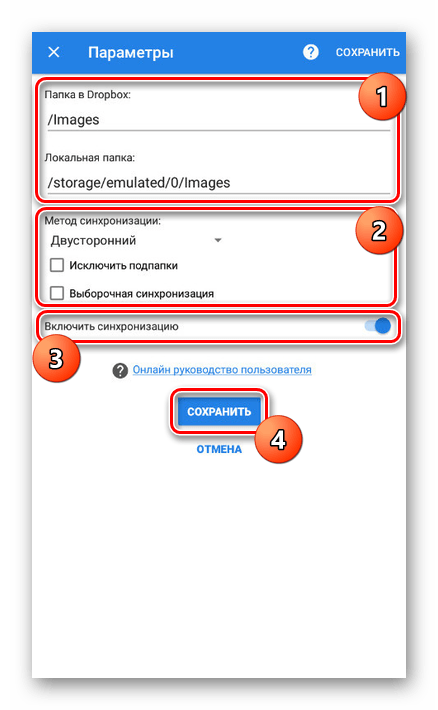
Нажмите по блоку «Папка в Dropbox», чтобы перейти к каталогу файлов в облаке. Обратите внимание, в дальнейшем также нужно будет воспользоваться пунктом «Локальная папка».
В первом случае будет представлен список директорий, когда-либо созданных в облаке. По необходимости можете добавить и выбрать новую папку.
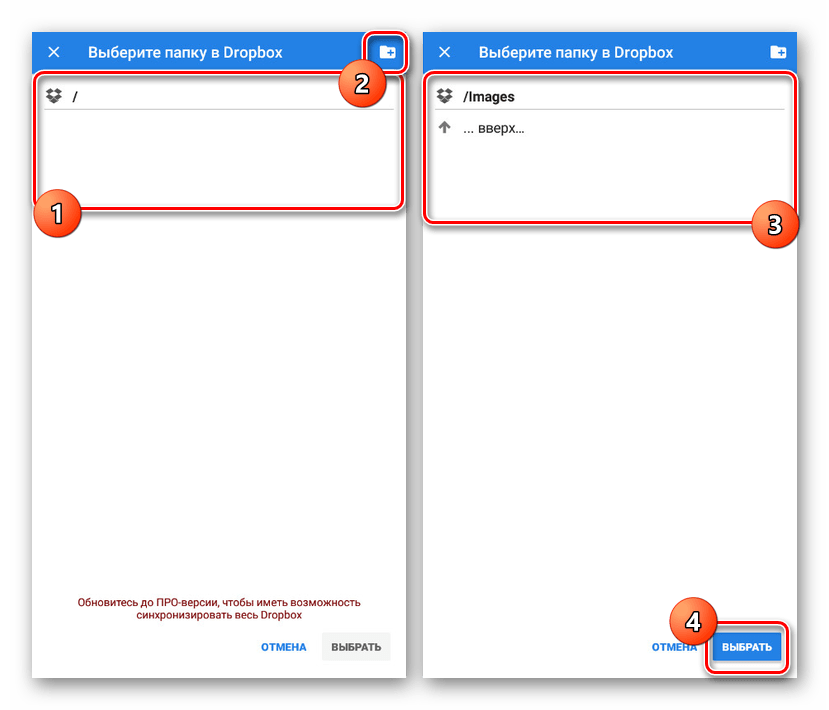
При использовании пункта «Локальная папка» откроется корневой каталог смартфона, где вам нужно выбрать директорию для синхронизации. Учтите, все данные, находящиеся в выбранной папке, будут сразу переданы на сервер Dropbox.

Вернувшись на страницу «Параметры», измените «Метод синхронизации» на «Двусторонний» и, если нужно, отметьте галочками дополнительные параметры. Переход нажатием кнопки «Сохранить» обязательно убедитесь, что переключатель «Включить синхронизацию» находится в активированном состоянии.
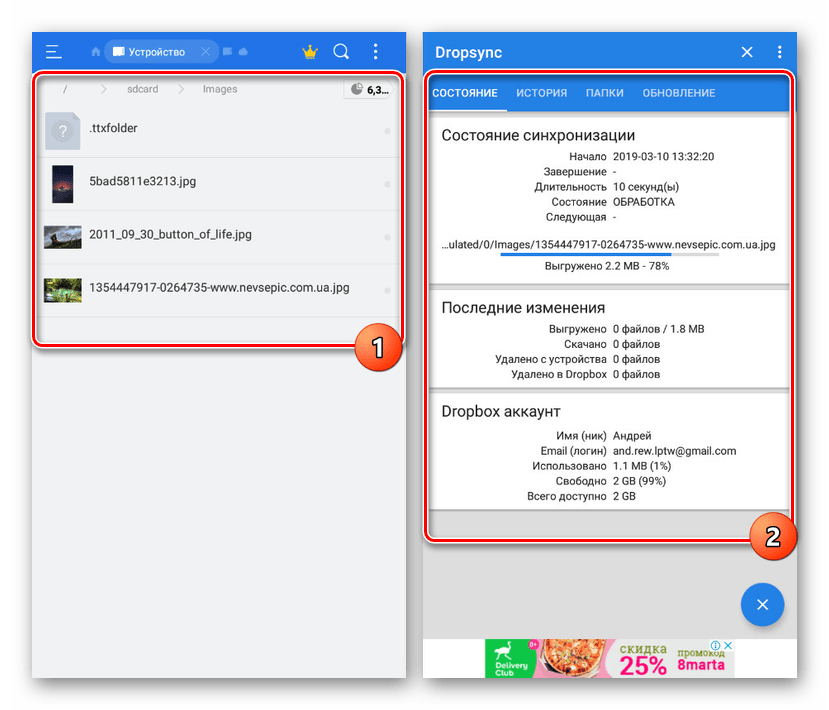
Теперь начнется первичная синхронизация данных и будет повторяться каждые несколько минут, проверяя состояние файлов в облаке и в папке на девайсе.

Поместив или удалив какие-либо файлы в выбранную директорию, они будут загружены в облако. Если же Dropsync обнаружит несовпадение в документах, из хранилища они также удалятся.
Подводя итог, можно с уверенностью сказать, что для наиболее эффективной синхронизации лучше всего использовать оба варианта сразу. Каждый из них не требует ручного управления и отлично справляется с возложенной задачей.
Помимо этой статьи, на сайте еще 12473 инструкций.
Добавьте сайт Lumpics.ru в закладки (CTRL+D) и мы точно еще пригодимся вам.
Отблагодарите автора, поделитесь статьей в социальных сетях.
Источник
How to Transfer Contacts from Android to Android
Have had your old Android device for years, and intended to get an upgrade? Moving all contacts from an old Android to an new Android phone running Android 6.0 or above may sound complicated, but it’s actually really easy. In following article, we shows two ways to sync contacts from one Android phone to the other at ease. You can simply choose a method for yourself.
Method 1: Sync Android Contacts to Google account
For an Android user, you almost certainly already have a google login. Nonetheless, manay Android phone users aren’t familiar with its features on syncing contacts. Although, the synchronizing process is kind of cumbersome and old fashion, it do transfer contacts from Android to Android phone. Here is how it works:
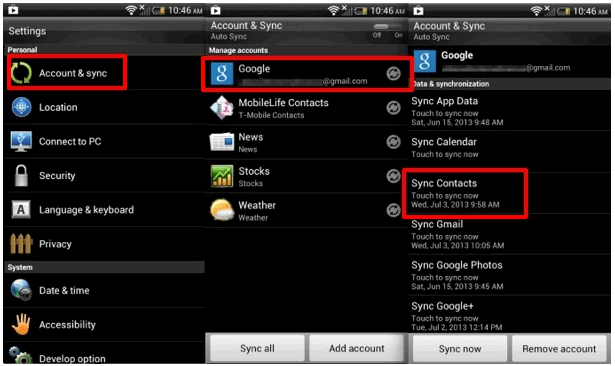
1. Open Settings on your old Android phone, then go to “Accounts & Sync”, and ten tap on the Google account.
2. Tap on “Sync Contacts” (or Sync All if you want to sync everything) and let the syncing process complete.
3. Navigate to your new phone. Open “Settings” then go to “Accounts & Sync” and login the same Google account.
4. Select «Sync Contacts» to restore your Android address book. This may take a few minutes if you have a very large address book.
 Method 2: One-Click Transfer Contacts from Android to Android
 Method 2: One-Click Transfer Contacts from Android to Android
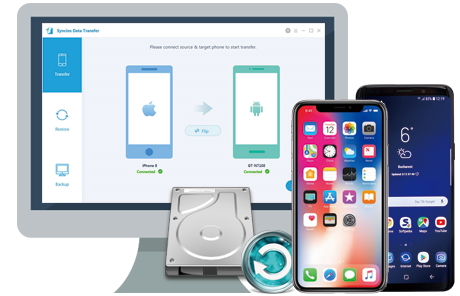
Obviously, transferring contacts from phone to phone using Google account is a bit troubblesome. What if you could connect your old android to the new one and switch contacts directly via USB cable? It is more convenient, isn’t it? Hence, we’d like to introduce you an phone-to-phone contacts transfer tool -Syncios Data Transfer, an easy-to-use tool, can clone address book from old Android phone to the new one with a lot less hassle.
Syncios Data Transfer
Syncios Data Transfer is a professional iOS & Android synchronizing tool, which enables you to backup or transfer messages, contacts, call logs, music, video, audio and other files between iOS & Android devices and computer with only few clicks or directly phone-to-phone transfer.
How to transfer Contacts from android to android?
Step 1: Install and run Android Data Transfer
Connect both of your Android devices to your computer and launch the Syncios Android Data Transfer. To transfer contacts from Samsung to HTC, Samsung to LG, or Sony to Moto etc, click «start» button under «Phone to Phone Transfer» section.
![]()
Step 2: Select contacts to transfer to Android
Between the two Android phones display all the contents you can transfer. The ‘contacts’ section would be automatically checked. You can uncheck any content you dislike to transfer. Then, click Start Copy.
It only takes few seconds to copy all contacts to Android phone.
Источник
Best 6 Ways to Transfer Contacts Android to Android


“I use more than one Android phone. How could I transfer contacts from one to another and merge both contacts?”
If you use more than one android device, perhaps one for business and another for personal purposes, you may find that sometimes the contacts on these devices can overlap. In this case, you may need to transfer contacts from one Android device to another.
In this article, we will be looking at some of the most effective solutions, beginning with the easiest and the most effective solution.
Part 1. How to Transfer Contacts from Android to Android with One Click
One of the best ways to transfer contacts from Android to Android is to use a third-party application known as MobileTrans — Phone Transfer. It is one of the best ways to transfer data from one phone to another, but you can also use it to transfer data selectively. That means that you will be able to choose the contacts you want to transfer, which can come in handy if you need to move just some of your contacts and not all of them.
MobileTrans — Phone Transfer
Transfer Contacts from Android to Android with One Click
- Easily transfer contacts, music, messages, notes, apps, photos, videos, and more.
- No iTunes, iCloud needed. Easy to operate and fast transfer speed.
- Fully compatible with iOS 14 and Android 10.0
- Transfer data to a new android phone without resetting.
To use MobileTrans to transfer contacts from Android to Android, follow these steps:
- Download and install MobileTrans on your computer. After successful installation, launch the program and then select the “Phone Transfer” feature on the main window.
![]()
Now, connect both Android devices to the computer using USB cables and make sure that MobileTrans can recognize both devices (You may have to enable USB debugging for the program to detect the devices).
It is also important to make sure that you have the order of devices correctly. Ensure that the device you want to transfer contacts from is the “Source” device, and the one you want to transfer contacts to is the “Destination”. If this order is not correct, click on “Flip” to change it.
![]()
Once the devices are both connected, and MobileTrans can detect them, you should see a list of all the data on the source device displayed between the two devices. Select “Contacts” and then click “Start” to transfer the contacts from the source device to the destination device.
![]()
Please note that if you want to replace the contacts on the destination device completely, check “Clear data before copy” before beginning the transfer process.
If you want to learn the six methods quickly, you can go through the video below:
Part 2. How to transfer contacts from Android to Android with a SIM card
If the SIM card you have on your device is removable, you can easily use it to transfer contacts to a new device by simply copying all the contacts to the SIM card, inserting it into the other device, and moving the stored contacts. Here’s a simple step by step guide to help you do that;
- Open the “Contacts” app on the source Android device and then tap on “Menu” (the three vertical dots at the top)
- Select “Manage Contacts” from the options that appear and then tap “Import/Export Contacts”.
- Tap “Export Contacts” and then select to a SIM card
- When all the contacts on the device have been transferred to the SIM card, remove the SIM card and then insert it into the destination device
- Open the Contacts app on the destination device and go to «Menu > Manage Contacts > Import/Export Contacts» and then select “Import from SIM Card.”
- Keep the devices connected to the computer until all the contacts are transferred.
- You will be able to see the transferred contacts on the destination device in a few minutes.
![]()
Part 3. How to Transfer Contacts from Android to Android via a VCF file
If your SIM card is not removable or you have too many contacts on your Android device to justify transferring them one by one, you can easily move them from one Android device to another via a VCF file. This process is particularly useful since you can transfer all your contacts at once as an email attachment. Follow these simple steps to transfer contacts from Android to Android using a VCF file;
- Open the “Contacts” app on your Android phone and then tap on the three dots at the top (menu). Select “Manage Contacts” to continue.
Please note that these buttons may be different on some Android models.
![]()
Part 4. How to Transfer Contacts from Android to Android with Google Account and Sync
You might also be able to transfer contacts from Android to Android by syncing the contacts from a Google backup. The following are simple steps to show you how to do that;
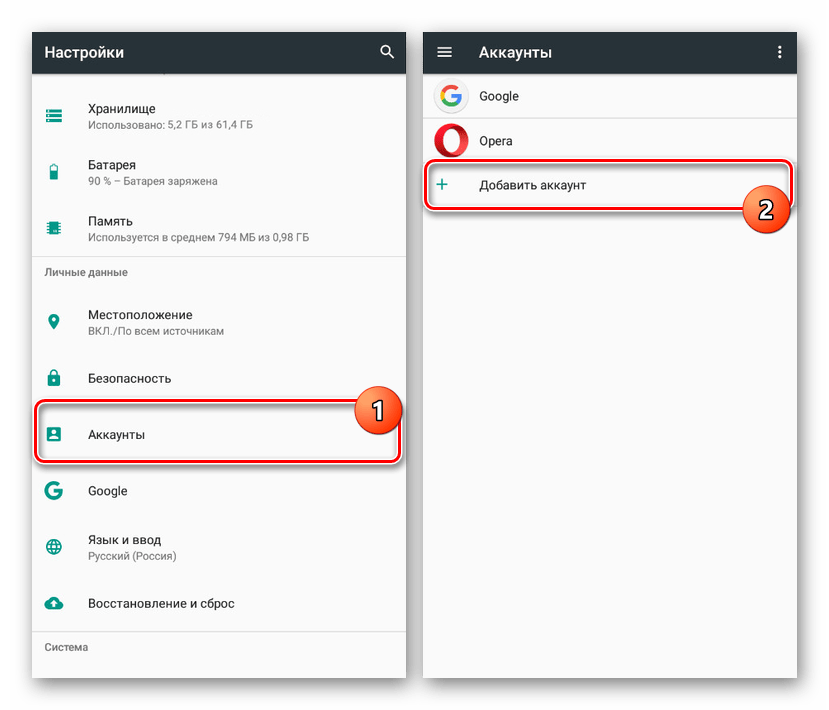
- If you haven’t already, the first thing you need to do is add a Google account to the source device. To do that, go to Settings > Accounts > Add account and select Google. Sign in to your Google account to add the account.
- Now sync the contacts to this Google account. To do that, go to Settings > Accounts > Google and then enable “Sync Contacts”.
- On the destination device, add the same Google account and then go to Settings > Account >Google and then select “Contacts” from the Google Backups list. Tap on “Sync Now” and the contacts will be transferred to the destination device.
![]()
Part 5. How to Transfer Contacts from Android to Android with SHAREit
If you don’t want to use Google sync to transfer contacts from one Android device to another, you may want to use an app like SHAREit. When installed on both devices, this app allows users to share contacts between the two devices easily. Here’s how to use it;
- Begin by installing the SHAREit app on both devices from the Google Play Store
- On the source device, open the contacts app and then select the apps you want to transfer to the destination device.
- When the contacts are selected, tap on the “Share” icon, and then choose “SHAREit” as the method to share.
- Now open “SHAREit” on the destination device and ensure that both devices are on the same Wi-Fi network. The SHAREit app on the source device will scan the target device. When the name of the destination device appears, tap on it to begin the transfer process.
![]()
Part 6. How to Transfer Contacts from Android to Android via Bluetooth
Of course, you can also choose to transfer contacts from Android to Android using Bluetooth. This solution is simple, as all you have to do is connect both devices via Bluetooth. Here’s how you can transfer your contacts from the one device to another using Bluetooth;
- On the Source device, open the contacts app and tap on Menu (three dots) > Share icon. Please note that these steps may be different on different devices.
- Tap on “Import/Export” and then select “Share name card via” before selecting the contacts you would like to transfer. If you want to transfer all of them, simply check “Select All”.
- This will open the sharing options. Select “Bluetooth”, you will be prompted to enable “Bluetooth” if you haven’t already. Ensure that Bluetooth is enabled on both devices.
- Allow Bluetooth to scan for nearby devices and select the destination device when it appears. When the devices are paired successfully, the transfer process should begin immediately.
![]()
The solutions above are the most effective ways to transfer contacts from Android to Android. Select a solution that is as easy to implement as it is valid and then follow the instructions laid out above to apply it. If you have any questions, don’t hesitate to ask and we’ll do our best to help.
Источник


