- Use Ktor for networking
- Connect Ktor
- Set up an HTTP client
- Select an engine
- Mock engine
- Configure the client
- Engine configuration
- Features
- Create HTTP requests
- Method
- Headers
- Response type
- Multipart requests
- Concurrency
- Close the HTTP client
- Kotlin HTTP GET/POST request
- HTTP GET
- HTTP POST
- Kotlin GET request with HttpClient
- GET query parameters with HttpClient
- Kotlin POST JSON data request with HttpClient
- Kotlin POST FORM data request with HttpClient
- Kotlin GET request with Fuel
- GET query parameters with Fuel
- Kotlin POST JSON data request with Fuel
- Kotlin POST FORM data request with Fuel
- Запрос HTTP в Котлине
- Возможно, самый простой GET
- How to make POST, GET, PUT and DELETE requests with Retrofit using Kotlin
- Adding the libraries
- Adding Permissions & Preparing the Files
- Adding data using POST method
- • Uploading JSON data (application/json)
- • Uploading Files (multipart/form-data)
- • Uploading with parameters encoded in the URL (application/x-www-form-urlencoded)
- Retrieving data using GET method
Use Ktor for networking
Conventionally, modern applications with client-server architecture use the HTTP protocol for transferring data between the server and the client. If your mobile app has a server to exchange data with, an HTTP client is an essential part of this app that enables its interaction with the server.
For Kotlin projects, we recommend Ktor- a framework for building asynchronous clients and servers. It’s written in Kotlin and leverages its core features such as coroutines or targeting multiple platforms. For more detailed information, see the Ktor website.
In Kotlin Multiplatform Mobile (KMM) projects, you can use the Ktor Http Client for interactions with servers. On this page, we’ll take a brief tour on how to connect the Ktor client to a KMM project, create and configure an HTTP client, and perform network requests with it.
Connect Ktor
To use the Ktor HTTP client in your project, connect the client as a Gradle dependency: add the corresponding entries in the dependencies block of a module’s build file ( build.gradle or build.gradle.kts ).
Ktor provides separate artifacts for using the HTTP client: a common module and different engines that process the network request.
To use Ktor KMM module in the common code, add the dependency to io.ktor:ktor-client-core to the commonMain source set in the build.gradle or build.gradle.kts file of the KMM module:
Then connect the platform engines by adding the dependencies on them. For Android, add the ktor-client-android dependency to the corresponding source set:
For iOS, add the ktor-client-ios dependency to the corresponding source set:
Instead of $ktor_version , use the required version of the library.
For more information about connecting the Ktor client to the multiplatform project, see the Ktor documentation.
Set up an HTTP client
In Ktor, HTTP clients are represented by the HttpClient class. To create an HTTP client with default settings, call the HttpClient() constructor:
CIO here is the class that represents an HTTP engine that the client will use. Let’s take a closer look at the available HTTP engines.
Select an engine
Ktor offers you multiple HTTP engines to use in your project: Apache, CIO, Android, iOS, and others. Engines differ by sets of supported features or platforms they work on. For the full list of supported HTTP engines, refer to the Ktor documentation.
To use a specific HTTP engine, connect the corresponding Ktor artifact as a dependency, for example:
Now you can create an HTTP client with this engine: just pass the engine class as an argument of the HttpClient() constructor.
If you call the HttpClient() constructor without an argument, then one of the engines available to Ktor will be automatically selected at compile time.
Mock engine
Ktor offers a special HTTP engine for testing purposes — MockEngine , which simulates HTTP calls without an actual connection to an API endpoint.
There are several platform-specific implementations of MockEngine . To use them in your KMM project, connect the corresponding dependencies: io.ktor:ktor-client-mock-jvm for Android io.ktor:ktor-client-mock-native for iOS
Then create an HttpClient instance with MockEngine :
For detailed information about testing with Ktor, refer to the Ktor documentation.
Configure the client
Client configuration can be done through a lambda expression with the receiver. In other words, the receiver object of the HttpClientConfig class for a specific HTTP engine through which the entire configuration is performed will be transferred to the lambda, which is transferred as an argument to the HttpClient() function.
To configure the client, pass a lambda expression to the HttpClient() call.
In this example, the following configuration is used: Receiving HTTP errors in response don’t cause exceptions A ResponseObserver is created that prints response statuses to the standard output.
Engine configuration
When you create an HTTP client with a specific engine, pass the engine configuration in the same lambda in the engine block.
For more information on engines configuration, see the Ktor documentation.
Features
Ktor lets you use additional HTTP client functionality ( features) that is not available by default, for example, logging, authorization, or serialization. Most of them are distributed in separate artifacts. To use them, you should connect them as dependencies to the common source set. For example:
Then, add the required features in the client configuration using the install() function.
For example, you can use the ResponseObserver class to set up an observer for responses. At the beginning of the article, an observer was added using the ResponseObserver<> builder function, which internally calls up the install function. An observer as additional functionality can be explicitly added as follows:
For the full list of available HTTP client features and instructions on their configuration, see the Ktor documentation.
Create HTTP requests
The main function for creating HTTP requests is request — an extension function for the HttpClient class. All the request settings are generated using the HttpRequestBuilder class. The request function has the suspend modifier, so requests can be executed in coroutines. For detailed information about creating and sending requests with the Ktor client, see the Ktor documentation.
Method
To define an HTTP method (for example, GET or POST ) for a request, provide a value for the method property: a GET request whose result comes as a string:
Ktor provides extension functions for the HttpClient class for using basic HTTP methods: get , post , put , patch , delete , options , head . This is how you use them to send a GET request:
Headers
To add headers to the request, use the headers extension function.
To set the body of a request, assign a value to the body property in the HttpRequestBuilder class. You can assign a string or an OutgoingContent object to this property. For example, sending data with a text/plain text MIME type can be implemented as follows:
Response type
To obtain more information in the response, such as HTTP status, you can use the HttpResponse type as the request result:
For more information about the HttpResponse , refer to the Documentation.
You can also obtain the request results in the form of a byte array:
Multipart requests
To send a multipart request, pass a MultiPartFormDataContent object to the body property. Create this object by calling the MultiPartFormDataContent() constructor with the argument parts: List
. To create this list, use the FormBuilder builder class. It provides multiple variations of the append function for adding the data. There is also formData builder function, which accepts a lambda with the FormBuilder receiver.
An example of creating a POST request with Multipart data may look as follows:
Concurrency
The Ktor API is based on suspend functions, so Kotlin coroutines are used when working with asynchronous requests. Therefore, all requests must be executed in coroutines, which will suspend their execution while awaiting a response.
For concurrent execution of two or more requests, you can use coroutine builders: launch or async . For example, sending two concurrent requests using async might look as follows:
Close the HTTP client
After you finish working with the HTTP client, don’t forget to free up the resources that it uses: threads, connections, and CoroutineScope for coroutines. To do this, call up the close() function in HttpClient :
If you need to use HttpClient for a single request, call the extension function use() that will automatically calls close() after executing the code block:
Note that the close function prohibits the creation of new requests, but doesn’t terminate currently active ones. Resources will only be released after all client requests are completed
We’d like to thank the IceRock team for helping us write this article.
Источник
Kotlin HTTP GET/POST request
last modified January 26, 2021
Kotlin HTTP GET/POST request tutorial shows how to send a GET and a POST request in Kotlin. We use HttpClient and Fuel library.
The is an application protocol for distributed, collaborative, hypermedia information systems. HTTP is the foundation of data communication for the World Wide Web.
In the examples, we use httpbin.org , which is a freely available HTTP request and response service, and the webcode.me , which is a tiny HTML page for testing.
HTTP GET
The HTTP GET method requests a representation of the specified resource. Requests using GET should only retrieve data.
HTTP POST
The HTTP POST method sends data to the server. It is often used when uploading a file or when submitting a completed web form.
Kotlin GET request with HttpClient
HttpClient is a tool for generating http requests in Java.
We create a GET request to the webcode.me webpage.
A client is created.
We build a synchronous request to the webpage. The default method is GET.
We send the request, retrieve the content of the response, and print it to the console.
This is the output.
GET query parameters with HttpClient
The following example appends some query parameters to the URL.
We create a GET request to the httpbin.org/get with some URL parameters.
This is a string extension method for encoding URL paramaters.
We have a map of values. We endcode them for the URL path with the custom extension method.
We append the parameters to the URL.
This is the output.
Kotlin POST JSON data request with HttpClient
The following example sends a POST request with HttpClient. The data is sent in JSON format.
For this example, we need the jackson-module-kotlin dependency.
We generate a POST request to the httpbin.org/post webpage. The post data are taken from a map and transformed into a string with Jackson’s ObjectMapper.
A POST request is generated via the POST method.
This is the output.
Kotlin POST FORM data request with HttpClient
With application/x-www-form-urlencoded the data is sent in the body of the request; the keys and values are encoded in key-value tuples separated by ‘&’, with a ‘=’ between the key and the value.
We generate a POST request with FORM data to httpbin.org/post .
We set the content type header to application/x-www-form-urlencoded .
With the String.uft8 and formData helper functions, we create a body publisher with url encoded values.
This is the output.
Kotlin GET request with Fuel
Fuel is an easy-to-use HTTP networking library for Kotlin.
We need to add the fuel dependency.
The example sends a simple GET request to webcode.me .
GET query parameters with Fuel
The following example sends some query parameters with the GET request.
The Fuel library automatically takes care of encoding the parameters in httpGet .
Kotlin POST JSON data request with Fuel
We set a POST request with JSON data. This time we use the Gson library.
We have additional dependencies for the Gson library.
We serialize the user object into a JSON string with the toJson method. We set a JSON body with the jsonBody method.
Kotlin POST FORM data request with Fuel
In the following example, we send a POST request with FORM data.
Fuel automatically tranforms the data to application/x-www-form-urlencoded content type in httpPost .
Источник
Запрос HTTP в Котлине
Я совершенно не знаком с Котлином. Я хочу сделать проверку входа в систему с помощью метода POST и получить некоторую информацию с помощью метода GET. У меня есть URL, имя пользователя и пароль уже моего предыдущего проекта. Я не нашел подходящего примерного проекта, который использует эту вещь. Любой, пожалуйста, предложите мне любой рабочий пример, где я могу использовать метод GET и POST в запросе HTTP
Для Android Volley — хорошее место для начала. Для всех платформ вы также можете проверить клиент Ktor.
Однако вы можете использовать стандартные библиотеки, которые вы используете в Java. Например, с HttpURLConnection вы можете сделать:
Отправьте запрос HTTP POST/GET с параметрами, используя HttpURLConnection :
POST с параметрами:
GET с параметрами:
Возможно, самый простой GET
Для всех, придерживающихся NetworkOnMainThreadException для других решений: используйте AsyncTask или, даже короче, (все же экспериментально) Coroutines:
Если вам нужно протестировать с помощью простого http, не забудьте добавить к вашему манифесту: android:usesCleartextTraffic=»true»
Для экспериментальных Coroutines вам необходимо добавить build.gradle по состоянию на 10/10/2018:
Вы можете использовать библиотеку kohttp. Это HTTP-клиент Kotlin DSL. Он поддерживает функции square.okhttp и предоставляет им понятный DSL. Асинхронные вызовы KoHttp приводятся в действие сопрограммами.
httpGet расширения httpGet
Вы также можете использовать асинхронный вызов с сопрограммами
или функция DSL для более сложных запросов
Вы можете найти более подробную информацию в документации
Чтобы получить его с использованием Gradle
Без добавления дополнительных зависимостей это работает. Для этого вам не нужен Volley. Это работает с использованием текущей версии Kotlin по состоянию на декабрь 2018 года: Kotlin 1.3.10
Если вы используете Android Studio, вам нужно добавить это объявление в свой AndroidManifest.xml:
Здесь вы должны вручную объявить импорт. Авто-импорт инструмент вызвал у меня много конфликтов.:
Вы не можете выполнять сетевые запросы в фоновом потоке. Вы должны подклассифицировать AsyncTask .
Источник
How to make POST, GET, PUT and DELETE requests with Retrofit using Kotlin
Retrofit is the most popular HTTP library and one of the most popular 3rd party libraries on Android.
Today, I’ll to show you how to do the following HTTP requests using Retrofit:
- POST request with the most commonly used MIME types:
- application/json: Upload JSON data
- multipart/form-data: Upload files (images, texts e.t.c)
- application/x-www-form-urlencoded: Upload with the parameters encoded in the URL, for example https://myrestapi.com/post?name=Jack&age=45
- GET request and how to use @Path and @Query
- PUT request
- DELETE request
Retrofit not only can make HTTP requests but can also parse the JSON simultaneously.
I’m NOT going to show you how to parse the JSON data in this tutorial, but only how to make HTTP requests and print the results.
If you want to parse JSON with Retrofit, you need to read the current article first and then follow this.
Adding the libraries
Go to your app-level build.gradle file and add the following dependencies:
at the same file, at the bottom of the android section, add:
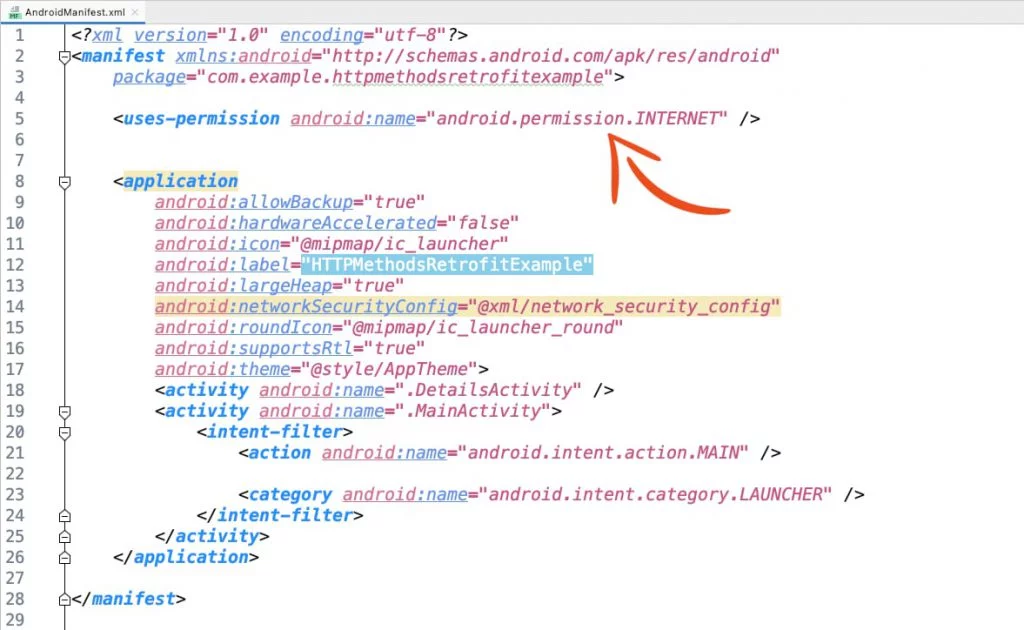
Adding Permissions & Preparing the Files
Go to the AndroidManifest.xml file and add the following permission:
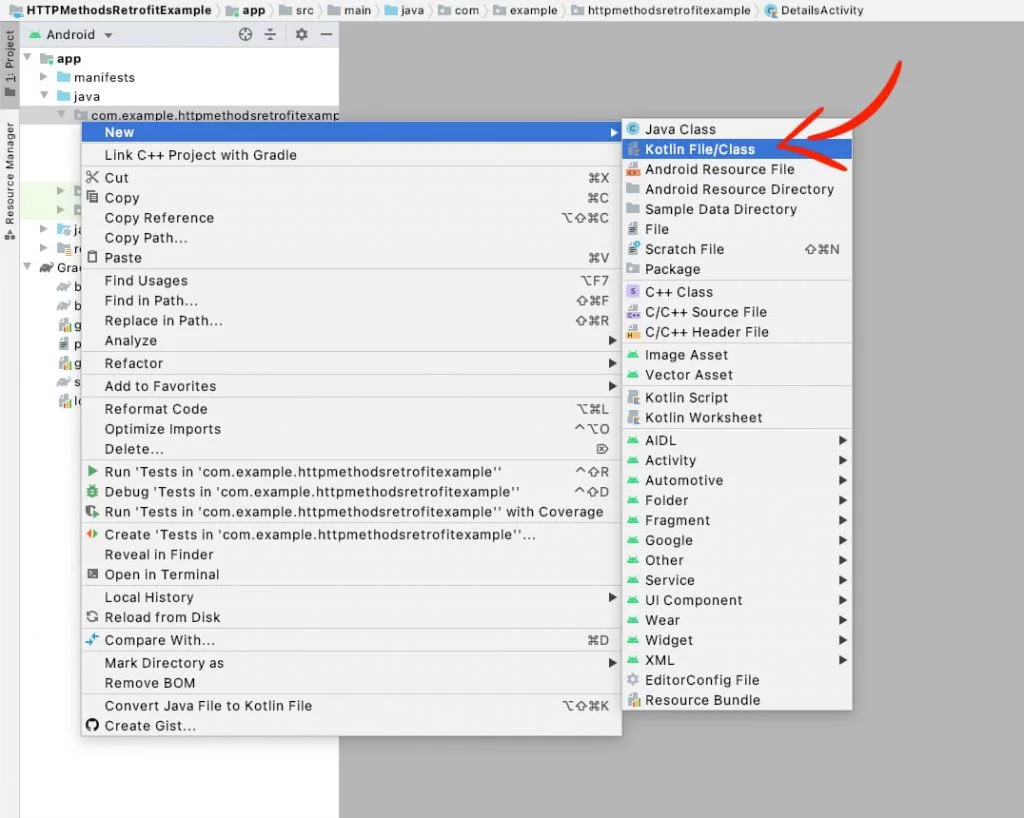
Now, create a new Kotlin Interface file to put our @POST , @GET , @PUT , and @DELETE annotations later.
Right-click on your project name > New > Kotlin File/Class
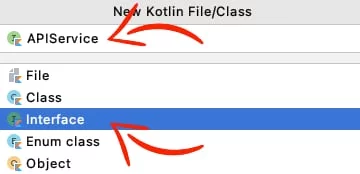
Select Interface, name the file APIService and press Enter
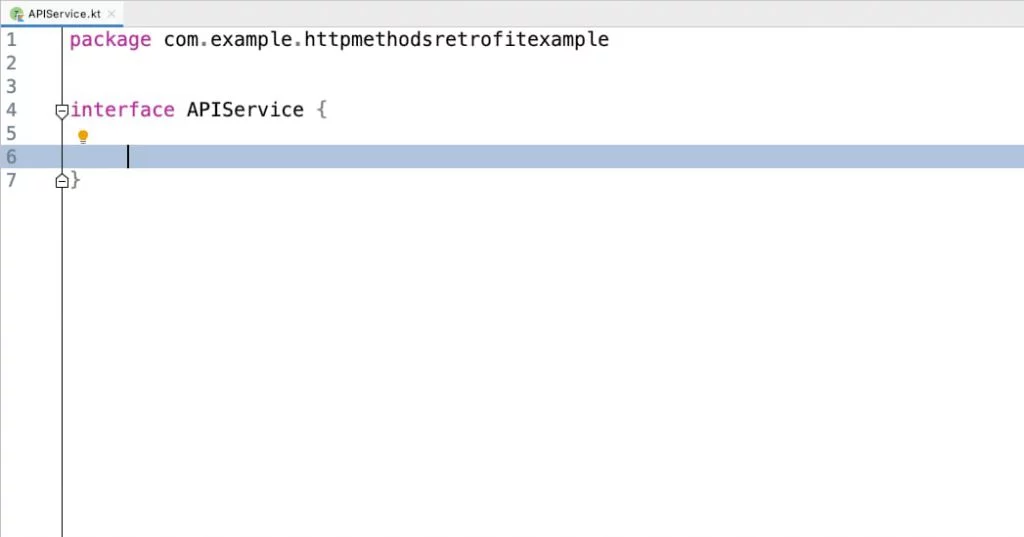
After that, the file will look like this:
Adding data using POST method
To add data to the server, you need to use the HTTP request method POST.
Before you upload the data, you have to define what type of data you are uploading (e.g., raw JSON, media e.t.c). To do that, you need to set the MIME type.
- application/json for raw JSON data
- multipart/form-data for files, like images, pdfs, texts e.t.c
- application/x-www-form-urlencoded for passing the paramers encoded in the URL
• Uploading JSON data (application/json)
In this example, we’re going to POST the following data as raw JSON data in the URL: http://dummy.restapiexample.com/api/v1/create
- name: Jack
- salary: 3540
- age: 23
First, in the APIService.kt file add the following @POST annotation:
Then, to create the JSON we’ll use the JSONObject() class and add the data we want to upload.
So, at the end, the POST request will look like this:
• Uploading Files (multipart/form-data)
In this example, we’re going to POST a String value and a .txt file in the URL: https://httpbin.org/post
- email: jack@email.com
- file: lorem_ipsum.txt
First, in the APIService.kt file add:
As you see, we’re using HashMap to add the data (string and .txt file), alongside with Retrofit’s @PartMap annotation
…and the POST request will be:
• Uploading with parameters encoded in the URL (application/x-www-form-urlencoded)
To have the parameters encoded in the URL, all you have to do is to add the @FormUrlEncoded annotation in the APIService.kt file and use HashMap with the @FieldMap annotation.
And when you make the POST request, create a HashMap and add the parameters you want:
Retrieving data using GET method
To retrieve the data from the server, you need to use the HTTP request method GET.
Источник


