- Glide transform android studio
- Built in types
- Applying Transformations
- Default Transformations
- Multiple Transformations.
- Custom transformations.
- BitmapTransformation
- Required methods
- Don’t forget equals()/hashCode()!
- Special Behavior in Glide
- Re-using Transformations
- Automatic Transformations for ImageViews
- Custom resources
- Displaying Images with the Glide Library
- Glide transform android studio
- About
- Glide transform android studio
Glide transform android studio
Transformations in Glide take a resource, mutate it, and return the mutated resource. Typically transformations are used to crop, or apply filters to Bitmaps, but they can also be used to transform animated GIFs, or even custom resource types.
Built in types
Glide includes a number of built in transformations, including:
Applying Transformations
Transformations are applied using the RequestOptions class:
Default Transformations
Or with RequestOptions :
For more information on using RequestOptions, see the Options wiki page.
Multiple Transformations.
By default, each subsequent call to transform() or any specific transform method ( fitCenter() , centerCrop() , bitmapTransform() etc) will replace the previous transformation.
To instead apply multiple transformations to a single load, use the MultiTransformation class or the shortcut .transforms() method.
Or with the shortcut method:
The order in which you pass transformations to MultiTransformation ’s constructor determines the order in which the transformations are applied.
Custom transformations.
Although Glide provides a variety of built in Transformation implementations, you may also implement your own custom Transformation s if you need additional functionality.
BitmapTransformation
If you only need to transform Bitmap s, it’s best to start by subclassing BitmapTransformation . BitmapTransformation takes care of a few of the basic things for you, including extracting recycling the original Bitmap if your Transformation returns a new modified Bitmap.
A simple implementation might look something like this:
Although your Transformation will almost certainly do something more sophisticated than our example, it should contain the same basic elements and method overrides.
Required methods
In particular, note that there are three methods that you must implement for any Transformation subclass, including BitmapTransformation in order for disk and memory caching to work correctly:
If your Transformation takes no arguments, it’s often easy to just use a static final String containing the fully qualified package name as an id that can form the basis of hashCode() and can be used to update the MessageDigest passed to updateDiskCacheKey() . If your Transformation does take arguments that affect the way the Bitmap is transformed, they must be included in these three methods as well.
For example, Glide’s RoundedCorners Transformation accepts an int that determines the radius of the rounded corners. Its implementations of equals() , hashCode() and updateDiskCacheKey looks like this:
The original String id remains as well, but the roundingRadius is included in all three methods as well. The updateDiskCacheKey method here also demonstrates how you can use ByteBuffer to including primitive arguments in your updateDiskCacheKey implementation.
Don’t forget equals()/hashCode()!
It’s worth re-iterating one more time that it’s essential that you implement equals() and hashCode() for memory caching to work correctly. Unfortunately BitmapTransformation and Transformation implementations will compile if those methods are not overridden, but that doesn’t mean they work correctly. We’re exploring options for making using the default equals() and hashCode methods a compile time error in future versions of Glide.
Special Behavior in Glide
Re-using Transformations
Transformations are meant to be stateless. As a result, it should always be safe to re-use a Transformation instance for multiple loads. It’s usually good practice to create a Transformation once and then pass it in to multiple loads.
Automatic Transformations for ImageViews
When you start a load into an ImageView in Glide, Glide may automatically apply either FitCenter or CenterCrop, depending on the ScaleType of the view. If the scale type is CENTER_CROP , Glide will automatically apply the CenterCrop transformation. If the scale type is FIT_CENTER or CENTER_INSIDE , Glide will automatically apply the FitCenter transformation.
You can always override the default transformation by applying a RequestOptions with a Transformation set. In addition, you can ensure no Transformation is automatically applied using dontTransform() .
Custom resources
Because Glide 4.0 allows you to specify a super type of the resource you’re going to decode, you may not know exactly what type of transformation to apply. For example, when you use asDrawable() (or just with() since asDrawable() is the default) to ask for a Drawable resource, you may get either the BitmapDrawable subclass, or the GifDrawable subclass.
To ensure any Transformation you add to your RequestOptions is applied, Glide adds your Transformation to a map keyed on the resource class you provide to transform() . When a resource is successfully decoded , Glide uses the map to retrieve a corresponding Transformation .
Glide can apply Bitmap Transformations to BitmapDrawable , GifDrawable , and Bitmap resources, so typically you only need to write and apply Bitmap Transformations . However, if you add additional resource types you may need to consider sub-classing RequestOptions and always applying a Transformation for your custom resource type in addition to the built in Bitmap Transformations .
Источник
Displaying Images with the Glide Library
Glide is an Image Loader Library for Android developed by bumptech and is a library that is recommended by Google. It has been used in many Google open source projects including Google I/O 2014 official application. It provides animated GIF support and handles image loading/caching.
Add to your app/build.gradle file:
Make sure to create a MyAppGlideModule that simply extends from AppGlideModule and has the @GlideModule annotation. For now, the class is empty but later we will show how it can be used to set the default image resolution. If you upgrading from Glide v3, make sure you follow this step too:
Make sure to sync your project to Gradle before continuing, since Glide needs to generate the necessary code to invoke GlideApp.with() in Android Studio.
If you are migrating from Glide v3, make sure to review this guide. Instead of Glide.with() , you will need to use GlideApp.with() :
Resizing images with:
Placeholder and error images:
Cropping images with:
Modify your MyAppGlideModule to override applyOptions:
Ideally, an image’s dimensions would match exactly those of the ImageView in which it is being displayed, but as this is often not the case, care must be taken to resize and/or scale the image appropriately. Android’s native support for this isn’t robust, especially when displaying very large images (such as bitmaps returned from the camera) in smaller image views, which can often lead to errors (see Troubleshooting).
Glide automatically limits the size of the image it holds in memory to the ImageView dimensions. Picasso has the same ability, but requires a call to fit() . With Glide, if you don’t want the image to be automatically fitted to the ImageView , you can call override(horizontalSize, verticalSize) . This will resize the image before displaying it in the ImageView but without respect to the image’s aspect ratio:
Resizing images in this way without respect to the original aspect ratio will often make the image appear skewed or distorted. In most cases, this should be avoided, and Glide offers two standard scaling transformation options to prevent this: centerCrop and fitCenter .
If you only want to resize one dimension, use Target.SIZE_ORIGINAL as a placeholder for the other dimension:
Calling centerCrop() scales the image so that it fills the requested bounds of the ImageView and then crops the extra. The ImageView will be filled completely, but the entire image might not be displayed.
Calling fitCenter() scales the image so that both dimensions are equal to or less than the requested bounds of the ImageView . The image will be displayed completely, but might not fill the entire ImageView .
If an image or set of images aren’t loading, make sure to check the Android monitor log in Android Studio. There’s a good chance you might see an java.lang.OutOfMemoryError «Failed to allocate a [. ] byte allocation with [. ] free bytes» or a Out of memory on a 51121168-byte allocation. . This is quite common and means that you are loading one or more large images that have not been properly resized.
First, you have to find which image(s) being loaded are likely causing this error. For any given Glide . call, we can fix this by one or more of the following approaches:
- Add an explicit width or height to the ImageView by setting layout_width=500dp in the layout file.
- Call .override(width, height) during the Glide load and explicitly set a width or height for the image such as: GlideApp.with(. ).load(imageUri).override(500, 500).into(. ) .
- Try removing android:adjustViewBounds=»true» from your ImageView if present and if you not calling .override()
- Open up your static placeholder or error images and make sure their dimensions are relatively small ( AndroidManifest.xml and then add android:largeHeap to your manifest:
Note that this is not generally a good idea, but can be used temporarily to trigger fewer out of memory errors.
If you experience errors loading images, you can create a RequestListener and pass it in via Glide.listener() to intercept errors:
Transformations are supported by an additional third-party library, glide-transformations. First, add the dependencies:
Источник
Glide transform android studio
Useful Glide transformations for use with the Android Glide image loading library.
Android development environment with the jcenter repository added in the project’s build.gradle file. A target SDK of 14 or higher.
Add the following dependency in the app’s build.gradle file:
| Transformation | Image | Description |
|---|---|---|
| Original | 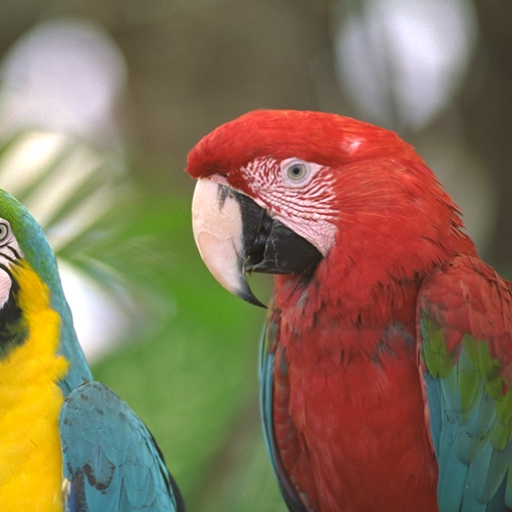 | The original image. |
| Padding | 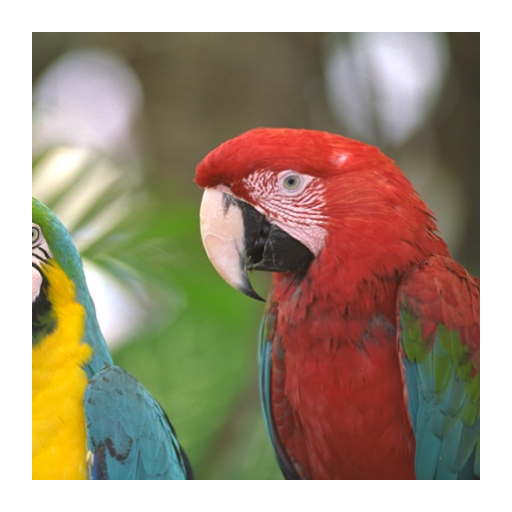 | Adds padding intrinsically to the Bitmap. Useful to use in conjunction with Shadow to prevent clipping. |
| Ellipse | 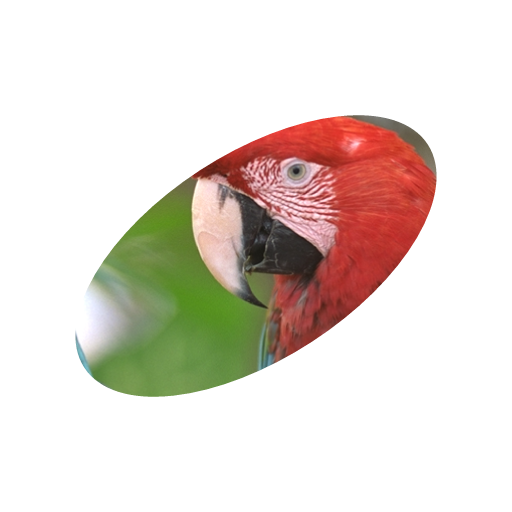 | Crops image by specified ellipse and angle. Can be used to crop a perfect circle. |
| Shadow | 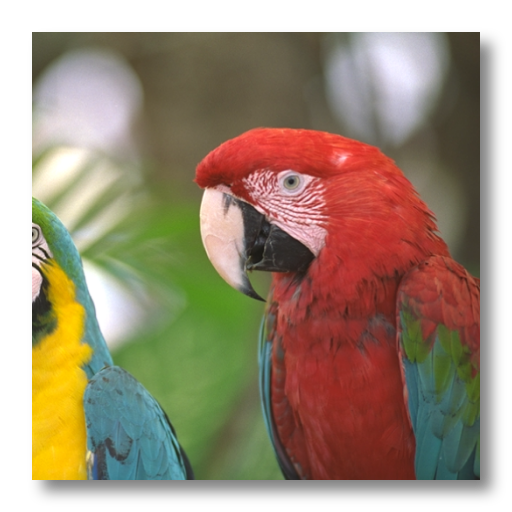 | Adds shadow intrinsically to the Bitmap. Useful for complex shapes where Android cannot render an elevation shadow by default. |
| Greyscale |  | Desaturates image and produces a greyscale result. |
| Inverse |  | Inverts the colours of the image. |
| Flip |  | Flips the image in the specified direction. |
| GaussianBlur |  | Applies RenderScript Gaussian blur with specified radius. |
| Mosaic |  | Applies a mosaic or pixellation effect. |
Transformations can be passed into Glide using standard methods:
Or multiple transformations at once:
Some transformations have parameters that can be set with a builder pattern:
- Glide processes transformations in the order they are given as parameters to the transforms() function. It is important to consider the application order to achieve your desired effect. For instance, applying a cropping transformation (e.g. Padding() or Ellipse() ) before GaussianBlur() will blur the newly drawn edges as well. It may be desired to apply a crop afterwards in order to preserve sharp image boundaries.
- It is advised to perform image scaling through Glide’s own transformations such as CenterCrop() and FitCenter() before any other transformations rather than specifying a scaleType in the ImageView ‘s XML. Not only is it faster, but transformations do not know the final scaling mode and cannot adjust the transformation accordingly. Processing the scaling in XML may have undesired interactions with the transformations.
Current version: 0.1.0
- Shane Scarlett — core development — Scarlett Systems
This project is licensed under the Apache 2.0 License.
About
Transformations for the Android Glide library.
Источник
Glide transform android studio
![]()
![]()
![]()
An Android transformation library providing a variety of image transformations for Glide.
Please feel free to use this.
Are you using Picasso or Fresco?


How do I use it?
Set Glide Transform.
Advanced Step 3
You can set a multiple transformations.
- CropTransformation
- CropCircleTransformation
- CropCircleWithBorderTransformation
- CropSquareTransformation
- RoundedCornersTransformation
- ColorFilterTransformation
- GrayscaleTransformation
Will require add dependencies for GPUImage.
- ToonFilterTransformation
- SepiaFilterTransformation
- ContrastFilterTransformation
- InvertFilterTransformation
- PixelationFilterTransformation
- SketchFilterTransformation
- SwirlFilterTransformation
- BrightnessFilterTransformation
- KuwaharaFilterTransformation
- VignetteFilterTransformation
Applications using Glide Transformations
Please ping me or send a pull request if you would like to be added here.
Источник


