Управление свайпами в игровом проекте на Godot Engine
Всем Приветствие! Сегодня я бы хотел рассказать о том, как реализовать управление свайпами в игровом проекте для Android на движке Godot Engine.

Меня зовут Пётр, и я являюсь одним из активных пользователей игрового движка Godot Engine.
В русскоязычном сегменте огромнейший дефицит материалов по данному инструменту, что меня сильно удивляет, так как он является одним из самых быстро-развивающихся игровых движков.
Конечно, он во многом уступает таким движкам, как Unity, UE, и подобным, да и игру класса «AAA» на нём не сделаешь.
Однако! Он бесплатный (полностью), кросс-платформенный (полностью), а его вес составляет порядка 60 мегабайт, в противовес тому же Unity.
Движок запускается на большинстве устройств, даже если последние из совсем уж бюджетного ряда. Так же «из коробки» он уже русифицирован, имеет на борту все необходимые инструменты, не требует наличия дополнительного ПО, и не съедает в запущенном виде всю оперативную память.
На Хабре я уже видел пару статей по нему, и это очень мало, так как он настолько дружелюбен к разработчику, что пройти мимо него и не попробовать — большое упущение.
Тема данного поста — реализация управления свайпами (жестами) в Android-проекте.
Вообще, опыт моего использования движка довольно обширен, и, если тема получит отклик, я могу оформить целый обучающий курс. Данным же постом я хочу хотя бы немного привлечь ваше внимание к движку.
В качестве языка программирования можно использовать, опять же, из коробки, два варианта: GDScript и C#. Я буду использовать первый.
Интерфейс основного редактора выглядит так:
В нем можно работать одновременно с 3D, 2D, скриптами и вообще всем, что может потребоваться разработчику.
В движке используется подход, при котором ваша игра представляет из себя набор сцен, вложенных друг в друга. И тут может возникнуть некоторая путаница, потому термин «сцена» я использую для узлов, которые представляют из себя именно игровые сцены (ситуации, окна, состояния игры (меню, игра, т.д.)), а для остальных случаев я использую термин «префаб», позаимствованный у Unity.
Поскольку в данном посте я буду рассматривать частный случай, то и разворачивать некоторые темы я не буду. Если что-то неясно — есть комментарии.
Так вот, основной сценой для демонстрации у нас будет game.
Структура её выглядит так:
Корневой узел game хранит в себе вложенные:
— world, — хранит в себе данные уровня
— — level, — набор объектов окружения (блоки, кольца, препятствия)
— — player, — объект игрока
— — InterpolatedCamera, — плавная камера, следящая за игроком
— gui, — интерфейс, задействован не будет
Имена объектам и структура произвольная и это только частный случай.
Возле некоторых объектов вы можете видеть значки, говорящие о том, что этот объект является префабом (вложенной сценой) и у него так же может быть добавлен скрипт.
Так, нажав на значок «скрипт», мы попадаем в редактор сценариев, по сути просто переключается режим работы движка.
В данном режиме работы можно редактировать поведение объектов. Собственно, в данном случае это скрипт объекта world, который при загрузке объекта в игру устанавливает в объект камеры (InterpolatedCamera) устанавливает цель для слежения.
Синтаксически GDScript похож на Python. Пройти краткое обучение GDScript на русском языке можно тут: GDScript Book
С объектом world понятно, он просто устанавливает камере цель для слежения. Следующий объект (уже дочерний для world), — это level. Его структура выглядит так:
По сути, это просто расставленные объекты с физическими свойствами, не имеющие скриптов и поведения. Кроме объектов «cell». Это вращающиеся колечки, исчезающие при соприкосновении с объектом игрока.
Больше всего сейчас интересен объект player, в котором содержится логика управления свайпами для сенсорных экранов.
Выглядит данный префаб так:
Корневой объект имеет скрипт, к которому мы перейдем немного позже.
Сначала рассмотрим вложенные объекты.
- camera, — тот самый указатель для камеры, которая будет плавно к нему стремиться, дабы сгладить движение. Не имеет никакого поведения и просто существует в рамках объекта player.
- CollisionShape, — это физическое тело объекта. Именно он реагирует на столкновения и позволяет «осязать» объект. Для примера я выбрал его в виде куба, хотя поддерживаются самые разные формы, вплоть до произвольных. По сути для физической формы объектов ограничений нет совсем.
- MeshInstance, — это визуальное представление объекта. В данном случае это шар, покрытый текстурой. Сделан в Blender 3D меньше, чем за минуту.
- Tween, специальный аниматор для плавных изменений численных свойств объектов. Он отвечает за анимированные сдвиги влево и вправо при свайпах.
Ну и теперь рассмотрим уже сам скрипт в корневом объекте. Он получается самым объемным во всей «игре».
Ну и его описание и расшифровка.
Каждую строчку описал, надеюсь, со скриптами всё плюс минус ясно.
Если русским языком, то мы при движении пальцем по экрану регистрируем направление движения и скорость. Если палец движется с нужной скоростью, засчитываем свайп. Исходя из того, по какой оси и в какую сторону шло движение, имеем три вариант: ВВЕРХ, ВЛЕВО, ВПРАВО.
Записываем полученное значение в переменную, которую тут же подхватывает событие обновления состояния объекта, и выполняет с ним нужные действия, после чего помечает событие, как отработанное и ожидает следующее.
Я взял не самый простой способ реализации свайпа, однако довольно надежный и работающий в большинстве ситуаций. Само собой, зависит от жанра и типа игры.
В результате проделанной работы мы получаем пример того, как легко реализовать управление свайпами буквально за десять минут.
Суммарно на всё у меня ушло минут 30, это с учетом создания моделек в Blender.
Источник
Godot engine android реклама
This is the AdMob module for Godot Engine (https://github.com/okamstudio/godot)
- Android & iOS
- Banner
- Interstitial
- Rewarded Video
To use this module you’ll need a custom template for Android. You can build it by yourself or download a precompiled one. Another option available for Godot 3.2+ is the new Android plugin system, much easier to use (no recompilation needed). You can find a port of this module using this system here.
Compiling the template (First Option)
This is harder, but you’ll have more control over the building process. You can, for example, include any other module you want. For that, do the following steps:
- Clone or download this repository.
- Clone or download the Godot Engine repository. One important note here is that this must match the same version of the Godot editor you’re using to develop your game.
- Drop the «admob» directory inside the «modules» directory on the Godot source.
- Recompile the android export template following the official instructions.
Using precompiled templates (Second Option)
If you don’t want or can’t build the template by yourself, you can find a precompiled template with this module here. Go to the release tab and download the zip file.
- In your project goto Export > Target > Android:
- Options:
- Custom Package:
- place the template apk you had compiled (or downloaded)
- Permissions on:
- Access Network State
- Internet
- Custom Package:
- Options:
- Drop the «admob» directory inside the «modules» directory on the Godot source;
- Download and extract the Google Mobile Ads SDK(>= 7.60.0) inside the directory «admob/ios/lib»; (If you are unable to download the version informed above, you can alternatively download it through Cocoapods or HERE)
- Follow the instructions provided by Google to add the GADApplicationIdentifier to your Info.plist in XCode. It is not necessary to add the frameworks to your XCode project, as they will be compiled and linked into the godot engine directly.
- Recompile the iOS export template. (If you get some error, check this issue)
Configuring your game
To enable the module on Android, add the path to the module to the «modules» property on the [android] section of your engine.cfg file (Godot 2) or project.godot (Godot 3). It should look like this:
If you have more separate by comma.
Just make sure you’re using your custom template (compiled in the previous step), for that rename it to «godot_opt.iphone» and replace the file with same name inside the Xcode project.
- Tutorial: https://www.youtube.com/watch?v=s5sNrOM3Oeo
- Export your project from Godot, it’ll create an Xcode project;
- Copy the library (.a) you have compiled following the official documentation inside the exported Xcode project. You must override the ‘your_project_name.a’ file with this file.
- Copy the following frameworks inside the exported Xcode project folder and link it using the «Link Binary with Libraries» option. In the case of xcframework, framework folder exists in the folder like GoogleUtilities.xcframework/ios-armv7_arm64/GoogleUtilities.framework ;
- GoogleMobileAds.framework
- GoogleAppMeasurement.framework
- GoogleUtilities.framework
- PromisesObjC.framework
- nanopb.framework
- Add the following frameworks to the project:
- StoreKit
- GameKit
- CoreVideo
- AdSupport
- MessageUI
- CoreTelephony
- CFNetwork
- MobileCoreServices
- SQLite (libsqlite3.0.tbd)
- If you are using the version 7.65.0 >=, then also add this framework?
- JavaScriptCore
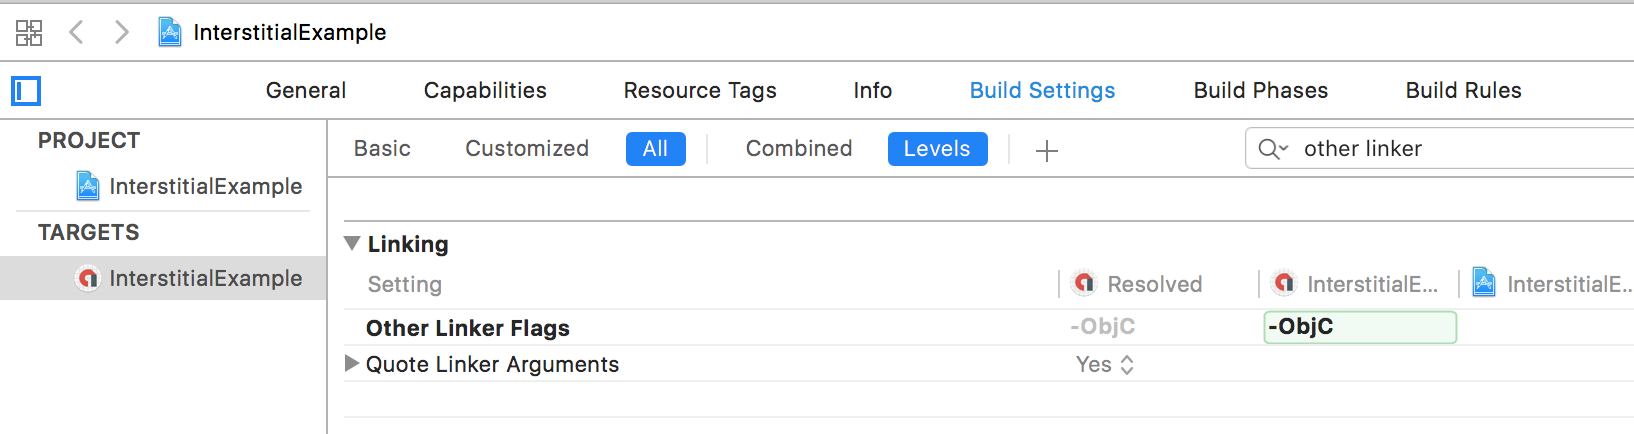
- Add the -ObjC linker flag to Other Linker Flags in your project’s build settings:

- Update your GAMENAME-Info.plist file, add a GADApplicationIdentifier key with a string value of your AdMob app ID:

API Reference (Android & iOS)
The following methods are available:
- You can’t use Rewarded Video and any other ad type (Banner and/or Interstitial) at same time on iOS or your app will crash with the error Multiple locks on web thread not allowed when the Reward is closed. To fix this, we need help from an iOS developer as I don’t have any Apple hardware to do it by myself. You can see more details about this issue here. You can find a workaround for this issue here.
First of all, please make sure you’re able to compile the custom template without the Admob module, this way we can isolate the cause of the issue.
Using the Xcode debug console for iOS and logcat for Android is the best way to troubleshoot most issues. You can filter Godot only messages with logcat using the command: adb logcat -s godot
ERROR_CODE_NO_FILL is a common issue with Admob, but out of the scope to this module. Here’s the description on the API page: ERROR_CODE_NO_FILL: The ad request was successful, but no ad was returned due to lack of ad inventory.
Источник
Godot engine android реклама
This is an Android AdMob plugin for Godot Engine (https://github.com/okamstudio/godot) 3.2.2 or higher. For Godot
- Configure, install and enable the «Android Custom Template» for your project, just follow the official documentation;
- go to the release tab, choose a version and download the respective GodotAdMobPlugin-x.x.x.zip package;
- extract the content of the admob-plugin directory ( GodotAdmob.gdap and GodotAdmob.release.aar from the zip package) inside the res://android/plugins directory on your Godot project.
- extract the admob-lib directory (from the zip package) inside the res:// directory on your Godot project.
- on the Project -> Export. -> Android -> Options ->
- Permissions: check the permissions for Access Network State and Internet
- Custom Template: check the Use Custom Build
- Plugins: check the Godot Ad Mob (this plugin)
- edit the file res//android/build/AndroidManifest.xml to add your App ID as described here. For the demo project, for example, you should use:
One good place to add this metadata is just below these lines, inside of the application tag:
NOTE: everytime you install a new version of the Android Build Template this step must be done again, as the AndroidManifest.xml file will be overriden.
Now you’ll be able to add an AdMob Node to your scene (only one node should be added per scene)

Edit its properties

And connect its signals

In the demo directory you’ll find a working sample project where you can see how the things works on the scripting side.
REMEMBER: You still need to configure the project as described in the «Setup» section to be able to run the demo project.
Does this plugin really work? Yes sir! You can see a list of published games here.
Was this project useful for you? Wanna make a donation? These are the options:
If you’re a Brave browser user, please consider donating some BATs 😉
Compiling the Plugin (optional)
If you want to compile the plugin by yourself, it’s very easy:
- clone this repository;
- checkout the desired version;
- download the AAR library for Android plugin from the official Godot website;
- copy the downloaded AAR file into the admob-plugin/godot-lib.release/ directory and rename it to godot-lib.release.aar ;
- using command line go to the admob-plugin/ directory;
- run gradlew build .
If everything goes fine, you’ll find the .aar files at admob-plugin/godotadmob/build/outputs/aar/ .
First of all, please make sure you’re able to compile the custom build for Android without the AdMob plugin, this way we can isolate the cause of the issue.
Using logcat for Android is the best way to troubleshoot most issues. You can filter Godot only messages with logcat using the command:
AdMob Java Singleton not found:
- this plugin is Android only, so the AdMob Java singleton will only exists on the Android platform. In other words, you will be able to run it on an Android device (or emulator) only, it will not work on editor or on another platform;
- make sure you checked the Use Custom Build and Godot Ad Mob options in the export window.
App is crashing at startup: use the logcat to check what’s happening. It can be caused for many different reasons, if you forgot to or not configure correctly you App ID on the AndroidManifest.xml , for example, your app will crash.
Error code 3 (ERROR_CODE_NO_FILL) is a common issue with Admob, but out of the scope to this plugin. Here’s the description on the API page: ERROR_CODE_NO_FILL: The ad request was successful, but no ad was returned due to lack of ad inventory.
Any other error code: you can find more information about the error codes here. Please don’t open issues on this repository asking for help about that, as we can’t provide any, sorry.
Banner sizes: Adaptive Banners and Smart Banners uses dynamic banner sizes, the other options uses fixed sizes, please check its respectives documentation for more details.
Источник


