- Godot 3.1 – How to export to Android in simple steps
- Installing the export templates
- Downloading Android SDK and the JDK
- Creating a key using the command line
- Navigating to the Android export editor settings
- Setting up the location for the Adb
- Setting up the location for the Jarsigner
- Setting up the location of the Debug Keystore
- Getting ready to make a build
- Making your build
- Releasing the build to Google Play Games
- How to make a release keystore?
- Set the reference in the export
- №95. Экспорт на Android.
- Java JDK
- Android SDK
- Скачайте Open JDK 8
- Создайте debug.keystore
- Exporting for Android
- Download the Android SDK
- Install OpenJDK or Oracle JDK
- Create a debug.keystore
- Make sure you have adb
- Setting it up in Godot
- Godot 3.2 will get a new Android plugin system
- By: Juan Linietsky 24 April 2019
- New custom build system
- New plugin system
- Future
Godot 3.1 – How to export to Android in simple steps

Building and setting up the export for Android in Godot can feel a bit intimidating for newcomers, however you only have to do this once. Afterwards you are able to send a build to your mobile device in a matter of seconds, by just pressing a button and having a mobile device attached through USB.
The first thing you have to do in Godot is ensure you have the Export Templates setup. You can do this by going to Editor/Manage Export Templates in Godot. Afterwards you click on the download button. Afterwards you go to Editor/Editor Settings select the Export tab, and Android. From there you can set the locations for the Adb, Debug Keystore and Jarsigner locations. You can get the Adb from the Android SDK, the debug keystore is made using the JDK keytool which is downloadable through Github or Oracle.
Installing the export templates
In order to install the export templates, navigate to the top window and select Editor. From there you can select Manage Export Templates. Afterwards you click on the download button like the image below. And you then select Official 3.1.2 [HTTPS]. Note that this can change based on the version you are currently using of Godot. Sometimes when the link is not available, you have the option to install a template through a file. You can find older export templates and releases here. You can also get the latest Github release with export templates on the Unofficial Godot Engine builds site by Hugo Locurcio. Do note tough that the export template needs to match the current Godot version.
The images below show you how to do it visually.
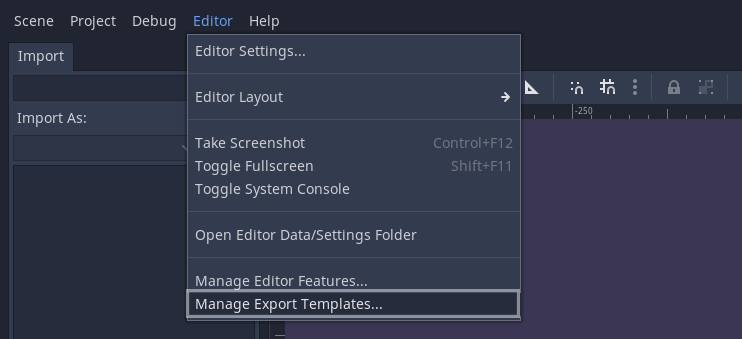 Here you can see how to navigate to the Manage Export Templates selection
 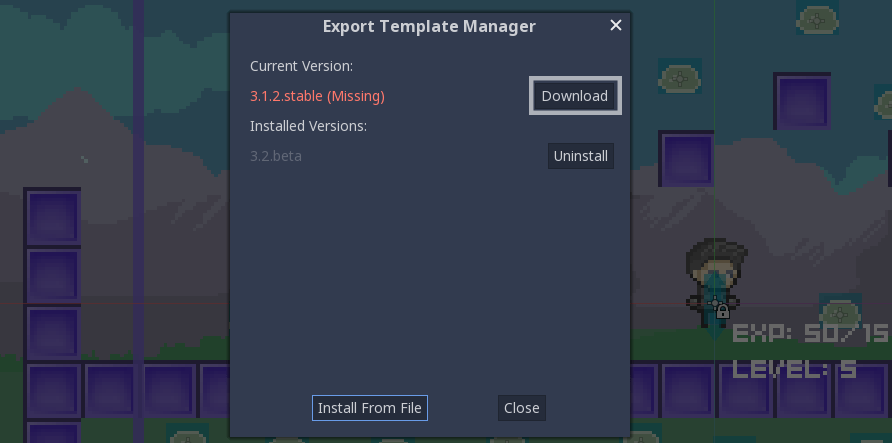 After opening the Export Template Manager menu, click on Download
 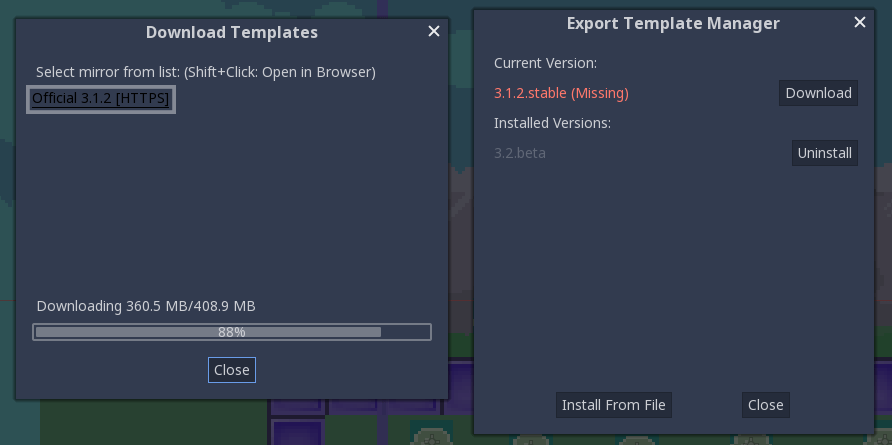 Installing the export templates using the official link
After the download is done, the export templates get installed automatically. Kind in mind that you will have to repeat this process for each new version you have to install. This step is fairly easy tough, I think we can manage this.
Downloading Android SDK and the JDK
In order to setup these things you have to download the Android SDK and you have to download OpenJDK or OracleJDK. It is recommended to stay at JDK version 8 or higher, as lower versions may have issues. I personally installed java-1.8.0-openjdk, the third option on the OpenJDK github page.
Creating a key using the command line
After you have installed both the SDK and OpenJDK. You should be able to use this command with the command line. For windows you can go to the command like by opening the search bar (pressing the windows button) and searching for CMD and pressing enter. You can then copy the following command into the command line.
For Windows 10, you can then find the keystore in “C:\Users\YourUserName”, it is named “debug.keystore”. Make sure to keep the folder to this location available, since we will need it later on.
If you are certain you have installed both the JDK and SDK and the command does not work due to it not being recognized, then there is a chance the system variables are not setup properly. You can find a guide here that shows you how to point the system variables to the JDK folder.
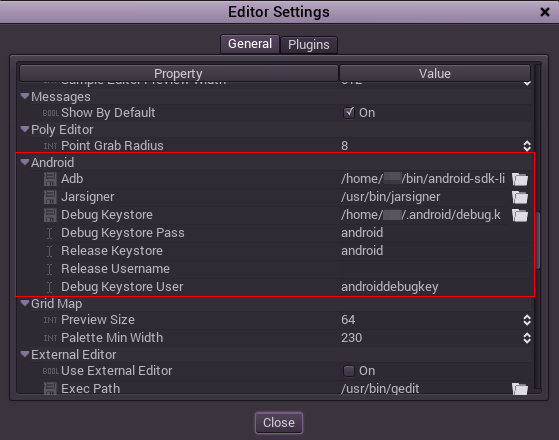
Navigating to the Android export editor settings
In order to start setting up the references, you have to navigate to Editor/Editor Settings
 As you can see, the Editor Settings is located under the Editor tab
Afterwards, you scroll down on the left side until you get to the Export tab, and you select Android
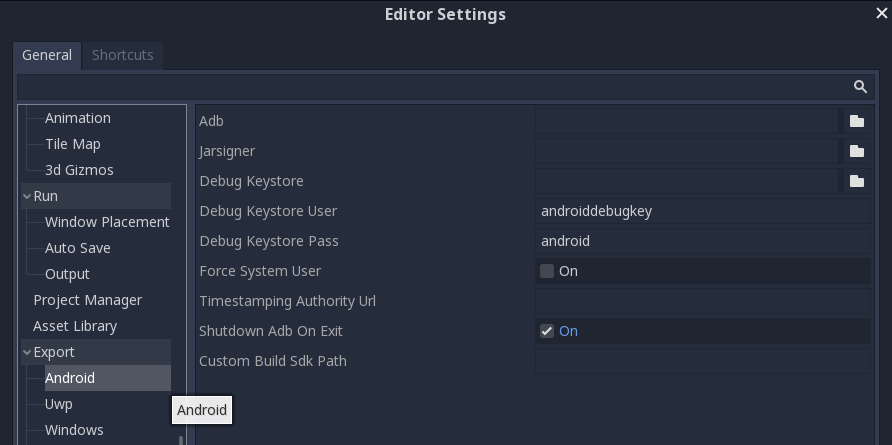 All the settings for the Android Export
Setting up the location for the Adb
For Adb you have to go to the SDK folder and then into the “platform-tools” folder. For windows 10 this is generally located at:
If you are unsure where to find the Sdk folder, open up the Android SDK and navigate to the new project settings like the image below.
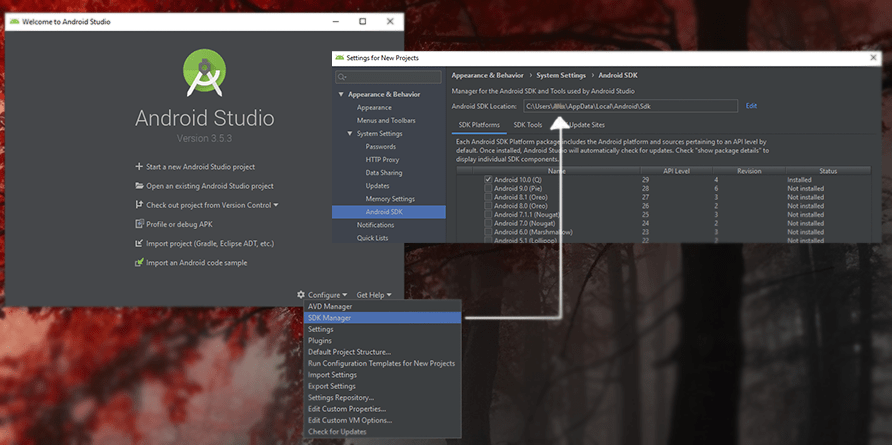 Example of how to find the android Sdk location on your computer using Android Studio
Setting up the location for the Jarsigner
The Jarsigner is located in the OpenJDK or OracleJDK folder you have unpacked previously.
When installing the OpenJDK on my device it was located at:
Setting up the location of the Debug Keystore
This keystore was made earlier in this article, once created, it gets placed in the User folder:
Getting ready to make a build
Navigate to Project/Export to go to the export window

Add a new export preset by pressing the Add… button and selecting Android
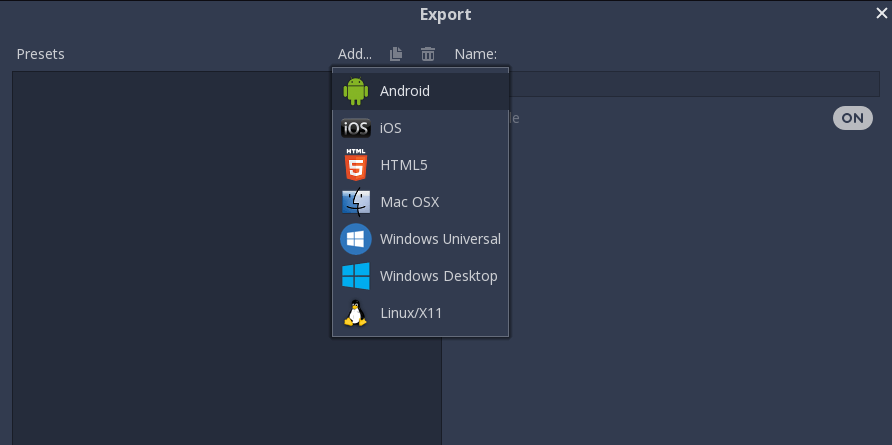 How to add a new present in the export options
Now finally, set the Unique name and name of the package.
How I generally name the Unique name is com.myComp.ProductName and the name is what will be displayed on your android device. So that should be equal to your product name. Spaces are allowed.
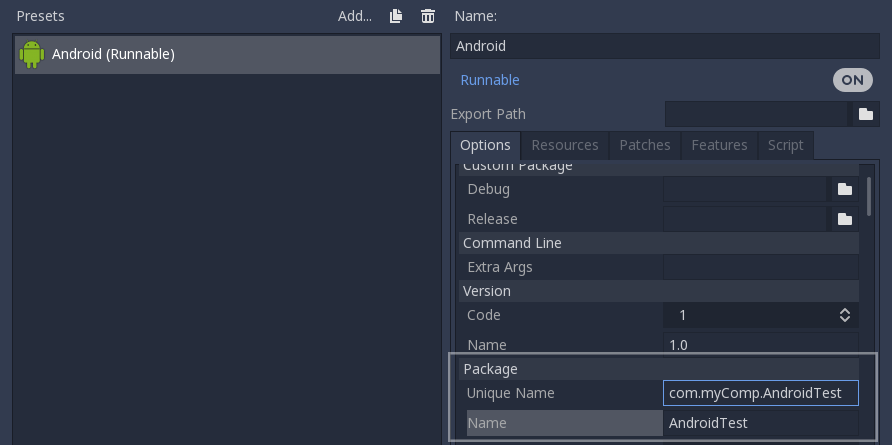 How to setup the package Unique name and general name
Making your build
There are two ways to make a build. One is to press the Export Project button in the export window. The other option is to use the icon that is available in the editor window. Personally I prefer using the icon, as this will automatically install the build to the phone. Just make sure it is connected to your computer using USB with USB Logging on, using developer mode. If you are unsure how to enable developer mode. Then you have to google “How to enable developer mode ”.
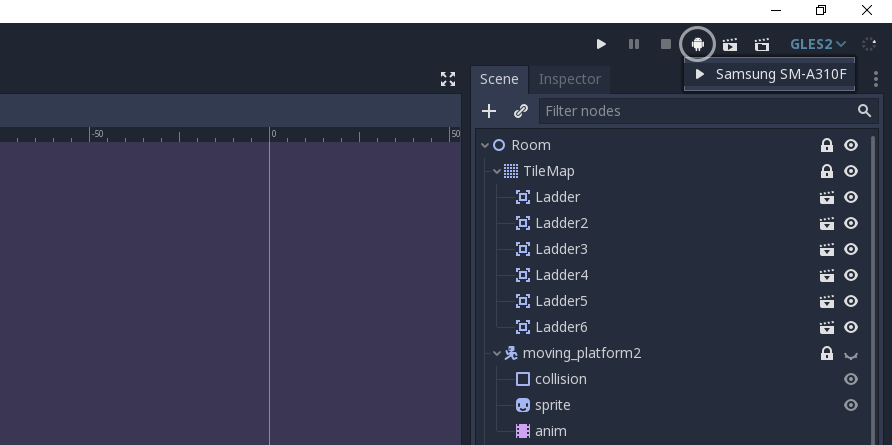 How to quickly build the project to your device
After pressing the button above, you will have the game running in no time on your device.
Releasing the build to Google Play Games
When exporting a build to Google Play Games, it is important to use a release keystore. This is because the debug keystore is merely meant for development and testing purposes. It is also not advised to release games using a debug keystore.
Signing a keystore is like branding the application with your credentials. And it is possible to assign the same keystore to multiple applications. The debug keystore has base credentials.
Eventually when you want to release to the play store you use a Release keystore. It is important that you keep this key safe, since you will only be able to push updates if you sign the application with the initial key. Preventing malicious users from pushing harmful code in case the account gets stolen.
How to make a release keystore?
Again, like the steps above to create a debug key, there is a parameter to create a release key. Make sure to set yourKeyAlias to an alias of your choice.
After doing this, you will get the question for a password. Make sure to note it down, because losing it means losing your key. And it has happens to people before that they had to republish a game on Google Play due to this.
After entering the password twice, you will get a lot of questions such as first/last name. Organisational unit, etc. You can leave these blank. At the end you get a question asking if it is all correct, you then type in yes. After creating the key, you may get this message:
Doing this will change the keystore into a file with the “.pfx” extention, from what I’ve seen godot only accepts the .keystore format. So we can ignore this for now.
Set the reference in the export
Finally we set the reference to our release key in the export like the image below.
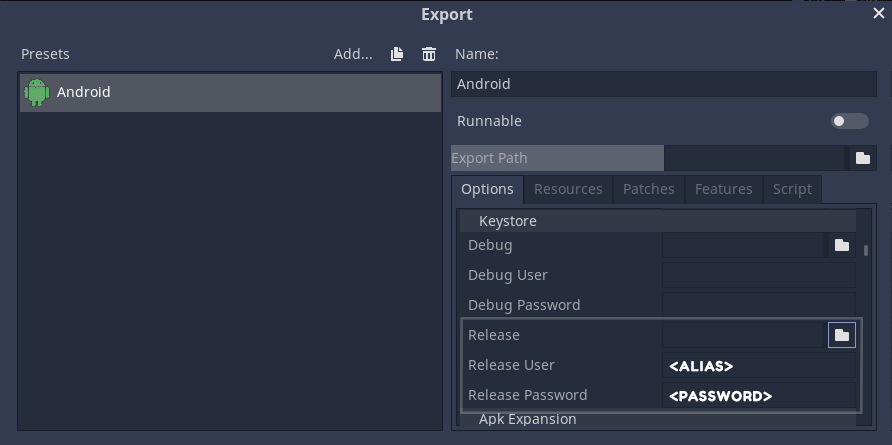
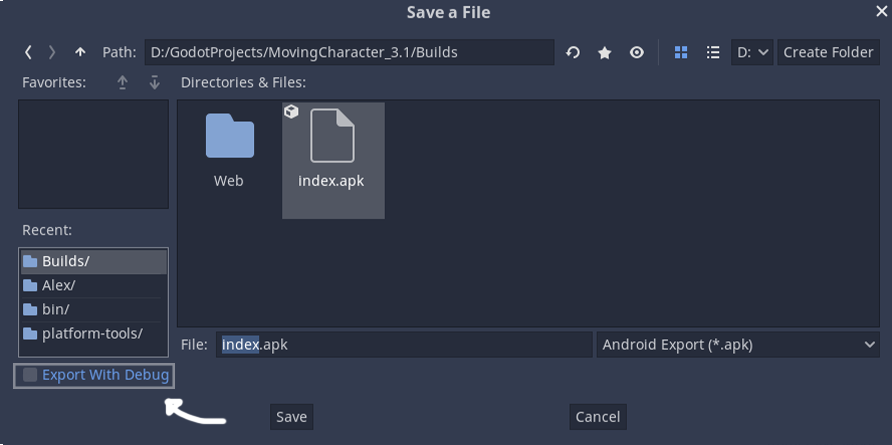
Also, when you have pressed export, do not forget to toggle this off, else it will still sign it using the debug key!
Thank you for reading, and I hope it has helped you. If you have interest in implementing ads into your game and you happen to be using Godot 3.2, then I recommend reading “How to integrate Google Ads (Admob) for Android”
Источник
№95. Экспорт на Android.
В этой статье разберемся с тем, как экспортнуть проект на платформу Android.
Java JDK
Первое что нужно сделать — скачать Java JDK 8.
На текущий момент актуальный билд – 8 update 281.
Устанавливаем в папку по умолчанию: C:\Program Files\Java\.
Android SDK
В более раннее время Android SDK был отдельным инструментом. Впоследствии он был интегрирован в среду Android Studio. Но для экспорта на Android нецелесообразно устанавливать Android Studio, поскольку она занимает большой объём на диске и не будет использоваться вами в дальнейшем. А совсем недавно от Android SDK осталась только команда в Командной строке Windows, хотя Godot требует наличие полноценной программы.
Поэтому вам необходимо найти более старую версию этой программы на просторах Интернета. В рамках статьи использовался Android SDK 24.4.1.
Устанавливаем в папку по умолчанию: C:\Users\ИМЯ_ПОЛЬЗОВАТЕЛЯ\AppData\Local\Android\android-sdk.
Работаем в Android SDK
Открыв Android SDK, перед вами загрузится список из инструментов, так или иначе относящихся к разработке приложений для Android.
⦁ Нажимаем Deselect All, нам не нужно то, что предлагает программа.
⦁Выбираем самый свежий Android SDK Platform-tools из папки Tools.
⦁ Выбираем самый свежий Android SDK Build-tools из папки Tools.
⦁ Выбираем SDK Platform из папки Android 10 (API 29).
⦁ Выбираем Google USB Driver из папки Extras.
⦁ Нажимаем Install packages, соглашаемся с лицензией отдельно по каждому выбранному пакету, устанавливаем.
⦁ Ждём, когда это всё загрузится. Папка с Android SDK увеличит объём примерно на 1 ГБ.
Скачайте Open JDK 8
Устанавливаем в папку по умолчанию: C:\Program Files\AdoptOpenJDK\.
Создайте debug.keystore
Этот файл необходим для установки приложений, скачанных не из магазина. Так Android понимает, что этому APK-пакету можно доверять, и он находится на стадии разработки.
⦁ Открываем командную строку от имени администратора. Для Windows 10: вводим в поиск “cmd”, ПКМ по “Командная строка” – Открыть от имени администратора.
⦁ Сменяем директорию на установленный Java JDK на папку bin: cd C:\Program Files\Java\jdk1.8.0_281\bin
Источник
Exporting for Android
Exporting for Android has fewer requirements than compiling Godot for it. The following steps detail what is needed to setup the SDK and the engine.
Download the Android SDK
Install OpenJDK or Oracle JDK
Download and install OpenJDK or Oracle JDK. Version 6 and 8 are known to work, some users have reported issues with the jarsigner (used to sign the APKs) in JDK 7.
Create a debug.keystore
Android needs a debug keystore file to install to devices and distribute non-release APKs. If you have used the SDK before and have built projects, ant or eclipse probably generated one for you (In Linux and OSX, you can find it in the
If you can’t find it or need to generate one, the keytool command from the JDK can be used for this purpose:
Make sure you have adb
Android Debug Bridge (adb) is the command line tool used to communicate with Android devices. It’s installed with the SDK, but you may need to install one (any) of the Android API levels for it to be installed in the SDK directory.
Setting it up in Godot
Enter the Editor Settings screen. This screens contains the editor settings for the user account in the computer (It’s independent from the project).
Scroll down to the section where the Android settings are located:
In that screen, the path to 3 files needs to be set:
- The adb executable (adb.exe on Windows)
- The jarsigner executable (from JDK 6 or 8)
- The debug keystore
Once that is configured, everything is ready to export to Android!
© Copyright 2014-2018, Juan Linietsky, Ariel Manzur and the Godot community (CC-BY 3.0) Revision a19c0c36 .
Источник
Godot 3.2 will get a new Android plugin system
By: Juan Linietsky 24 April 2019
Godot has a simple and efficient Android deploy system. With a single click, your project is running on your phone. With a single option (network filesystem deployment) your gigabyte-sized project is running and updating on your device in seconds. You can use the editor to debug your running game while playing on your device and you can make changes in the scenes or scripts and they will reflect in real-time on your phone or tablet. The big drawback until now, however, was that adding plugins was a pain in the butt.
Beginnig with Godot 3.2, the Android plugins system has been overhauled. It is no longer required to recompile the engine to add a new plugin.
New custom build system
Godot export templates for Android projects are just two .apk files, one for debug and one for release. On export, Godot fills them with the project files and tweaks some internal variables of the format. This works well in general, but many times the Android project needs to be actually modified and the current approach is not flexible enough.
Instead of going the way of other engines, which just export an Android project, it was decided to keep the current, easy-to-use approach, but to make it easier to generate the base templates from source.
To do this, there is a very simple option in the Project menu to install the build template:
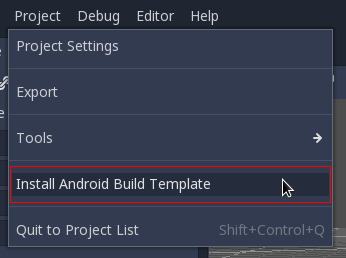
When used, the Godot Android project that is used to build Godot for Android is installed in «res://android/build», including full Java source code (a proper .gdignore file is added in «res://android» to avoid Godot filesystem dock from entering this folder).
When the build template is installed, the following option can be turned on in the Android export presets:
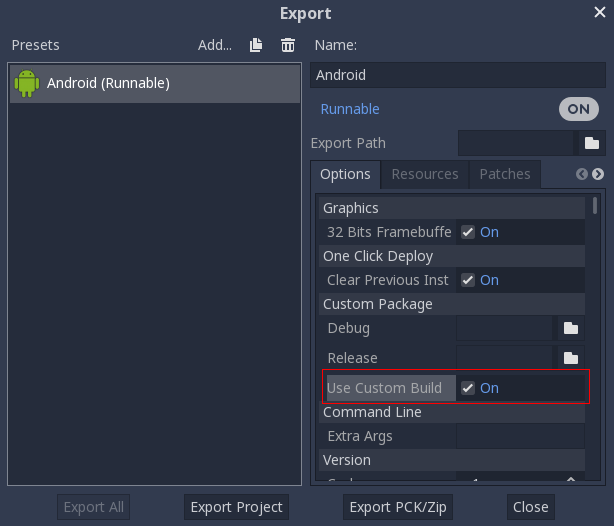
And from now on, every time the project is exported, gradle will be executed to produce fresh export templates from the Android source. The output (as well as potential errors) is displayed in the editor UI:

The generated templates are used automatically without any user intervention.
Setting this system up still requires installing the Java and Android SDK in order for Godot to build, but detailed instructions can be found in this new tutorial.
New plugin system
Having the Godot Android project source built automatically allows doing modifications to it, in a way more similar to how it works in other engines. This way you can keep modifying your Android project and bypass the rigidity of the export system as desired.
Still, however, the problem persists where, if a new Godot version is released, the Android build template will need to be erased and updated, discarding any changes you may have done to it.
To avoid this situation, a new plugin system was also added. This allows adding plugins inside the «res://android» directory (with any name other than «build», of course). When Godot exports using the custom build option, the plugins are be compiled-in automatically.
Plugins allow extending the existing base build template by adding extra files and resources to it in outside directories. They also support blitting chunks of text into AndroidManifest.xml and build.gradle, so these files can be modified without risking to lose these changes as soon as the build template is updated.
The code part (Java) for creating plugins remains unmodified so existing plugins should be easy to port to the new system. For more details on how to create them, see this new tutorial.
As plugins are just extra files that are added to the project, you can now also distribute them via our asset library. This was not possible before.
Future
With upcoming Godot 3.2, it will be very easy for both our community and third party vendors to create and distribute Android add-ons (such as Ad-Mob, Firebase, Facebook, etc) for others to use. Here’s towards a flourishing ecosystem!
And as always, remember that this is done with love from us. This was a highly requested feature that we’re glad to finally be able to provide. If you aren’t already, please consider becoming our Patron and help Godot’s main developers work full time on the project, so the world can have a free and open source tool that lets you create games without any restrictions. Even a small donation is a huge help!
Источник


