- Move from Android to iPhone, iPad, or iPod touch
- Before you begin
- Tap Move Data from Android
- Open the Move to iOS app
- Wait for a code
- Use the code
- Connect to a temporary Wi-Fi network
- Choose your content and wait
- Set up your iOS device
- Finish up
- If you need help with the transfer
- If you need help after the transfer
- Как «превратить» iOS в Android
- Лучшая сторонняя клавиатура iOS
- Как удалить родные приложения на айфоне
- Виджеты Google на айфон
- Как изменить браузер по умолчанию в iOS
- Как установить Gmail на айфон
- How to transfer from iPhone to Android: the complete guide
- Transferring bookmarks to Google Chrome
- Transferring bookmarks to Firefox
- Conclusion
Move from Android to iPhone, iPad, or iPod touch
Ready to transfer to iOS? Download the Move to iOS app to get help switching from your Android device to your new iPhone, iPad, or iPod touch.
If you can’t use the Google Play Store, learn how to download Move to iOS.
Before you begin
- On your Android device, make sure that Wi-Fi is turned on.
- Plug your new iOS device and your Android device into power.
- Make sure that the content you’re moving, including what’s on your external Micro SD card, will fit on your new iOS device
- If you want to transfer your Chrome bookmarks, update to the latest version of Chrome on your Android device.

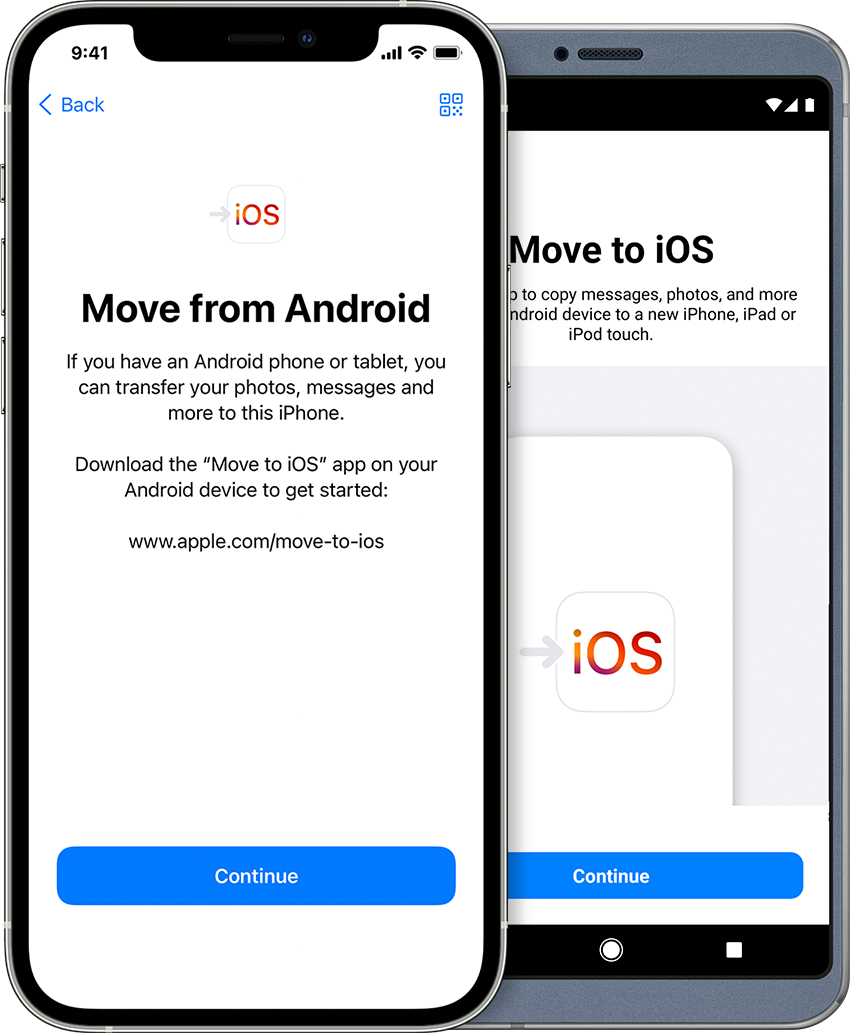
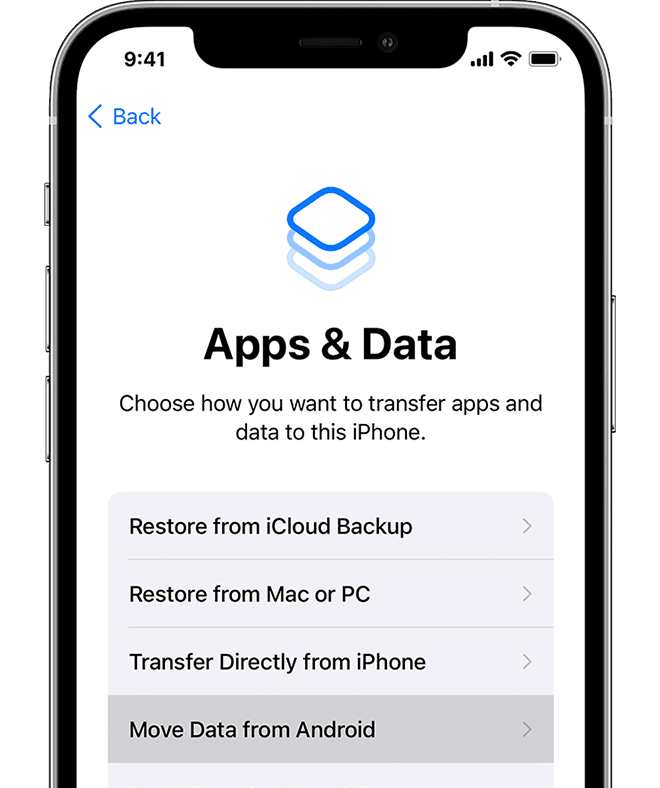
Tap Move Data from Android
While you set up your new iOS device, look for the Apps & Data screen. Then tap Move Data from Android. (If you already finished setup, you need to erase your iOS device and start over. If you don’t want to erase, just transfer your content manually.)
Open the Move to iOS app
On your Android device, open the Move to iOS app. If you don’t have the Move to iOS app, you can tap the QR code button on your new iOS device and scan the QR code using the camera on your Android device to open the Google Play Store. Tap Continue, and read the terms and conditions that appear. To continue, tap Agree.
Wait for a code
On your iOS device, tap Continue when you see the Move from Android screen. Then wait for a ten-digit or six-digit code to appear. If your Android device shows an alert that you have a weak internet connection, you can ignore the alert.
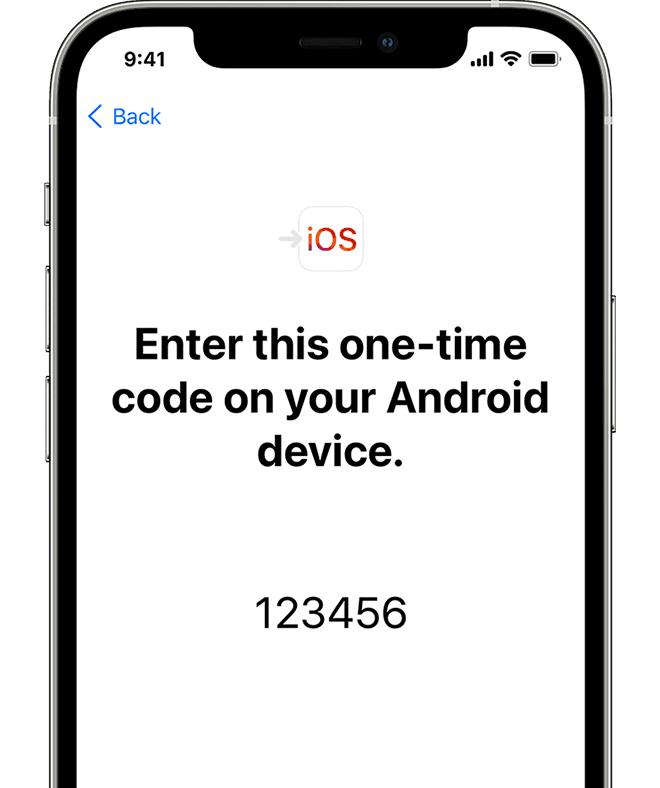
Use the code
Enter the code on your Android device.
Connect to a temporary Wi-Fi network
Your iOS device will create a temporary Wi-Fi network. When asked, tap Connect to join that network on your Android device. Then wait for the Transfer Data screen to appear.
Choose your content and wait
On your Android device, select the content that you want to transfer and tap Continue. Then—even if your Android device shows that the process is complete—leave both devices alone until the loading bar that appears on your iOS device finishes. The whole transfer can take a while, depending on how much content you’re moving.
Here’s what gets transferred: contacts, message history, camera photos and videos, photo albums, files and folders, accessibility settings, display settings, web bookmarks, mail accounts, and calendars. If they’re available on both Google Play and the App Store, some of your free apps will also transfer. After the transfer completes, you can download any free apps that were matched from the App Store.
Set up your iOS device
After the loading bar finishes on your iOS device, tap Done on your Android device. Then tap Continue on your iOS device and follow the onscreen steps to finish setup for your iOS device.
Finish up
Make sure that all of your content transferred. Music, books, and PDFs need to be moved over manually.
Need to get the apps that were on your Android device? Go to the App Store on your iOS device to download them.
If you need help with the transfer
- Make sure that you leave both devices alone until the transfer finishes. For example, on your Android device, the Move to iOS app should stay onscreen the whole time. If you use another app or get a phone call on your Android before the transfer finishes, your content won’t transfer.
- On your Android device, turn off apps or settings that might affect your Wi-Fi connection, like the Sprint Connections Optimizer or the Smart Network Switch. Then find Wi-Fi in Settings, touch and hold each known network, and forget the network. Then try the transfer again.
- Restart both of your devices and try again.
- On your Android device, turn off your cellular data connection. Then try the transfer again.
If you need help after the transfer
- Get help if Messages doesn’t work as expected after you transfer your content.
- If you don’t see apps from your Android device on your new iOS device, find and download them in the App Store on your new device.
- You might find that only some content transferred and your iOS device ran out of space, or your iOS device might appear full even though the transfer didn’t finish. If so, erase your iOS device and start the transfer again. Make sure that your Android content doesn’t exceed the available space on your iOS device.
Information about products not manufactured by Apple, or independent websites not controlled or tested by Apple, is provided without recommendation or endorsement. Apple assumes no responsibility with regard to the selection, performance, or use of third-party websites or products. Apple makes no representations regarding third-party website accuracy or reliability. Contact the vendor for additional information.
Источник
Как «превратить» iOS в Android
Вспомните, как раньше воевали между собой владельцы яблочных и Android устройств. Конфликты случались огромных масштабов. Каждый владелец смартфона хотел доказать своему оппоненту, что его операционная система в десятки раз лучше, и что айфон — это вообще дно. В наши дни все немного изменилось. Что iOS, что Android предлагают примерно одинаковую функциональность и не сильно отличаются по характеристикам. А помните, как на Android любили устанавливать оболочку от iOS? Да, было и такое. Сейчас же, все совсем иначе. Теперь Google предлагает превратить ваш iPhone в Pixel.
Превратить iPhone в Android смартфон не так сложно, как кажется.
Признаюсь, я тоже грешил кастомизацией в сторону iOS. Только делал это не на Android девайсе, а на Windows Mobile. Был у меня большой громоздкий коммуникатор, с оболочкой iOS 5.0. Некоторых ребят даже удавалось обмануть, ввиду того, что iPhone тогда еще никто вживую толком не видел.
Причины, по которым вам могут быть интересны решения от Google не так однозначны. Кроме «просто побаловаться», здесь есть и прикольные фичи, недоступные владельцам техники Apple. Например, свайп на клавиатуре.
Лучшая сторонняя клавиатура iOS
Родная клавиатура на iPhone очень удобная. Крайне редко бывают случаи, когда промахиваешься по клавишам или что-то идет не так, но без свайпового набора иногда действительно тяжко. Gboard от Google во многом решает эту проблему. Плюс, у нее есть еще куча других крутых функций, сами посмотрите.
Чтобы установить стороннюю клавиатуру следуйте следующим простым шагам:
- Перейдите в Настройки.
- Далее Основные, Клавиатура.
- Тапните по подразделу Клавиатуры, Новые Клавиатуры.
- В колонке Сторонние Клавиатуры найдите Gboard.
- После этого перейдите в Gboard, разрешите Полный доступ.
- Удалите все родные клавиатуры от Apple.
- Готово.
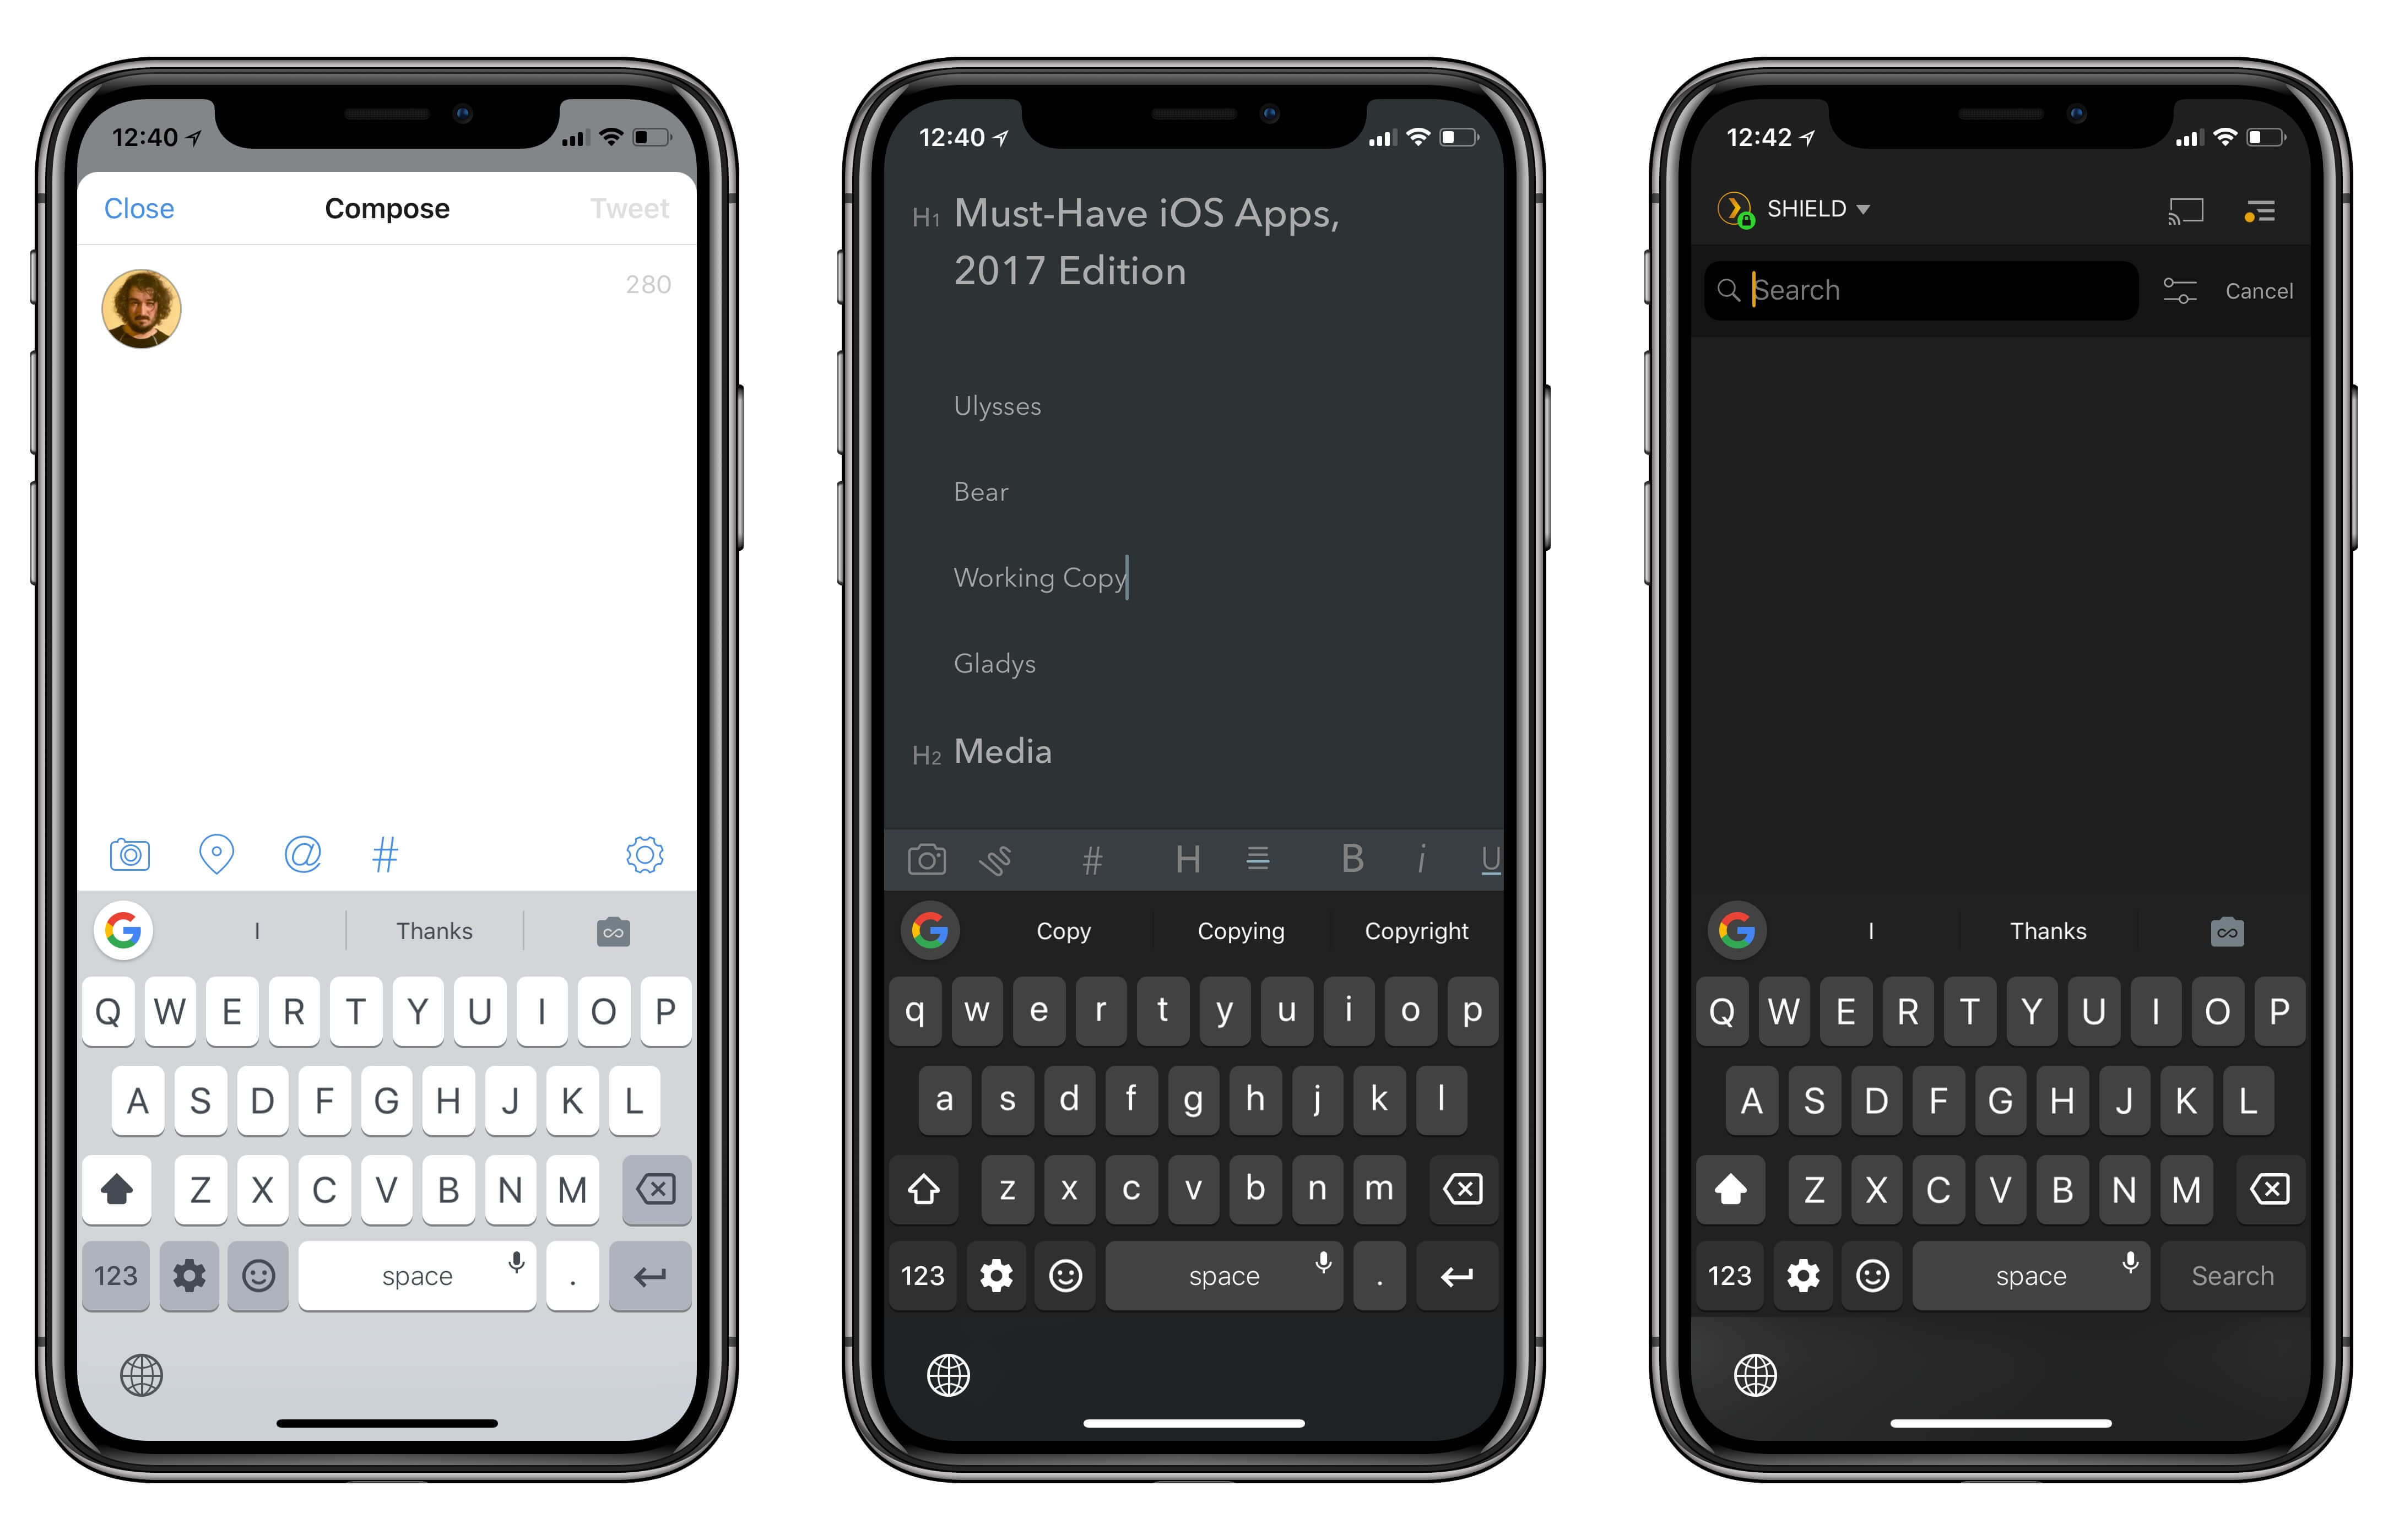
Google Клавиатура — отличная альтернатива решению от Apple.
После этого перейдите в любое приложение, где можно набрать текст и ознакомьтесь с основными функциями. Google вам расскажет об этом сам с помощью небольшого анимационного ролика. Сам я пользовался ей несколько лет, но при смене одного смартфона на другой, однажды плюнул на эту идею.
Как удалить родные приложения на айфоне
В последних обновлениях iOS, Apple разрешает своим пользователям избавляться от родных приложений, хотя раньше сделать это было нельзя. А что, друзья, если превращать iPhone в Android, то делать это по-крупному. При этом, можно сгрузить все в библиотеку приложений или вовсе удалить. Не переживайте, при возникновении трудностей, софт будет доступен для скачивания в App Store.
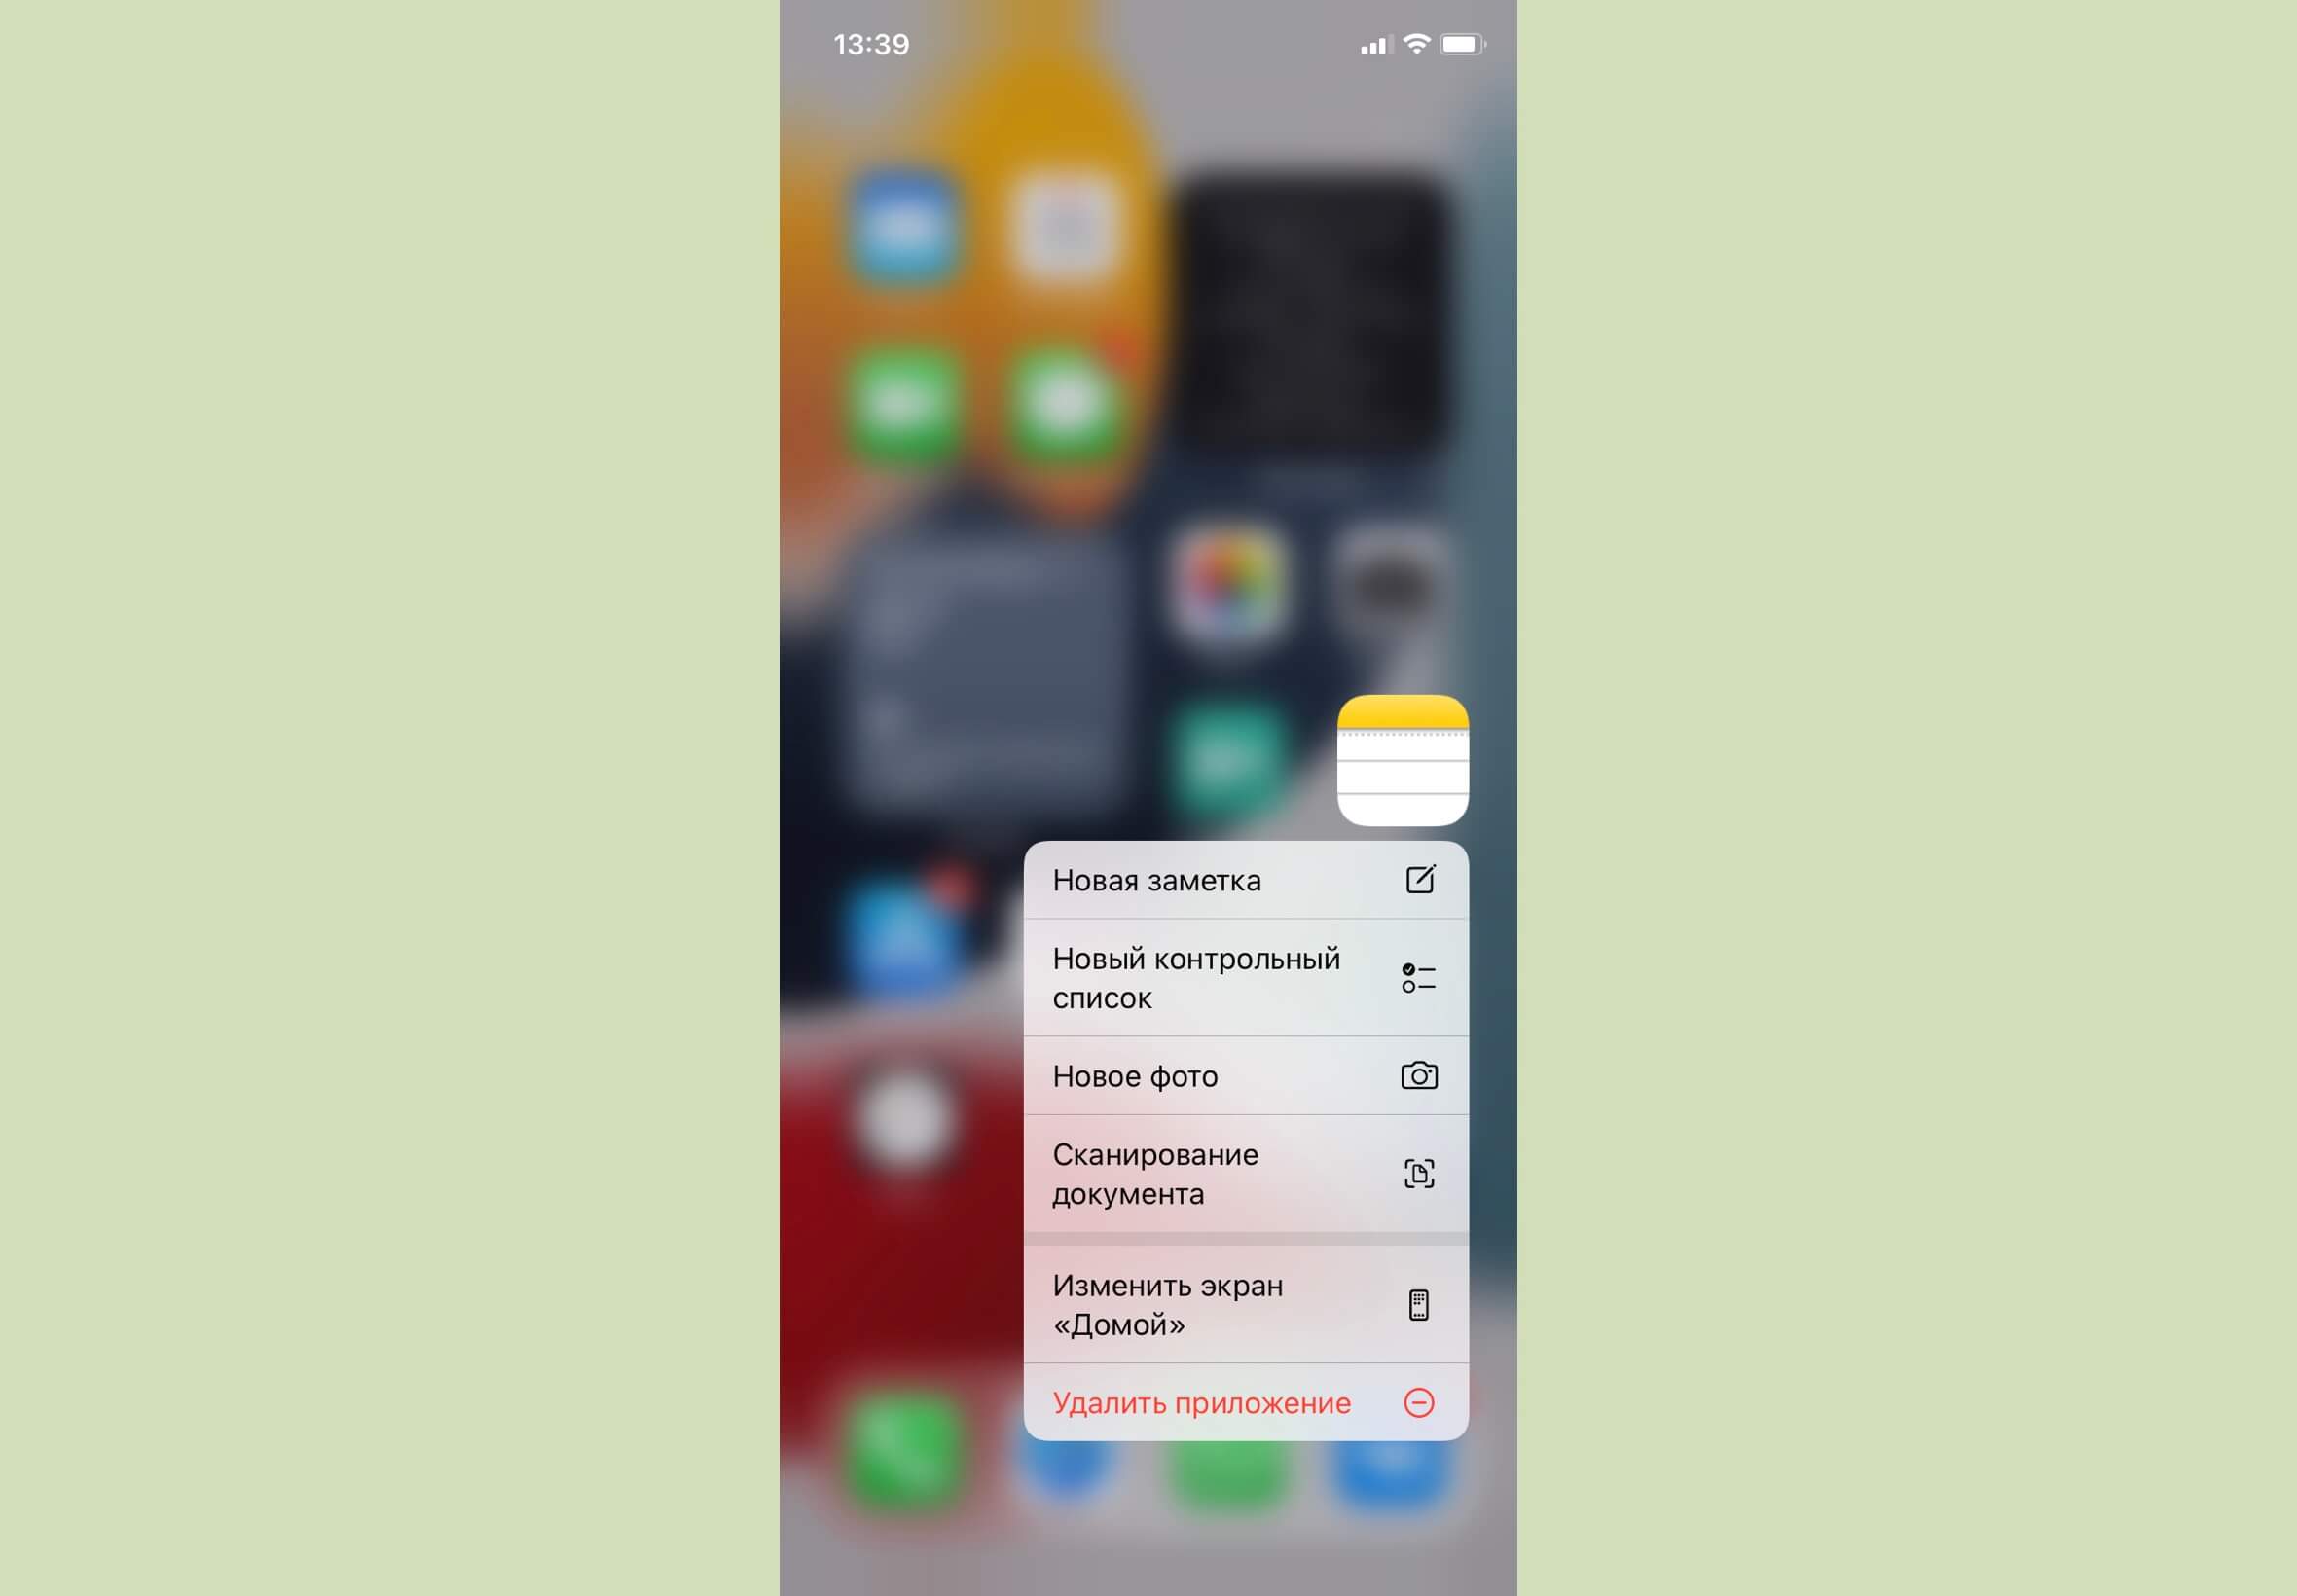
Окажитесь от родных приложений Apple, чтобы почувствовать себя владельцем Android девайса.
Заодно и появится возможность оценить сторонние приложения для заметок или Google Фото. Обещаю, вам будет чему удивиться. Чтобы удалить нативный софт, просто нажмите и удерживайте иконку, затем тапните по кнопке Удалить приложение и выберите подходящие вам опции.
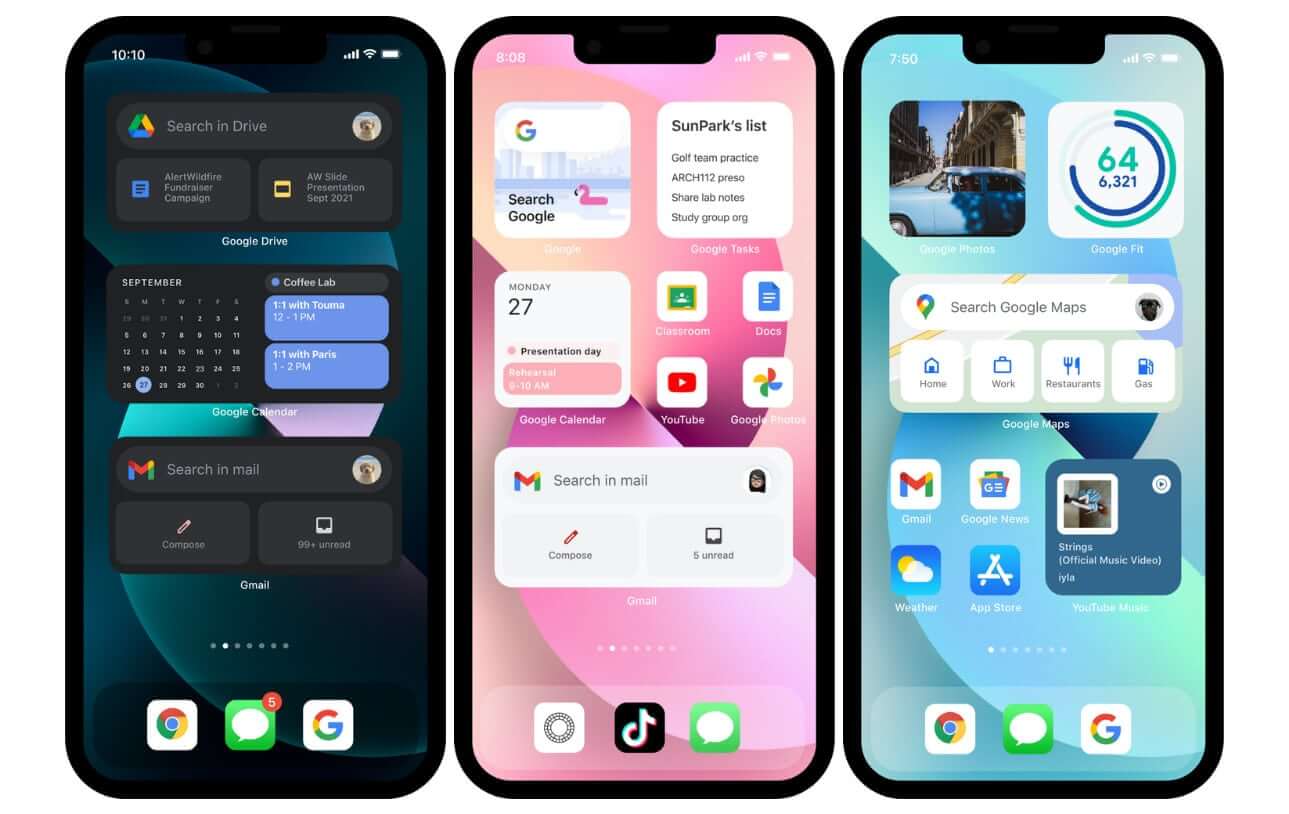
Виджеты Google на айфон
Google уделяет большое внимание своим приложениям на iPhone и iPad. Компания добра всегда старается одной из первых внедрять те или иные нововведения. Так, недавно мы уже рассказывали о новых больших виджетах для iPad и упоминали там некоторые решения, которые позволят быть чуть-чуть ближе к Android. Рекомендую ознакомиться.
Также можно сделать смарт-стопку из разных программ, чтобы облегчить к ним доступ. Я предлагаю воспользоваться основными: Google Поиск, Фото и Почта Gmail. С учетом того, что приложения весьма популярные, думаю, что такое решение придется многим по душе.
Чтобы установить виджеты, вам необходимо:
- Разблокировать iPhone.
- Тапнуть на любое из приложений.
- Нажать на значок + в левом верхнем углу.
- Выбрать приложение с интересующим вас виджетом.
- Указать нужный вам размер.
- Готово.
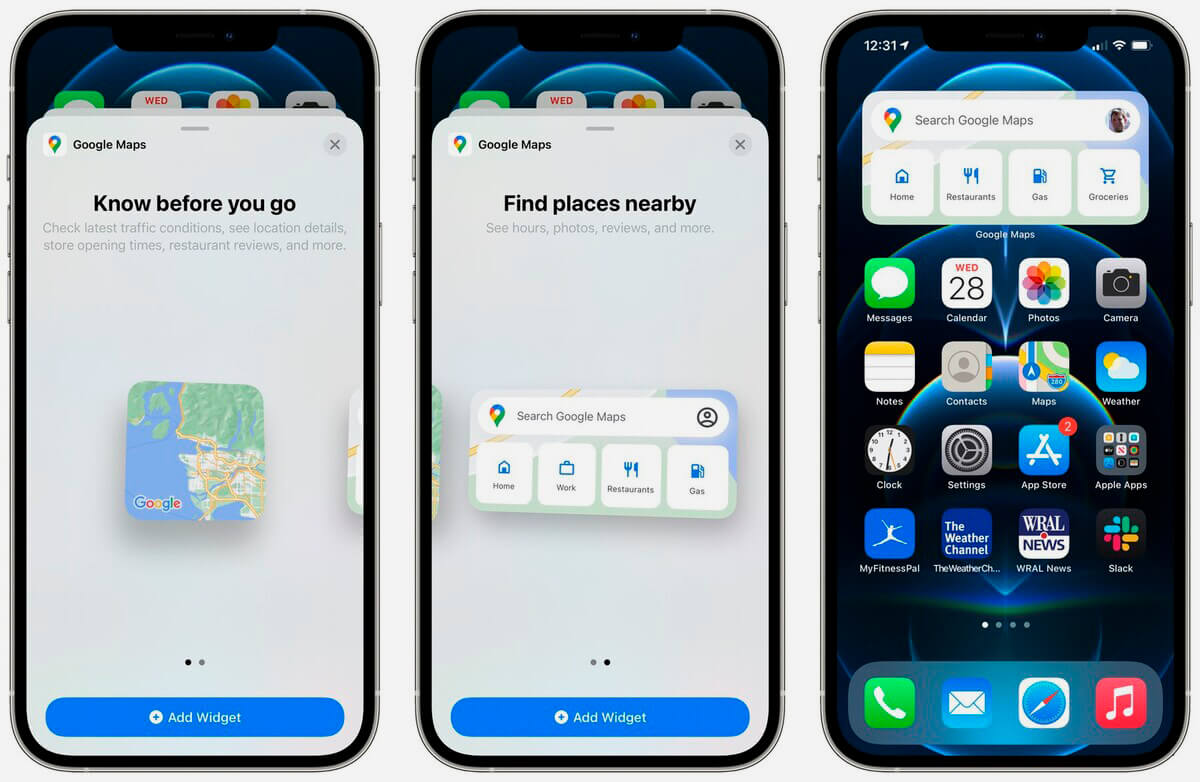
Виджет Google Maps тоже может вам понравиться.
Подписывайтесь на нас в Яндекс.Дзен, там вы найдете много полезной и интересной информации из мира Apple.
Как изменить браузер по умолчанию в iOS
Google Chrome, пожалуй, является одним из главных приложений из мира Android в целом. Можно сколько угодно пытаться отказаться от сервисов Google, но от Chrome избавиться достаточно сложно. Его функциональность вкупе с простым и понятным интерфейсом не оставят равнодушными даже самых требовательных пользователей.
Тем более, если до этого вы всегда использовали Safari в качестве браузера, эта идея кажется еще интереснее.
Плюс, думаю, что многие выбирают Google Chrome в качестве основной машины на своем ПК. Попробуйте окунуться в систему — будет интересный опыт.
Чтобы установить Chrome браузером по умолчанию следуйте шагам:
- Скачайте Google Chrome из App Store.
- Откройте Настройки, далее Chrome.
- Перейдите в Приложение браузера по умолчанию.
- Тапните на Chrome.
- Готово.
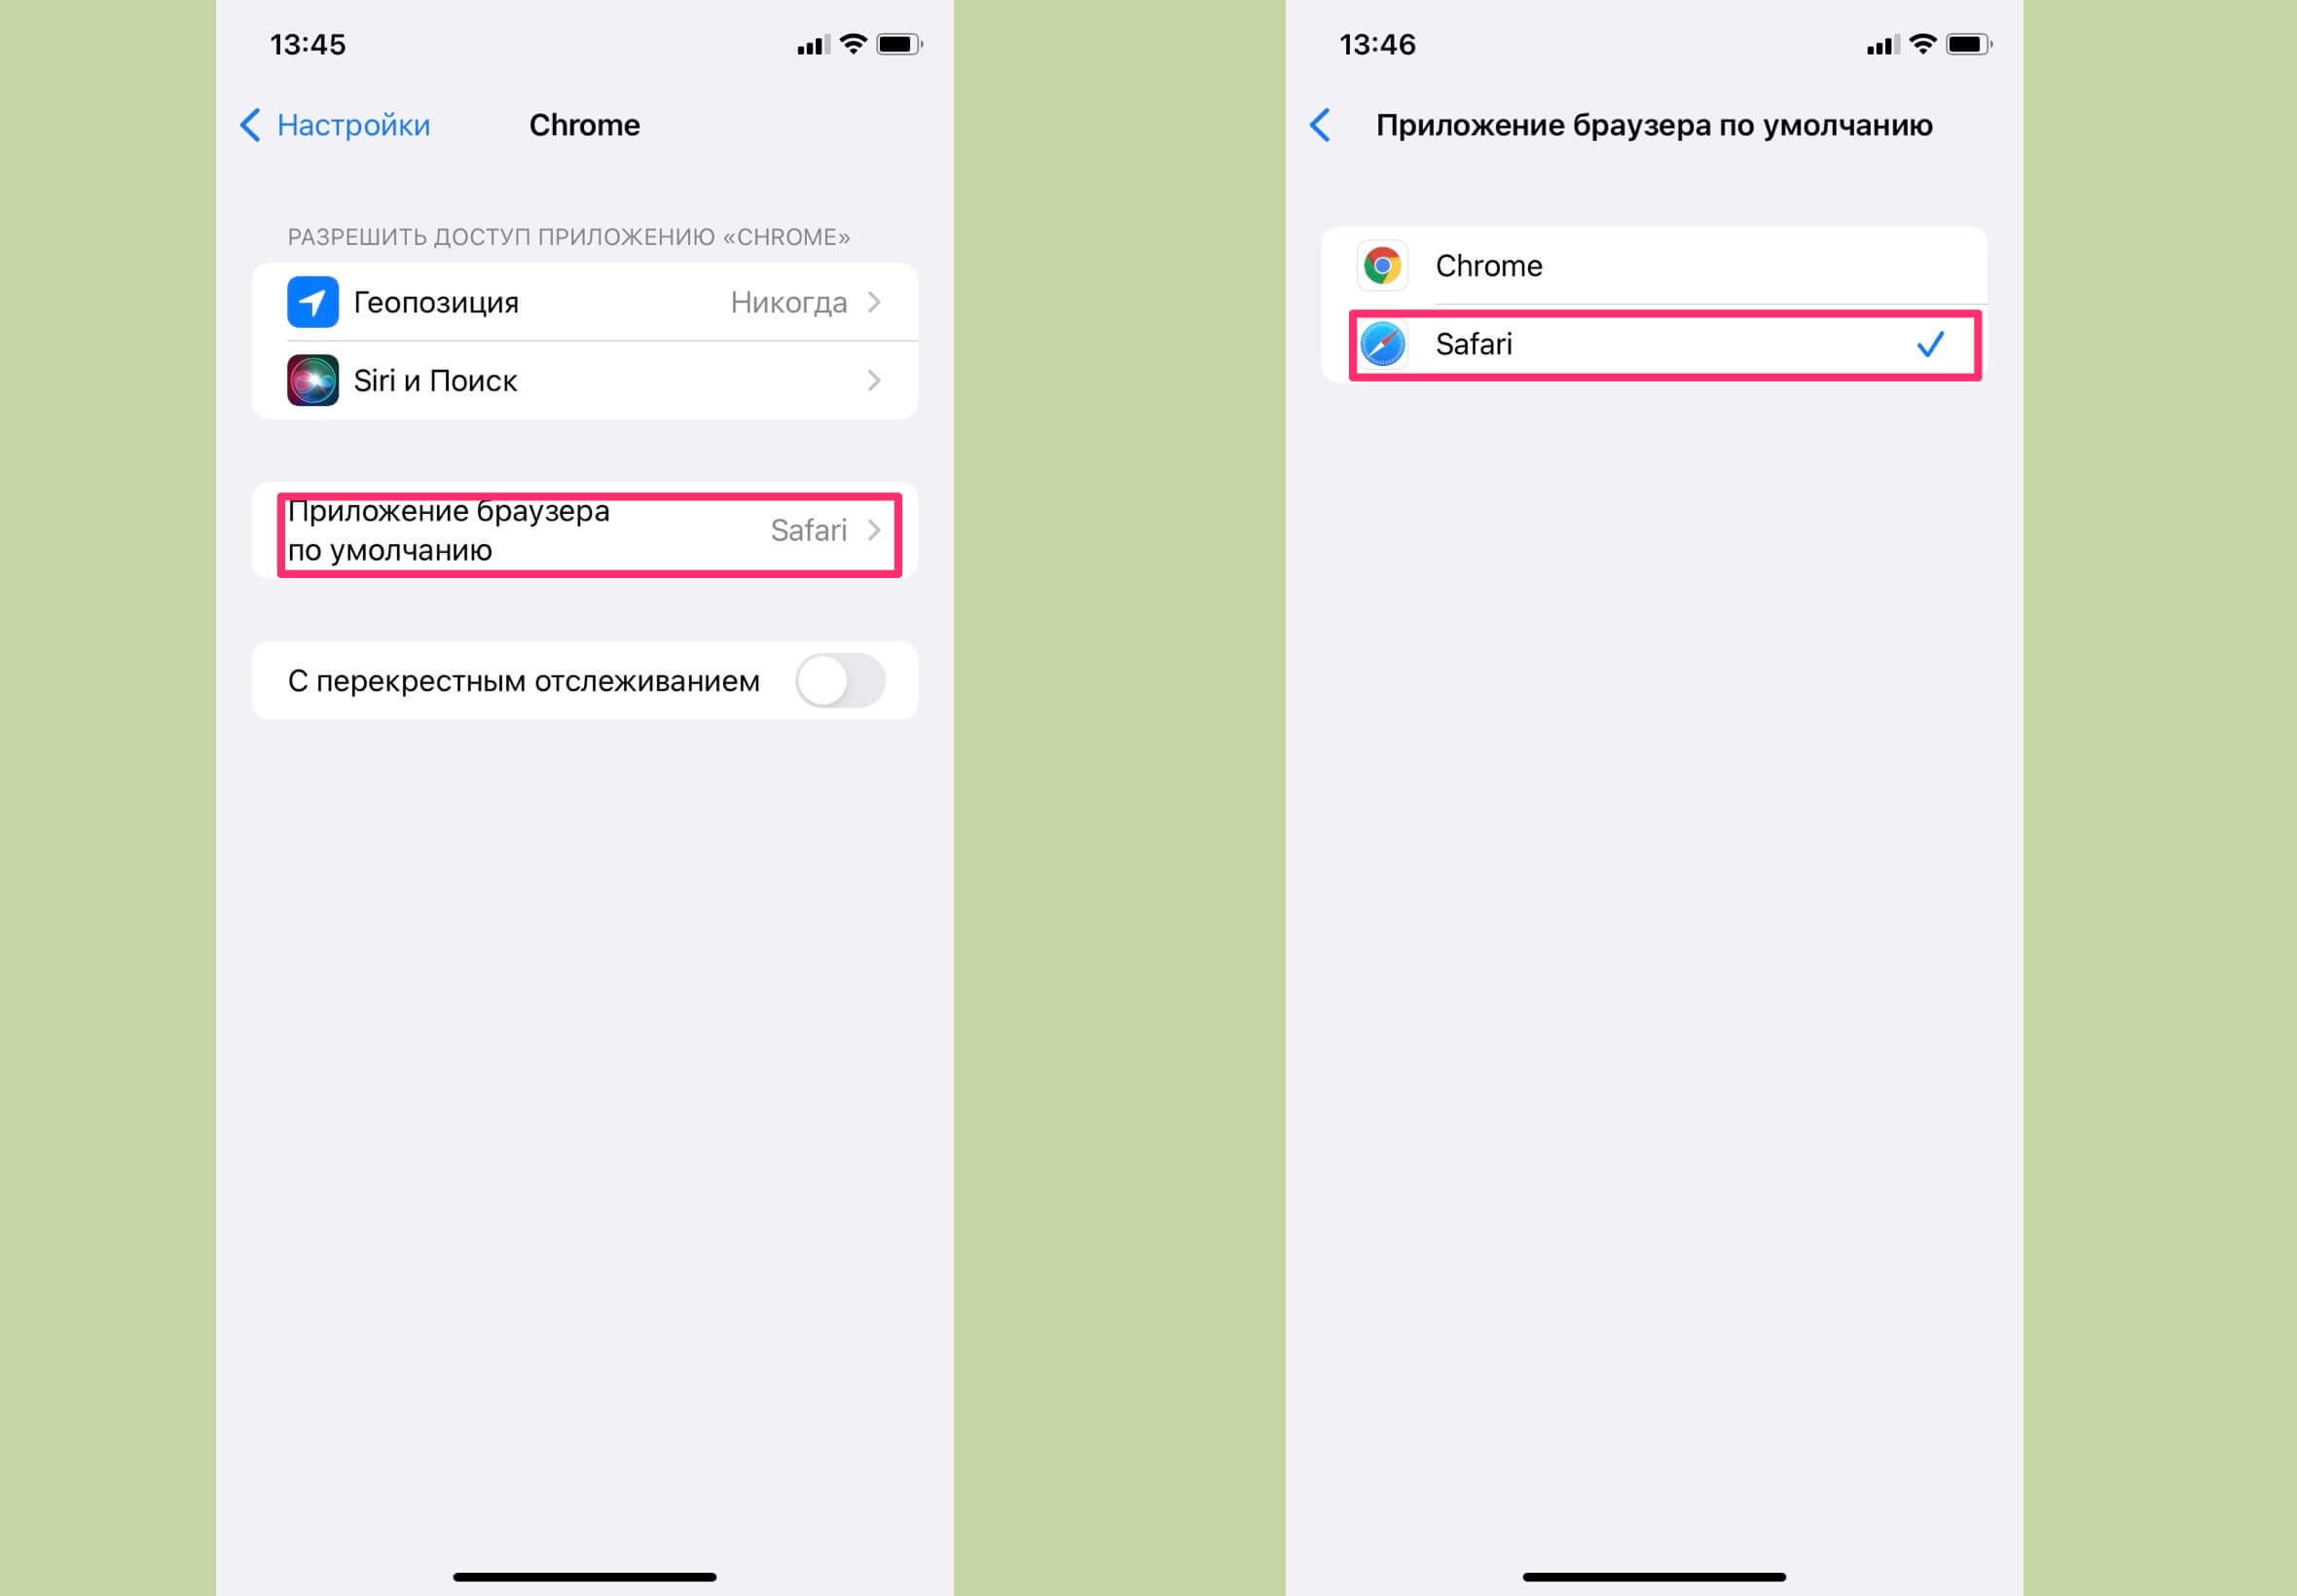
Попробуйте отказаться от Safari на несколько дней. Хотя бы ради эксперимента.
Как установить Gmail на айфон
Родное приложение Почта от Apple не всегда может похвастаться функциональностью, доступной в сторонних клиентах. Плюс ко всему, многие используют Gmail в качестве основного сервиса и однозначно найдут полезной данную фичу.
Чтобы изменить Gmail по умолчанию на iPhone или iPad выполните следующие действия:
- Скачайте Gmail в App Store.
- Откройте Настройки.
- Пролистайте вниз и найдите нужное вам приложение (Gmail)
- Выберите его и внутри откройте меню Приложение почты по умолчанию.
- Установите галочку напротив напротив Gmail.
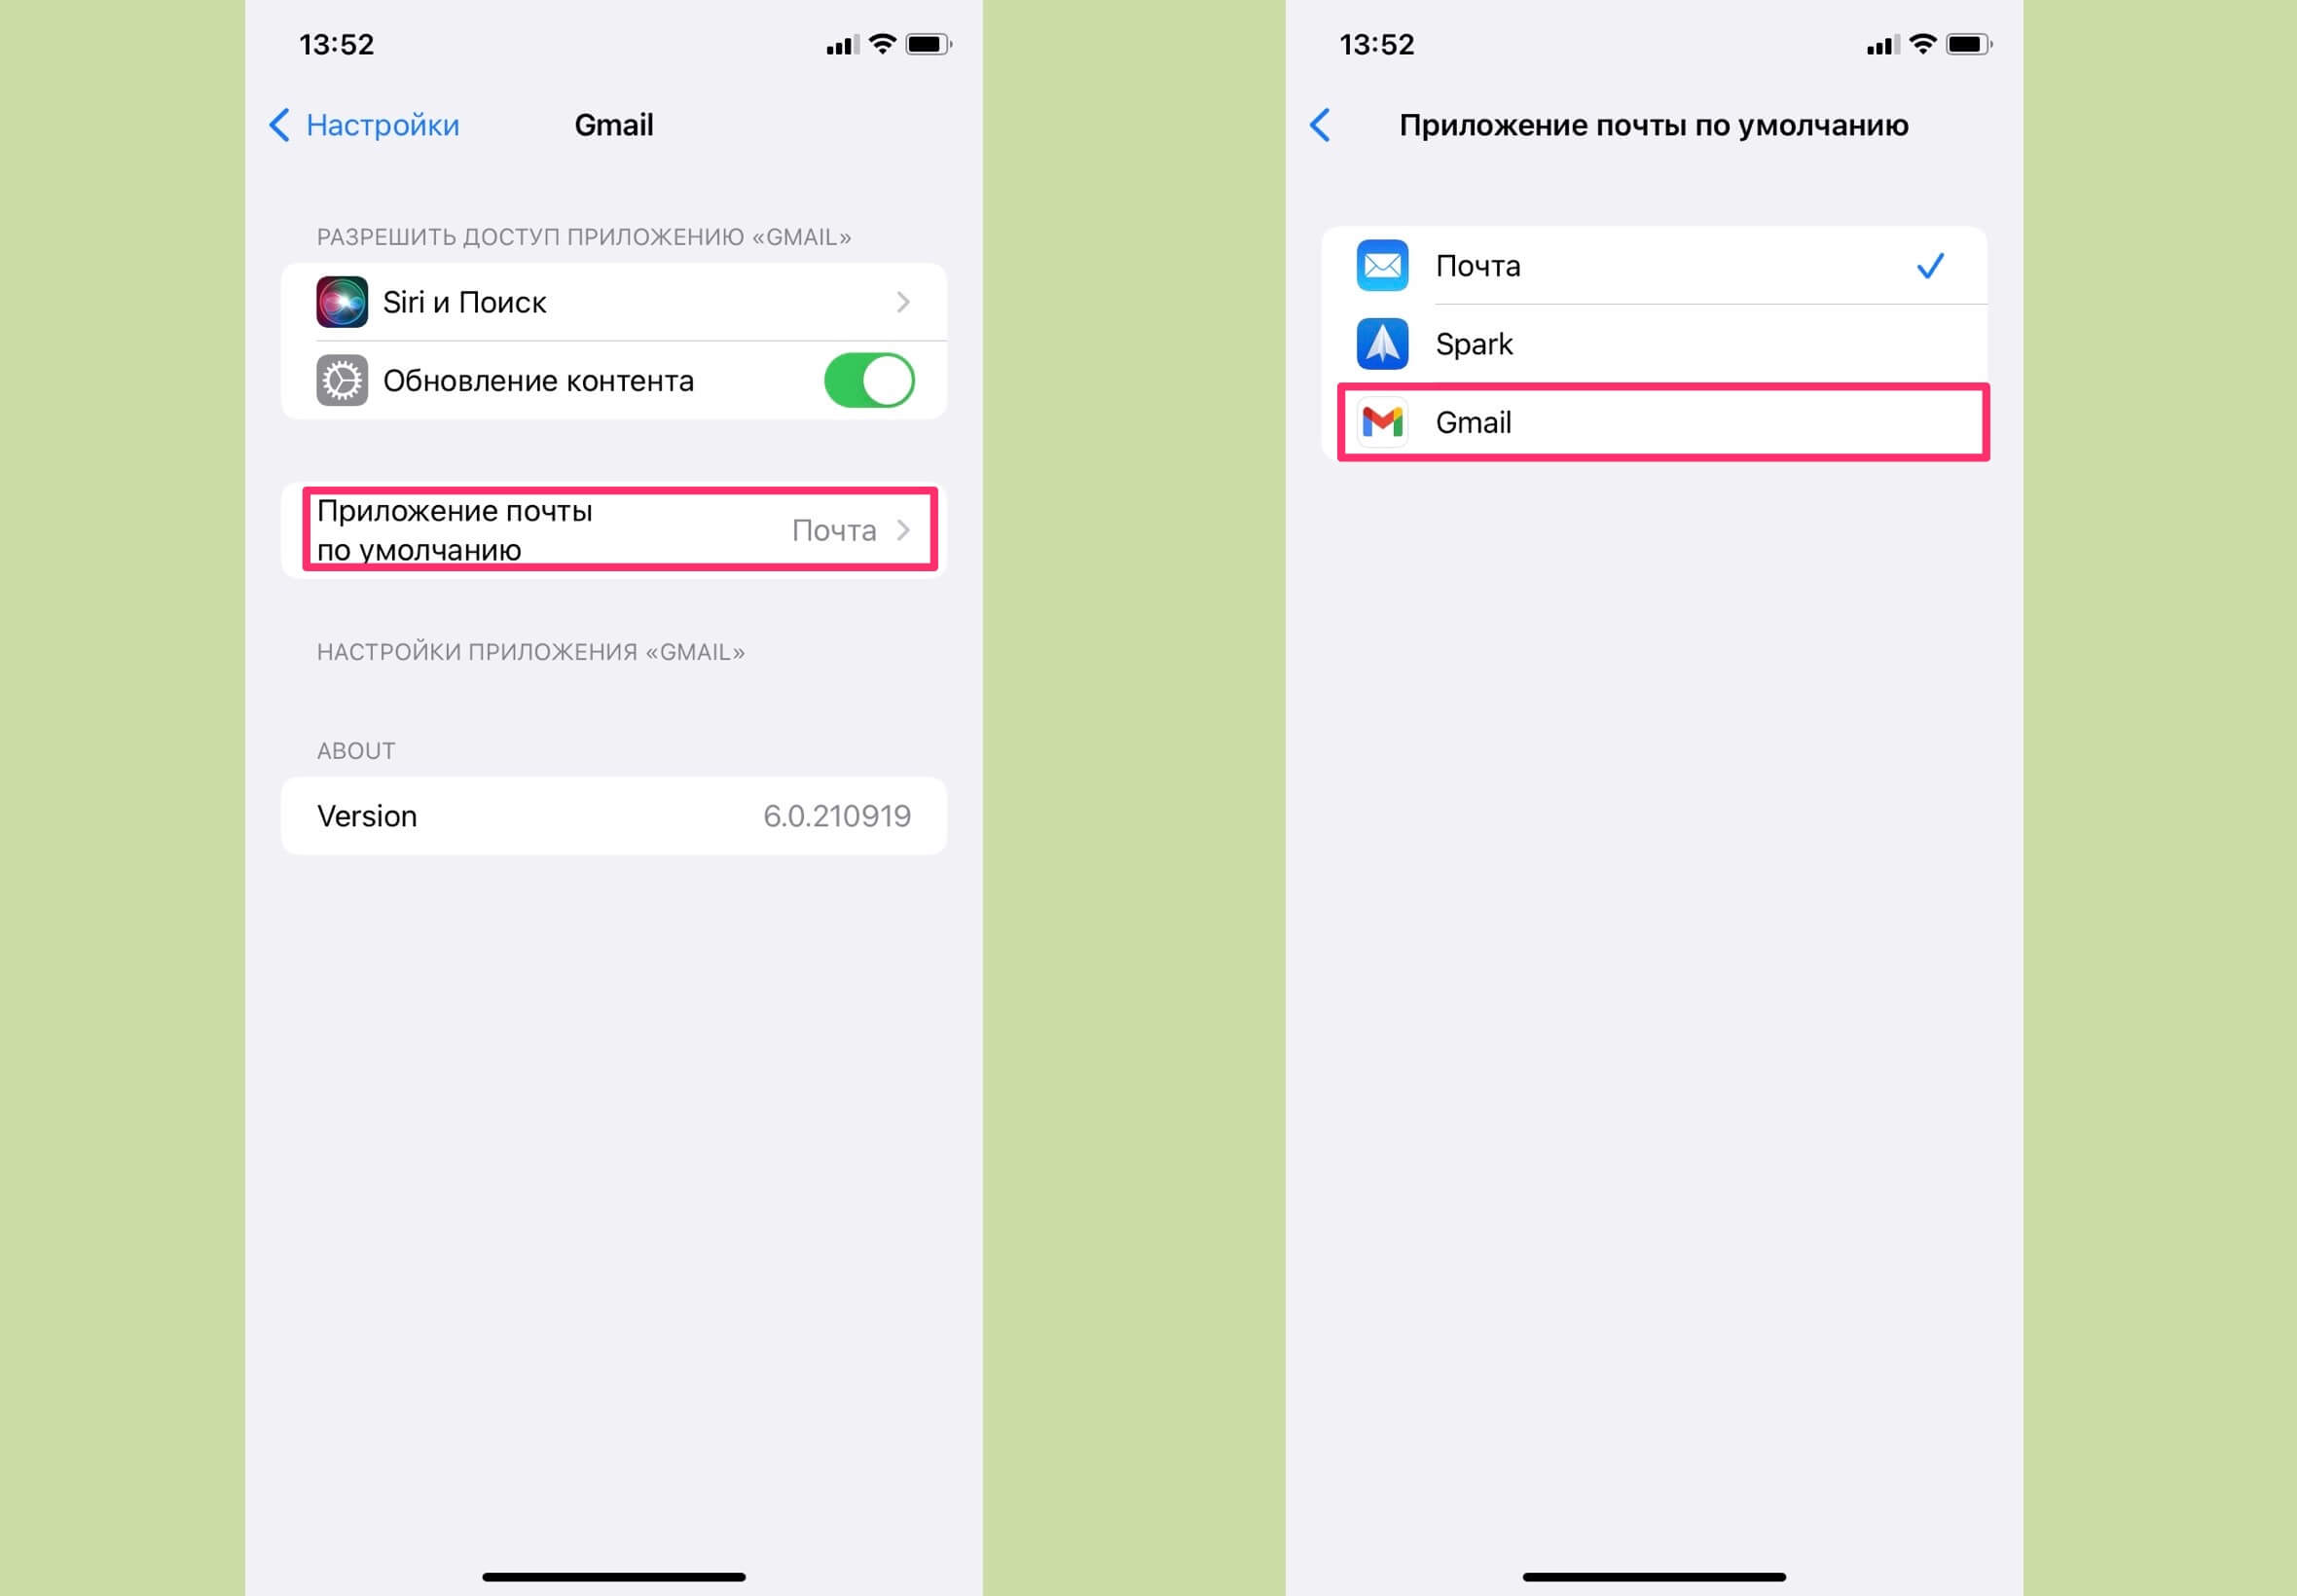
Почтовый клиент от Google тоже вполне неплох.
С помощью этих простых действий вы сможете установить не только клиент от Google, но и любой другой софт на ваше усмотрение. Недавно мы рассказывали про почтовое приложение Spark. Оно мне кажется куда более выигрышным вариантом, но не забывайте, сегодня наша цель — перевоплощение в Android.
Конечно, это далеко не все возможности преобразования iPhone в устройство от Google. Существует еще куча разных мелких фишек, вроде смены обоев или полного очищения домашнего экрана, но, мне кажется, это уже слишком.
Своими впечатлениями от прочитанного, рекомендую поделиться в нашем Телеграм-чате или в комментариях ниже. Будет интересно прочесть.
Источник
How to transfer from iPhone to Android: the complete guide
![]()
All of these guides require you to have a Google account. We tried our best to select the simplest, easiest, and least-complicated method for accomplishing a task. At the same time, we also tried to choose methods that won’t cost you a cent or that won’t require you to buy software that you’ll use only once.
If I were in your shoes, the very first thing that I’d want to transfer to my new Android phone would be my contact list. Especially since I use my smartphone as a phone more than anything else, contacts are at the top of the list of data types that I’d consider most important.
![]()
- iPhone and Android phone
- iCloud account set up, activated, and synced on your iPhone
- Google account
- Internet connection
The first thing that you need to do is to enable iCloud on your iPhone and sync your contacts to the cloud:
- On your iPhone, go to Settings > iCloud.
- Login with your iCloud account.
- Enable “Contacts” on the iCloud page to allow your phone to sync your contacts to iCloud.
- Make sure your iPhone is connected to the Internet to sync your contacts to iCloud.
![]()
- Open a Web browser on your computer.
- Go to https://www.icloud.com/ and sign in with your iCloud account.
- Click Contacts to view your list of contacts.
- Select the contact(s) that you want to export.
- Click the Actions Menu button (cog wheel icon at the lower-left corner) to open the settings menu.
- Select Export vCard from the settings menu.
- Your browser will download a VCF file containing the exported contacts.
- Open a new tab in your Web browser and login to your Google Contacts account at http://www.google.com/contacts.
- On the left pane, scroll down to the bottom and click on Import Contacts. A window will appear.
- Locate and select the VCF file that you exported from iCloud.
- Click Import to import your iPhone contacts to your Google account.
- Let your Google account sync your contacts to your Android device.
For other methods for transferring contacts from iPhone to Android, see the post entitled “How to transfer your contacts from iPhone to Android.”
![]()
iCloud has a feature that allows you to share your calendars to other Apple users — pretty much like Google’s own calendar sharing feature. The method in this section actually takes advantage of that very same sharing ability because it allows you to save your shared calendar into a file. In a nutshell, this method will export all of your iPhone calendar events into a file that you can import into Google Calendar. The trick here is for you to have an iCloud account properly set up and activated on your iPhone and synced. The great thing about this method is that you can migrate all of your iPhone calendar events in one go. The minor downside is that if you have several calendars in your account, you need to export them one at a time. What you will need for this method:
- iPhone and Android phone
- iCloud account set up, activated, and synced on your iPhone
- desktop or laptop PC with Web browser (preferably Chrome or Firefox)
- Google account
- Internet connection
Unless you have already done so, first set up iCloud on your iPhone, as follows:
- Open the Settings page.
- Tap on Mail, Contacts, Calendars.
- Tap Add Account and log in to your iCloud account.
- Once you’ve logged into your iCloud account, ensure that syncing is turned on or enabled for “Calendars.”
- Connect to the Internet to allow iCloud to sync your iPhone data to the cloud.
![]()
- In your Web browser, open www.icloud.com and login to your iCloud account.
- Click on the calendar icon to open your Calendar page.
- Your list of calendars will be listed on the left pane.
- Click on the Share Calendar button beside the name of the calendar that you want to export.
- On the popup that appears, place a checkmark beside “Public Calendar.” Copy the URL that appears below it. It looks like a string of random characters beginning with webcal:// .
- Open a new browser tab or window.
- Paste the URL onto the new tab or window’s address bar — but do not press the Enter key yet.
- Edit the URL by changing webcal:// to http:// and then press the Enter key to open the URL.
- No webpage will open. Instead, a file will begin downloading. Its file name will be made up of a long string of random characters. This file is actually a plain text file that contains your calendar entries. Save the file to a convenient location on your PC. You may also rename the file into something shorter and easier to remember (e.g., calendar.ics).
- Close the browser tabs/windows for iCloud and the download URL.
![]()
- On a new tab/window, login to Google Calendar (http://www.google.com/calendar/) using the same Google account as the one logged in on your Android device.
- Near the bottom of the left pane, locate the Other Calendars menu. Click the downward-pointing arrow at the right of the label.
- Click on Import Calendar to open the dialog for importing your calendar.
- Click on the Choose File button. Locate and select the calendar file that you exported from iCloud.
- If you have several calendars in your Google Calendar account, they will appear on the drop-down list. Choose one as the destination for the imported entries.
- Click the Import button to begin importing the calendar entries.
- After importing is completed, the new entries should now be visible in the Google calendar that you selected as destination for the entries.
For other methods for moving calendar events from iPhone to Android, see the post entitled “How to transfer or sync your calendar from iPhone to Android.”
Unless you belong to the breed of iPhone users who rarely — if ever — take photos and capture videos using their iPhones, in all likelihood your iPhone will contain images and videos that you captured through its camera. How do you completely migrate all of those to your Android phone?
![]()
- your iPhone and Android phone
- your iPhone’s proprietary, non-standards-compliant USB cable
- your Android’s standards-compliant USB cable
- Windows PC
First, import your iPhone images and videos to your Windows PC. Follow these steps:
- Connect your iPhone to your computer via the iPhone’s proprietary USB cable, preferably using a USB port at the back of your PC.
- Open My Computer. Under the Portable Devices section, find your iPhone’s storage and right-click on its icon.
- Click on Import Pictures and Videos from the menu that pops up. This will cause your PC to scan your iPhone for images and videos.
- After scanning completes, click on Import to copy found images and videos to your PC. The default location for the copied files will be in a subfolder in your My Pictures folder.
- At this point, you may now unplug the iPhone from your PC.
Next, copy the imported videos and images from your PC to your Android device. Here’s how to do it:
- Connect your Android device to your PC via USB cable. Your Android’s storage should be automatically detected.
- Open your Android device’s storage and navigate to the image folder. This is usually the DCIM folder. If you want, create a subfolder to hold the iPhone photos and videos that you will be copying in the next steps.
- Open the My Pictures folder on your PC.
- Copy the imported images and videos from your My Pictures subfolder to your Android’s images (sub)folder.
Find more alternate methods for moving your iPhone images to Android in the post entitled “How to transfer photos and images from iPhone to Android.”
![]()
Transferring music from your iPhone to Android is a bit tricky, but not impossible. The method recommended in this section generally involves (1) syncing your iPhone music tracks with your iTunes Music Library on your desktop PC and (2) uploading the music files to your Google Music account. To accomplish this, you will need the Google Music Manager software. There is another easy method that will let you quickly transfer your music from iPhone to PC and from PC to Android, but that method allows limited access to your music. However, in the method recommended in this section, once you upload your music tracks to Google Music, those tracks will be available to any device from where you can log into Google Music using the Play Music app (e.g., an Android device) or a supported Web browser. For this method you will need the following:
- iTunes software installed on your PC
- Google Music Manager installed on your PC
- Apple ID and Google account
First, you need to sync your iPhone music tracks to the Music Library on your PC’s iTunes. Also ensure that your purchased songs are downloaded from iCloud to your PC, as Google Music Manager only uploads songs that are saved on the PC. Here’s how to do this:
- Run iTunes on your desktop. Login to your Apple account using your Apple ID.
- Open the iTunes Music Library. Click on the Songs tab to see a list of the music tracks on your iPhone, including songs bought using the logged-in Apple ID.
- Check whether the music tracks that you want to copy are stored on the PC. Tracks that have an iCloud logo with a downward arrow displayed beside the track title are tracks that have not yet been saved to the PC. To download the file to your PC, just click on the iCloud logo beside the track title. You can also download several tracks simultaneously by multi-selecting tracks, then right-clicking on a highlighted track title, and clicking Download from the popup menu.
- If you don’t see your purchased music tracks on the Songs tab, try going to Preferences > Store, then enable “Show iTunes in the Cloud Purchases.”
Now, your music tracks are ready for upload to Google Music. Follow these steps:
- Launch Google Music Manager on your computer and log-in with your Google account. Follow the setup instructions flashed on the screen.
- Select Upload Songs to Google Play on the setup page. Select “iTunes” on the list. You can upload all the tracks in your iTunes library, selected music playlists, or podcasts to Google.
- On the next screen, Google Music Manager will prompt you about whether you want all newly added songs to iTunes to be also automatically uploaded to your Google Play Music account.
- Once you’ve specified all setup options, Google Music Manager will scan your iTunes Music Library and begin uploading your songs to Google.
![]()
Bookmarks help you find your way back to a particular location on the Web. In many cases, the bookmarks that you save actually indicate your favorite places on the Web; some Web browsers aptly call such a collection “Favorites.” If you ever use your iPhone for Web browsing, you most likely will have bookmarked some sites or webpages. And, when you move to Android, you will want to bring those bookmarks with you.
![]()
- an iCloud account
- iCloud Control Panel installed on your Windows computer
- an active Internet connection
- Google Chrome or Mozilla Firefox installed on both computer and Android device
First, use iCloud to sync your Safari bookmarks to your computer, as follows:
- On your iPhone, go to Settings > iCloud and set up or login with your iCloud account. Also enable Safari on this menu to sync Safari data to iCloud.
- Launch iCloud Control Panel on your computer and log-in with your iCloud account.
- Tick the checkbox for “Bookmarks.”
- Click Options and select the browser that you want to merge the bookmarks to. Choose either “Firefox” or “Google Chrome.”
- Click on Apply.
- When asked, choose to merge your bookmarks. Select Merge to continue.
- You will be asked to download the iCloud Bookmarks extension for Google Chrome and Firefox.
- Click Download to download and install the extensions.
After the extension finishes installing in the last step above, the Safari bookmarks from your iPhone will be transferred to Google Chrome or Firefox on your computer. You can now sync your Google Chrome or Firefox bookmarks to your Android device. The next sections will show you how.
![]()
Transferring bookmarks to Google Chrome
If you chose Google Chrome as your browser, syncing your bookmarks to your Android device will be easy. Just login to your Google account in Google Chrome on your computer. Your browser data (including bookmarks) will then be synced to your Google account, making your data accessible to the Google Chrome app on your Android device. Make sure that you login using the same Google account in Chrome on your Android device.
![]()
Transferring bookmarks to Firefox
The Firefox browser on your computer has an option that allows you to sync your bookmarks to Firefox on your Android device. If you haven’t enabled this option yet, you can do so by following the steps below.
- On your Windows computer, open the Firefox menu and select Set Up Sync.
- Login to your Firefox account with your credentials to sync your browser data (including bookmarks) to the cloud. If you don’t have an account yet, create an account within the browser. Syncing your local browser data to the cloud will take a moment, so give it some time to complete the sync before moving on to the next step.
- On your Android device, launch the Firefox app and open the settings page.
- Select Sync and take note of the unique pairing codes generated by the app.
- Go back to Firefox on your computer and open the Options menu.
- Go to the Sync tab and click on Pair a Device.
- Input the pairing codes generated by the Firefox app for Android.
- Click Next to begin syncing browser data between your computer and Android.
Firefox on both your computer and Android device will now be paired. Browser data from your Firefox on your PC will now be synced to your Android device. More alternate methods for moving your iPhone bookmarks to Android, are described in the post entitled “How to transfer bookmarks from iPhone to Android.”
Conclusion
Migrating from the iPhone to Android doesn’t have to be very painful — but, the pain is definitely worth it. With our easy-to-follow guides, you should be able to easily transfer your most important data and files to your Android phone. This post in particular showed you easy methods to transfer your contacts, images, videos, calendar events, and bookmarks from iPhone to Android. Have you made the big move already? How was it? Did you follow any of the methods described in this post? What methods did you use? Share your stories in the comments section below.
Источник


