- Android Developer Challenge: the winning apps, powered by ML
- Google Play In-App Review API: пошаговое руководство по внедрению
- Руководство
- Добавление зависимостей
- Реализация
- Тестирование
- Internal app sharing
- Итоги
- Get Started with Play Games Services for Android
- Before you begin
- App prerequisites
- Set up your game in Google Play Console
- Configure your app
- Sample App Guide
- Step 1: Download the sample app
- Step 2: Set up the game in the Google Play Console
- Step 3: Modify your code
- Step 4: Test your game
Android Developer Challenge: the winning apps, powered by ML

Finding the right words faster in Gmail. Helping you pick the most popular dish on a menu with Google Lens. Automatically captioning videos or podcasts on your Android phone with Live Caption. What do all of these features have in common? They use Google’s machine learning to help you get things done faster and easier throughout your day.
This technology is becoming more accessible to the developers who build the apps you use everyday. To encourage more developers around the world to build apps using machine learning, we launched the Android Developer Challenge last year. And after months of hard work, today the 10 winners of the Android Developer Challenge are launching their apps ready for you to try out. Each of these projects was created by the developers individually not Google:
- AgriFarm helps farmers detect plant diseases and prevent major damage in fruits and vegetables such as tomatoes, corn and potatoes. [Balochisan, Pakistan]
- AgroDoc helps farmers diagnose plant disease and make treatment plans. [Navneet Krishna; Kochi, India]
- Eskke simplifies mobile money management for people in the Congo, letting them transfer money, pay bills, and buy subscriptions and essential airtime for sending SMS. [David Mumbere Kathoh; Goma, Democratic Republic of Congo]
- Leepi helps students learn hand gestures and symbols for American Sign Language. [Prince Patel; Bengaluru, India]
- MixPose is a live streaming app that gives yoga teachers and fitness professionals the opportunity to teach, track alignment, make sure you’re in the correct pose, and give real-time feedback. [Peter Ma; San Francisco, California, USA]
- Pathfinder could help people with visual impairments navigate complex situations by identifying and calculating the trajectories of objects moving in their path. [Colin Shelton; Addison, Texas, USA]
- Snore & Cough helps you identify and analyze snoring and coughing, so you can listen to and send recordings from a night’s sleep. [Ethan Fan; Mountain View, California, USA]
- Stila pairs with a wearable device, like the Fitbit wristband or a device running on Wear OS by Google, to monitor, track and help manage the body’s stress levels. [Yingdin Wing; Munich, Germany]
- Trashly makes recycling easier. Just point the on-device camera at an item, and through object detection, the app identifies and classifies plastic and paper cups, bags, bottles, etc. [Elvin Rakhmankulov; Chicago, Illinois, USA]
- UnoDogs helps owners better support their pet’s wellness, providing customized information and fitness programs. [Chinmany Mishra; New Delhi, India]
Источник
Google Play In-App Review API: пошаговое руководство по внедрению
Летом 2020 года появилась новая классная функциональность в библиотеке Play Core — In-App Review [1]. При помощи этой фичи можно реализовать диалог с отзывом и оценкой пользователя. Это очень удобно и не ломает пользовательский сценарий. Фича полезна для повышения рейтинга и продвижения. Например, после внедрения в одном из приложений количество оценок увеличилось в 5 раз [2]. В этой статье я расскажу, как внедрить In-App Review в ваше приложение.
Руководство
Добавление зависимостей
Добавьте в ваш build.gradle следующие зависимости:
Реализация
Добавьте следующий код для вызова диалога оценки приложения:
Также, если необходимо, добавьте флаг в SharedPreference , который можно проверять в случае, если вы хотите вызывать сценарий только один раз. Нужно иметь в виду, что диалог в целом может вызваться только ограниченное количество раз [3], a также при помощи API невозможно проверить — прошел ли пользователь ревью или нет [4]. Как добавить In-App Review в Unity или нативный код, читайте в следующей документации [5], [6].
Тестирование
Протестировать сценарий In-App Review можно только, если приложение было скачано через Google Play, поэтому есть два способа проверить сценарий руками:
- Internal Test Track: чтобы использовать этот механизм, нужно, чтобы ваше приложение было опубликовано в Google Play Store.
- Internal App Sharing: относительно новый механизм распространение тестовых версий приложений, который позволяет распростронять ваши .apk (или .aab) через Google Play.
Для Unit-тестирования API предоставляет нам класс FakeReviewManager . Далее расскажу как проверить сценарий In-App Review при помощи Internal App Sharing.
Internal app sharing
После того, как вы соберете ваш .apk (или .aab) и создадите новое приложение в Google Play, перейдите в раздел Internal App Sharing:

В нем вы можете управлять настройками рассылки приложения, например, задать списки с почтами, которым разрешено скачивать .apk (или .aab):
Можно также задать настройку, чтобы все, кто обладает ссылкой, могли скачать приложение без ограничений:
После того, как мы задали настройки, переходим на форму отправки https://play.google.com/console/u/0/internal-app-sharing и загружаем .apk (или .aab):
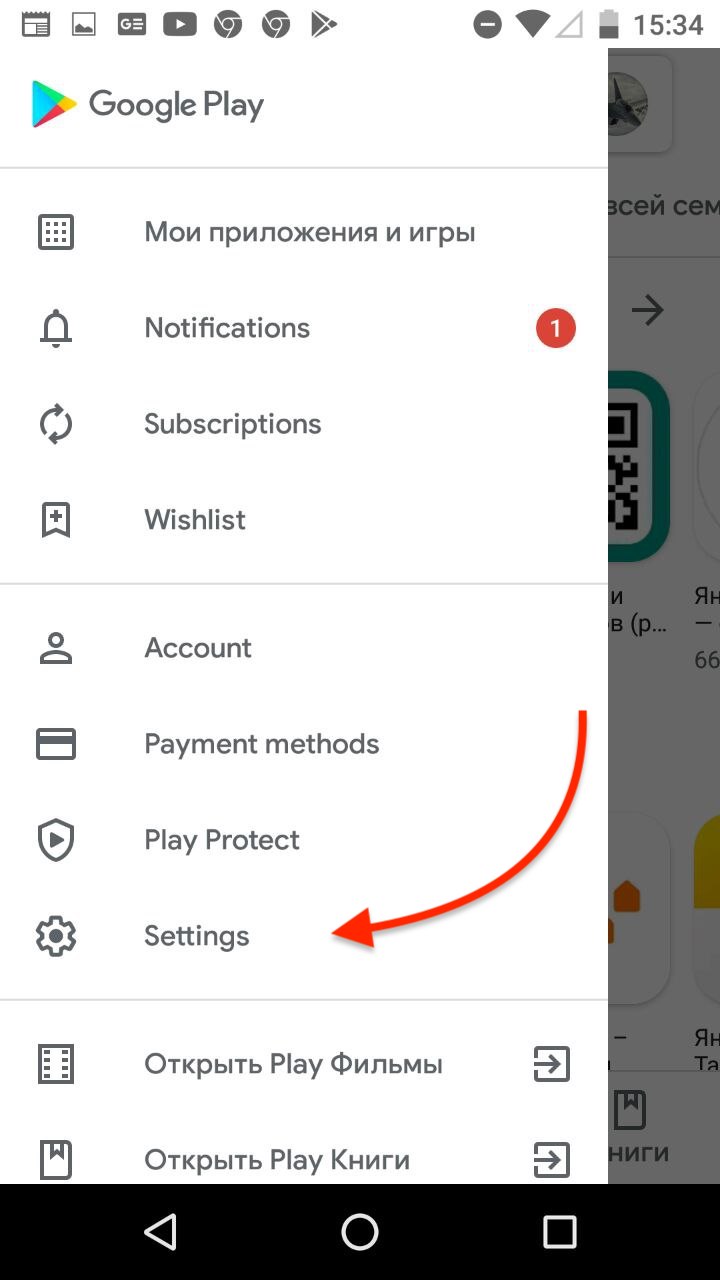
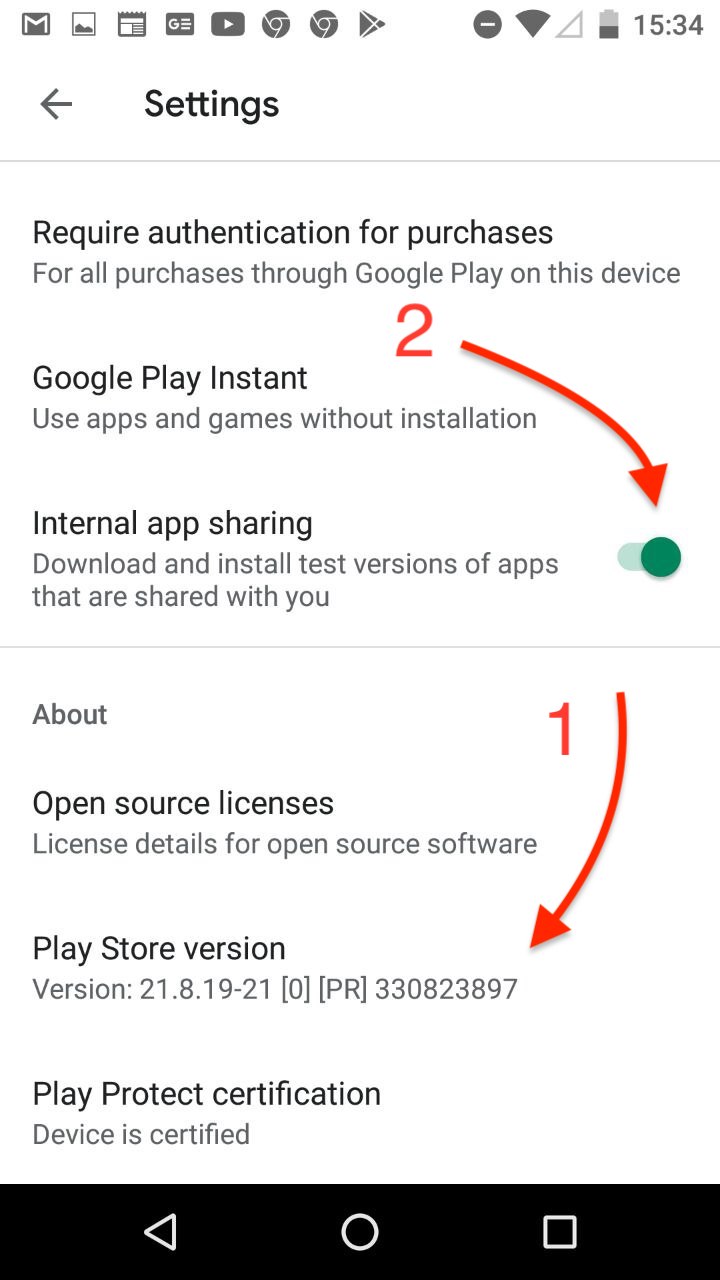
Копируем ссылку и отправляем адресату. Далее, как же получить наш архив? Для этого заходим в приложение Google Play на телефоне, открываем настройки, кликаем пять раз по “Play Store version”, и предоставляем внутренний доступ к приложениям, нажав на свитч:
После этого можно открыть ссылку и установить приложение:
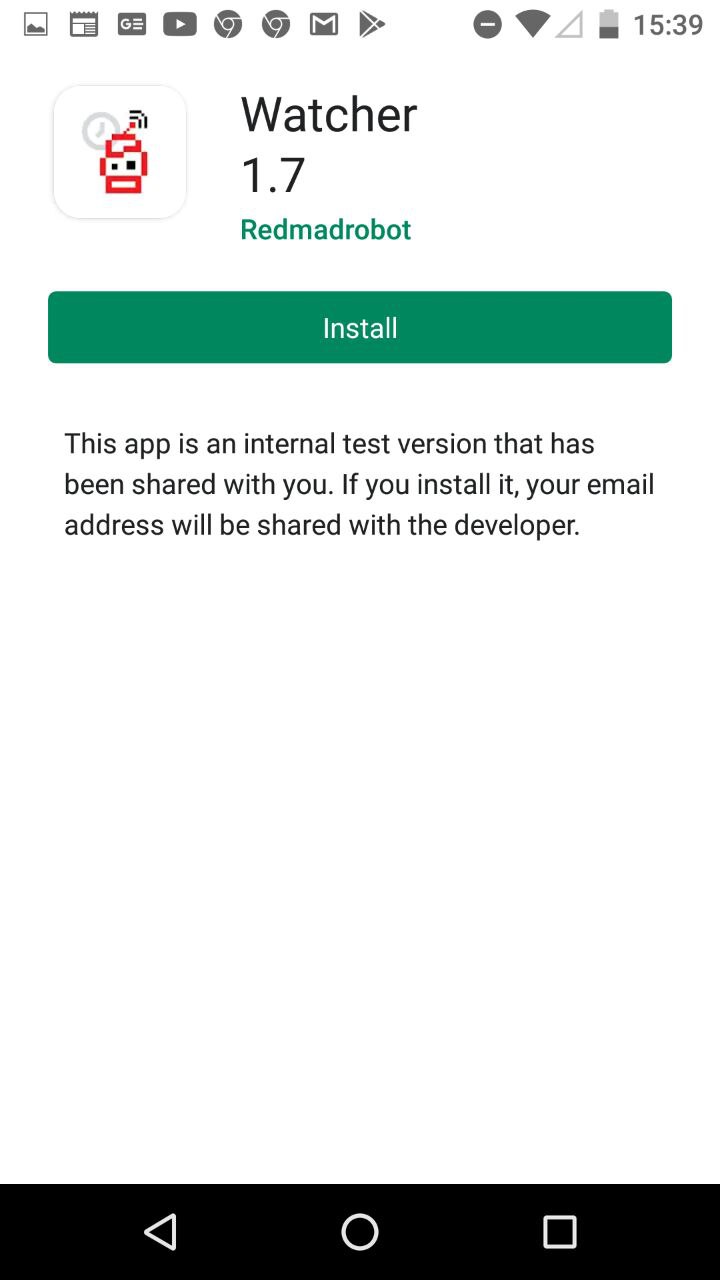
В этом режиме кнопка отправки ревью не работает:

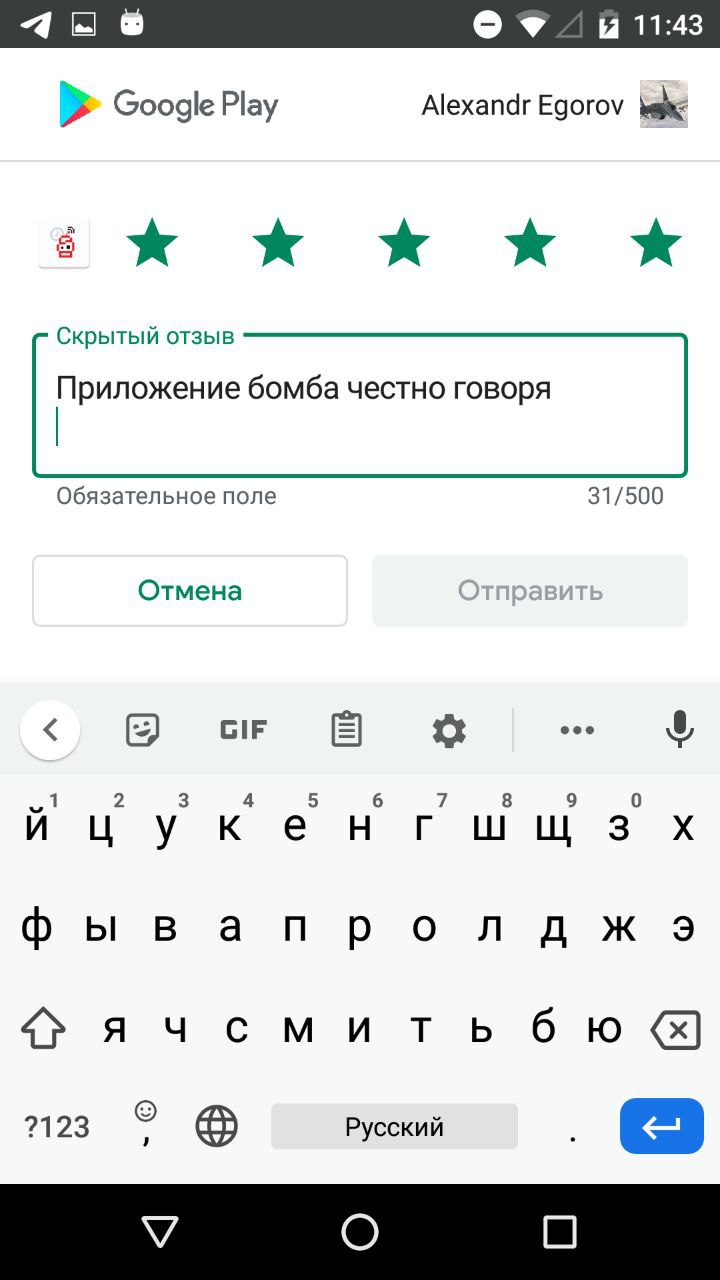
Но проверить работу сценария все равно можно.
Итоги
Google Play Core предоставил отличный инструмент для повышения рейтинга приложений, который можно с легкостью внедрить и протестировать. Тестирование In-App Review можно проводить только с .apk, которые были скачаны и установлены через Google Play Store, например, через механизм Internal App Sharing. Размер apk при этом увеличится на 100 KB, dex файл увеличится на 200 классов и 500 методов примерно, что, возможно, порадует разработчиков-оптимизаторов apk.
Источник
Get Started with Play Games Services for Android
Welcome to Android game development with the Google Play games services!
The Play Games SDK provides cross-platform Google Play games services that lets you easily integrate popular gaming features such as achievements, leaderboards, and Saved Games in your tablet and mobile games.
This training will guide you to install a sample game application for Android and quickly get started to create your own Android game. The Type-a-Number Challenge sample app demonstrates how you can integrate achievements and leaderboards into your game.
Before you begin
To prepare your app, complete the steps in the following sections.
App prerequisites
Make sure that your app’s build file uses the following values:
- A minSdkVersion of 19 of higher
- A compileSdkVersion of 28 or higher
Set up your game in Google Play Console
The Google Play Console is where you manage Google Play games services for your game, and configure metadata for authorizing and authenticating your game. For more information, see Setting Up Google Play Games Services.
Configure your app
In your project-level build.gradle file, include Google’s Maven repository and Maven central repository in both your buildscript and allprojects sections:
Add the Google Play services dependency for the Play Games SDK to your module’s Gradle build file, which is commonly app/build.gradle :
Sample App Guide
This training will guide you to install a sample game app for Android and quickly get started to create your own Android game. The Type-a-Number Challenge sample app demonstrates how you can integrate achievements and leaderboards into your game.
Step 1: Download the sample app
For this developer guide, you will need to download the Type-a-Number Challenge sample Android application.
To download and set up the sample application in Android Studio:
- Download the Android samples from the samples download page.
- Import the android-basic-samples project. This project includes TypeANumber and other Android game samples. To do this in Android Studio:
- Click File >Import Project.
- Browse to the directory where you downloaded android-basic-samples on your development machine. Select the file android-basic-samples/build.gradle and click OK.
- In the TypeANumber module, open AndroidManifest.xml and change the package name from com.google.example.games.tanc to a different package name of your own. The new package name must not start with com.google , com.example , or com.android .
Step 2: Set up the game in the Google Play Console
The Google Play Console is where you manage Google Play games services for your game, and configure metadata for authorizing and authenticating your game.
To set up the sample game in the Google Play Console:
- Point your web browser to the Google Play Console, and sign in. If you haven’t registered for the Google Play Console before, you will be prompted to do so.
- Follow these instructions to add your game to the Google Play Console.
- When asked if you use Google APIs in your app, select I don’t use any Google APIs in my game yet.
- For the purpose of this developer guide, you can fill up the form with your own game details. For convenience, you can use the placeholder icons and screenshots provided in the Downloads page.
- Follow these instructions to generate an OAuth 2.0 client ID for your Android app.
- When linking your Android app, make sure to specify the exact package name you used previously when renaming the sample package.
- You can use the Generate Signed APK Wizard in Android Studio to generate a new keystore and signed certificate if you don’t have one already. To learn how to run the Generate Signed APK Wizard, see Signing Your App in Android Studio.
- Make sure to record the following information for later:
- Your application ID: This is a string consisting only of digits (typically 12 or more), at the beginning of your client ID.
- Your signing certificate: Note which certificate you used when setting up your API access (the certificate whose SHA1 fingerprint you provided). You should use the same certificate to sign your app when testing or releasing your app.
- Configure achievements for Type-a-Number Challenge:
- Select the Achievements tab in the Google Play Console.
- Add the following sample achievements:
Name Description Special Instructions Prime Get a score that’s a prime number. None Humble Request a score of 0. None Don’t get cocky, kid Request a score of 9999 in either mode. None OMG U R TEH UBER LEET! Receive a score of 1337. Make this a hidden achievement. Bored Play the game 10 times. Make this an an incremental achievement with 10 steps to unlock. Really Really Bored Play the game 100 times. Make this an an incremental achievement with 100 steps to unlock. - Record the IDs (long alphanumeric strings) for each achievement that you created.
- Configure achievements that are appropriate for your game. To learn more, see the concepts behind achievements and how to implement achievements in Android.
- Configure the leaderboards for Type-a-Number Challenge:
- Select the Leaderboards tab in the Google Play Console.
- Add two sample leaderboards: one named “Easy High Scores” and another named “Hard High Scores”. Both leaderboards should use Integer score formatting with 0 decimal places, and an ordering type of Larger is better.
- Record the IDs (long alphanumeric strings) for each leaderboard you created.
- Configure leaderboards that are appropriate for your game. To learn more, see the concepts behind leaderboards and how to implement leaderboards in Android.
- Add test accounts for your game. This step is needed only for apps that have not yet been published in the Google Play Console. Before the app is published, only the test accounts listed in the Google Play Console can log in. However, once an application is published, everyone is allowed to log in.
Warning: If you try to make Play Games SDK calls for an unpublished game by using an account that’s not listed as a test account, the Google Play games services will behave as if the game did not exist and you’ll get back the ConnectionResult.SIGN_IN_REQUIRED return code. If you attempt to launch ConnectionResult.startResolutionForResult() , you’ll get back GamesActivityResultCodes.RESULT_SIGN_IN_FAILED .
Step 3: Modify your code
To run the game, you need to configure the application ID as a resource in your Android project. You will also need to add games metadata in the AndroidManifest.xml .
- Open res/values/ids.xml and replace the placeholder IDs. If you are creating an Android game from scratch, you will need to create this file first.
- Specify your application ID in the app_id resource.
- Specify each achievement ID that you created earlier in the corresponding achievement_* resource.
- Specify each leaderboard ID that you created earlier in the corresponding leaderboard_* resource.
- Open AndroidManifest.xml and enter your package name in the package attribute of the manifest > element. If you are creating an Android game from scratch, make sure that you also add the following code inside the application > element:
Step 4: Test your game
To ensure that Google Play games services are functioning correctly in your game, test the application before you publish it on Google Play.
To run your game on your physical test device:
- Verify that you have set up the test account that you are using to log in to the app (as described in Step 2).
- Export an APK and sign it with the same certificate that you used to set up the project in Google Play Console. To export a signed APK in Android Studio, click Build >Generate Signed APK.
- Install the signed APK on your physical test device by using the adb tool. To learn how to install an application, see Running on a Device.
Warning: When you run the application directly from Android Studio, Android Studio will sign the application with your debug certificate by default. If you did not use this debug certificate when setting up the application in Google Play Console, this will cause errors. Make sure to run an APK that you exported and signed with a certificate that matches one of the certificates you used during the application setup in Google Play Console.
Except as otherwise noted, the content of this page is licensed under the Creative Commons Attribution 4.0 License, and code samples are licensed under the Apache 2.0 License. For details, see the Google Developers Site Policies. Java is a registered trademark of Oracle and/or its affiliates.
Источник


