- Get Started
- Before you begin
- App prerequisites
- Set up your app in your AdMob account
- Configure your app
- Initialize the Google Mobile Ads SDK
- Example MainActivity (excerpt)
- Kotlin
- Select an ad format
- Banner
- Interstitial
- Native
- Rewarded
- Additional resources
- Google android example apps
- About
- Google android example apps
- Guide to app architecture
- Mobile app user experiences
- Common architectural principles
- Separation of concerns
- Drive UI from a model
- Recommended app architecture
- Overview
- Build the user interface
- Fetch data
- Manage dependencies between components
- Connect ViewModel and the repository
- Cache data
- Persist data
- Single source of truth
- Show in-progress operations
- Test each component
- Best practices
- Addendum: exposing network status
Get Started
Integrating the Google Mobile Ads SDK into an app is the first step toward displaying ads and earning revenue. Once you’ve integrated the SDK, you can choose an ad format (such as native or rewarded video) and follow the steps to implement it.
Before you begin
To prepare your app, complete the steps in the following sections.
App prerequisites
- Use Android Studio 3.2 or higher
Make sure that your app’s build file uses the following values:
- A minSdkVersion of 16 or higher
- A compileSdkVersion of 28 or higher
Set up your app in your AdMob account
Register your app as an AdMob app by completing the following steps:
Register your app with AdMob. This step creates an AdMob app with a unique AdMob App ID that is needed later in this guide.
Configure your app
In your project-level build.gradle file, include Google’s Maven repository and Maven central repository in both your buildscript and allprojects sections:
Add the dependencies for the Google Mobile Ads SDK to your module’s app-level Gradle file, normally app/build.gradle :
Add your AdMob app ID (identified in the AdMob UI) to your app’s AndroidManifest.xml file. To do so, add a tag with android:name=»com.google.android.gms.ads.APPLICATION_ID» . You can find your app ID in the AdMob UI. For android:value , insert your own AdMob app ID, surrounded by quotation marks.
In a real app, use your actual AdMob app ID, not the one listed above. If you’re just looking to experiment with the SDK in a Hello World app, you can use the sample app ID shown above.
Note also that failure to add the tag as shown above results in a crash with the message:
(Optional) Declare AD_ID permission for previous versions to work with Android S.
If your app uses the Google Mobile Ads SDK version 20.4.0 or higher, you can skip this step since the SDK automatically declares the com.google.android.gms.permission.AD_ID permission and is able to access the Advertising ID whenever it’s available.
For apps that use the Google Mobile Ads SDK version 20.3.0 or lower and are targeting Android S, you must add the com.google.android.gms.permission.AD_ID permission in the AndroidManifest.xml file in order to target Android S:
To learn more about the com.google.android.gms.permission.AD_ID permission declaration, including how to disable it, please refer to this Play Console article.
Initialize the Google Mobile Ads SDK
Before loading ads, have your app initialize the Google Mobile Ads SDK by calling MobileAds.initialize() which initializes the SDK and calls back a completion listener once initialization is complete (or after a 30-second timeout). This needs to be done only once, ideally at app launch.
Ads may be preloaded by the Google Mobile Ads SDK or mediation partner SDKs upon calling MobileAds.initialize() . If you need to obtain consent from users in the European Economic Area (EEA), set any request-specific flags (such as tagForChildDirectedTreatment or tag_for_under_age_of_consent ), or otherwise take action before loading ads, ensure you do so before initializing the Google Mobile Ads SDK.
Here’s an example of how to call the initialize() method in an Activity:
Example MainActivity (excerpt)
Kotlin
If you’re using mediation, wait until the completion handler is called before loading ads, as this will ensure that all mediation adapters are initialized.
Select an ad format
The Google Mobile Ads SDK is now imported and you’re ready to implement an ad. AdMob offers a number of different ad formats, so you can choose the one that best fits your app’s user experience.
Banner
Rectangular ads that appear at the top or bottom of the device screen. Banner ads stay on screen while users are interacting with the app, and can refresh automatically after a certain period of time. If you’re new to mobile advertising, they’re a great place to start.
Interstitial

Full-screen ads that cover the interface of an app until closed by the user. They’re best used at natural pauses in the flow of an app’s execution, such as between levels of a game or just after a task is completed.
Native

Customizable ads that match the look and feel of your app. You decide how and where they’re placed, so the layout is more consistent with your app’s design.
Rewarded

Ads that reward users for watching short videos and interacting with playable ads and surveys. Used for monetizing free-to-play apps.
Additional resources
The Google Mobile Ads repository on GitHub demonstrates how to use the different ad formats that this API offers.
Except as otherwise noted, the content of this page is licensed under the Creative Commons Attribution 4.0 License, and code samples are licensed under the Apache 2.0 License. For details, see the Google Developers Site Policies. Java is a registered trademark of Oracle and/or its affiliates.
Источник
Google android example apps
Android Architecture Blueprints v2
Android Architecture Blueprints is a project to showcase different architectural approaches to developing Android apps. In its different branches you’ll find the same app (a TODO app) implemented with small differences.
In this branch you’ll find:
- Kotlin Coroutines for background operations.
- A single-activity architecture, using the Navigation component to manage fragment operations.
- A presentation layer that contains a fragment (View) and a ViewModel per screen (or feature).
- Reactive UIs using LiveData observables and Data Binding.
- A data layer with a repository and two data sources (local using Room and remote) that are queried with one-shot operations (no listeners or data streams).
- Two product flavors, mock and prod , to ease development and testing (except in the Dagger branch).
- A collection of unit, integration and e2e tests, including «shared» tests that can be run on emulator/device or Robolectric.
This project hosts each sample app in separate repository branches. For more information, see the README.md file in each branch.
Stable samples — Kotlin
| Sample | Description |
|---|---|
| master | The base for the rest of the branches. Uses Kotlin, Architecture Components, coroutines, Data Binding, etc. and uses Room as source of truth, with a reactive UI. |
| dagger-android [compare] | A simple Dagger setup that uses dagger-android and removes the two flavors. |
| usecases [compare] | Adds a new domain layer that uses UseCases for business logic. |
Old samples — Kotlin and Java
Blueprints v1 had a collection of samples that are not maintained anymore, but can still be useful. See all project branches.
The app in this project aims to be simple enough that you can understand it quickly, but complex enough to showcase difficult design decisions and testing scenarios. For more information, see the app’s specification.
- A UI/Material Design sample. The interface of the app is deliberately kept simple to focus on architecture. Check out Plaid instead.
- A complete Jetpack sample covering all libraries. Check out Android Sunflower or the advanced Github Browser Sample instead.
- A real production app with network access, user authentication, etc. Check out the Google I/O app, Santa Tracker or Tivi for that.
- Intermediate developers and beginners looking for a way to structure their app in a testable and maintainable way.
- Advanced developers looking for quick reference.
Opening a sample in Android Studio
To open one of the samples in Android Studio, begin by checking out one of the sample branches, and then open the root directory in Android Studio. The following series of steps illustrate how to open the usecases sample.
Clone the repository:
This step checks out the master branch. If you want to change to a different sample:
Note: To review a different sample, replace usecases with the name of sample you want to check out.
Finally open the android-architecture/ directory in Android Studio.
About
A collection of samples to discuss and showcase different architectural tools and patterns for Android apps.
Источник
Google android example apps
Google Mobile Ads SDK for Android
![]()
The Google Mobile Ads SDK is the latest generation in Google mobile advertising, featuring refined ad formats and streamlined APIs for access to mobile ad networks and advertising solutions. The SDK enables mobile app developers to maximize their monetization in native mobile apps.
This repository contains open source examples and developer resources for both the Google AdMob and Google Ad Manager components of the Google Mobile Ads SDK.
Google Mobile Ads SDK Developers forum
To report SDK feature requests, bugs, and crashes or to browse SDK-related discussions, please use our Google Mobile Ads SDK Developers forum. The forum provides the latest SDK announcements and updates as well as technical SDK support for our Android developers.
Check out our developers site for documentation on using the Mobile Ads SDK.
- App Open: Java, Kotlin
- Banner: Java, Kotlin
- Interstitial: Java, Kotlin
- Rewarded Interstitial: Java, Kotlin
- Rewarded Video: Java, Kotlin
- Native Advanced: Java, Kotlin
- API Demo: Java, Kotlin — Provides additional examples for both AdMob and Ad Manager to help improve your mobile app integration of the Google Mobile Ads SDK.
- Banner RecyclerView: Java — Provides an example for displaying ads from AdMob Banner ads in a RecyclerView widget.
- App Open: Java, Kotlin
- Banner: Java, Kotlin
- Interstitial: Java, Kotlin
- Rewarded Interstitial: Java, Kotlin
- Rewarded Video: Java, Kotlin
- Native Ads: Java, Kotlin
Please check out our releases for the latest downloads of our example apps.
GitHub issue tracker
To file bugs, make feature requests, or suggest improvements for the Android example apps, please use GitHub’s issue tracker.
For SDK support issues, please use the Google Mobile Ads SDK Developers forum.
Источник
Guide to app architecture
This guide encompasses best practices and recommended architecture for building robust, production-quality apps.
This page assumes a basic familiarity with the Android Framework. If you are new to Android app development, check out our Developer guides to get started and learn more about the concepts mentioned in this guide.
If you’re interested in app architecture, and would like to see the material in this guide from a Kotlin programming perspective, check out the Udacity course Developing Android Apps with Kotlin.
Mobile app user experiences
In the majority of cases, desktop apps have a single entry point from a desktop or program launcher, then run as a single, monolithic process. Android apps, on the other hand, have a much more complex structure. A typical Android app contains multiple app components, including activities, fragments, services, content providers, and broadcast receivers.
You declare most of these app components in your app manifest. The Android OS then uses this file to decide how to integrate your app into the device’s overall user experience. Given that a properly-written Android app contains multiple components and that users often interact with multiple apps in a short period of time, apps need to adapt to different kinds of user-driven workflows and tasks.
For example, consider what happens when you share a photo in your favorite social networking app:
- The app triggers a camera intent. The Android OS then launches a camera app to handle the request. At this point, the user has left the social networking app, but their experience is still seamless.
- The camera app might trigger other intents, like launching the file chooser, which may launch yet another app.
- Eventually, the user returns to the social networking app and shares the photo.
At any point during the process, the user could be interrupted by a phone call or notification. After acting upon this interruption, the user expects to be able to return to, and resume, this photo-sharing process. This app-hopping behavior is common on mobile devices, so your app must handle these flows correctly.
Keep in mind that mobile devices are also resource-constrained, so at any time, the operating system might kill some app processes to make room for new ones.
Given the conditions of this environment, it’s possible for your app components to be launched individually and out-of-order, and the operating system or user can destroy them at any time. Because these events aren’t under your control, you shouldn’t store any app data or state in your app components, and your app components shouldn’t depend on each other.
Common architectural principles
If you shouldn’t use app components to store app data and state, how should you design your app?
Separation of concerns
The most important principle to follow is separation of concerns. It’s a common mistake to write all your code in an Activity or a Fragment . These UI-based classes should only contain logic that handles UI and operating system interactions. By keeping these classes as lean as possible, you can avoid many lifecycle-related problems.
Keep in mind that you don’t own implementations of Activity and Fragment ; rather, these are just glue classes that represent the contract between the Android OS and your app. The OS can destroy them at any time based on user interactions or because of system conditions like low memory. To provide a satisfactory user experience and a more manageable app maintenance experience, it’s best to minimize your dependency on them.
Drive UI from a model
Another important principle is that you should drive your UI from a model, preferably a persistent model. Models are components that are responsible for handling the data for an app. They’re independent from the View objects and app components in your app, so they’re unaffected by the app’s lifecycle and the associated concerns.
Persistence is ideal for the following reasons:
- Your users don’t lose data if the Android OS destroys your app to free up resources.
- Your app continues to work in cases when a network connection is flaky or not available.
By basing your app on model classes with the well-defined responsibility of managing the data, your app is more testable and consistent.
Recommended app architecture
In this section, we demonstrate how to structure an app using Architecture Components by working through an end-to-end use case.
Imagine we’re building a UI that shows a user profile. We use a private backend and a REST API to fetch the data for a given profile.
Overview
To start, consider the following diagram, which shows how all the modules should interact with one another after designing the app:
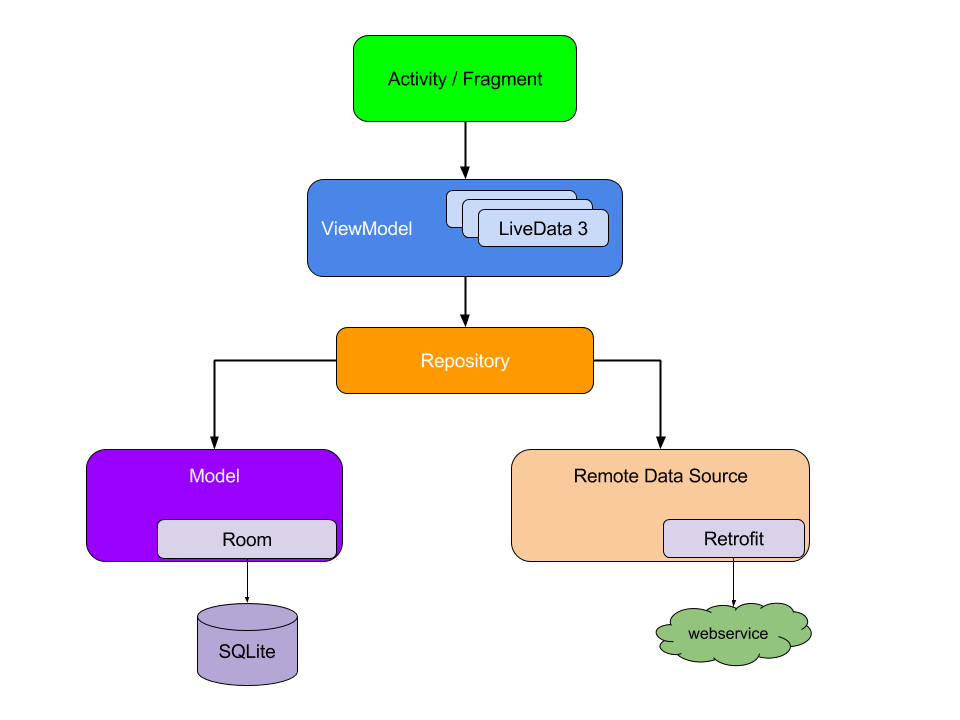
Notice that each component depends only on the component one level below it. For example, activities and fragments depend only on a view model. The repository is the only class that depends on multiple other classes; in this example, the repository depends on a persistent data model and a remote backend data source.
This design creates a consistent and pleasant user experience. Regardless of whether the user comes back to the app several minutes after they’ve last closed it or several days later, they instantly see a user’s information that the app persists locally. If this data is stale, the app’s repository module starts updating the data in the background.
Build the user interface
The UI consists of a fragment, UserProfileFragment , and its corresponding layout file, user_profile_layout.xml .
To drive the UI, our data model needs to hold the following data elements:
- User ID: The identifier for the user. It’s best to pass this information into the fragment using the fragment arguments. If the Android OS destroys our process, this information is preserved, so the ID is available the next time our app is restarted.
- User object: A data class that holds details about the user.
We use a UserProfileViewModel , based on the ViewModel architecture component, to keep this information.
A ViewModel object provides the data for a specific UI component, such as a fragment or activity, and contains data-handling business logic to communicate with the model. For example, the ViewModel can call other components to load the data, and it can forward user requests to modify the data. The ViewModel doesn’t know about UI components, so it isn’t affected by configuration changes, such as recreating an activity when rotating the device.
We’ve now defined the following files:
- user_profile_layout.xml : The UI layout definition for the screen.
- UserProfileFragment : The UI controller that displays the data.
- UserProfileViewModel : The class that prepares the data for viewing in the UserProfileFragment and reacts to user interactions.
The following code snippets show the starting contents for these files. (The layout file is omitted for simplicity.)
Now that we have these code modules, how do we connect them? After all, when the user field is set in the UserProfileViewModel class, we need a way to inform the UI.
To obtain the user , our ViewModel needs to access the Fragment arguments. We can either pass them from the Fragment, or better, using the SavedState module, we can make our ViewModel read the argument directly:
Now we need to inform our Fragment when the user object is obtained. This is where the LiveData architecture component comes in.
LiveData is an observable data holder. Other components in your app can monitor changes to objects using this holder without creating explicit and rigid dependency paths between them. The LiveData component also respects the lifecycle state of your app’s components—such as activities, fragments, and services—and includes cleanup logic to prevent object leaking and excessive memory consumption.
Note: If you’re already using a library like RxJava, you can continue using them instead of LiveData. When you use libraries and approaches like these, however, make sure you handle your app’s lifecycle properly. In particular, make sure to pause your data streams when the related LifecycleOwner is stopped and to destroy these streams when the related LifecycleOwner is destroyed. You can also add the android.arch.lifecycle:reactivestreams artifact to use LiveData with another reactive streams library, such as RxJava2.
To incorporate the LiveData component into our app, we change the field type in the UserProfileViewModel to LiveData . Now, the UserProfileFragment is informed when the data is updated. Furthermore, because this LiveData field is lifecycle aware, it automatically cleans up references after they’re no longer needed.
Now we modify UserProfileFragment to observe the data and update the UI:
Every time the user profile data is updated, the onChanged() callback is invoked, and the UI is refreshed.
If you’re familiar with other libraries where observable callbacks are used, you might have realized that we didn’t override the fragment’s onStop() method to stop observing the data. This step isn’t necessary with LiveData because it’s lifecycle aware, which means it doesn’t invoke the onChanged() callback unless the fragment is in an active state; that is, it has received onStart() but hasn’t yet received onStop() ). LiveData also automatically removes the observer when the fragment’s onDestroy() method is called.
We also didn’t add any logic to handle configuration changes, such as the user rotating the device’s screen. The UserProfileViewModel is automatically restored when the configuration changes, so as soon as the new fragment is created, it receives the same instance of ViewModel , and the callback is invoked immediately using the current data. Given that ViewModel objects are intended to outlast the corresponding View objects that they update, you shouldn’t include direct references to View objects within your implementation of ViewModel . For more information about the lifetime of a ViewModel corresponds to the lifecycle of UI components, see The lifecycle of a ViewModel.
Fetch data
Now that we’ve used LiveData to connect the UserProfileViewModel to the UserProfileFragment , how can we fetch the user profile data?
For this example, we assume that our backend provides a REST API. We use the Retrofit library to access our backend, though you are free to use a different library that serves the same purpose.
Here’s our definition of Webservice that communicates with our backend:
A first idea for implementing the ViewModel might involve directly calling the Webservice to fetch the data and assign this data to our LiveData object. This design works, but by using it, our app becomes more and more difficult to maintain as it grows. It gives too much responsibility to the UserProfileViewModel class, which violates the separation of concerns principle. Additionally, the scope of a ViewModel is tied to an Activity or Fragment lifecycle, which means that the data from the Webservice is lost when the associated UI object’s lifecycle ends. This behavior creates an undesirable user experience.
Instead, our ViewModel delegates the data-fetching process to a new module, a repository.
Repository modules handle data operations. They provide a clean API so that the rest of the app can retrieve this data easily. They know where to get the data from and what API calls to make when data is updated. You can consider repositories to be mediators between different data sources, such as persistent models, web services, and caches.
Our UserRepository class, shown in the following code snippet, uses an instance of WebService to fetch a user’s data:
Even though the repository module looks unnecessary, it serves an important purpose: it abstracts the data sources from the rest of the app. Now, our UserProfileViewModel doesn’t know how the data is fetched, so we can provide the view model with data obtained from several different data-fetching implementations.
Manage dependencies between components
The UserRepository class above needs an instance of Webservice to fetch the user’s data. It could simply create the instance, but to do that, it also needs to know the dependencies of the Webservice class. Additionally, UserRepository is probably not the only class that needs a Webservice . This situation requires us to duplicate code, as each class that needs a reference to Webservice needs to know how to construct it and its dependencies. If each class creates a new WebService , our app could become very resource heavy.
You can use the following design patterns to address this problem:
- Dependency injection (DI): Dependency injection allows classes to define their dependencies without constructing them. At runtime, another class is responsible for providing these dependencies.
- Service locator: The service locator pattern provides a registry where classes can obtain their dependencies instead of constructing them.
These patterns allow you to scale your code because they provide clear patterns for managing dependencies without duplicating code or adding complexity. Furthermore, these patterns allow you to quickly switch between test and production data-fetching implementations.
We recommend following dependency injection patterns and using the Hilt library in Android apps. Hilt automatically constructs objects by walking the dependency tree, provides compile-time guarantees on dependencies, and creates dependency containers for Android framework classes.
Our example app uses Hilt to manage the Webservice object’s dependencies.
Connect ViewModel and the repository
Now, we modify our UserProfileViewModel to use the UserRepository object:
Cache data
The UserRepository implementation abstracts the call to the Webservice object, but because it relies on only one data source, it’s not very flexible.
The key problem with the UserRepository implementation is that after it fetches data from our backend, it doesn’t store that data anywhere. Therefore, if the user leaves the UserProfileFragment , then returns to it, our app must re-fetch the data, even if it hasn’t changed.
This design is suboptimal for the following reasons:
- It wastes valuable network bandwidth.
- It forces the user to wait for the new query to complete.
To address these shortcomings, we add a new data source to our UserRepository , which caches the User objects in memory:
Persist data
Using our current implementation, if the user rotates the device or leaves and immediately returns to the app, the existing UI becomes visible instantly because the repository retrieves data from our in-memory cache.
However, what happens if the user leaves the app and comes back hours later, after the Android OS has killed the process? By relying on our current implementation in this situation, we need to fetch the data again from the network. This refetching process isn’t just a bad user experience; it’s also wasteful because it consumes valuable mobile data.
You could fix this issue by caching the web requests, but that creates a key new problem: What happens if the same user data shows up from another type of request, such as fetching a list of friends? The app would show inconsistent data, which is confusing at best. For example, our app might show two different versions of the same user’s data if the user made the list-of-friends request and the single-user request at different times. Our app would need to figure out how to merge this inconsistent data.
The proper way to handle this situation is to use a persistent model. This is where the Room persistence library comes to the rescue.
Room is an object-mapping library that provides local data persistence with minimal boilerplate code. At compile time, it validates each query against your data schema, so broken SQL queries result in compile-time errors instead of runtime failures. Room abstracts away some of the underlying implementation details of working with raw SQL tables and queries. It also allows you to observe changes to the database’s data, including collections and join queries, exposing such changes using LiveData objects. It even explicitly defines execution constraints that address common threading issues, such as accessing storage on the main thread.
Note: If your app already uses another persistence solution, such as a SQLite object-relational mapping (ORM), you don’t need to replace your existing solution with Room. However, if you’re writing a new app or refactoring an existing app, we recommend using Room to persist your app’s data. That way, you can take advantage of the library’s abstraction and query validation capabilities.
To use Room, we need to define our local schema. First, we add the @Entity annotation to our User data model class and a @PrimaryKey annotation to the class’s id field. These annotations mark User as a table in our database and id as the table’s primary key:
Then, we create a database class by implementing RoomDatabase for our app:
Notice that UserDatabase is abstract. Room automatically provides an implementation of it. For details, see the Room documentation.
We now need a way to insert user data into the database. For this task, we create a data access object (DAO).
Notice that the load method returns an object of type Flow . Using Flow with Room allows you to get live updates. This means that every time there’s a change in the user table, a new User will be emitted.
With our UserDao class defined, we then reference the DAO from our database class:
Now we can modify our UserRepository to incorporate the Room data source:
Now that getUser returns an object of Flow , you need to update UserProfileViewModel to handle the new return type of Flow :
Notice that even though you changed where the data comes from in UserRepository , you didn’t need to change UserProfileFragment . This small-scoped update demonstrates the flexibility that this app architecture provides. It’s also great for testing, because you can provide a mock instance of UserRepository and test your production UserProfileViewModel at the same time.
If users wait a few days before returning to an app that uses this architecture, it’s likely that they’ll see out-of-date information until the repository can fetch updated information. Depending on your use case, you may not want to show this out-of-date information. Instead, you can display placeholder data, which shows example values and indicates that your app is currently fetching and loading up-to-date information.
Single source of truth
It’s common for different REST API endpoints to return the same data. For example, if our backend has another endpoint that returns a list of friends, the same user object could come from two different API endpoints, maybe even using different levels of granularity. If the UserRepository were to return the response from the Webservice request as-is, without checking for consistency, our UIs could show confusing information because the version and format of data from the repository would depend on the endpoint most recently called.
For this reason, our UserRepository implementation saves web service responses into the database. Changes to the database then trigger callbacks on active LiveData objects. Using this model, the database serves as the single source of truth, and other parts of the app access it using our UserRepository . Regardless of whether you use a disk cache, we recommend that your repository designate a data source as the single source of truth for the rest of your app.
Show in-progress operations
In some use cases, such as pull-to-refresh, it’s important for the UI to show the user that there’s currently a network operation in progress. It’s good practice to separate the UI action from the actual data because the data might be updated for various reasons. For example, if we fetched a list of friends, the same user might be fetched again programmatically, triggering a LiveData update. From the UI’s perspective, the fact that there’s a request in flight is just another data point, similar to any other piece of data in the User object itself.
We can use one of the following strategies to display a consistent data-updating status in the UI, regardless of where the request to update the data came from:
- Change getUser() to return an object of type LiveData . This object would include the status of the network operation.
For an example, see the NetworkBoundResource implementation in the android-architecture-components GitHub project. - Provide another public function in the UserRepository class that can return the refresh status of the User . This option is better if you want to show the network status in your UI only when the data-fetching process originated from an explicit user action, such as pull-to-refresh.
Test each component
In the separation of concerns section, we mentioned that one key benefit of following this principle is testability.
The following list shows how to test each code module from our extended example:
- User interface and interactions: Use an Android UI instrumentation test. The best way to create this test is to use the Espresso library. You can create the fragment and provide it with a mock UserProfileViewModel . Because the fragment communicates only with the UserProfileViewModel , mocking this one class is sufficient to fully test your app’s UI.
- ViewModel: You can test the UserProfileViewModel class using a JUnit test. You only need to mock one class, UserRepository .
- UserRepository: You can test the UserRepository using a JUnit test, as well. You need to mock the Webservice and the UserDao . In these tests, verify the following behavior:
- The repository makes the correct web service calls.
- The repository saves results into the database.
- The repository doesn’t make unnecessary requests if the data is cached and up to date.
- Because both Webservice and UserDao are interfaces, you can mock them or create fake implementations for more complex test cases.
UserDao: Test DAO classes using instrumentation tests. Because these instrumentation tests don’t require any UI components, they run quickly. For each test, create an in-memory database to ensure that the test doesn’t have any side effects, such as changing the database files on disk.
Caution:Room allows specifying the database implementation, so it’s possible to test your DAO by providing the JUnit implementation of SupportSQLiteOpenHelper . This approach isn’t recommended, however, because the SQLite version running on the device might differ from the SQLite version on your development machine.
Webservice: In these tests, avoid making network calls to your backend. It’s important for all tests, especially web-based ones, to be independent from the outside world. Several libraries, including MockWebServer, can help you create a fake local server for these tests.
Testing Artifacts: Architecture Components provides a maven artifact to control its background threads. The androidx.arch.core:core-testing artifact contains the following JUnit rules:
- InstantTaskExecutorRule : Use this rule to instantly execute any background operation on the calling thread.
- CountingTaskExecutorRule : Use this rule to wait on background operations of Architecture Components. You can also associate this rule with Espresso as an idling resource.
Best practices
Programming is a creative field, and building Android apps isn’t an exception. There are many ways to solve a problem, be it communicating data between multiple activities or fragments, retrieving remote data and persisting it locally for offline mode, or any number of other common scenarios that nontrivial apps encounter.
Although the following recommendations aren’t mandatory, it has been our experience that following them makes your code base more robust, testable, and maintainable in the long run:
Avoid designating your app’s entry points—such as activities, services, and broadcast receivers—as sources of data.
Instead, they should only coordinate with other components to retrieve the subset of data that is relevant to that entry point. Each app component is rather short-lived, depending on the user’s interaction with their device and the overall current health of the system.
Create well-defined boundaries of responsibility between various modules of your app.
For example, don’t spread the code that loads data from the network across multiple classes or packages in your code base. Similarly, don’t define multiple unrelated responsibilities—such as data caching and data binding—into the same class.
Expose as little as possible from each module.
Don’t be tempted to create «just that one» shortcut that exposes an internal implementation detail from one module. You might gain a bit of time in the short term, but you then incur technical debt many times over as your codebase evolves.
Consider how to make each module testable in isolation.
For example, having a well-defined API for fetching data from the network makes it easier to test the module that persists that data in a local database. If, instead, you mix the logic from these two modules in one place, or distribute your networking code across your entire code base, it becomes much more difficult—if not impossible—to test.
Focus on the unique core of your app so it stands out from other apps.
Don’t reinvent the wheel by writing the same boilerplate code again and again. Instead, focus your time and energy on what makes your app unique, and let the Android Architecture Components and other recommended libraries handle the repetitive boilerplate.
Persist as much relevant and fresh data as possible.
That way, users can enjoy your app’s functionality even when their device is in offline mode. Remember that not all of your users enjoy constant, high-speed connectivity.
Assign one data source to be the single source of truth.
Whenever your app needs to access this piece of data, it should always originate from this single source of truth.
Addendum: exposing network status
In the recommended app architecture section above, we omitted network error and loading states to keep the code snippets simple.
This section demonstrates how to expose network status using a Resource class that encapsulates both the data and its state.
The following code snippet provides a sample implementation of Resource :
Because it’s common to load data from the network while showing the disk copy of that data, it’s good to create a helper class that you can reuse in multiple places. For this example, we create a class called NetworkBoundResource .
The following diagram shows the decision tree for NetworkBoundResource :
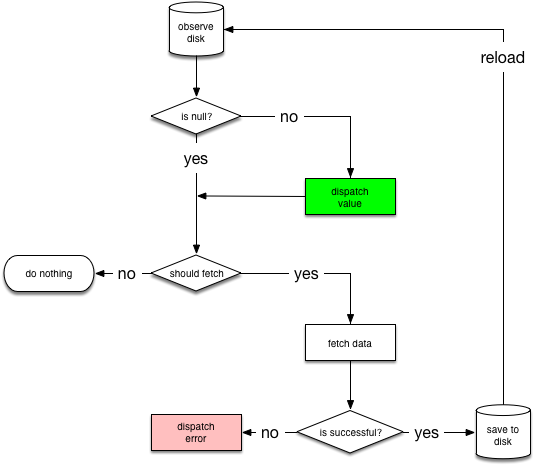
It starts by observing the database for the resource. When the entry is loaded from the database for the first time, NetworkBoundResource checks whether the result is good enough to be dispatched or that it should be re-fetched from the network. Note that both of these situations can happen at the same time, given that you probably want to show cached data while updating it from the network.
If the network call completes successfully, it saves the response into the database and re-initializes the stream. If the network request fails, the NetworkBoundResource dispatches a failure directly.
Note: After saving new data to disk, we re-initialize the stream from the database. We usually don’t need to do that, however, because the database itself happens to dispatch the change.
Keep in mind that relying on the database to dispatch the change involves relying on the associated side effects, which isn’t good because undefined behavior from these side effects could occur if the database ends up not dispatching changes because the data hasn’t changed.
Also, don’t dispatch the result that arrived from the network because that would violate the single source of truth principle. After all, maybe the database includes triggers that change data values during a «save» operation. Similarly, don’t dispatch `SUCCESS` without the new data, because then the client receives the wrong version of the data.
The following code snippet shows the public API provided by NetworkBoundResource class for its subclasses:
Note these important details about the class’s definition:
- It defines two type parameters, ResultType and RequestType , because the data type returned from the API might not match the data type used locally.
- It uses a class called ApiResponse for network requests. ApiResponse is a simple wrapper around the Retrofit2.Call class that converts responses to instances of LiveData .
The full implementation of the NetworkBoundResource class appears as part of the android-architecture-components GitHub project.
After creating the NetworkBoundResource , we can use it to write our disk- and network-bound implementations of User in the UserRepository class:
Content and code samples on this page are subject to the licenses described in the Content License. Java is a registered trademark of Oracle and/or its affiliates.
Источник


