- Get started on Android
- Setup
- Get a Google Account
- Get Google Play services
- Get an OAuth 2.0 client ID
- Create and configure your project
- Add the Google Play services client library
- Kotlin DSL
- Groovy DSL
- Build and test your app
- Get the necessary Android permissions
- Get OAuth permissions
- Create an API client
- Resulting user authorization flow
- Apply for verification
- Get Started
- Before you begin
- App prerequisites
- Set up your app in your AdMob account
- Configure your app
- Initialize the Google Mobile Ads SDK
- Example MainActivity (excerpt)
- Kotlin
- Select an ad format
- Banner
- Interstitial
- Native
- Rewarded
- Additional resources
- Get Started with Play Games Services for Android
- Before you begin
- App prerequisites
- Set up your game in Google Play Console
- Configure your app
- Sample App Guide
- Step 1: Download the sample app
- Step 2: Set up the game in the Google Play Console
- Step 3: Modify your code
- Step 4: Test your game
Get started on Android
This guide explains how to start development with Google Fit on Android.
Setup
Before you start to build your app, complete the steps in the following sections.
Get a Google Account
To use the Google Fit APIs, you need a Google Account. You can create a new account or use an existing account. You might want to create a separate account to test your app from a user’s perspective.
Get Google Play services
Get the latest client library for Google Play services on your development host:
- Open the Android SDK Manager.
- Under SDK Tools, find Google Play services.
- If the status for these packages isn’t Installed, select them both and click Install Packages.
Get an OAuth 2.0 client ID
Create and configure your project
We recommend using the Android Studio development environment to build an app with the Fitness API. For details on how to make a new project and configure it in Android Studio, see Create a project.
Add the Google Play services client library
In Android Studio, open the build.gradle file for your module and add the Google Play services client library as a dependency:
Kotlin DSL
Groovy DSL
This makes sure that Gradle automatically downloads the fitness SDK when it builds your app.
Build and test your app
After you finish the setup steps, you can start to build your app. To get started, learn about the types of data your app can store and read. Learn more about working with data in Google Fit.
Get the necessary Android permissions
Get OAuth permissions
The data types that your app has permission to access correspond to authorization scopes. To ask for these permissions, you need to add which data types your app needs access to in a FitnessOptions instance. When your app asks to use any of the Google Fit data types, the Android SDK automatically checks which scopes they belong to and asks the user for authorization to those scopes.
Create an API client
Create an API client and add the data types that your app needs to access to write or read data. The following endpoints are available:
- SensorsClient : Access different sources of health and wellness data from hardware sensors in the local device and in companion devices.
- RecordingClient : For low-power, always-on background collection of sensor data.
- HistoryClient : Insert, delete, and read historical data in Google Fit.
- SessionsClient : Create and manage Sessions of user activity.
- GoalsClient : Read Heart Point and Steps goals created by users in Google Fit.
- ConfigClient : Access custom data types and settings in the Google Fit platform.
Resulting user authorization flow
The following shows the resulting authorization flow that users experience when they’re asked for permissions:
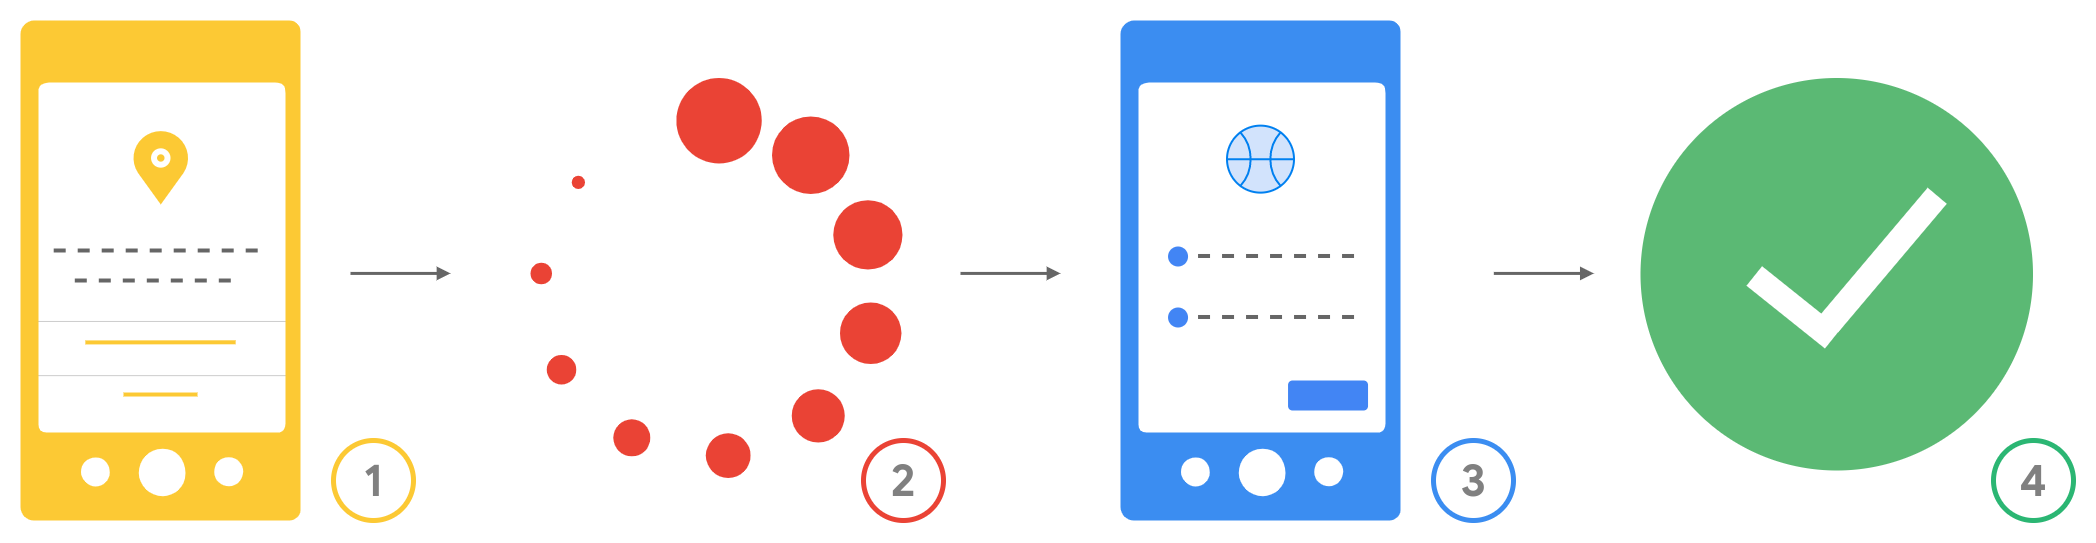 Figure 1.The authorization flow for users.
- Android permissions: Users see what Android permissions your app has requested before downloading it. After your app is downloaded, it requests any runtime permissions that it needs, and users grant or deny these permissions.
- Check and connect: Your app checks whether permissions were granted before it requests access to other data types.
- OAuth scopes request: Google prompts the user to grant your app the OAuth scopes needed for the data types that it wants to access.
- Access applied: After the user grants permissions, your app can access the data types that belong to the scopes that the user has granted permission for.
Apply for verification
After you build and test your app, you need to apply for verification with different levels of justification needed for sensitive and restricted scopes.
Except as otherwise noted, the content of this page is licensed under the Creative Commons Attribution 4.0 License, and code samples are licensed under the Apache 2.0 License. For details, see the Google Developers Site Policies. Java is a registered trademark of Oracle and/or its affiliates.
Источник
Get Started
Integrating the Google Mobile Ads SDK into an app is the first step toward displaying ads and earning revenue. Once you’ve integrated the SDK, you can choose an ad format (such as native or rewarded video) and follow the steps to implement it.
Before you begin
To prepare your app, complete the steps in the following sections.
App prerequisites
- Use Android Studio 3.2 or higher
Make sure that your app’s build file uses the following values:
- A minSdkVersion of 16 or higher
- A compileSdkVersion of 28 or higher
Set up your app in your AdMob account
Register your app as an AdMob app by completing the following steps:
Register your app with AdMob. This step creates an AdMob app with a unique AdMob App ID that is needed later in this guide.
Configure your app
In your project-level build.gradle file, include Google’s Maven repository and Maven central repository in both your buildscript and allprojects sections:
Add the dependencies for the Google Mobile Ads SDK to your module’s app-level Gradle file, normally app/build.gradle :
Add your AdMob app ID (identified in the AdMob UI) to your app’s AndroidManifest.xml file. To do so, add a tag with android:name=»com.google.android.gms.ads.APPLICATION_ID» . You can find your app ID in the AdMob UI. For android:value , insert your own AdMob app ID, surrounded by quotation marks.
In a real app, use your actual AdMob app ID, not the one listed above. If you’re just looking to experiment with the SDK in a Hello World app, you can use the sample app ID shown above.
Note also that failure to add the tag as shown above results in a crash with the message:
(Optional) Declare AD_ID permission for previous versions to work with Android S.
If your app uses the Google Mobile Ads SDK version 20.4.0 or higher, you can skip this step since the SDK automatically declares the com.google.android.gms.permission.AD_ID permission and is able to access the Advertising ID whenever it’s available.
For apps that use the Google Mobile Ads SDK version 20.3.0 or lower and are targeting Android S, you must add the com.google.android.gms.permission.AD_ID permission in the AndroidManifest.xml file in order to target Android S:
To learn more about the com.google.android.gms.permission.AD_ID permission declaration, including how to disable it, please refer to this Play Console article.
Initialize the Google Mobile Ads SDK
Before loading ads, have your app initialize the Google Mobile Ads SDK by calling MobileAds.initialize() which initializes the SDK and calls back a completion listener once initialization is complete (or after a 30-second timeout). This needs to be done only once, ideally at app launch.
Ads may be preloaded by the Google Mobile Ads SDK or mediation partner SDKs upon calling MobileAds.initialize() . If you need to obtain consent from users in the European Economic Area (EEA), set any request-specific flags (such as tagForChildDirectedTreatment or tag_for_under_age_of_consent ), or otherwise take action before loading ads, ensure you do so before initializing the Google Mobile Ads SDK.
Here’s an example of how to call the initialize() method in an Activity:
Example MainActivity (excerpt)
Kotlin
If you’re using mediation, wait until the completion handler is called before loading ads, as this will ensure that all mediation adapters are initialized.
Select an ad format
The Google Mobile Ads SDK is now imported and you’re ready to implement an ad. AdMob offers a number of different ad formats, so you can choose the one that best fits your app’s user experience.
Banner
Rectangular ads that appear at the top or bottom of the device screen. Banner ads stay on screen while users are interacting with the app, and can refresh automatically after a certain period of time. If you’re new to mobile advertising, they’re a great place to start.
Interstitial

Full-screen ads that cover the interface of an app until closed by the user. They’re best used at natural pauses in the flow of an app’s execution, such as between levels of a game or just after a task is completed.
Native

Customizable ads that match the look and feel of your app. You decide how and where they’re placed, so the layout is more consistent with your app’s design.
Rewarded

Ads that reward users for watching short videos and interacting with playable ads and surveys. Used for monetizing free-to-play apps.
Additional resources
The Google Mobile Ads repository on GitHub demonstrates how to use the different ad formats that this API offers.
Except as otherwise noted, the content of this page is licensed under the Creative Commons Attribution 4.0 License, and code samples are licensed under the Apache 2.0 License. For details, see the Google Developers Site Policies. Java is a registered trademark of Oracle and/or its affiliates.
Источник
Get Started with Play Games Services for Android
Welcome to Android game development with the Google Play games services!
The Play Games SDK provides cross-platform Google Play games services that lets you easily integrate popular gaming features such as achievements, leaderboards, and Saved Games in your tablet and mobile games.
This training will guide you to install a sample game application for Android and quickly get started to create your own Android game. The Type-a-Number Challenge sample app demonstrates how you can integrate achievements and leaderboards into your game.
Before you begin
To prepare your app, complete the steps in the following sections.
App prerequisites
Make sure that your app’s build file uses the following values:
- A minSdkVersion of 19 of higher
- A compileSdkVersion of 28 or higher
Set up your game in Google Play Console
The Google Play Console is where you manage Google Play games services for your game, and configure metadata for authorizing and authenticating your game. For more information, see Setting Up Google Play Games Services.
Configure your app
In your project-level build.gradle file, include Google’s Maven repository and Maven central repository in both your buildscript and allprojects sections:
Add the Google Play services dependency for the Play Games SDK to your module’s Gradle build file, which is commonly app/build.gradle :
Sample App Guide
This training will guide you to install a sample game app for Android and quickly get started to create your own Android game. The Type-a-Number Challenge sample app demonstrates how you can integrate achievements and leaderboards into your game.
Step 1: Download the sample app
For this developer guide, you will need to download the Type-a-Number Challenge sample Android application.
To download and set up the sample application in Android Studio:
- Download the Android samples from the samples download page.
- Import the android-basic-samples project. This project includes TypeANumber and other Android game samples. To do this in Android Studio:
- Click File >Import Project.
- Browse to the directory where you downloaded android-basic-samples on your development machine. Select the file android-basic-samples/build.gradle and click OK.
- In the TypeANumber module, open AndroidManifest.xml and change the package name from com.google.example.games.tanc to a different package name of your own. The new package name must not start with com.google , com.example , or com.android .
Step 2: Set up the game in the Google Play Console
The Google Play Console is where you manage Google Play games services for your game, and configure metadata for authorizing and authenticating your game.
To set up the sample game in the Google Play Console:
- Point your web browser to the Google Play Console, and sign in. If you haven’t registered for the Google Play Console before, you will be prompted to do so.
- Follow these instructions to add your game to the Google Play Console.
- When asked if you use Google APIs in your app, select I don’t use any Google APIs in my game yet.
- For the purpose of this developer guide, you can fill up the form with your own game details. For convenience, you can use the placeholder icons and screenshots provided in the Downloads page.
- Follow these instructions to generate an OAuth 2.0 client ID for your Android app.
- When linking your Android app, make sure to specify the exact package name you used previously when renaming the sample package.
- You can use the Generate Signed APK Wizard in Android Studio to generate a new keystore and signed certificate if you don’t have one already. To learn how to run the Generate Signed APK Wizard, see Signing Your App in Android Studio.
- Make sure to record the following information for later:
- Your application ID: This is a string consisting only of digits (typically 12 or more), at the beginning of your client ID.
- Your signing certificate: Note which certificate you used when setting up your API access (the certificate whose SHA1 fingerprint you provided). You should use the same certificate to sign your app when testing or releasing your app.
- Configure achievements for Type-a-Number Challenge:
- Select the Achievements tab in the Google Play Console.
- Add the following sample achievements:
Name Description Special Instructions Prime Get a score that’s a prime number. None Humble Request a score of 0. None Don’t get cocky, kid Request a score of 9999 in either mode. None OMG U R TEH UBER LEET! Receive a score of 1337. Make this a hidden achievement. Bored Play the game 10 times. Make this an an incremental achievement with 10 steps to unlock. Really Really Bored Play the game 100 times. Make this an an incremental achievement with 100 steps to unlock. - Record the IDs (long alphanumeric strings) for each achievement that you created.
- Configure achievements that are appropriate for your game. To learn more, see the concepts behind achievements and how to implement achievements in Android.
- Configure the leaderboards for Type-a-Number Challenge:
- Select the Leaderboards tab in the Google Play Console.
- Add two sample leaderboards: one named “Easy High Scores” and another named “Hard High Scores”. Both leaderboards should use Integer score formatting with 0 decimal places, and an ordering type of Larger is better.
- Record the IDs (long alphanumeric strings) for each leaderboard you created.
- Configure leaderboards that are appropriate for your game. To learn more, see the concepts behind leaderboards and how to implement leaderboards in Android.
- Add test accounts for your game. This step is needed only for apps that have not yet been published in the Google Play Console. Before the app is published, only the test accounts listed in the Google Play Console can log in. However, once an application is published, everyone is allowed to log in.
Warning: If you try to make Play Games SDK calls for an unpublished game by using an account that’s not listed as a test account, the Google Play games services will behave as if the game did not exist and you’ll get back the ConnectionResult.SIGN_IN_REQUIRED return code. If you attempt to launch ConnectionResult.startResolutionForResult() , you’ll get back GamesActivityResultCodes.RESULT_SIGN_IN_FAILED .
Step 3: Modify your code
To run the game, you need to configure the application ID as a resource in your Android project. You will also need to add games metadata in the AndroidManifest.xml .
- Open res/values/ids.xml and replace the placeholder IDs. If you are creating an Android game from scratch, you will need to create this file first.
- Specify your application ID in the app_id resource.
- Specify each achievement ID that you created earlier in the corresponding achievement_* resource.
- Specify each leaderboard ID that you created earlier in the corresponding leaderboard_* resource.
- Open AndroidManifest.xml and enter your package name in the package attribute of the manifest > element. If you are creating an Android game from scratch, make sure that you also add the following code inside the application > element:
Step 4: Test your game
To ensure that Google Play games services are functioning correctly in your game, test the application before you publish it on Google Play.
To run your game on your physical test device:
- Verify that you have set up the test account that you are using to log in to the app (as described in Step 2).
- Export an APK and sign it with the same certificate that you used to set up the project in Google Play Console. To export a signed APK in Android Studio, click Build >Generate Signed APK.
- Install the signed APK on your physical test device by using the adb tool. To learn how to install an application, see Running on a Device.
Warning: When you run the application directly from Android Studio, Android Studio will sign the application with your debug certificate by default. If you did not use this debug certificate when setting up the application in Google Play Console, this will cause errors. Make sure to run an APK that you exported and signed with a certificate that matches one of the certificates you used during the application setup in Google Play Console.
Except as otherwise noted, the content of this page is licensed under the Creative Commons Attribution 4.0 License, and code samples are licensed under the Apache 2.0 License. For details, see the Google Developers Site Policies. Java is a registered trademark of Oracle and/or its affiliates.
Источник


