- Overview of Google Apps Script
- What can Apps Script do?
- Your first script
- Set it up
- New editor
- Legacy editor
- Try it out
- New editor
- Legacy editor
- Learn more
- Tutorials
- Basics and working with Google Sheets
- Integration with other services
- Workflows and end-to-end examples
- Libraries
- Gain access to a library
- New editor
- Legacy editor
- Add a library to your script project
- New editor
- Legacy editor
- Use a library
- New editor
- Legacy editor
- Remove a library
- New editor
- Legacy editor
- Update a library
- New editor
- Legacy editor
- Create and share a library
- New editor
- Legacy editor
- Best practices
- Resource scoping
- Test a library
- New editor
- Legacy editor
- Debug a library
Overview of Google Apps Script
Google Apps Script is a rapid application development platform that makes it fast and easy to create business applications that integrate with Google Workspace. You write code in modern JavaScript and have access to built-in libraries for favorite Google Workspace applications like Gmail, Calendar, Drive, and more. There’s nothing to install—we give you a code editor right in your browser, and your scripts run on Google’s servers.
If you’re new to JavaScript, Codecademy offers a number of JavaScript courses. (Note that these courses weren’t developed by and aren’t associated with Google.)
What can Apps Script do?
Apps Script is versatile. Among other things, you can:
- Add custom menus, dialogs, and sidebars to Google Docs, Sheets, and Forms.
- Write custom functions and macros for Google Sheets.
- Publish web apps — either standalone or embedded in Google Sites.
- Interact with other Google services, including AdSense, Analytics, Calendar, Drive, Gmail, and Maps.
- Build add-ons to extend Google Docs, Sheets, Slides, and Forms, and publish them to the Add-on store.
- Convert an Android app into an Android add-on so that it can exchange data with a user’s Google Doc or Sheet on a mobile device.
- Streamline Google Chat workflows by building a chat bot.
Your first script
Build and run a simple standalone script that creates a Google Doc and emails you a link to it.
Set it up
To build the script, follow the steps below.
New editor
- Sign in to your Google Account.
- To open the script editor, go to script.google.com . If this is the first time you’ve been to script.google.com , click View Dashboard.
- At the top left, click New project.
Delete any code in the script editor and paste in the code below.
At the top, click Save save .
At the top left, click Untitled project.
Enter a name for your script and click Rename.
Legacy editor
- Sign in to your Google Account.
- To open the script editor, go to script.google.com . If this is the first time you’ve been to script.google.com , click View Dashboard.
Delete any code in the script editor and paste in the code below.
Select the menu item File > Save. Name your new script and click OK.
Try it out
To execute the script, follow the steps below.
New editor
- At the top of the editor, click Run.
- In the first dialog box that appears, click Review permissions. In the second dialog box, review the permissions your script uses and click Allow.
- When the script execution completes, check your Gmail inbox for the new email.
- Open the email and click the link to open the Google Doc you created.
Legacy editor
- To execute the script, either click run ▶ or select the menu item Run >createAndSendDocument.
- A dialog box will appear and tell you that the script requires authorization. Click Continue. A second dialog box will then request authorization for specific Google services. Read the notice carefully, then click Allow.
- A yellow bar at the top of the script editor will indicate when the script is running. When the yellow bar disappears, the script has finished.
- Check your Gmail inbox for the new email, then click the link to open the Google Doc you created.
- Open your Google Drive. You’ll see that both the script and the document are stored there.
Learn more
To continue learning about Apps Script, take a look at the following resources:
Except as otherwise noted, the content of this page is licensed under the Creative Commons Attribution 4.0 License, and code samples are licensed under the Apache 2.0 License. For details, see the Google Developers Site Policies. Java is a registered trademark of Oracle and/or its affiliates.
Источник
Tutorials
These tutorials are designed to help you start using Google Apps Scripts more quickly. Some of these tutorials focus on the basics, some provide an in-depth analysis of a complex script, while others address specific nuances of the Google Apps Script system itself.
Basics and working with Google Sheets
- Your First Script — This tutorial covers the basics of writing and executing a script, demonstrating how to create a Google Document and send an email.
- Your First Custom Function — This tutorial teaches you how to create custom spreadsheet functions which can be used as part of normal spreadsheet formulas.
- Sending Emails from a Spreadsheet — This tutorial shows how to use spreadsheet data to send emails to different people.
- Removing Duplicate Rows in a Spreadsheet — This tutorial shows how to remove duplicates when manipulating data in Apps Script.
Integration with other services
- Generating Google Slides from images — This tutorial demonstrates how to create slide presentations from a set of images using the Slides Service.
- Populate a Team Vacation Calendar — This sample shows how a domain user can automatically populate a team vacation calendar by scanning the calendars of domain users for specific keywords.
Workflows and end-to-end examples
- Creating a Tournament Bracket — This tutorial shows you how to use the Spreadsheet service to create Tournament Brackets similar to College Basketball’s March Madness. You can use this tutorial to easily create your own brackets.
- Simple Mail Merge — This example shows how to leverage Google Forms and Sheets to deliver personalized emails to users.
Except as otherwise noted, the content of this page is licensed under the Creative Commons Attribution 4.0 License, and code samples are licensed under the Apache 2.0 License. For details, see the Google Developers Site Policies. Java is a registered trademark of Oracle and/or its affiliates.
Источник
Libraries
A library is a script project whose functions can be reused in other scripts.
Warning: A script that uses a library doesn’t run as quickly as it would if all the code were contained within a single script project. Although libraries can make development and maintenance more convenient, use them sparingly in projects where speed is critical. Because of this issue, library use should be limited in add-ons.
Gain access to a library
New editor
To include a library in your project you must have at least view-level access to it. If you aren’t the author of the library that you want to include, contact the author and request access.
You need the script ID of the library you want to include. When you have access to the library, you can find the script ID on the Project Settings settings page.
Legacy editor
To include a library in your project you must have at least read-level access to it. If you are not the author of the library that you want to include, you need to contact the author and request them to grant you access.
You also need the project key of the library you are including. If you have access to the library, you can find the project key under File > Project Properties. Otherwise, you need to ask the author of the library to give you the project key.
Add a library to your script project
New editor
- At the left of the Apps Script editor, next to «Libraries,» click Add a library add .
- In the «Script ID» field, paste in the script ID of the library.
- Click Look up. If you encounter an error, make sure that you have at least view-level access to the project that you’re trying to include.
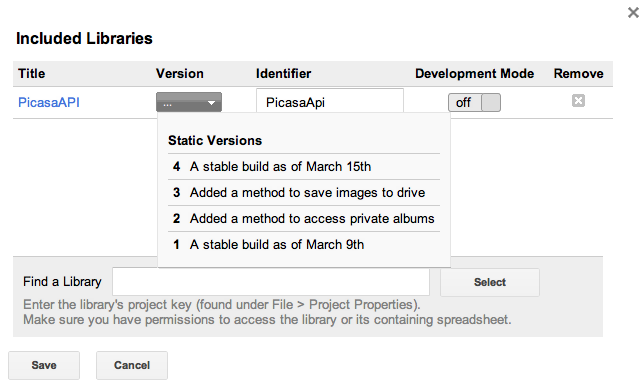
- Click the Version dropdown and select the version of the library to use.
- Check to see if the default «Identifier» name is the one that you want to use with this library. This is the name that your script uses to refer to the library. For example, if you set it to Test then you can call a method of that library as follows: Test.libraryMethod() . If you use an identifier name that matches the name of an already existing service, such as MailApp , or a previously added library, then the library you have added most recently overrides the existing service or library.
- Click Add.
Legacy editor
- Select Resources > Libraries.
- Paste in the project key of the library that you want to use into the Add a Library text box.
- Click Add to add the library to your project. If you encounter an authorization error, make sure that you have at least read-level access to the project that you are trying to include.
- Click on the Version dropdown and select a version of this library that you want to use.

- Check to see if the default Identifier name is the one that you would like to use with this library. This is the name that your script uses to refer to the library. For example, if you set it to Test then you could call a method of that library as follows: Test.libraryMethod() . If you use an identifier name that matches the name of an already existing service, such as MailApp , or a previously added library, then the library you have added most recently overrides the existing service/library.
- Enable Development mode if you want to override the selected version. For more information, see Testing and debugging a library.
- Click Save to save the libraries you have added and close the dialog box.
Use a library
Use your included library as you would use a default service. For example, if Test is the identifier for your library, type Test immediately followed by a period to see the list of methods in the library.
The reference documentation for an included library can be opened by following these steps:
New editor
At the left of the script editor, next to the library name, click More more_vert > Open in a new tab.
Legacy editor
- Select Resources > Libraries
- The name of the library that you have included is a link that opens a new browser tab which contains the reference documentation for this library.
Remove a library
New editor
At the left of the script editor, next to the library name, click More more_vert > Remove > Remove library.
Legacy editor
- Select Resources > Libraries.
- Click on the X button to the right of the library to delete it.
- Click Save for the changes to take effect.
Update a library
You can change the version of the library or update its identifier.
New editor
- At the left of the editor, under «Libraries,» click the name of the library.
- Make your changes and click Save.
Legacy editor
- At the top of the editor, click Resources > Libraries.
- Make your changes and click Save.
Create and share a library
To use and share your script project as a library, follow the below steps.
New editor
- Create a versioned deployment of your script.
- Share at least view-level access with all potential users of the library.
- Give those users the script ID, which can be found on the Project settings settings page.
Legacy editor
- Save a version of the script project.
- Grant at least read-level access to all potential users of the library.
- Give those users the library’s project key, which can be found under File > Project Properties.
Best practices
Here are some guidelines to follow when writing a library:
- Choose a meaningful name for your project since it’s used as the default identifier when your library is included by others.
- If you want one or more methods of your script to not be visible (nor usable) to your library users, you can end the name of the method with an underscore. For example, myPrivateMethod_() .
- Only enumerable global properties are visible to library users. This includes function declarations, variables created outside a function with var , and properties explicitly set on the global object. For example, Object.defineProperty() with enumerable set to false creates a symbol you can use in your library, but this symbol isn’t accessible by your users.
If you want your library users to make use of the script editor autocomplete and the automatically generated documentation, you must have JSDoc-style documentation for all your functions. Here’s an example:
Resource scoping
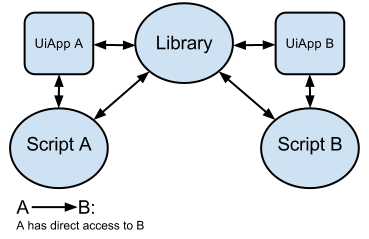
There are two types of resources when you are working with libraries: shared and not-shared. A shared resource means that both the library and the including script have a built-in access to the same instance of the resource. The following diagram illustrates a shared resource using the example of User Properties:
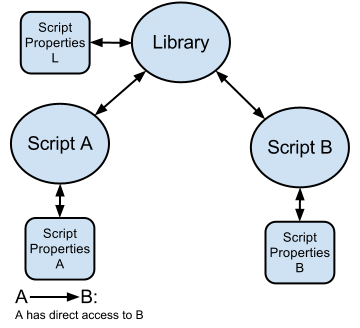
A not-shared resource means that both library and the including script have built-in access only to their instance of the resource. However, a library can provide access to its not-shared resources by having explicit functions that operate on them. Here is an example of a function that you would include in your library to expose its Script Properties:
The following diagram illustrates a not-shared resource using the example of Script Properties:
This table lists the shared and not-shared resources for your reference:
| Resource | Shared* | Not-Shared** | Notes |
|---|---|---|---|
| Lock |  | The same instance is visible to all including scripts when created in the library. | |
| Script Properties | | The same instance is visible to all including scripts when created in the library. | |
| Cache | | The same instance is visible to all including scripts when created in the library. | |
| Triggers | | Simple triggers created in library are not triggered by the including script. | |
| ScriptApp | | ||
| UiApp | | ||
| User Properties | | ||
| Logger and execution transcript | | ||
| Sites, Spreadsheets and other containers | | A call to getActive() returns the container of the including script. | |
| MailApp and GmailApp | | ||
| * This means that the library does not have its own instance of the feature/resource and instead is using the one created by the script that invoked it. ** This means that library has its own instance of the resource/feature and that all scripts that use the library share and have access to that same instance. | |||
Test a library
New editor
To test your library, use the head deployment. Anyone who has editor-level access to the script can use the head deployment.
Legacy editor
When you are writing a library and doing a lot of testing, you should use Development mode. Once the development mode is on, the following becomes true:
- Anyone who has editor-level access to the script has the latest changes made to the files in the library project even if it was not saved as a version.
- Anyone with only the read-level access to the script still uses the selected version regardless of whether the development mode is on or off.
Debug a library
When you use the debugger in a project that includes a library you can step into a function of the included library. The code shows up in the debugger in view-only mode and at the right version.
Except as otherwise noted, the content of this page is licensed under the Creative Commons Attribution 4.0 License, and code samples are licensed under the Apache 2.0 License. For details, see the Google Developers Site Policies. Java is a registered trademark of Oracle and/or its affiliates.
Источник


