- Google first android app
- Google first android app
- Build Your First Android App in Java
- 1. Welcome!
- What you must know already
- What you’ll learn
- Use Android Studio and Java to write Android apps
- Note: This version of the codelab requires Android Studio 3.6 or higher.
- 2. Install Android Studio
- Note: This version of the codelab requires Android Studio 3.6 or higher.
- 3. Task: Create your first project
- What you’ll learn
- Step 1: Create a new project
- Step 2: Get your screen set up
- Step 3: Explore the project structure and layout
- Step 4: Create a virtual device (emulator)
- Step 5: Run your app on your new emulator
Google first android app

Краткое описание:
Google One – это простой тарифный план.
Описание:
Google One – это тарифный план, который позволяет увеличить объем хранилища и получить дополнительные возможности от Google.
С помощью приложения Google One вы можете:
• Управлять тарифным планом и выбирать объем хранилища, предназначенного для Google Диска, Gmail и Google Фото (в этом сервисе место занимают только фотографии и видео, сохраненные в исходном качестве).
• Выполнять автоматическое резервное копирование данных с телефона. В результате все фотографии, контакты, SMS и другой контент будут загружены в облачное хранилище. Их можно быстро восстановить на новом устройстве, если вы потеряете, сломаете или захотите поменять старый телефон.
• Мгновенно обращаться к нашей команде специалистов за помощью, касающейся использования продуктов и сервисов Google.
• Пользоваться преимуществами для подписчиков, например получать бонусы Google Play и скидки на бронирование номеров в гостиницах*.
• Делиться дополнительным пространством для хранения и доступом к специальным предложениям с участниками семейной группы (до 5 человек).
*Преимущества доступны не всем подписчикам Google One и не во всех странах. Они зависят от условий тарифного плана. Есть ограничения.
Требуется Android: 4.2+
Русский интерфейс: Да
Версия: 1.80.345768476 (4 variants) от Google Play Market (gorand39)
Версия: 1.80.342357844 Сообщение №103, автор And_RU
Версия: 1.79.339194938 (2 variants) от Google Play Market (gorand39)
Версия: 1.79.339194938 Сообщение №98, автор And_RU
Версия: 1.78.337948881 (4 variants) от Google Play Market (gorand39)
Версия: 1.77.331246954 обновление от Google Play Market (gorand39)
Версия: 1.76.331227418
обновление от Google Play Market (And_RU)
Версия: 1.76.328242605 обновление от Google Play Market (gorand39)
Версия: 1.75.327556233 Google One (Пост gorand39, Google Play)
Версия: 1.74.327492212 обновление от Google Play Market (gorand39)
Версия: 1.73.324410959 Google One (Пост And_RU, Google Play)
Версия: 1.73.323176089 обновление от Google Play Market (gorand39)
Версия: 1.72.322245822 Сообщение №73, автор And_RU
Версия: 1.71.317855936 Google One (Пост And_RU)
Версия: 1.69.315336844 Сообщение №71, автор And_RU
Версия: 1.68.313309940 обновление от Google Play Market (gorand39)
Версия: 1.67.312209249 обновление от Google Play Market (gorand39)
Версия: 1.63.309504111 обновление от Google Play Market (gorand39)
Версия: 1.64.304725437 обновление от Google Play Market (gorand39)
Версия: 1.63.304700014 обновление от Google Play Market (gorand39)
Версия: 1.61.298840089 Сообщение №65, автор And_RU
Версия: 1.58.292021221 Google One (Пост gorand39)
Версия: 1.55.288553301 Google One (Пост And_RU)
Версия: 1.54.285215801 Google One (Пост And_RU)
Версия: 1.51.278913637 Google One (Пост And_RU)
Версия: 1.49.277603345 Google One (Пост And_RU)
Версия: 1.48.276523843 Сообщение №57, автор And_RU
Версия: 1.44.269753008 Сообщение №55, автор And_RU
Версия: 1.42.265900054 Сообщение №50, автор And_RU
версия: 1.41.265147259 1.41.265147259
версия: 1.40.263230865 Google One (Пост And_RU)
Версия: 1.38.261988490 Сообщение №45, автор And_RU
Версия: 1.36.258624156 Сообщение №44, автор And_RU
Версия: 1.33.254704806 Google One (Пост And_RU)
Версия: 1.32.254302268 Google One (Пост And_RU)
Версия: 1.30.251778593 Google One
Версия: 1.29.251761654 Google One (Пост And_RU)
Версия: 1.27.248451069 из GP (gar_alex)
Версия: 1.26.248450717 Google One (DannyShook™)
Версия: 1.26.247109769 Google One (DannyShook™)
Версия: 1.24.244655944 Google One (Пост And_RU)
Версия: 1.23.243607399 Google One (DannyShook™)
Версия: 1.20.240263894 Google One (Пост And_RU)
Версия: 1.19.239648062 Google One (Пост And_RU)
Версия: 1.18.239640766 Google One (Пост And_RU)
Версия: 1.17.236925145 Google One (Пост And_RU)
Версия: 1.16.236586559 Google One (Пост And_RU)
Версия: 1.15.236427991 Google One (Пост And_RU)
Версия: 1.14.234046987 Google One (Пост gar_alex)
Версия: 1.13.234036116 Google One (Пост gar_alex)
Версия: 1.11.233868022 Google One (Пост gar_alex)
Версия: 1.11.231412796 Google One (Пост And_RU)
Версия: 1.10.229191693 Google One (Пост gar_alex)
Версия: 1.8.223801179 Google One (Пост gar_alex)
Версия: 1.6.220387691 Google One (Пост pokpok) Google One v. 1.0.197473691.apk ( 3.67 МБ )
Сообщение отредактировал iMiKED — 16.11.21, 20:59
Что-то не понял из описания. Допустим, покупаю подписку на 100Гб. Добавляю туда члена семьи. Что будет в итоге? У меня 100Гб и у того члена 100Гб? Ли у нас будут общие 100Гб на двоих и мы должны будем драться сами пытаться распределить это место между собой?
Сообщение отредактировал Alex93 — 25.11.18, 12:49
Источник
Google first android app
Google I/O Android App

Due to global events, Google I/O 2020 was canceled and Google I/O 2021 is an online-only event, so the companion app hasn’t been updated since 2019. However, the iosched team has continued adding several architecture improvements to its codebase. The general look and feel of the app is unchanged, and the app still uses the data from Google I/O 2019.
Major improvements implemented in 2021:
- Migration from LiveData to Kotlin Flows to observe data.
- Support for large screens and other form factors.
- Migration from SharedPreferences to Jetpack DataStore.
- (Experimental) Partial migration to Jetpack Compose (in the compose branch)
Google I/O is a developer conference with several days of deep technical content featuring technical sessions and hundreds of demonstrations from developers showcasing their technologies.
This project is the Android app for the conference.
Running the app
The project contains a staging variant that replaces some modules at compile time so they don’t depend on remote services such as Firebase. This allows you to try out and test the app without the API keys.
The app displays a list of conference events — sessions, office hours, app reviews, codelabs, etc. — and allows the user to filter these events by event types and by topics (Android, Firebase, etc.). Users can see details about events, and they can star events that interest them. Conference attendees can reserve events to guarantee a seat.
Other features include a Map of the venue, informational pages to guide attendees during the conference in Info, and time-relevant information during the conference in Home.

The app is written entirely in Kotlin and uses the Gradle build system.
To build the app, use the gradlew build command or use «Import Project» in Android Studio. Android Studio Arctic Fox or newer is required and may be downloaded here.
The architecture is built around Android Architecture Components and follows the recommendations laid out in the Guide to App Architecture. Logic is kept away from Activities and Fragments and moved to ViewModels. Data is observed using Kotlin Flows and the Data Binding Library binds UI components in layouts to the app’s data sources.
The Repository layer handles data operations. IOSched’s data comes from a few different sources — user data is stored in Cloud Firestore (either remotely or in a local cache for offline use), user preferences and settings are stored in DataStore, conference data is stored remotely and is fetched and stored in memory for the app to use, etc. — and the repository modules are responsible for handling all data operations and abstracting the data sources from the rest of the app.
A lightweight domain layer sits between the data layer and the presentation layer, and handles discrete pieces of business logic off the UI thread. See the .\*UseCase.kt files under shared/domain for examples.
The Navigation component is used to implement navigation in the app, handling Fragment transactions and providing a consistent user experience.
Room is used for Full Text Search using Fts4 to search for a session, speaker, or codelab.
UI tests are written with Espresso and unit tests use Junit4 with Mockito when necessary.
The Jetpack Benchmark library makes it easy to benchmark your code from within Android Studio. The library handles warmup, measures your code performance, and outputs benchmarking results to the Android Studio console. We added a few benchmark tests around critical paths during app startup — in particular, the parsing of the bootstrap data. This enables us to automate measuring and monitoring initial startup time. Here is an example from a benchmark run:
Dependency Injection is implemented with Hilt. For more details on migrating from dagger-android to Hilt, read the (migration article.
ViewPager2 offers enhanced functionality over the original ViewPager library, such as right-to-left and vertical orientation support. For more details on migrating from ViewPager to ViewPager2, please see this migration guide.
The app makes considerable use of the following Firebase components:
- Cloud Firestore is our source for all user data (events starred or reserved by a user). Firestore gave us automatic sync and also seamlessly managed offline functionality for us.
- Firebase Cloud Functions allowed us to run backend code. The reservations feature heavily depended on Cloud Functions working in conjuction with Firestore.
- Firebase Cloud Messaging let us inform the app about changes to conference data on our server.
- Remote Config helped us manage in-app constants.
For 2020, the implementation was migrated to the Firebase Kotlin extension (KTX) libraries to write more idiomatic Kotlin code when calling Firebase APIs. To learn more, read this Firebase blog article on the Firebase KTX libraries.
The app is entirely written in Kotlin and uses Jetpack’s Android Ktx extensions.
Asynchronous tasks are handled with coroutines. Coroutines allow for simple and safe management of one-shot operations as well as building and consuming streams of data using Kotlin Flows.
All build scripts are written with the Kotlin DSL.
Источник
Build Your First Android App in Java
1. Welcome!
In this codelab, you’ll learn how to build and run your first Android app in the Java programming language. (If you’re looking for the Kotlin version of this codelab, you can go here.)
What you must know already
This codelab is written for programmers and assumes that you know either the Java or Kotlin programming language. If you are an experienced programmer and adept at reading code, you will likely be able to follow this codelab, even if you don’t have much experience with Java.
What you’ll learn
- How to use Android Studio to build your app.
- How to run your app on a device or in the emulator.
- How to add interactive buttons.
- How to display a second screen when a button is pressed.
Use Android Studio and Java to write Android apps
You write Android apps in the Java programming language using an IDE called Android Studio. Based on JetBrains’ IntelliJ IDEA software, Android Studio is an IDE designed specifically for Android development.
Note: This version of the codelab requires Android Studio 3.6 or higher.
To work through this codelab, you will need a computer that can run Android Studio 3.6 or higher (or already has Android Studio 3.6 or higher installed).
2. Install Android Studio
Note: This version of the codelab requires Android Studio 3.6 or higher.
You can download Android Studio 3.6 from the Android Studio page.
Android Studio provides a complete IDE, including an advanced code editor and app templates. It also contains tools for development, debugging, testing, and performance that make it faster and easier to develop apps. You can use Android Studio to test your apps with a large range of preconfigured emulators, or on your own mobile device. You can also build production apps and publish apps on the Google Play store.
Note: Android Studio is continually being improved. For the latest information on system requirements and installation instructions, see the Android Studio download page.
Android Studio is available for computers running Windows or Linux, and for Macs running macOS. The OpenJDK (Java Development Kit) is bundled with Android Studio.
The installation is similar for all platforms. Any differences are noted below.
- Navigate to the Android Studio download page and follow the instructions to download and install Android Studio.
- Accept the default configurations for all steps, and ensure that all components are selected for installation.
- After the install is complete, the setup wizard downloads and installs additional components, including the Android SDK. Be patient, because this process might take some time, depending on your internet speed.
- When the installation completes, Android Studio starts, and you are ready to create your first project.
Troubleshooting: If you run into problems with your installation, see the Android Studio release notes or Troubleshoot Android Studio.
3. Task: Create your first project
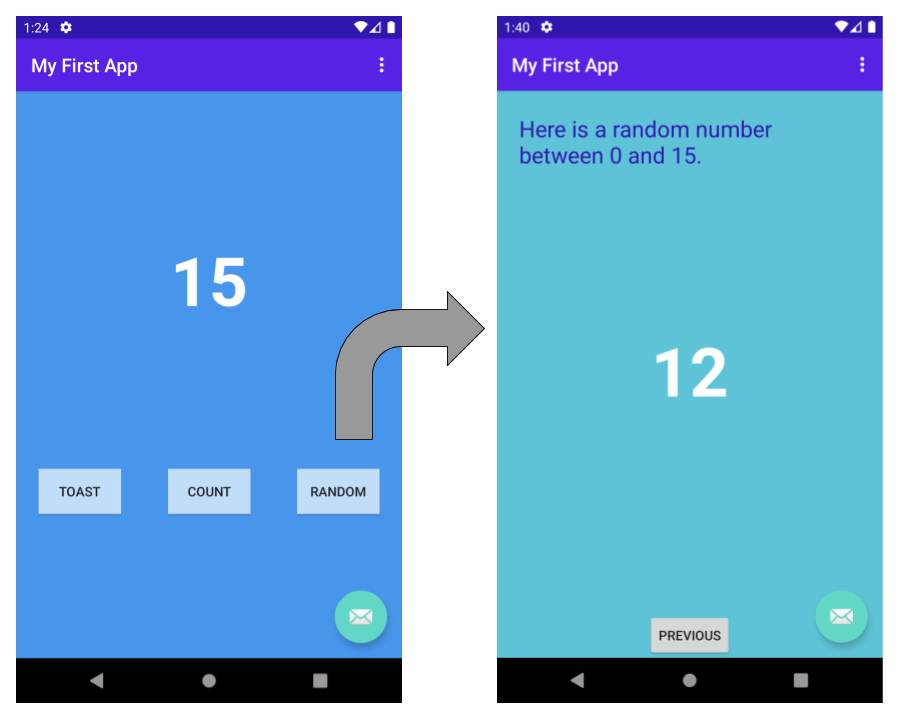
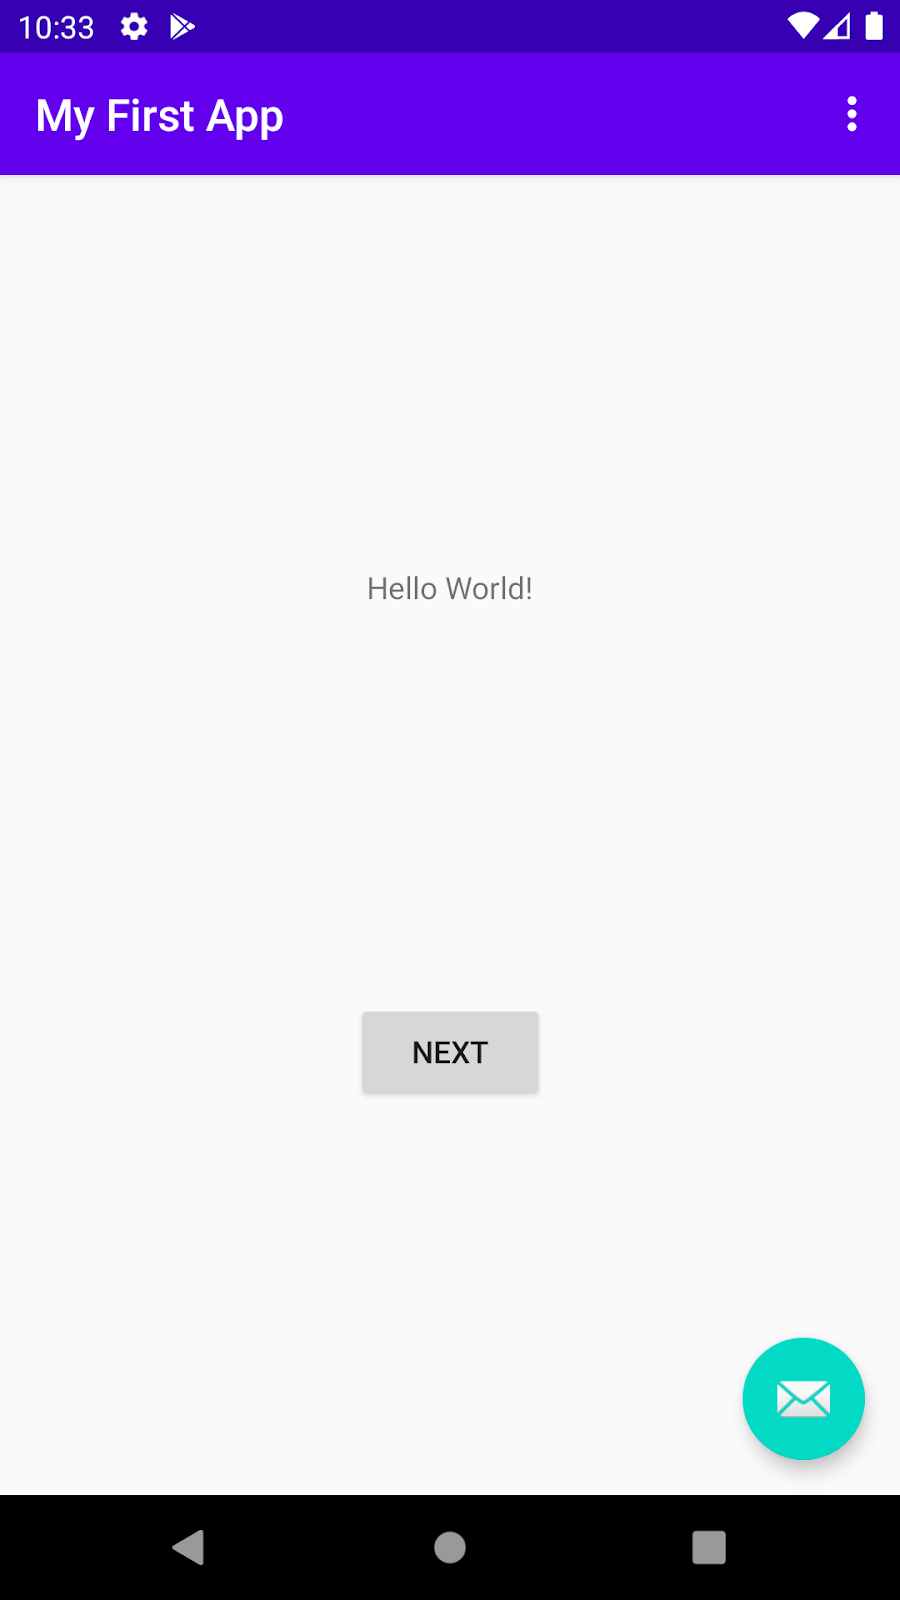
In this step, you will create a new Android project for your first app. This simple app displays the string «Hello World» on the screen of an Android virtual or physical device.
Here’s what the finished app will look like:
What you’ll learn
- How to create a project in Android Studio.
- How to create an emulated Android device.
- How to run your app on the emulator.
- How to run your app on your own physical device, if you have one.
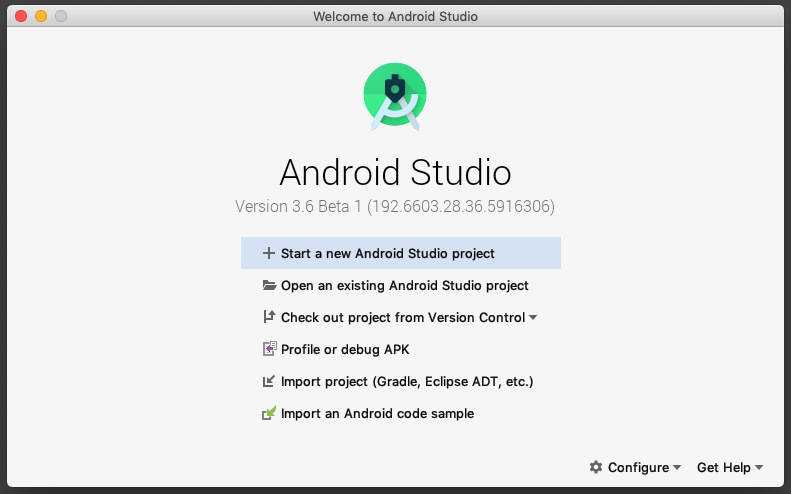
Step 1: Create a new project
- Open Android Studio.
- In the Welcome to Android Studio dialog, click Start a new Android Studio project.

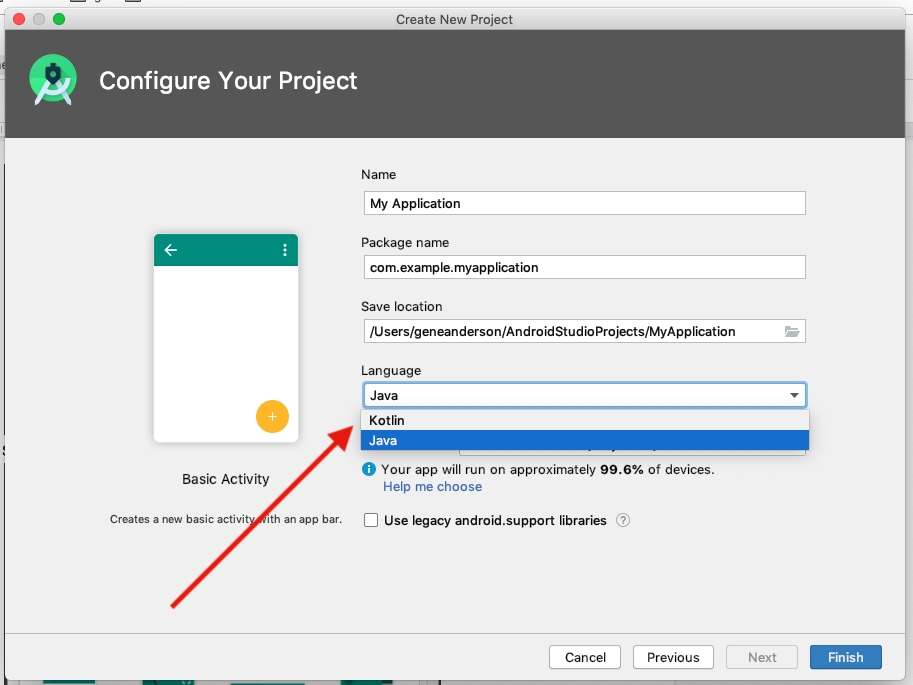
- Select Basic Activity (not the default). Click Next.
- Give your application a name such as My First App.
- Make sure the Language is set to Java.
- Leave the defaults for the other fields.
- Click Finish.

After these steps, Android Studio:
- Creates a folder for your Android Studio project called MyFirstApp. This is usually in a folder called AndroidStudioProjects below your home directory.
- Builds your project (this may take a few moments). Android Studio uses Gradle as its build system. You can follow the build progress at the bottom of the Android Studio window.
- Opens the code editor showing your project.
Step 2: Get your screen set up
When your project first opens in Android Studio, there may be a lot of windows and panes open. To make it easier to get to know Android Studio, here are some suggestions on how to customize the layout.
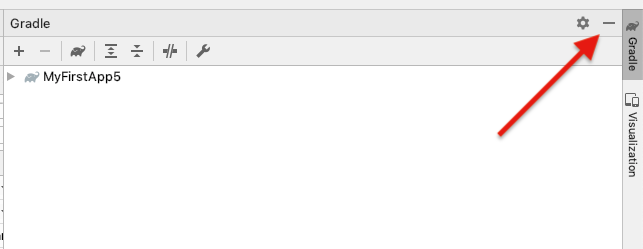
- If there’s a Gradle window open on the right side, click on the minimize button (—) in the upper right corner to hide it.
- Depending on the size of your screen, consider resizing the pane on the left showing the project folders to take up less space.
At this point, your screen should look a bit less cluttered, similar to the screenshot shown below.

Step 3: Explore the project structure and layout
The upper left of the Android Studio window should look similar to the following diagram: 
Based on you selecting the Basic Activity template for your project, Android Studio has set up a number of files for you. You can look at the hierarchy of the files for your app in multiple ways, one is in Project view. Project view shows your files and folders structured in a way that is convenient for working with an Android project. (This does not always match the file hierarchy! To see the file hierarchy, choose the Project files view by clicking (3).)
- Double-click the app (1) folder to expand the hierarchy of app files. (See (1) in the screenshot.)
- If you click Project (2), you can hide or show the Project view. You might need to select View > Tool Windows to see this option.
- The current Project view selection (3) is Project > Android.
In the Project > Android view you see three or four top-level folders below your app folder: manifests, java, java (generated) and res. You may not see java (generated) right away.
- Expand the manifests folder.
This folder contains AndroidManifest.xml . This file describes all the components of your Android app and is read by the Android runtime system when your app is executed. 2. Expand the java folder. All your Java language files are organized here. The java folder contains three subfolders:
com.example.myfirstapp: This folder contains the Java source code files for your app.
com.example.myfirstapp (androidTest): This folder is where you would put your instrumented tests, which are tests that run on an Android device. It starts out with a skeleton test file.
com.example.myfirstapp (test): This folder is where you would put your unit tests. Unit tests don’t need an Android device to run. It starts out with a skeleton unit test file. 3. Expand the res folder. This folder contains all the resources for your app, including images, layout files, strings, icons, and styling. It includes these subfolders:
drawable: All your app’s images will be stored in this folder.
layout: This folder contains the UI layout files for your activities. Currently, your app has one activity that has a layout file called activity_main.xml . It also contains content_main.xml , fragment_first.xml , and fragment_second.xml .
menu: This folder contains XML files describing any menus in your app.
mipmap: This folder contains the launcher icons for your app.
navigation: This folder contains the navigation graph, which tells Android Studio how to navigate between different parts of your application.
values: This folder contains resources, such as strings and colors, used in your app.
Step 4: Create a virtual device (emulator)
In this task, you will use the Android Virtual Device (AVD) manager to create a virtual device (or emulator) that simulates the configuration for a particular type of Android device.
The first step is to create a configuration that describes the virtual device.
- In Android Studio, select Tools >AVD Manager, or click the AVD Manager icon in the toolbar.
- Click +Create Virtual Device. (If you have created a virtual device before, the window shows all of your existing devices and the +Create Virtual Device button is at the bottom.) The Select Hardware window shows a list of pre-configured hardware device definitions.
- Choose a device definition, such as Pixel 2, and click Next. (For this codelab, it really doesn’t matter which device definition you pick).
- In the System Image dialog, from the Recommended tab, choose the latest release. (This does matter.)
- If a Download link is visible next to a latest release, it is not installed yet, and you need to download it first. If necessary, click the link to start the download, and click Next when it’s done. This may take a while depending on your connection speed.

Note: System images can take up a large amount of disk space, so just download what you need.
- In the next dialog box, accept the defaults, and click Finish.
The AVD Manager now shows the virtual device you added.
- If the Your Virtual Devices AVD Manager window is still open, go ahead and close it.
Step 5: Run your app on your new emulator
- In Android Studio, select Run > Run ‘app’ or click the Run icon in the toolbar. The icon will change when your app is already running.
 The icon will change when your app is already running.
If you get a dialog box stating «Instant Run requires that the platform corresponding to your target device (Android N. ) is installed» go ahead and click Install and continue.
- In Run > Select Device, under Available devices, select the virtual device that you just configured. This menu also appears in the toolbar.
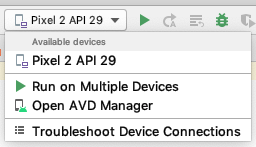
The emulator starts and boots just like a physical device. Depending on the speed of your computer, this may take a while. You can look in the small horizontal status bar at the very bottom of Android Studio for messages to see the progress.
Messages that might appear briefly in the status bar
Gradle build running

Waiting for target device to come on line
Источник


