- Introducing Custom Map Styles for Google Maps
- Why should I use this?
- Setting the map style
- Using the Google Maps Styling Wizard
- JSON Styling
- And that’s all!
- Add a map to your Android app (Kotlin)
- 1. Before You Begin
- Prerequisites
- What you’ll do
- What you’ll need
- 2. Get set up
- Set up Google Maps Platform
- 3. Quick start
- 4. Add Google Maps
- Add your API key
- local.properties
- app-level build.gradle
- project-level build.gradle
- Add Google Maps dependency
- build.gradle
- AndroidManifest.xml
- activity_main.xml
- MainActivity
- 5. Add markers
- Get a reference to GoogleMap
- MainActivity.onCreate()
- Provided class: PlacesReader
- PlacesReader
- Load places
- MainActivity.places
- Place
- Add markers to map
- MainActivity.addMarkers()
- 6. Customize markers
- Adding an info window
- Create marker_info_contents.xml
- marker_info_contents.xml
- Create an implementation of an InfoWindowAdapter
- MarkerInfoWindowAdapter
- Update MainActivity
- MainActivity.onCreate()
- MainActivity.addMarkers()
- Add a custom marker image
- Set custom bitmap on marker
- BitmapHelper
- Using the helper method, declare a new property called bicycleIcon and give it the following definition: MainActivity.bicycleIcon
- MainActivity.addMarkers()
- 7. Cluster markers
- Maps SDK for Android Utility Library
- Update your build.gradle
- build.gradle
- Implement clustering
- Implement the ClusterItem interface
- Place
- Subclass the DefaultClusterRenderer class
- PlaceRenderer
- Create a ClusterManager and add items
- MainActivity.onCreate()
- MainActivity.addClusteredMarkers()
- 8. Draw on the map
- Add click listener
- MainActivity.addClusteredMarkers()
- MainActivity.addCircle()
- 9. Camera Control
- Camera and view
- MainActivity.onCreate()
- Listening to camera changes
- MainActivity.addClusteredMarkers()
- MainActivity.addClusteredMarkers()
- 10. Maps KTX
- build.gradle
- MainActivity.addMarkers(GoogleMap)
- MainActivity.addCircle(GoogleMap)
- MainActivity.onCreate(Bundle)
- 11. Congratulations
- Learn more
Introducing Custom Map Styles for Google Maps


Play services has just received an update to version 9.6.0 and there’s an awesome new addition to it, custom styling for Google Maps 😍 I feel like this has been a long time coming, so I decided to give the documentation a good read to see exactly what we can do with this new feature 🛠
Why should I use this?
Maps can becomes very cluttered for users. All of the roads, rivers, labels, points of interest and more can quickly make it hard to
There are a number of reasons why you may wish to style your maps, such as:
- Hiding Points of Interest to free up space on your map
- Theming the map to match the colour scheme of your app
- Highlighting routes (roads) on the map
- Reducing the complexity of the map by removing landscapes
- Changing the style of the map based on the time of day
- Hide specific map elements that you do not wish to display
The reasons and possibilities are endless, so let’s dive in so you can get started implement this into your app 🙂
Setting the map style
Setting the map style is pretty simple to do within your application. Once you’ve got access to the map instance that you wish to theme, you can simple use the setMapStyle() method to pass in either a JSON string (maybe a value sent from your server or a users preference) or a RAW JSON file from your resources directory. We can then set this like so:
Within this JSON we can declare two main parts of the Google Map component to modify the styling, these are:
- Selectors — These are the geographic components on the map that can be styled, such as roads / parks/ rivers. You can also style the labels which are used for these components.
- Stylers — There are properties which can be used to alter both the colour and/or visibility if elements on the map.
Luckily for us, Google provide a handy tool to create this JSON file 🙌
Using the Google Maps Styling Wizard
Introducing the Google Map Styling Wizard — go check it out, it basically does all of the hard work for us!
We can do a number of things with this tool, such as adjust the density of the roads:
Or the density of landmarks:

or even the density of the labels displayed on the map:

And if that wasn’t enough, we can even change the complete look and feel of the map by choosing one of 6 options 😱
Pretty neat, huh? 😍
So that’s all of the simple styling, there is so much more that we can do with the wizard. If you click the little MORE OPTIONS button you’ll be presented with an advanced menu of options. From this menu we can customise the style for:
- Geometry — Change properties for both the fill and stroke for geometric components within the map.
- Labels — Change properties for the text fill / outline and properties for icons shown on the map.
We can then create styles based on these and apply them selectivily per feature type, such as:
- Everything — Set styles for all of the components shown on the map
- By Administration — Set styles for elements based on the administrative status of the element.
- Landscape — Set styles for elements based on it’s landscape status.
- Points of Interest — Set styles for specific points of interest icons that are displayed on the map.
- Road — Set styles for different types of roads on the map.
Once a feature is selected, you can then select an element type which you want to apply the styling to.
Once we’ve chosen our feature and elements, we can then select the stylers to apply to it. For example, let’s say we want to adjust the stylers for the fill of geometry elements for all features:
We can set stylers such as the colour:

Or maybe we want to change the weight of the element:
Or adjust the saturation for the selected element:
Once we’ve set the fill stylers, we may then also want to set some stylers for the stroke property of geometric elements:
Or if we just wish to change the geometric stylers for Natural Landscapes:

JSON Styling
We can use JSON to create styles for our Google Maps look and feel — it allows us to change the properties of various elements on our maps. This can range from roads to labels to rivers and much more. As previously mentioned, the wizard creates all of the JSON we need for us — but it’s important to understand what this is made up of. So let’s take a look at an example of some generated SON below:
So whats this doing? Well this JSON is telling our map that we want all features to have the colour #F0F0F0, all geometry elements for the road.arterial feature to be hidden and all geometry components for the landscape features to be coloured with #DEDEDE. So what are these styling elements? Well:
- The featureType is an optional property and is used to define which features should have this style applied to them. Features can be components such as road, water, parks — they are geographical characteristics displayed on the map.
- The elementType is the property to be selected for the declared feature. These elements are all children of the declared feature — this includes items such as geometry and labels. Note: If this is not specified then all elements belonging in the feature are selected.
- The stylers are the attributes to be applied to the declared elements and features — these are properties such as the visibility, colour, weight and more.
You can read more about styling here 🙂
And that’s all!
I hope this quick article has given you an insight into how to style your Google Map instances within your app! The wizard is a very powerful tool, just be careful not too get too carried away with the styling! I’d love to see where you’re using this in your apps, so do drop me a tweet should you have anything to share!
Источник
Add a map to your Android app (Kotlin)
1. Before You Begin
This codelab teaches you how to integrate Maps SDK for Android with your app and use its core features by building an app that displays a map of bicycle shops in San Francisco, CA, USA.
Prerequisites
- Basic knowledge of Kotlin and Android development
What you’ll do
- Enable and use the Maps SDK for Android to add Google Maps to an Android app.
- Add, customize, and cluster markers.
- Draw polylines and polygons on the map.
- Control the viewpoint of the camera programmatically.
What you’ll need
- Maps SDK for Android
- A Google Account with billing enabled
- Android Studio 2020.3.1 or higher
- Google Play services installed in Android Studio
- An Android device or an Android emulator that runs the Google APIs platform based on Android 4.2.2 or higher (see Run apps on the Android Emulator for installation steps.)
2. Get set up
For the following enablement step , you need to enable Maps SDK for Android.
Set up Google Maps Platform
If you do not already have a Google Cloud Platform account and a project with billing enabled, please see the Getting Started with Google Maps Platform guide to create a billing account and a project.
- In the Cloud Console, click the project drop-down menu and select the project that you want to use for this codelab.

- Enable the Google Maps Platform APIs and SDKs required for this codelab in the Google Cloud Marketplace. To do so, follow the steps in this video or this documentation.
- Generate an API key in the Credentials page of Cloud Console. You can follow the steps in this video or this documentation. All requests to Google Maps Platform require an API key.
3. Quick start
To get you started as quickly as possible, here’s some starter code to help you follow along with this codelab. You’re welcomed to jump to the solution, but if you want to follow along with all the steps to build it yourself, keep reading.
- Clone the repository if you have git installed.
Alternatively, you can click the following button to download the source code.
Give me the code
- Upon getting the code, go ahead and open the project found inside the starter directory in Android Studio.
4. Add Google Maps
In this section, you will add Google Maps so that it loads when you launch the app.
Add your API key
The API key that you created in an earlier step needs to be provided to the app so that Maps SDK for Android can associate your key with your app.
- To provide this, open the file called local.properties in the root directory of your project (the same level where gradle.properties and settings.gradle are).
- In that file, define a new key GOOGLE_MAPS_API_KEY with its value being the API key that you created.
local.properties
Notice that local.properties is listed in the .gitignore file in the Git repository. This is because your API key is considered sensitive information and should not be checked in to source control, if possible.
- Next, to expose your API so it can be used throughout your app, include the Secrets Gradle Plugin for Android plugin in your app’s build.gradle file located in the app/ directory and add the following line within the plugins block:
app-level build.gradle
You will also need to modify your project-level build.gradle file to include the following classpath:
project-level build.gradle
This plugin will make keys you have defined within your local.properties file available as build variables in the Android manifest file and as variables in the Gradle-generated BuildConfig class at build time. Using this plugin removes the boilerplate code that would otherwise be needed to read properties from local.properties so that it can be accessed throughout your app.
Note: API keys are sensitive credentials that should be carefully protected to avoid abuse. For more information about best practices for securing your API key, read Protecting API keys. For more Gradle tips, see Gradle tips and recipes.
Note: Make sure to update the correct build.gradle file. In your project, there should be two. One project-level build.gradle file and a module-specific one ( app/build.gradle ). The latter is the correct one to use.
Add Google Maps dependency
- Now that your API key can be accessed inside the app, the next step is to add the Maps SDK for Android dependency to your app’s build.gradle file.
In the starter project that comes with this codelab, this dependency has already been added for you.
build.gradle
- Next, add a new meta-data tag in AndroidManifest.xml to pass in the API key that you created in an earlier step. To do so, go ahead and open this file in Android Studio and add the following meta-data tag inside the application object in your AndroidManifest.xml file, located in app/src/main .
AndroidManifest.xml
Note: Notice that the injected build variable matches the same name as the variable you declared in your local.properties file earlier. Normally, you would have to modify your build.gradle file to inject build variables into your manifest file, but this is all handled by the Secrets Gradle Plugin for Android plugin.
- Next, create a new layout file called activity_main.xml in the app/src/main/res/layout/ directory and define it as follows:
activity_main.xml
This layout has a single FrameLayout containing a SupportMapFragment . This fragment contains the underlying GoogleMaps object that you use in later steps.
- Lastly, update the MainActivity class located in app/src/main/java/com/google/codelabs/buildyourfirstmap by adding the following code to override the onCreate method so you can set its contents with the new layout you just created.
MainActivity
- Now go ahead and run the app. You should now see the map load on your device’s screen.
5. Add markers
In this task, you add markers to the map that represent points of interest that you want to highlight on the map. First, you retrieve a list of places that have been provided in the starter project for you, then add those places to the map. In this example, these are bicycle shops.
Get a reference to GoogleMap
First, you need to obtain a reference to the GoogleMap object so that you can use its methods. To do that, add the following code in your MainActivity.onCreate() method right after the call to setContentView() :
MainActivity.onCreate()
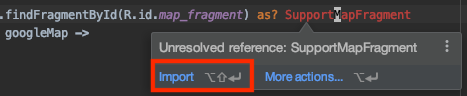
The implementation first finds the SupportMapFragment that you added in the previous step by using the findFragmentById() method on the SupportFragmentManager object. Once a reference has been obtained, the getMapAsync() call is invoked followed by passing in a lambda. This lambda is where the GoogleMap object is passed. Inside this lambda, the addMarkers() method call is invoked, which is defined shortly.
Note: As you copy and paste code from this codelab to your project, expect to see Unresolved reference errors. To fix these, you need to import the class in to your file. You can do this automatically in Android Studio by hovering on the class that displays an error and clicking Import in the helper dialog.
Provided class: PlacesReader
In the starter project, the class PlacesReader has been provided for you. This class reads a list of 49 places that are stored in a JSON file called places.json and returns these as a List
. The places themselves represent a list of bicycle shops around San Francisco, CA, USA.
If you are curious about the implementation of this class, you can access it on GitHub or open the PlacesReader class in Android Studio.
PlacesReader
Load places
To load the list of bicycle shops, add a property in MainActivity called places and define it as follows:
MainActivity.places
Note: This property is declared as lazy so that reading all the places from the file is performed only when needed—right after the GoogleMap object is initialized. For more information about lazy properties, see Lazy.
This code invokes the read() method on a PlacesReader , which returns a List
. A Place has a property called name , the name of the place, and a latLng —the coordinates where the place is located.
Place
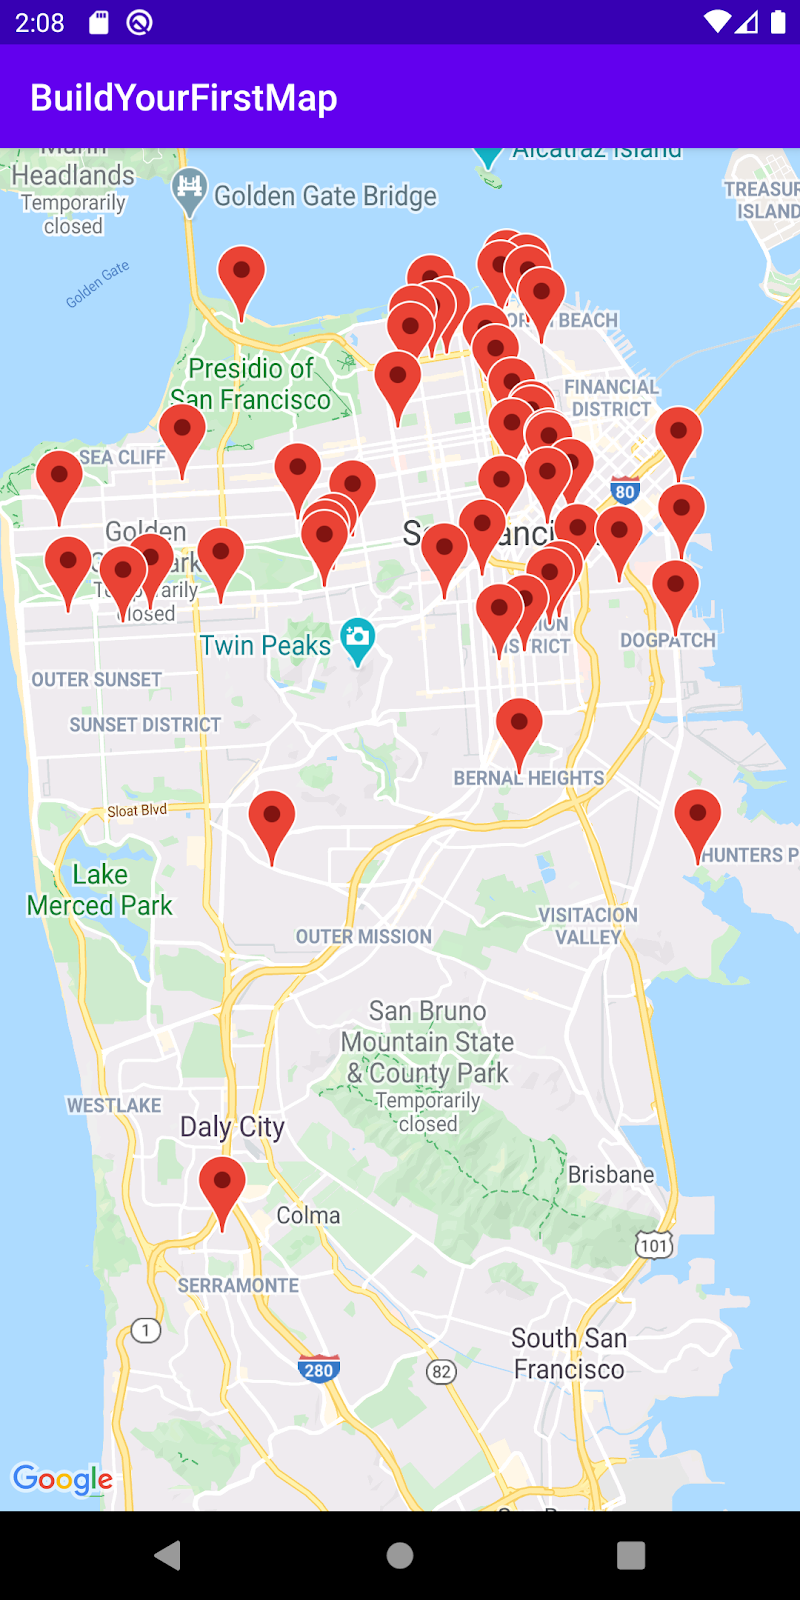
Add markers to map
Now that the list of places have been loaded to memory, the next step is to represent these places on the map.
- Create a method in MainActivity called addMarkers() and define it as follows:
MainActivity.addMarkers()
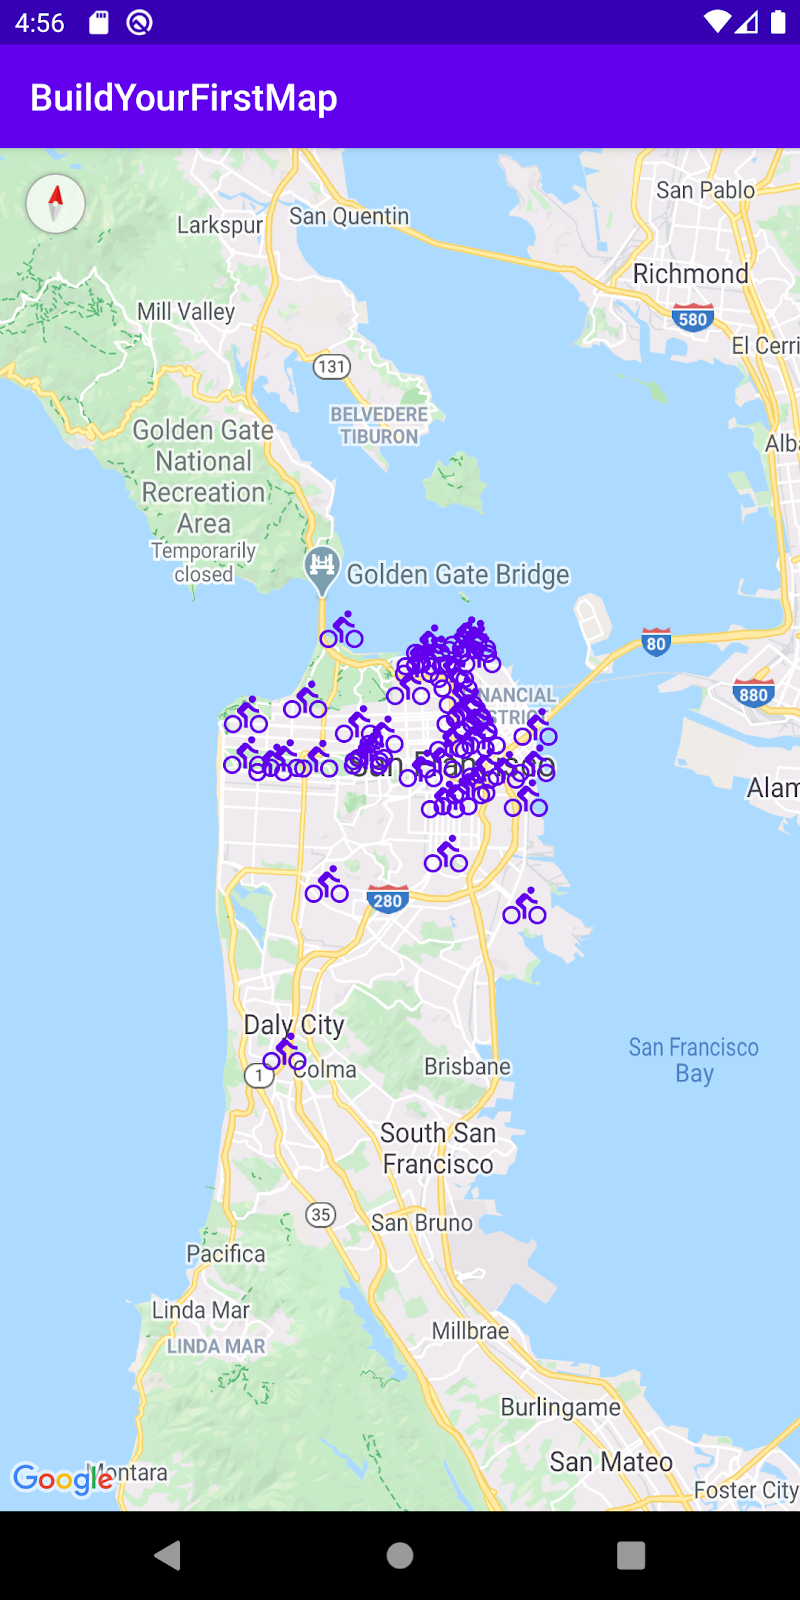
This method iterates through the list of places followed by invoking the addMarker() method on the provided GoogleMap object. The marker is created by instantiating a MarkerOptions object, which allows you to customize the marker itself. In this case, the title and position of the marker is provided, which represents the bicycle shop name and its coordinates, respectively.
- Go ahead and run the app, and head over to San Francisco to see the markers that you just added!
6. Customize markers
There are several customization options for markers you have just added to help them stand out and convey useful information to users. In this task, you’ll explore some of those by customizing the image of each marker as well as the information window displayed when a marker is tapped.
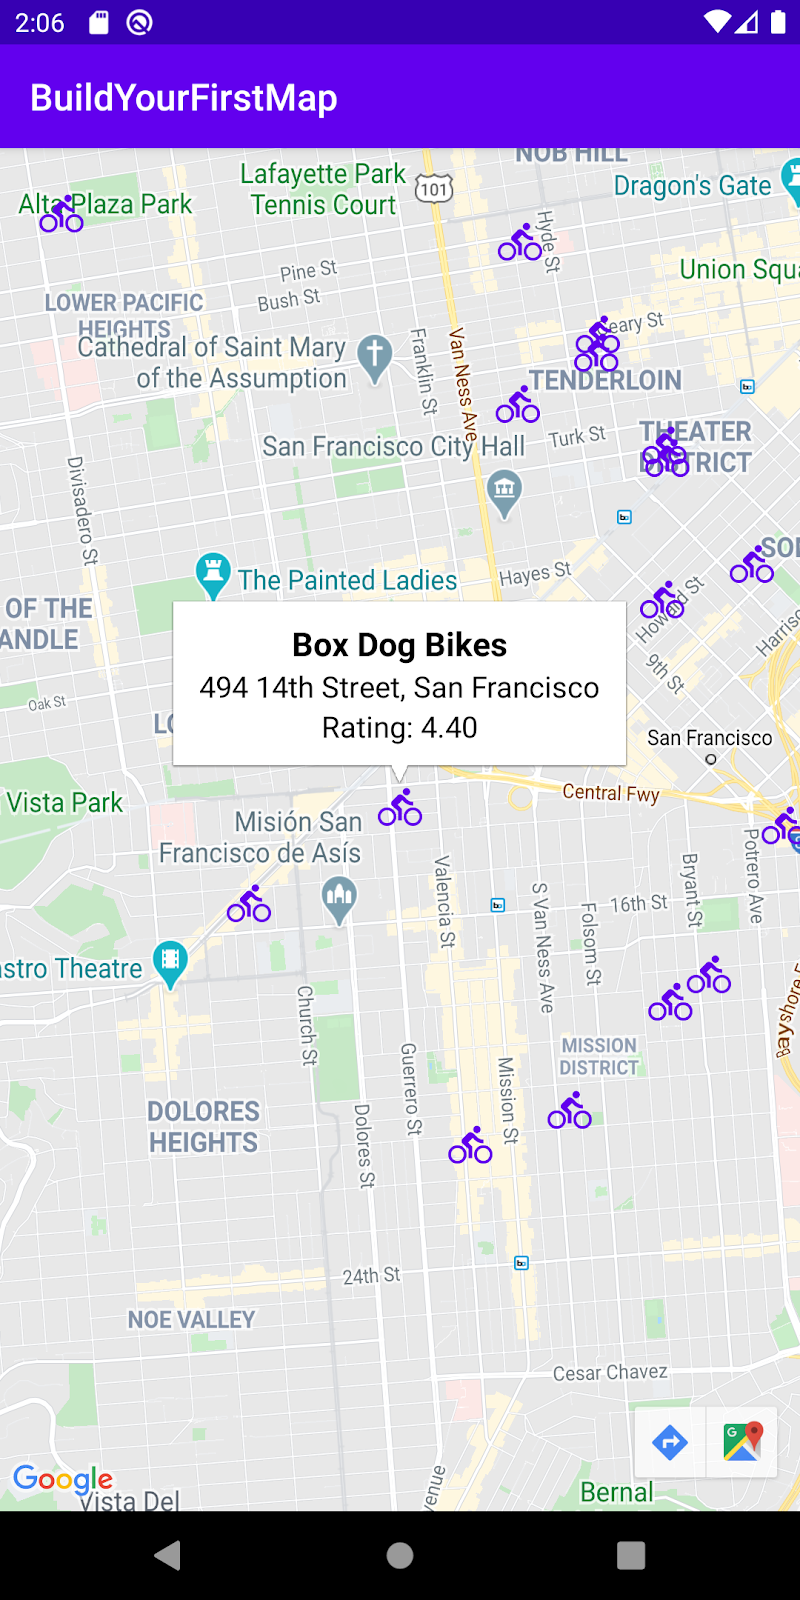
Adding an info window
By default, the info window when you tap on a marker displays its title and snippet (if set). You customize this so that it can display additional information, such as the place’s address and rating.
Create marker_info_contents.xml
First, create a new layout file called marker_info_contents.xml .
- To do so, right click on the app/src/main/res/layout folder in the project view in Android Studio and select New >Layout Resource File.
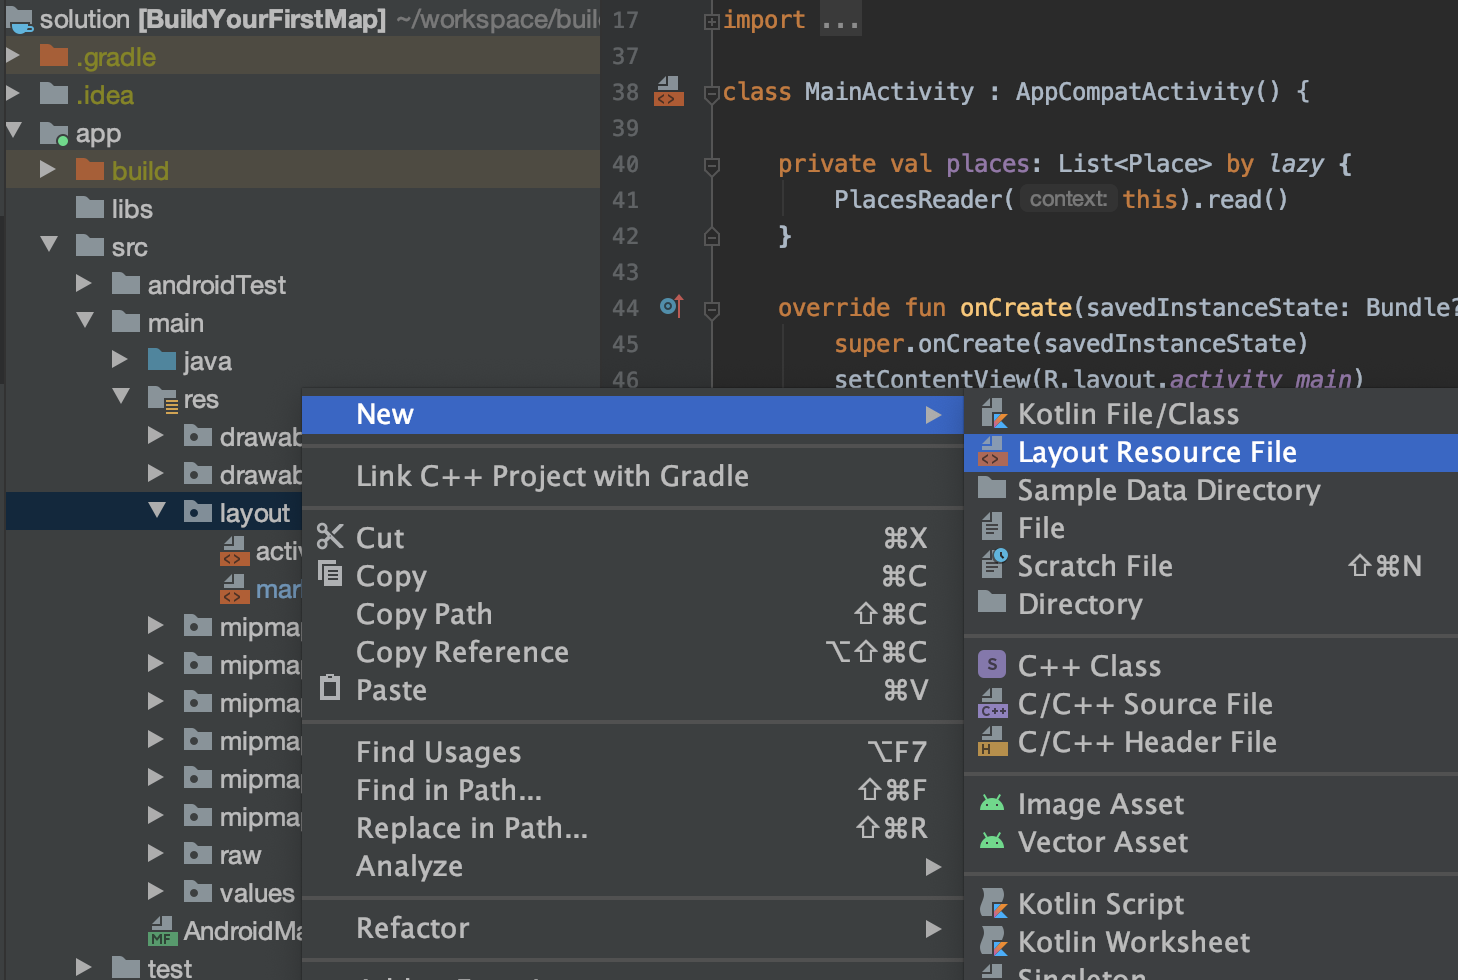
- In the dialog, type marker_info_contents in the File name field and LinearLayout in the Root element field, then click OK.
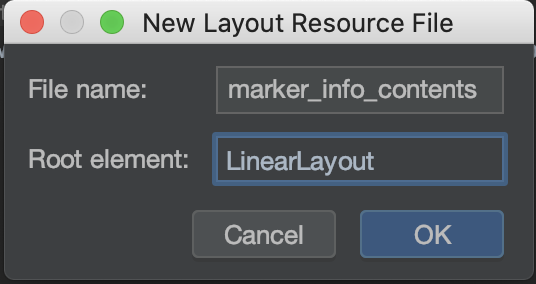
This layout file is later inflated to represent the contents within the info window.
- Copy the contents in the following code snippet, which adds three TextViews within a vertical LinearLayout view group, and overwrite the default code in the file.
marker_info_contents.xml
Create an implementation of an InfoWindowAdapter
After creating the layout file for the custom info window, the next step is to implement the GoogleMap.InfoWindowAdapter interface. This interface contains two methods, getInfoWindow() and getInfoContents() . Both methods return an optional View object wherein the former is used to customize the window itself, while the latter is to customize its contents. In your case, you implement both and customize the return of getInfoContents() while returning null in getInfoWindow() , which indicates that the default window should be used.
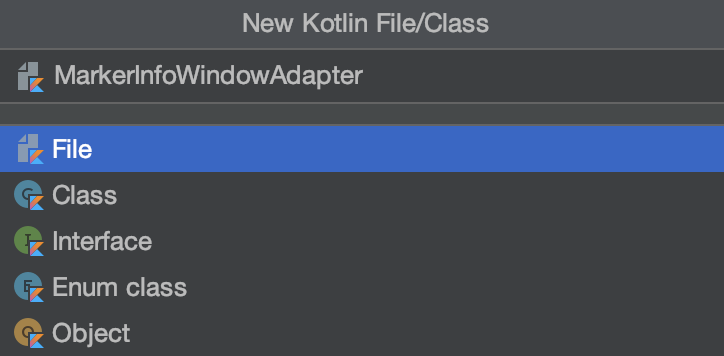
- Create a new Kotlin file called MarkerInfoWindowAdapter in the same package as MainActivity by right-clicking the app/src/main/java/com/google/codelabs/buildyourfirstmap folder in the project view in Android Studio, then select New >Kotlin File/Class.
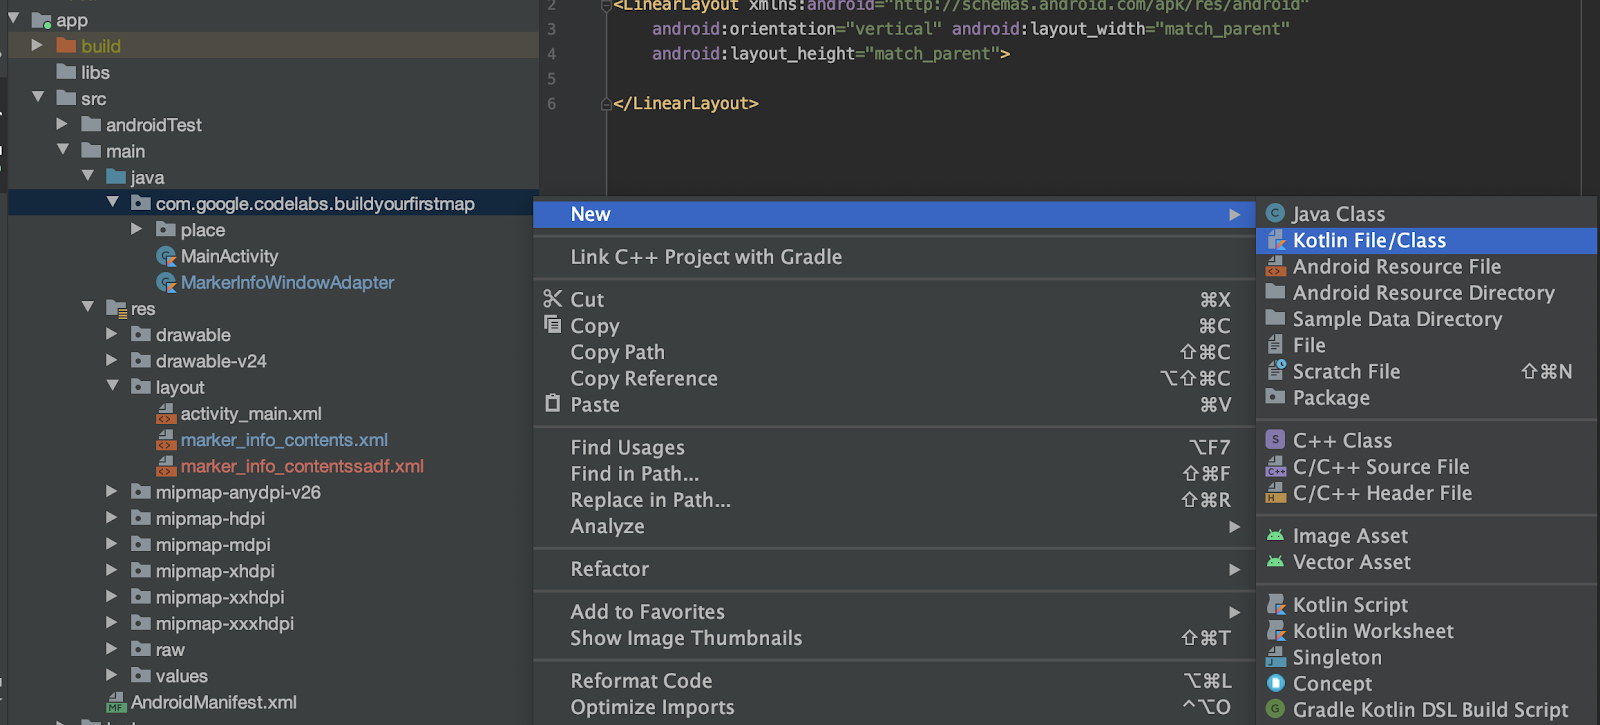
- In the dialog, type MarkerInfoWindowAdapter and keep File highlighted.
- Once you have the file created, copy the contents in the following code snippet in to your new file.
MarkerInfoWindowAdapter
In the contents of the getInfoContents() method, the provided Marker in the method is casted to a Place type, and if casting is not possible, the method returns null (you haven’t set the tag property on the Marker yet, but you do that in the next step).
Next, the layout marker_info_contents.xml is inflated followed by setting the text on containing TextViews to the Place tag.
Update MainActivity
To glue all the components you have created so far, you need to add two lines in your MainActivity class.
First, to pass the custom InfoWindowAdapter , MarkerInfoWindowAdapter , inside the getMapAsync method call, invoke the setInfoWindowAdapter() method on the GoogleMap object and create a new instance of MarkerInfoWindowAdapter .
- Do this by adding the following code after the addMarkers() method call inside the getMapAsync() lambda.
MainActivity.onCreate()
Lastly, you’ll need to set each Place as the tag property on every Marker that’s added to the map.
- To do that, modify the places.forEach<> call in the addMarkers() function with the following:
MainActivity.addMarkers()
Add a custom marker image
Customizing the marker image is one of the fun ways to communicate the type of place the marker represents on your map. For this step, you display bicycles instead of the default red markers to represent each shop on the map. The starter project includes the bicycle icon ic_directions_bike_black_24dp.xml in app/src/res/drawable , which you use.

Set custom bitmap on marker
With the vector drawable bicycle icon at your disposal, the next step is to set that drawable as each markers’ icon on the map. MarkerOptions has a method icon , which takes in a BitmapDescriptor that you use to accomplish this.
First, you need to convert the vector drawable you just added into a BitmapDescriptor . A file called BitMapHelper included in the starter project contains a helper function called vectorToBitmap() , which does just that.
BitmapHelper
This method takes in a Context , a drawable resource ID, as well as a color integer, and creates a BitmapDescriptor representation of it.
Note: vectorToBitmap was taken from the Maps SDK for Android samples. For more information, see it on GitHub.
Using the helper method, declare a new property called bicycleIcon and give it the following definition: MainActivity.bicycleIcon
This property uses the predefined color colorPrimary in your app, and uses that to tint the bicycle icon and return it as a BitmapDescriptor .
- Using this property, go ahead and invoke the icon method of MarkerOptions in the addMarkers() method to complete your icon customization. Doing this, the marker property should look like this:
MainActivity.addMarkers()
- Run the app to see the updated markers!
Note: For more information about what you can customize on markers, see Markers.
7. Cluster markers
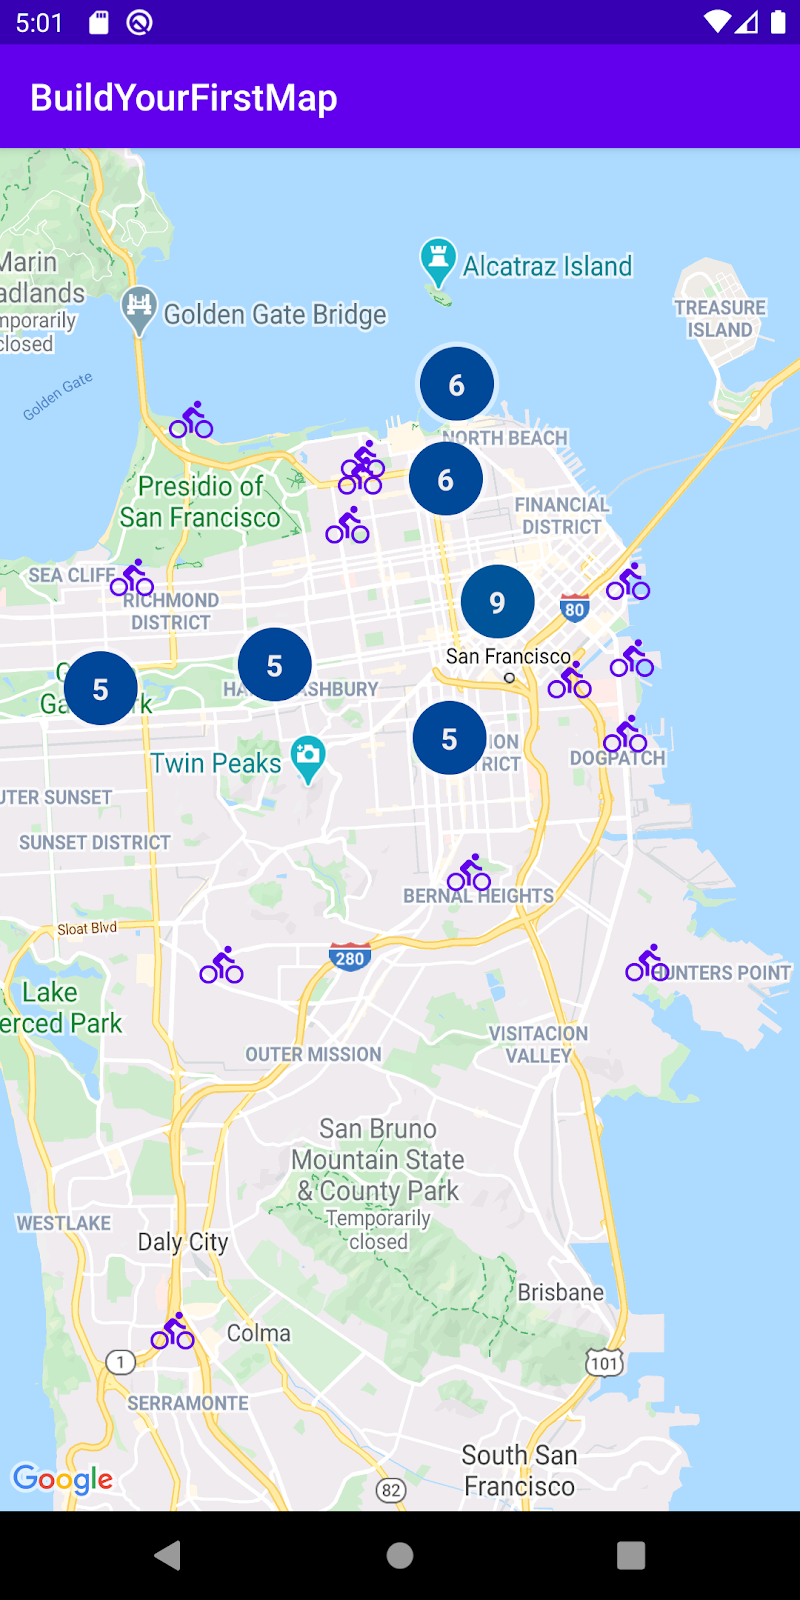
Depending on how far you zoom into the map, you may have noticed that the markers you added overlap. Overlapping markers are very hard to interact with and create a lot of noise, which affects the usability of your app.
To improve the user experience for this, whenever you have a large dataset that is clustered closely, it’s best practice to implement marker clustering. With clustering, as you zoom in and out of the map, markers that are in close proximity are clustered together like this:
To implement this, you need the help of the Maps SDK for Android Utility Library.
Maps SDK for Android Utility Library
The Maps SDK for Android Utility Library was created as a way to extend the functionality of the Maps SDK for Android. It offers advanced features, such as marker clustering, heatmaps, KML and GeoJson support, polyline encoding anddecoding, and a handful of helper functions around spherical geometry.
Note: One of the best parts about the Maps SDK for Android Utility Library is that it is open sourced on GitHub. This library is continually evolving, so if you have any suggestions or ideas, feel free to stop by and contribute!
Update your build.gradle
Because the utility library is packaged separately from Maps SDK for Android, you need to add an additional dependency to your build.gradle file.
- Go ahead and update the dependencies section of your app/build.gradle file.
build.gradle
- Upon adding this line, you have to perform a project sync to fetch the new dependencies.

Implement clustering
To implement clustering on your app, follow these three steps:
- Implement the ClusterItem interface.
- Subclass the DefaultClusterRenderer class.
- Create a ClusterManager and add items.
Implement the ClusterItem interface
All objects that represent a clusterable marker on the map need to implement the ClusterItem interface. In your case, that means that the Place model needs to conform to ClusterItem . Go ahead and open the Place.kt file and make the following modifications to it:
Place
The ClusterItem defines these three methods:
- getPosition() , which represents the place’s LatLng .
- getTitle() , which represents the place’s name
- getSnippet() , which represents the place’s address.
Subclass the DefaultClusterRenderer class
The class in charge of implementing clustering, ClusterManager , internally uses a ClusterRenderer class to handle creating the clusters as you pan and zoom around the map. By default, it comes with the default renderer, DefaultClusterRenderer , which implements ClusterRenderer . For simple cases, this should suffice. In your case, however, because markers need to be customized, you need to extend this class and add the customizations in there.
Go ahead and create the Kotlin file PlaceRenderer.kt in the package com.google.codelabs.buildyourfirstmap.place and define it as follows:
PlaceRenderer
This class overrides these two functions:
- onBeforeClusterItemRendered() , which is called before the cluster is rendered on the map. Here, you can provide customizations through MarkerOptions —in this case, it sets the marker’s title, position, and icon.
- onClusterItemRenderer() , which is called right after the marker is rendered on the map. This is where you can access the created Marker object—in this case, it sets the marker’s tag property.
Create a ClusterManager and add items
Lastly, to get clustering working, you need to modify MainActivity to instantiate a ClusterManager and provide the necessary dependencies to it. ClusterManager handles adding the markers (the ClusterItem objects) internally, so instead of adding markers directly on the map, this responsibility is delegated to ClusterManager . Additionally, ClusterManager also calls setInfoWindowAdapter() internally so setting a custom info window will have to be done on ClusterManger ‘s MarkerManager.Collection object.
- To start, modify the contents of the lambda in the getMapAsync() call in MainActivity.onCreate() . Go ahead and comment out the call to addMarkers() and setInfoWindowAdapter() , and instead invoke a method called addClusteredMarkers() , which you define next.
MainActivity.onCreate()
- Next, in MainActivity , define addClusteredMarkers() .
MainActivity.addClusteredMarkers()
This method instantiates a ClusterManager , passes the custom renderer PlacesRenderer to it, adds all the places, and invokes the cluster() method. Also, since ClusterManager uses the setInfoWindowAdapter() method on the map object, setting the custom info window will have to be done on ClusterManager.markerCollection object. Lastly, because you want clustering to change as the user pans and zooms around the map, an OnCameraIdleListener is provided to googleMap , such that when the camera goes idle, clusterManager.onCameraIdle() is invoked.
- Go ahead and run the app to see the new clustered shops!
8. Draw on the map
While you have already explored one way to draw on the map (by adding markers), the Maps SDK for Android supports numerous other ways you can draw to display useful information on the map.
For example, if you wanted to represent routes and areas on the map, you can use polylines and polygons to display these on the map. Or, if you wanted to fix an image to the ground’s surface, you can use ground overlays.
In this task, you learn how to draw shapes, specifically a circle, around a marker whenever it is tapped.

Add click listener
Typically, the way you would add a click listener to a marker is by passing in a click listener directly on the GoogleMap object via setOnMarkerClickListener() . However, because you’re using clustering, the click listener needs to be provided to ClusterManager instead.
- In the addClusteredMarkers() method in MainActivity , go ahead and add the following line right after the invocation to cluster() .
MainActivity.addClusteredMarkers()
This method adds a listener and invokes the method addCircle() , which you define next. Lastly, false is returned from this method to indicate that this method has not consumed this event.
Note: It’s important to return false from setOnClusterItemClickListener() so that your custom info window is still displayed.
- Next, you need to define the property circle and the method addCircle() in MainActivity .
MainActivity.addCircle()
The circle property is set so that whenever a new marker is tapped, the previous circle is removed and a new one is added. Notice that the API for adding a circle is quite similar to adding a marker.
- Go ahead now and run the app to see the changes.
Note: The nomenclature GoogleMap.add is a common way to draw on the map. If you’re curious, you can explore all the different ways you can add functionality to the map by typing in .add on a GoogleMap object in Android Studio. This autocompletes all the different methods supported.
9. Camera Control
As your last task, you look at some camera controls so that you can focus the view around a certain region.
Camera and view
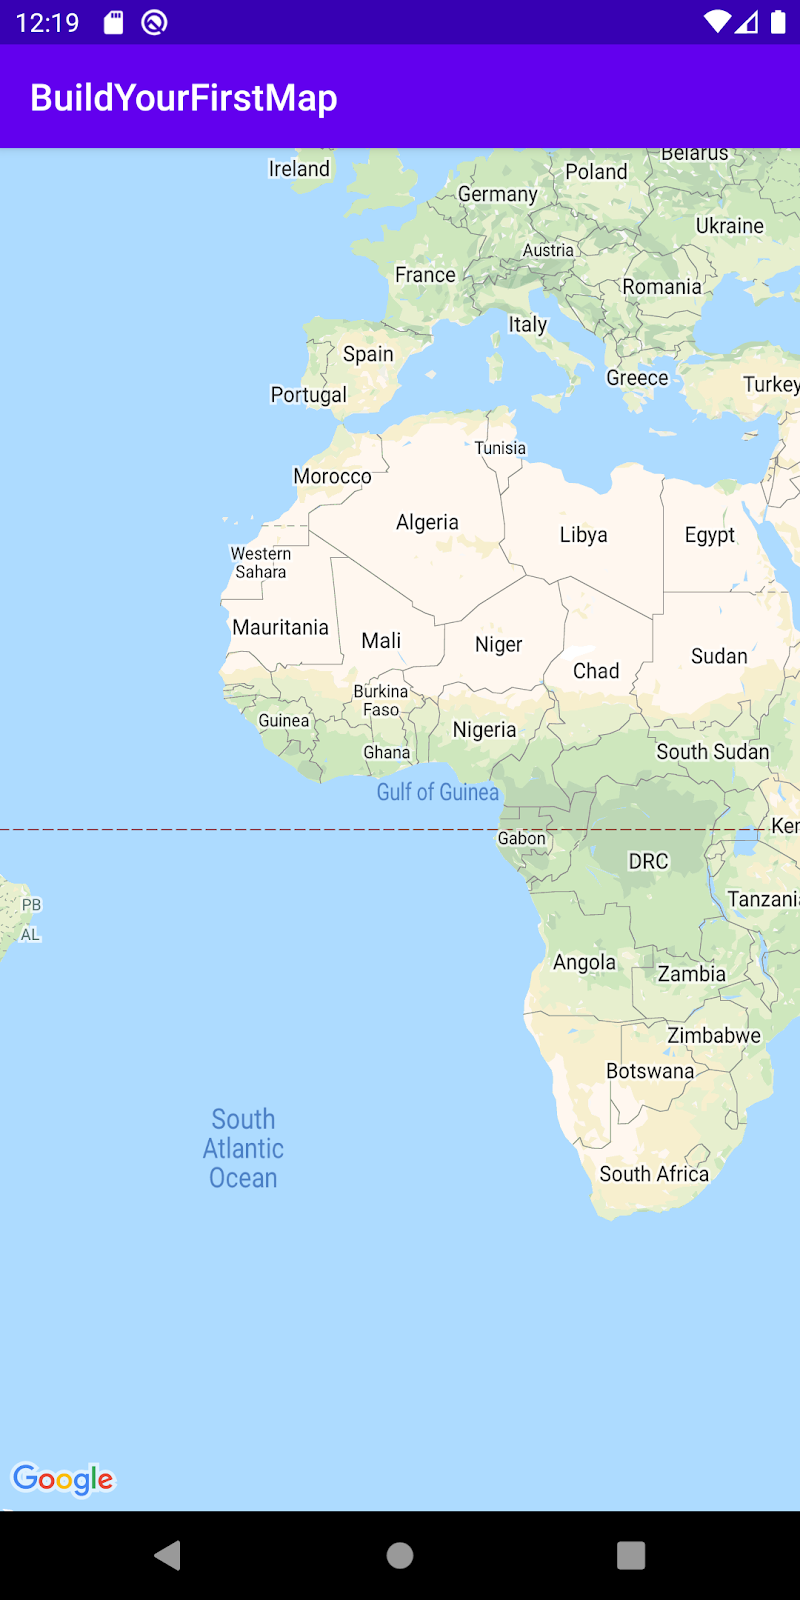
If you noticed when you run the app, the camera displays the continent of Africa, and you have to painstakingly pan and zoom to San Francisco to find the markers you added. While it can be a fun way to explore the world, it’s not useful if you want to display the markers right away.
To help with that, you can set the camera’s position programmatically so that the view is centered where you want it.
- Go ahead and add the following code to the getMapAsync() call to adjust the camera view so that it is initialized to San Francisco when the app is launched.
MainActivity.onCreate()
First, the setOnMapLoadedCallback() is called so that the camera update is only performed after the map is loaded. This step is necessary because the map properties, such as dimensions, need to be computed before making a camera update call.
In the lambda, a new LatLngBounds object is constructed, which defines a rectangular region on the map. This is incrementally built by including all the place LatLng values in it to ensure all places are inside the bounds. Once this object has been built, the moveCamera() method on GoogleMap is invoked and a CameraUpdate is provided to it through CameraUpdateFactory.newLatLngBounds(bounds.build(), 20) .
- Run the app and notice that the camera is now initialized in San Francisco.
Listening to camera changes
In addition to modifying the camera position, you can also listen to camera updates as the user moves around the map. This could be useful if you wanted to modify the UI as the camera moves around.
Just for fun, you modify the code to make the markers translucent whenever the camera is moved.
- In the addClusteredMarkers() method, go ahead and add the following lines toward the bottom of the method:
MainActivity.addClusteredMarkers()
This adds an OnCameraMoveStartedListener so that, whenever the camera starts moving, all the markers’ (both clusters and markers) alpha values are modified to 0.3f so that the markers appear translucent.
- Lastly, to modify the translucent markers back to opaque when the camera stops, modify the contents of the setOnCameraIdleListener in the addClusteredMarkers() method to the following:
MainActivity.addClusteredMarkers()
- Go ahead and run the app to see the results!
10. Maps KTX
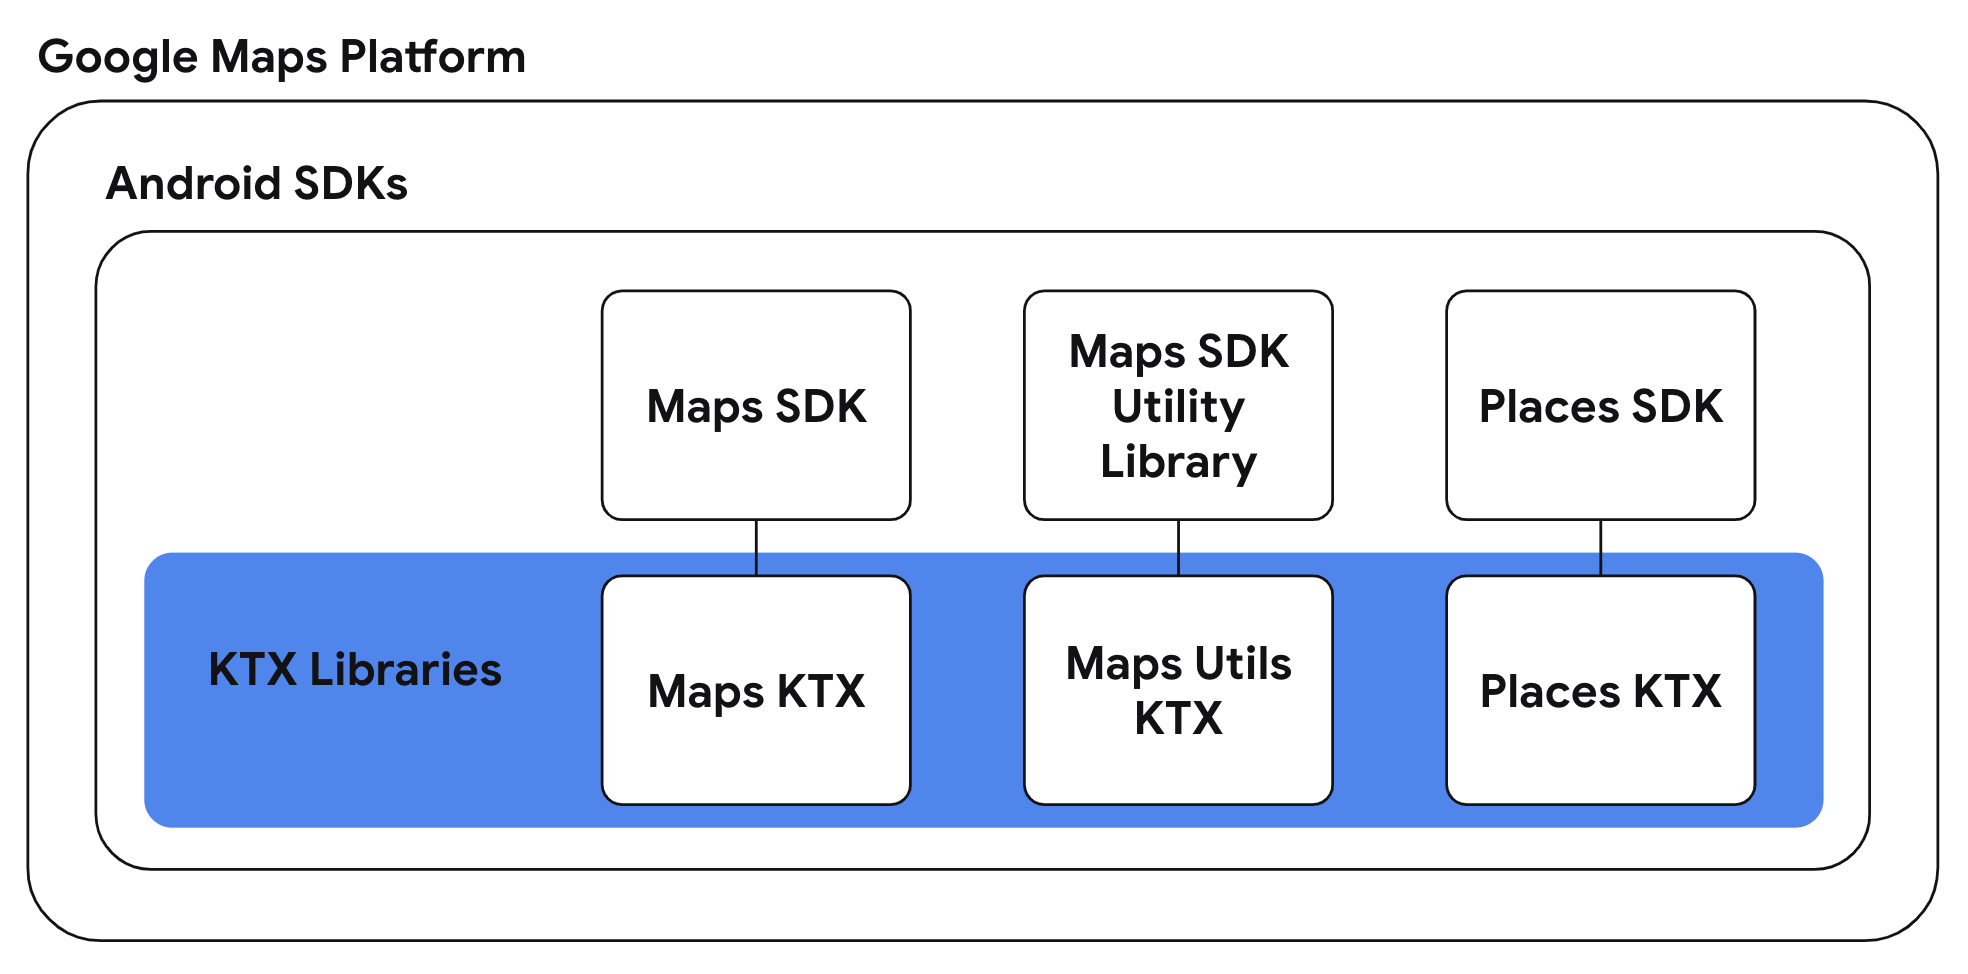
For Kotlin apps using one or more Google Maps Platform Android SDKs, Kotlin extension or KTX libraries are available to enable you to take advantage of Kotlin language features such as coroutines, extension properties/functions, and more. Each Google Maps SDK has a corresponding KTX library as shown below:
In this task, you will use the Maps KTX and Maps Utils KTX libraries to your app and refactor previous tasks’ implementations so that you can use Kotlin-specific language features in your app.
Note: The Google Maps Platform KTX libraries are all open sourced on GitHub. See android-maps-ktx and android-places-ktx to learn more.
- Include KTX dependencies in your app-level build.gradle file
Since the app uses both the Maps SDK for Android and the Maps SDK for Android Utility Library, you will need to include the corresponding KTX libraries for these libraries. You will also be using a feature found in the AndroidX Lifecycle KTX library in this task so include that dependency as well in your app-level build.gradle file as well.
build.gradle
- Use GoogleMap.addMarker() and GoogleMap.addCircle() extension functions
The Maps KTX library provides a DSL-style API alternative for the GoogleMap.addMarker(MarkerOptions) and GoogleMap.addCircle(CircleOptions) used in previous steps. To use the aforementioned APIs, construction of a class containing options for a marker or circle is necessary whereas with the KTX alternatives you are able to set the marker or circle options in the lambda you provide.
To use these APIs, update the MainActivity.addMarkers(GoogleMap) and MainActivity.addCircle(GoogleMap) methods:
MainActivity.addMarkers(GoogleMap)
MainActivity.addCircle(GoogleMap)
Rewriting the above methods in this way is a lot more concise to read which is made possible using Kotlin’s function literal with receiver.
Note: other DSL-style methods are also available for adding other shapes to the map—polygons, polylines, and so on. Refer to the android-maps-ktx reference documents to learn more.
- Use SupportMapFragment.awaitMap() and GoogleMap.awaitMapLoad() extension suspending functions
The Maps KTX library also provides suspending function extensions to be used within coroutines. Specifically, there are suspending function alternatives for SupportMapFragment.getMapAsync(OnMapReadyCallback) and GoogleMap.setOnMapLoadedCallback(OnMapLoadedCallback) . Using these alternative APIs removes the need for passing callbacks and instead allows you to receive the response of these methods in a serial and synchronous way.
Since these methods are suspending functions, their usage will need to occur within a coroutine. The Lifecycle Runtime KTX library offers an extension to provide lifecycle-aware coroutine scopes so that coroutines are run and stopped at the appropriate lifecycle event.
Combining these concepts, update the MainActivity.onCreate(Bundle) method:
MainActivity.onCreate(Bundle)
The lifecycleScope.launchWhenCreated coroutine scope will execute the block when the activity is at least in the created state. Also notice that the calls to retrieve the GoogleMap object, and to wait for the map to finish loading, have been replaced with SupportMapFragment.awaitMap() and GoogleMap.awaitMapLoad() , respectively. Refactoring code using these suspending functions enable you to write the equivalent callback-based code in a sequential manner.
- Go ahead and re-build the app with your refactored changes!
11. Congratulations
Congratulations! You covered a lot of content and hopefully you have a better understanding of the core features offered in the Maps SDK for Android.
Learn more
- Places SDK for Android—explore the rich set of places data to discover businesses around you.
- android-maps-ktx—an open source library allowing you to integrate with Maps SDK for Android and the Maps SDK for Android Utility Library in a Kotlin-friendly way.
- android-place-ktx—an open source library allowing you to integrate with Places SDK for Android in a Kotlin-friendly way.
- android-samples—sample code on GitHub demonstrating all the features covered in this codelab and more.
Except as otherwise noted, the content of this page is licensed under the Creative Commons Attribution 4.0 License, and code samples are licensed under the Apache 2.0 License. For details, see the Google Developers Site Policies. Java is a registered trademark of Oracle and/or its affiliates.
Источник


