- New Google Sign-In API
- Before you begin
- Make a sign-in request
- Handle sign in results
- Start Integrating Google Sign-In into Your Android App
- Prerequisites
- Add Google Play services
- Configure a Google API Console project
- Get your backend server’s OAuth 2.0 client ID
- Next steps
- Авторизация через Google в Android и проверка токена на сервере
- Небольшая подготовка
- Добавляем действие на кнопку
- Необходимые области доступа
- Регистрация нашего приложения.
- Код получения токена
- Проверяем токен на сервере. (PHP)
- Sign-in in Android Games
- Implementing player sign-in
- Check whether player is already signed in
- Performing silent sign-in
- Performing interactive sign-in
- Retrieving player information
- Providing a sign-in button
- Displaying game pop-ups
- Signing the player out
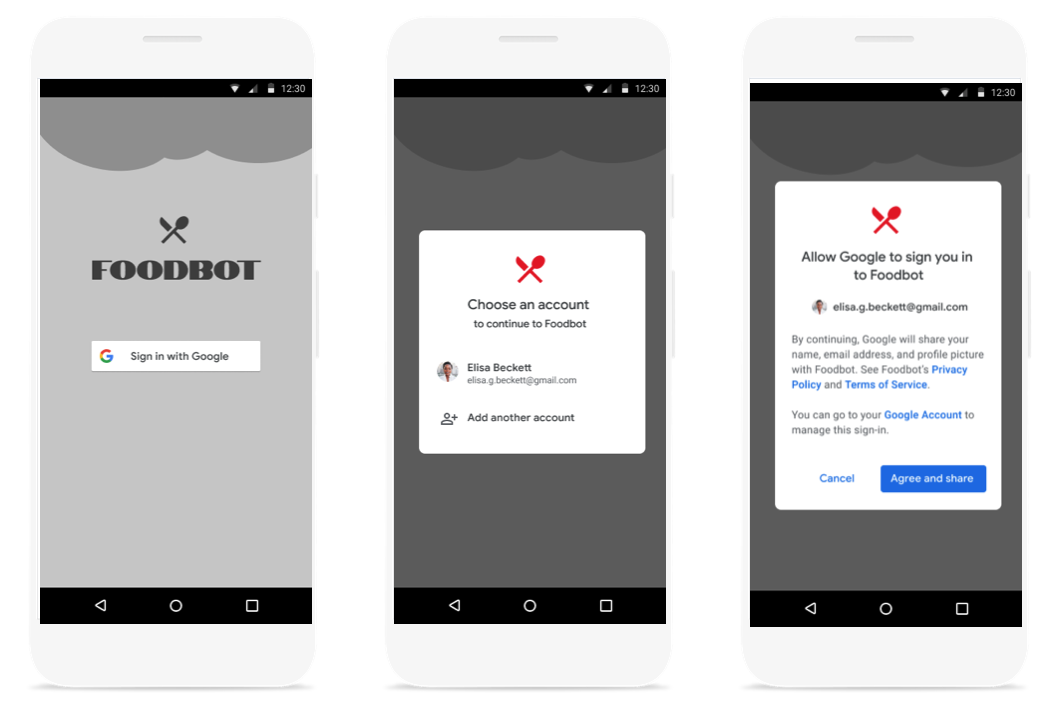
New Google Sign-In API
Google Identity Services (GIS) is a new set of APIs that provides users easy and secure sign-in and sign-up, in an easy-to-implement package for developers. This document details a new Google sign in API (part of GIS) that can be used to start the sign-in or sign-up flow when a user taps on a «Sign-In with Google» button. This API can be used instead of the existing Google Sign-In APIs for sign in flows.
You should use this API only when the user explicitly shows intent to sign in with Google. For example, use this API when they click a «Sign in with Google» button in your app.
You should not use this API to prompt the user to sign-in on app launch or in response to another trigger such as adding an item to the shopping cart. For these use cases, use One Tap sign-in and sign-up.
When you start the Google Sign-In flow with the new API, it will display this UI:
Before you begin
Make a sign-in request
To launch a Google Sign-In flow using the Identity API build a GetSignInRequest object. Then, on a SignInClient object call getSignInIntent . This call is async and on success it will provide a PendingIntent to launch the dialog.
Handle sign in results
In onActivityResult retrieve a SignInCredential . The SignInCredential object returned from getSignInCredentialFromIntent contains information about a valid login. If the user fails to log in for some reason, an ApiException is thrown.
The result of a successful sign in always returns the users full name, email, and profile picture url. If you need additional information you can direct users into a complete profile information flow.
Except as otherwise noted, the content of this page is licensed under the Creative Commons Attribution 4.0 License, and code samples are licensed under the Apache 2.0 License. For details, see the Google Developers Site Policies. Java is a registered trademark of Oracle and/or its affiliates.
Источник
Start Integrating Google Sign-In into Your Android App
Before you can start integrating Google Sign-In in your own app, you must configure a Google API Console project and set up your Android Studio project. The steps on this page do just that. The next steps then describe how to integrate Google Sign-In into your app.
Prerequisites
Google Sign-In for Android has the following requirements:
- A compatible Android device that runs Android 4.4 or newer and includes the Google Play Store or an emulator with an AVD that runs the Google APIs platform based on Android 4.2.2 or newer and has Google Play services version 15.0.0 or newer.
- The latest version of the Android SDK, including the SDK Tools component. The SDK is available from the Android SDK Manager in Android Studio.
- A project configured to compile against Android 4.4 (KitKat) or newer.
This guide is written for users of Android Studio, which is the recommended development environment.
Add Google Play services
In your project’s top-level build.gradle file, ensure that Google’s Maven repository is included:
Then, in your app-level build.gradle file, declare Google Play services as a dependency:
Configure a Google API Console project
To configure a Google API Console project, click the button below, and specify your app’s package name when prompted. You will also need to provide the SHA-1 hash of your signing certificate. See Authenticating Your Client for information.
Get your backend server’s OAuth 2.0 client ID
If your app authenticates with a backend server or accesses Google APIs from your backend server, you must get the OAuth 2.0 client ID that was created for your server. To find the OAuth 2.0 client ID:
Pass this client ID to the requestIdToken or requestServerAuthCode method when you create the GoogleSignInOptions object.
Next steps
Now that you have configured a Google API Console project and set up your Android Studio project, you can integrate Google Sign-In into your app.
Except as otherwise noted, the content of this page is licensed under the Creative Commons Attribution 4.0 License, and code samples are licensed under the Apache 2.0 License. For details, see the Google Developers Site Policies. Java is a registered trademark of Oracle and/or its affiliates.
Источник
Авторизация через Google в Android и проверка токена на сервере
Недавно мне захотелось создать личный проект на андроиде, и основной вопрос был такой: как однозначно идентифицировать пользователя заставляя его делать как можно меньше телодвижений? Конечно же это аккаунт Google. Я пытался пробовать множество примеров в сети — однако API несколько раз обновилось за время своего существования, многие методы не работали, мои вопросы в Google+ по этому поводу либо были вообще никак не восприняты окружением, либо были вроде «Никогда такое не делал».
В этой статье я постараюсь как можно более просто для новичков (вроде меня) описать мой метод авторизации в Google на андроид, получения токена и проверке этого самого токена на сервере.
Небольшая подготовка
Для начала — у вас должны быть установлены Google Play Services в SDK. После их установки можно будет импортировать все необходимые библиотеки. Статья пишется с расчетом на Android Studio — он сам подсказывает, что необходимо импортировать.
У вас должно быть создано активити с кнопкой.
Чтобы было привычнее пользователю можете создать стандартную кнопку Google+ Sing-In
Выглядеть она будет вот так: 
Просто добавьте в ваш Layout:
Добавляем действие на кнопку
Пишем в нашем активити:
Собственно присвоим кнопке действие — вызов интенда выбора аккаунта. Если вы работаете в Android Studio он сам вам подскажет, какие библиотеки нужно импортировать, так что это подробно тут я расписывать не буду.
startActivityForResult(intent, 123); — задает код с которым произойдет возврат. 123 это код возврата, он может быть каким угодно. Это необходимо, когда вы делаете несколько интендов, и вам надо обработать их по разному.
Необходимые области доступа
Обьявите эти переменные в классе. Это необходимые нам области доступа. Первый написано в google: «Позволяет определить аутентифицированного пользователя. Для этого при вызове API необходимо указать me вместо идентификатора пользователя Google+. » Второе разрешение нам необходимо для получения личных данных пользователя (Имя, Фамилия, адрес G+ страницы, аватар), и последнее для получения E-mail. Я посчитал это важным, ведь это вполне неизменный идентификатор для записи в бд.
Регистрация нашего приложения.
Изначально забыл этот пункт — исправляюсь.
Нам необходимо зайти на code.google.com/apis/console создать там проект, зайти в Credentials и создать новый Client ID для OAuth выбрав пункт Installed Application -> Android. Там нам необходимо ввести название нашего пакета и SHA1 сумму нашего ключа.
С этим у меня на самом деле было много проблем решил достаточно костыльным способом.
Нашел debug.keystore в %USERPROFILE%\.android\debug.keystore поместил в папку с проектом и прописал в build.grandle:
После чего нам нужно выполнить команду:
keytool -exportcert -alias androiddebugkey -keystore
/.android/debug.keystore -v -list
Сам keytool можно найти в SDK. Из вывода копируем SHA1 в нужное поле.
Как я понимаю метод временный, и для нормальной работы надо создать нормальный ключ. Но для тестирования этого достаточно.
Код получения токена
Где 123 — ваш код, который вы указали ранее, где AcrivityName — название вашего актитивити. Грубо говоря — мы скармливаем функции получения токена необходимые разрешения и имя аккаунта. И заметьте — это все происходит в фоновом режиме, после чего полученный токен передается в написанную мною функцию reg. Она уже отправляет токен и все необходимые данные на сервер.
Так как разрабатываю недавно, с исключениями пока что беда, если есть предложение — напишите в личку или в комментарии.
Проверяем токен на сервере. (PHP)
Хочу обратить внимание, полученный нами токен имеет тип Online. И действует он лишь 10 минут. Для получения offline токена (чтобы дольше работать с ним с сервера) обратитесь к этой инструкции developers.google.com/accounts/docs/CrossClientAuth
Собственно скармливаем токен в googleapis и забираем полученный JSON ответ.
Источник
Sign-in in Android Games
In order to access Google Play games services functionality, your game needs to provide the signed-in player’s account. If the player is not authenticated, your game may encounter errors when making calls to the Google Play games services APIs. This documentation describes how to implement a seamless sign-in experience in your game.
Implementing player sign-in
The GoogleSignInClient class is the main entry point to retrieve the account of the currently signed-in player, and to sign-in the player if they have not previously done so on your app in the device.
Note: The GoogleSignInClient class makes use of the Google Play services Task class to return results asynchronously. To learn more about using tasks to manage threaded work, see the Tasks API developer guide.
To create a sign-in client, follow these steps:
Create a sign-in client via the GoogleSignInOptions object, as shown in the following code snippet. In the GoogleSignInOptions.Builder to configure your sign-in, you must specify GoogleSignInOptions.DEFAULT_GAMES_SIGN_IN .
If you want to use a SnapshotsClient , then add .requestScopes(Games.SCOPE_GAMES_SNAPSHOTS) to your GoogleSignInOptions.Builder as shown in the following code snippet:
Call the GoogleSignIn.getClient() method and pass in the options that you configured in the previous steps. If the call is successful, the Google Sign-In API returns an instance of GoogleSignInClient .
Check whether player is already signed in
You can check whether an account is already signed in on the current device using GoogleSignIn.getLastSignedInAccount() and whether this account already has the required permissions granted using GoogleSignIn.hasPermissions() . If both conditions are true—that is, getLastSignedInAccount() returns a non-null value and hasPermissions() returns true —you can safely use the account returned from getLastSignedInAccount() , even if the device is offline.
Performing silent sign-in
You can call silentSignIn() to retrieve the currently signed-in player’s account, and try to sign players in without displaying a user interface if they have successfully signed in to your app on a different device.
The silentSignIn() method returns a Task . When the task completes, you set the GoogleSignInAccount field you declared earlier to the sign-in account that the task returns as the result, or to null , indicating there is not a signed-in user.
If the silent sign-in attempt fails, you can optionally send the sign-in intent to display a sign-in user interface, as described in Performing interactive sign-in.
Since the state of the signed-in player can change when the activity is not in the foreground, we recommended calling silentSignIn() from the activity’s onResume() method.
To perform the sign-in silently, follow these steps:
- Call the silentSignIn() method on the GoogleSignInClient to start the silent sign-in flow. This call returns an Task object which contains a GoogleSignInAccount if silent sign-in is successful.
- Handle the success or failure of the player sign-in by overriding OnCompleteListener .
- If the sign-in task was successful, get the GoogleSignInAccount object by calling getResult() .
- If sign-in was not successful, you can send a sign-in intent to launch an interactive sign-in flow. For a list of additional callback listeners you can use, see the Tasks API developer guide and Task API reference.
The following code snippet shows how your app can perform silent sign-in:
If the silent sign-in attempt fails, you can call getException() to obtain an ApiException with the detailed status code. A status code of CommonStatusCodes.SIGN_IN_REQUIRED indicates that the player needs to take explicit action to sign-in. In this case, your app should launch an interactive sign-in flow as described in the next section.
Performing interactive sign-in
To sign in with player interaction, your app needs to launch the sign-in intent. If successful, the Google Sign-In API displays a user interface that prompts the player to enter their credentials to sign in. This approach simplifies your app development, since the sign-in activity handles scenarios such as needing to update Google Play services or showing consent prompts, on your app’s behalf. The result is returned via the onActivityResult callback.
To perform the sign-in interactively, follow these steps:
Call getSigninIntent() on the GoogleSignInClient to obtain a sign-in intent, then call startActivity() and pass in that intent. The following code snippet shows how your app can launch an interactive sign-in flow:
In the onActivityResult() callback, handle the result from the returned intent.
- If the sign-in result was successful, get the GoogleSignInAccount object from the GoogleSignInResult .
- If sign-in result was not successful, you should handle the sign-in error (for example, by displaying an error message in an alert). The following code snippet shows how your app can handle the results of player sign-in:
Retrieving player information
The GoogleSignInAccount that the Google Sign-In API returns does not contain any player information. If your game uses player information, such as the player’s display name and player ID, you can follow these steps to retrieve this information.
Note: You should not store the player ID returned from the Android SDK in the game’s backend, as it’s possible for an untrusted device to tamper with it. Instead, you should enable server-side API access and retrieve the player ID or other data with a server-side call directly from the game’s backend.
- Obtain a PlayersClient object by calling the getPlayersClient() method, and passing in the GoogleSignInAccount as a parameter.
- Use the PlayersClient methods to asynchronously load the Player object that contains a player’s information. For example, you can call getCurrentPlayer() to load the currently signed-in player. If the task returns an ApiException with status code of SIGN_IN_REQUIRED , this indicates that the player needs to be re-authenticated. To do this, call GoogleSignInClient.getSignInIntent() to sign in the player interactively.
- If the task successfully returns the Player object, you can then call the methods of the Player object to retrieve specific player details (for example, getDisplayName() or getPlayerId() .
Providing a sign-in button
To provide a standard Google sign-in button in your game, you can use one of these approaches:
When users click the sign-in button, your game should initiate the sign-in flow by sending a sign-in intent, as described in Performing interactive sign-in.
This code snippet shows how you can add a sign-in button in the onCreate() method for your activity.
The following code snippet shows how you can send the sign-in intent when the user clicks on the sign-in button.
Displaying game pop-ups
You can display pop-up views in your game using the GamesClient class. For example, your game can display a “Welcome back” or an “Achievements unlocked” pop-up. To allow Google Play games services to launch pop-ups in views in your game, call the setViewForPopups() method. You can further customize where the pop-up appears in the screen by calling setGravityForPopups() .
Signing the player out
Signing-out is done via call the signOut() method on the GoogleSignInClient .
Except as otherwise noted, the content of this page is licensed under the Creative Commons Attribution 4.0 License, and code samples are licensed under the Apache 2.0 License. For details, see the Google Developers Site Policies. Java is a registered trademark of Oracle and/or its affiliates.
Источник


