- Gradle
- Задаём имя APK при компиляции
- Оптимизатор кода R8
- Сжимаем итоговый APK
- Класс BuildConfig
- Разделяем отладочную и финальную версию
- Прячем секретную информацию
- Автогенерация версии кода
- settings.gradle
- gradle.properties (Project Properties)
- Режим параллельного выполнения
- Gradle-демон
- Режим конфигурации при необходимости
- Меняем номер версии библиотек в одном месте
- Настройки в Android Studio
- Gradle Task
- Узнать debug.keystore: MD5 и SHA1
- Gradle Console
- Terminal
- Добавление зависимостей через интерфейс студии
- Дополнительное чтение
- Building Java & JVM projects
- Introduction
- Declaring your source files via source sets
- Managing your dependencies
- Compiling your code
- Customizing file and directory locations
- Changing compiler options
- Targeting a specific Java version
- Compiling and testing Java 6/7
- Example: Configure Java 7 build
- Compiling independent sources separately
- Managing resources
- Java properties files and reproducible builds
- Running tests
- Packaging and publishing
- Modifying the JAR manifest
- Generating API documentation
- Cleaning the build
- Building JVM components
- Building Java libraries
- Building Java applications
- Building Java web applications
- Building Java EE applications
- Building Java Platforms
- Enabling Java preview features
Gradle
Gradle — система автоматической сборки, построенная на принципах Apache Ant и Apache Maven. В Eclipse использовалась система Ant, но большинство разработчиков даже не замечало её работы. В основном возможности системы использовались в конторах для автоматизации различных задач. В Android Studio такой номер не пройдёт. Gradle сопровождает вас во время разработки постоянно. Поначалу, если вы перешли с Eclipse, Gradle сильно раздражает своими действиями. Но позже вы оцените её удобство и может даже полюбите её.
Gradle не является изобретением для Android Studio, система была разработана раньше и использовалась в приложениях для Java, Scala и других языках.
Система сборки Gradle очень мощная и сложная, чтобы о ней рассказать в двух словах. Есть целые книги о ней. Сами команды в Gradle представляют собой обычный текст с использованием синтаксиса Groove для конфигурации. Но нам не нужно знать всё. Познакомимся поближе с системой и научимся пользоваться ей.
Создайте новый проект или откройте любой существующий проект из Android Studio и посмотрите на структуру проекта.
В последних версиях студии файлы Gradle выделили в отдельную папку Gradle Script. Раскройте её. В основном вас должен интересовать файл build.gradle, который относится к модулю. Рядом с этим файлом в скобках будет написано Module: app. Двойным щелчком откройте его, вы увидите, что файл является текстовым.
Также есть файл build.gradle, который относится к проекту. Но с ним работают реже. Так находятся настройки для репозиториев и самого Gradle.
Вернёмся к файлу модуля, вы увидите много интересной информации. Например, вы там можете увидеть настройки, которые раньше вы могли видеть в манифесте — номера версий, номера SDK и так далее. Забегая вперёд, скажу, что здесь можно добавить всего одну волшебную строчку и нужная библиотека сама скачается из интернета и установится в проекте. Красота!
Однако вернёмся в корневую папку. Кроме файлов build.gradle мы можем заметить файлы gradle.properties, settings.gradle и другие. Трогать их не нужно.
В корневой папке также есть файлы gradlew и gradlew.bat для работы с Gradle Wrapper. В принципе вам не нужно знать о них ничего. Но для параноиков есть информация — если вы часто импортируете проекты из неизвестных источников, то они содержат файл gradle/wrapper/gradle-wrapper.properties. Откройте его текстовым редактором и посмотрите на адрес у distributionUrl. Путь должен вести на официальный сай //services.gradle.org или на внутренний корпоративный сервер. Другие адреса должны вызвать тревогу.
Вы могли заметить, что по сравнению с Eclipse изменилась структура файлов. В папке app находится папка src, а ней папка main, в которых папки java, res и файл манифеста. Новая структура лучше отвечает требованиям Gradle для управления файлами.
Вы, например, можете создавать альтернативные папки с ресурсами и с помощью build.gradle подключить их к проекту.
В этом примере мы указали, что существуют новая папка presentations в папке /src/main/ наряду с существующими папками java и res. Внутри созданной папки есть ещё две папки layout и animations, которые содержат файлы ресурсов.
Только помните, что вам нужно избегать конфликта имён при слиянии всех файлов при сборке.
Значение sourceSets указывает Gradle, какие папки следует использовать. Этим приёмом пользуются продвинутые программисты. Мы пока не будем использовать такую технику.
Другая полезная возможность — создавать разные версии приложений, например, демо-версию и платную версию. Немного об этом рассказано здесь.
Номер версии приложения и требования к версии Android прописаны в секции defaultConfig. Если у вас сохранились старые версии приложений, то в манифесте можете удалить данные записи. По-моему, там даже выводится соответствующая подсказка. Даже если вы эти данные в манифесте не удалите, то значения из gradle.build имеют больший приоритет и перепишут значения в манифесте при не совпадении.
Подключение библиотеки происходит одной строчкой. Например, нужно добавить библиотеку Picasso:
В Android Studio 3.0 используется новая версия Gradle, в которой compile считается устаревшей. Вместо него следует использовать новое слово implementation.
Есть похожая команда, которая подключает библиотеку, которая будет использоваться только для отладки приложения и в релизной версии она не нужна.
Далее включаете синхронизацию и через несколько секунд в папке появляется нужная библиотека, готовая к использованию. Сама библиотека скачивается с специального хранилища-репозитория JCenter. Данный репозиторий используется по умолчанию и прописан в buil.gradle проекта.
Можно указать другой репозиторий, например, Maven Central.
Для поиска через Maven-репозиторий используйте The Central Repository Search Engine.
Библиотеку можно подключать и старым способом, используя jar-файл, но такой способ уходит в прошлое.
Сам файл нужно скопировать в папку /libs.
При любом изменении файла недостаточно его сохранить. Нужно также произвести синхронизацию. Наверху обычно появляется жёлтая полоска с ссылкой Sync Now.
Задаём имя APK при компиляции
Можно задать собственное имя при компиляции проекта. Например, так.
Получим имя MyName-1.0.12-release.apk
Оптимизатор кода R8
Оптимизатор кода R8 имеет следующие возможности: урезание байт-кода, сжатие, обфускация, оптимизация, удаление «синтаксического сахара», преобразование в DEX. Оптимизатор может производить все операции за один шаг, что даёт сильное улучшение производительности. R8 был введён в Android Gradle plugin 3.3.0. Вам нужно только включить его.
R8 разработан для работы с существующими ProGuard-правилами, хотя возможны ситуации, когда нужно переработать правила.
Сжимаем итоговый APK
В Gradle 1.4 появилась возможность сжать итоговый файл, убрав неиспользуемые ресурсы, в том числе из библиотек, например, Google Play Services.
Во время сборки приложения вы можете увидеть строку:
Другой способ убрать неиспользуемые ресурсы конфигурации. Например, вам не нужные локализованные ресурсы для всех языков, которые входят в библиотеку Google Play Services или Android Support Library и др. Оставим только нужные языки. Возможно, вы также не хотите поддерживать mdpi или tvdpi-разрешения в своём приложении. Мы можем установить языки и разрешения, которые используются в приложении, остальные будут исключены, что позволит уменьшить вес приложения.
Можно перенести ключи из манифеста.
Чтобы их не светить, например, если выкладывать код на Гитхабе, то сделаем так.
И в манифесте переделаем код.
В большинстве случаев это сработает, но иногда ключ требуется при компиляции и указанный пример может не сработать. В таком случае применяют другой вариант через manifestPlaceholders.
В манифесте пишем.
Класс BuildConfig
В статье LogCat упоминался способ быстрого отключения журналирования.
Суть в следующем. Когда вы создаёте новые переменные в блоках defaultConfig или buildTypes (ветки debug и release), то Gradle создаёт специальный класс BuildConfig, и вы можете получить доступ к этим переменным.
Например, добавим переменную в defaultConfig
На языке Java это равносильно String YOUR_TOKEN = «ABRAKADABRA»;
Теперь мы можем обратиться к созданной строке.
С секцией buildType ситуация интереснее. У секции есть два блока debug и release. Можно создать переменные с разными значениями, которые будут использоваться в зависимости от ситуации. Например, у вас есть собственное API для сервера. Для тестирования вы используете один адрес, а для финальной версии — другой адрес. Тогда вы просто указываете разные адреса в разных ветках. Переменные могут быть не только строковыми.
Создаём код для перехода на веб-страницу.
Теперь вам не нужно переписывать каждый раз код. Загружаться будет страница по нужному адресу автоматически.
Разделяем отладочную и финальную версию
По такому же принципу можно организовать запуск новой версии программы, не затрагивая программу, которую вы установили с Google Play. Допустим вы на своём телефоне установили своё собственное приложение через Google Play. Теперь вам нужно написать новую версию и проверить на своём телефоне. Из-за конфликта имён новое тестируемое приложение перепишет финальную версию или вообще не установится. Поможет следующий трюк.
В специальных переменных applicationIdSuffix и versionNameSuffix мы задаём суффиксы, чтобы избежать конфликта. А в переменной resValue указываем название программы для отладочной и финальных версий, чтобы на устройстве можно было их найти. Не забудьте при этом удалить строковый ресурс app_name в res/values/strings.xml, иначе получите ошибку при компиляции. Теперь можете спокойно запускать приложение с новым кодом, не боясь повредить своё любимое приложение.
Прячем секретную информацию
Следующий совет больше подходит для компаний. Когда подписывается приложение, то нужно указывать пароль, хранилище и т.д. Чтобы их не светить в студии, можно прописать их в переменных и поместить в секцию signingConfigs. Сервер сам найдёт нужные ключи и воспользуется ими в своих сценариях.
Автогенерация версии кода
Нашёл совет, сам не применял. Не обязательно вручную менять версию приложения в атрибутах versionCode и versionName, можно сделать через переменные, а они сами подставятся в нужное место. На любителя.
settings.gradle
Файл settings.gradle обычно состоит из одной строчки.
Это означает, что у вас используется один проект для работы. Если вы будете подключать другие проекты, то здесь появятся новые строки.
gradle.properties (Project Properties)
Несколько советов по настройке файла gradle.properties.
Режим параллельного выполнения
В этом файле можно найти закомментированную строку # org.gradle.parallel=true. Если модули вашего проекта не используют друг друга как зависимости, создавая перекрёстные ссылки, можно включать режим параллельного выполнения, что ускорит скорость сборки до
Gradle-демон
Включение на компьютере демона Gradle даст значительный прирост в скорости сборки.
Режим конфигурации при необходимости
Если в проекте используется много модулей, то можно включить режим конфигурации при необходимости. Ускорение будет заметно при большом количестве используемых модулей:
Меняем номер версии библиотек в одном месте
Очень часто в проекте используются взаимосвязанные библиотеки с одинаковыми номерами.
Можно быстро поменять у всех номера через переменную. Для этого используется секция ext, в которой указывается переменная и номер версии. Затем в секции dependencies номер версии заменяется на имя переменной
Обратите внимание, что одинарные кавычки заменяются на двойные, а символ $ указывает на строковый тип.
Расширенная версия с разными переменными в другом виде.
Если в проекте используются несколько модулей с одинаковыми зависимостями, то эти записи можно перенести в корневой build.gradle, чтобы не менять номера версий в каждом модуле.
Настройки в Android Studio
Рассмотрим настройки, доступные в Android Studio. Закройте текущий проект, чтобы увидеть стартовое окно студии. В правой части нажмите на пункт Configure. В следующем окне выберите пункт Settings, чтобы оказаться в окне настроек студии. В левой части найдите пункт Build, Execution, Deployment, затем подпункт Build Tools, далее подпункт Gradle. По умолчанию, там всё чисто, только указан путь у Service directory path. Это были общие настройки.
Теперь рассмотрим настройки, относящиеся к проекту. Запустите любой проект в Android Studio. Выберите меню File | Settings. . Снова пройдитесь по пунктам Build, Execution, Deployment | Build Tools | Gradle. Вы увидите практически такое же окно с небольшими изменениями. Теперь поле Linked Gradle Projects не будет пустым, а также появятся дополнительные настройки. По умолчанию рекомендуют использовать Use default gradle wrapper.
Gradle Task
На правой стороне Android Studio имеется вертикальная вкладка Gradle, которую можно развернуть. Она содержит список задач (task), которая выполняет Gradle при работе с текущим проектом. Вы можете выделить любую из этих задач и запустить её двойным щелчком. Можно выделить несколько задач.
Узнать debug.keystore: MD5 и SHA1
Иногда требуется узнать значения debug.keystore: MD5 и SHA1. Обычно их получают через командную строку. Но это долго и неудобно, так как нужно помнить все аргументы. Есть способ проще. Открываем вкладку Gradle, нажимаем на кнопку со стрелками Refresh all Gradle Projects. Затем последовательно открываем элементы Tasks | android и запускаем команду signingReport. В нижнем окне Run увидите нужную информацию.
Gradle Console
Когда выполняется какая-то задача Gradle, то ход её выполнения можно увидеть в окне Gradle Console. Открыть её можно через вкладку Gradle Console в нижней правой части студии.
Terminal
Запускать задачи Gradle можно и в окне Terminal.
На панели инструментов имеется значок Sync Project with Gradle Files, которую следует использовать при редактировании файлов Gradle. Как правило, студия также выводит предупреждающее сообщение с ссылкой при изменении файла, которая делает ту же работу.
Добавление зависимостей через интерфейс студии
В статье описывался способ включения библиотеки в проект через редактирование файла build.gradle. Существует альтернативный вариант через настройки студии. Щёлкните правой кнопкой мыши на имени модуля (app) и выберите пункт Open Module Settings (быстрая клавиша F4). В правой части окна находятся вкладки, которые оказывают влияние на файл build.gradle. Например, вкладка Dependencies содержит подключаемые библиотеки.
Чтобы добавить новую зависимость, нажмите на значок с плюсом и выберите нужный вариант, например, Library dependency. Откроется список доступных библиотек из репозитория Maven.
Дополнительное чтение
В примере работы с PDF-файлами в папке assets использована операция запрета на сжатие файлов, которое происходит по умолчанию.
Задачи Gradle — теория для общего развития.
Источник
Building Java & JVM projects
Gradle uses a convention-over-configuration approach to building JVM-based projects that borrows several conventions from Apache Maven. In particular, it uses the same default directory structure for source files and resources, and it works with Maven-compatible repositories.
We will look at Java projects in detail in this chapter, but most of the topics apply to other supported JVM languages as well, such as Kotlin, Groovy and Scala. If you don’t have much experience with building JVM-based projects with Gradle, take a look at the Java samples for step-by-step instructions on how to build various types of basic Java projects.
The example in this section use the Java Library Plugin. However the described features are shared by all JVM plugins. Specifics of the different plugins are available in their dedicated documentation.
There are a number of hands-on samples that you can explore for Java, Groovy, Scala and Kotlin
Introduction
The simplest build script for a Java project applies the Java Library Plugin and optionally sets the project version and selects the Java toolchain to use:
By applying the Java Library Plugin, you get a whole host of features:
A compileJava task that compiles all the Java source files under src/main/java
A compileTestJava task for source files under src/test/java
A test task that runs the tests from src/test/java
A jar task that packages the main compiled classes and resources from src/main/resources into a single JAR named
A javadoc task that generates Javadoc for the main classes
This isn’t sufficient to build any non-trivial Java project — at the very least, you’ll probably have some file dependencies. But it means that your build script only needs the information that is specific to your project.
Although the properties in the example are optional, we recommend that you specify them in your projects. The toolchain options protects against problems with the project being built with different Java versions. The version string is important for tracking the progression of the project. The project version is also used in archive names by default.
The Java Library Plugin also integrates the above tasks into the standard Base Plugin lifecycle tasks:
jar is attached to assemble [1]
test is attached to check
The rest of the chapter explains the different avenues for customizing the build to your requirements. You will also see later how to adjust the build for libraries, applications, web apps and enterprise apps.
Declaring your source files via source sets
Gradle’s Java support was the first to introduce a new concept for building source-based projects: source sets. The main idea is that source files and resources are often logically grouped by type, such as application code, unit tests and integration tests. Each logical group typically has its own sets of file dependencies, classpaths, and more. Significantly, the files that form a source set don’t have to be located in the same directory!
Source sets are a powerful concept that tie together several aspects of compilation:
the source files and where they’re located
the compilation classpath, including any required dependencies (via Gradle configurations)
where the compiled class files are placed
You can see how these relate to one another in this diagram:
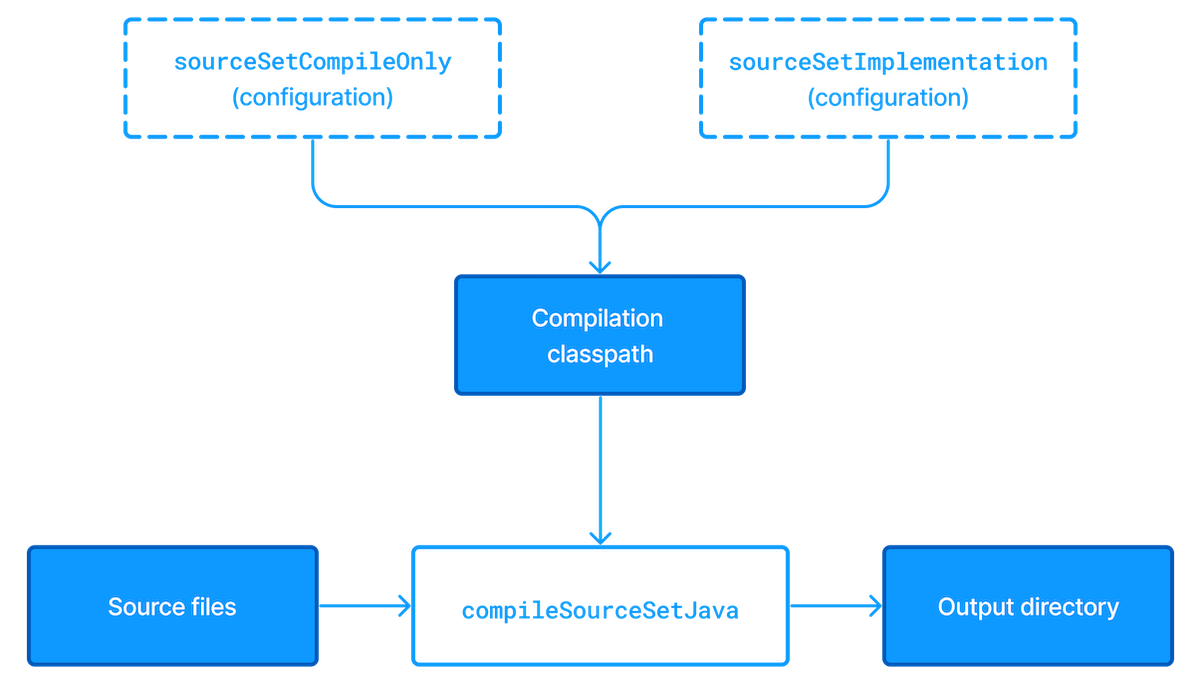
The shaded boxes represent properties of the source set itself. On top of that, the Java Library Plugin automatically creates a compilation task for every source set you or a plugin defines — named compileSourceSetJava — and several dependency configurations.
Most language plugins, Java included, automatically create a source set called main , which is used for the project’s production code. This source set is special in that its name is not included in the names of the configurations and tasks, hence why you have just a compileJava task and compileOnly and implementation configurations rather than compileMainJava , mainCompileOnly and mainImplementation respectively.
Java projects typically include resources other than source files, such as properties files, that may need processing — for example by replacing tokens within the files — and packaging within the final JAR. The Java Library Plugin handles this by automatically creating a dedicated task for each defined source set called processSourceSetResources (or processResources for the main source set). The following diagram shows how the source set fits in with this task:

As before, the shaded boxes represent properties of the source set, which in this case comprises the locations of the resource files and where they are copied to.
In addition to the main source set, the Java Library Plugin defines a test source set that represents the project’s tests. This source set is used by the test task, which runs the tests. You can learn more about this task and related topics in the Java testing chapter.
Projects typically use this source set for unit tests, but you can also use it for integration, acceptance and other types of test if you wish. The alternative approach is to define a new source set for each of your other test types, which is typically done for one or both of the following reasons:
You want to keep the tests separate from one another for aesthetics and manageability
The different test types require different compilation or runtime classpaths or some other difference in setup
You can see an example of this approach in the Java testing chapter, which shows you how to set up integration tests in a project.
You’ll learn more about source sets and the features they provide in:
Managing your dependencies
The vast majority of Java projects rely on libraries, so managing a project’s dependencies is an important part of building a Java project. Dependency management is a big topic, so we will focus on the basics for Java projects here. If you’d like to dive into the detail, check out the introduction to dependency management.
Specifying the dependencies for your Java project requires just three pieces of information:
Which dependency you need, such as a name and version
What it’s needed for, e.g. compilation or running
Where to look for it
The first two are specified in a dependencies <> block and the third in a repositories <> block. For example, to tell Gradle that your project requires version 3.6.7 of Hibernate Core to compile and run your production code, and that you want to download the library from the Maven Central repository, you can use the following fragment:
The Gradle terminology for the three elements is as follows:
Repository (ex: mavenCentral() ) — where to look for the modules you declare as dependencies
Configuration (ex: implementation ) — a named collection of dependencies, grouped together for a specific goal such as compiling or running a module — a more flexible form of Maven scopes
Module coordinate (ex: org.hibernate:hibernate-core-3.6.7.Final ) — the ID of the dependency, usually in the form ‘ : : ‘ (or ‘ : : ‘ in Maven terminology)
You can find a more comprehensive glossary of dependency management terms here.
As far as configurations go, the main ones of interest are:
compileOnly — for dependencies that are necessary to compile your production code but shouldn’t be part of the runtime classpath
implementation (supersedes compile ) — used for compilation and runtime
runtimeOnly (supersedes runtime ) — only used at runtime, not for compilation
testCompileOnly — same as compileOnly except it’s for the tests
testImplementation — test equivalent of implementation
testRuntimeOnly — test equivalent of runtimeOnly
You can learn more about these and how they relate to one another in the plugin reference chapter.
Be aware that the Java Library Plugin offers two additional configurations — api and compileOnlyApi — for dependencies that are required for compiling both the module and any modules that depend on it.
The Java Library Plugin has historically used the compile configuration for dependencies that are required to both compile and run a project’s production code. It is now deprecated, and will issue warnings when used, because it doesn’t distinguish between dependencies that impact the public API of a Java library project and those that don’t. You can learn more about the importance of this distinction in Building Java libraries.
We have only scratched the surface here, so we recommend that you read the dedicated dependency management chapters once you’re comfortable with the basics of building Java projects with Gradle. Some common scenarios that require further reading include:
Defining a custom Maven- or Ivy-compatible repository
Declaring dependencies with changing (e.g. SNAPSHOT) and dynamic (range) versions
Testing your fixes to a 3rd-party dependency via composite builds (a better alternative to publishing to and consuming from Maven Local)
You’ll discover that Gradle has a rich API for working with dependencies — one that takes time to master, but is straightforward to use for common scenarios.
Compiling your code
Compiling both your production and test code can be trivially easy if you follow the conventions:
Put your production source code under the src/main/java directory
Put your test source code under src/test/java
Declare your production compile dependencies in the compileOnly or implementation configurations (see previous section)
Declare your test compile dependencies in the testCompileOnly or testImplementation configurations
Run the compileJava task for the production code and compileTestJava for the tests
Other JVM language plugins, such as the one for Groovy, follow the same pattern of conventions. We recommend that you follow these conventions wherever possible, but you don’t have to. There are several options for customization, as you’ll see next.
Customizing file and directory locations
Imagine you have a legacy project that uses an src directory for the production code and test for the test code. The conventional directory structure won’t work, so you need to tell Gradle where to find the source files. You do that via source set configuration.
Each source set defines where its source code resides, along with the resources and the output directory for the class files. You can override the convention values by using the following syntax:
Now Gradle will only search directly in src and test for the respective source code. What if you don’t want to override the convention, but simply want to add an extra source directory, perhaps one that contains some third-party source code you want to keep separate? The syntax is similar:
Crucially, we’re using the method srcDir() here to append a directory path, whereas setting the srcDirs property replaces any existing values. This is a common convention in Gradle: setting a property replaces values, while the corresponding method appends values.
You can see all the properties and methods available on source sets in the DSL reference for SourceSet and SourceDirectorySet. Note that srcDirs and srcDir() are both on SourceDirectorySet .
Changing compiler options
Most of the compiler options are accessible through the corresponding task, such as compileJava and compileTestJava . These tasks are of type JavaCompile, so read the task reference for an up-to-date and comprehensive list of the options.
For example, if you want to use a separate JVM process for the compiler and prevent compilation failures from failing the build, you can use this configuration:
That’s also how you can change the verbosity of the compiler, disable debug output in the byte code and configure where the compiler can find annotation processors.
Targeting a specific Java version
By default, Gradle will compile Java code to the language level of the JVM running Gradle. With the usage of Java toolchains, you can break that link by making sure a given Java version, defined by the build, is used for compilation, execution and documentation. It is however possible to override some compiler and execution options at the task level.
Since version 9, the Java compiler can be configured to produce bytecode for an older Java version while making sure the code does not use any APIs from a more recent version. Gradle now supports this release flag on CompileOptions directly for Java compilation. This option takes precedence over the properties described below.
Due to a bug in Java 9 that was fixed in Java 10, Gradle cannot leverage the release flag when compiling with Java 9.
Historical options for the Java compiler remain available:
Defines which language version of Java your source files should be treated as.
Defines the minimum JVM version your code should run on, i.e. it determines the version of byte code the compiler generates.
These options can be set per JavaCompile task, or on the java < >extension for all compile tasks, using properties with the same names.
Using a toolchain makes it illegal to configure the sourceCompatibility or targetCompatibility at the java < >extension level.
However, these options do not protect against the use of APIs introduced in later Java versions.
Compiling and testing Java 6/7
Gradle can only run on Java version 8 or higher. Gradle still supports compiling, testing, generating Javadoc and executing applications for Java 6 and Java 7. Java 5 and below are not supported.
If using Java 10+, leveraging the release flag might be an easier solution, see above.
To use Java 6 or Java 7, the following tasks need to be configured:
JavaCompile task to fork and use the correct Java home
Javadoc task to use the correct javadoc executable
Test and the JavaExec task to use the correct java executable.
With the usage of Java toolchains, this can be done as follows:
Example: Configure Java 7 build
The only requirement is that Java 7 is installed and has to be either in a location Gradle can detect automatically or explicitly configured.
Compiling independent sources separately
Most projects have at least two independent sets of sources: the production code and the test code. Gradle already makes this scenario part of its Java convention, but what if you have other sets of sources? One of the most common scenarios is when you have separate integration tests of some form or other. In that case, a custom source set may be just what you need.
You can see a complete example for setting up integration tests in the Java testing chapter. You can set up other source sets that fulfil different roles in the same way. The question then becomes: when should you define a custom source set?
To answer that question, consider whether the sources:
Need to be compiled with a unique classpath
Generate classes that are handled differently from the main and test ones
Form a natural part of the project
If your answer to both 3 and either one of the others is yes, then a custom source set is probably the right approach. For example, integration tests are typically part of the project because they test the code in main . In addition, they often have either their own dependencies independent of the test source set or they need to be run with a custom Test task.
Other common scenarios are less clear cut and may have better solutions. For example:
Separate API and implementation JARs — it may make sense to have these as separate projects, particularly if you already have a multi-project build
Generated sources — if the resulting sources should be compiled with the production code, add their path(s) to the main source set and make sure that the compileJava task depends on the task that generates the sources
If you’re unsure whether to create a custom source set or not, then go ahead and do so. It should be straightforward and if it’s not, then it’s probably not the right tool for the job.
Managing resources
Many Java projects make use of resources beyond source files, such as images, configuration files and localization data. Sometimes these files simply need to be packaged unchanged and sometimes they need to be processed as template files or in some other way. Either way, the Java Library Plugin adds a specific Copy task for each source set that handles the processing of its associated resources.
The task’s name follows the convention of processSourceSetResources — or processResources for the main source set — and it will automatically copy any files in src/[sourceSet]/resources to a directory that will be included in the production JAR. This target directory will also be included in the runtime classpath of the tests.
Since processResources is an instance of the Copy task, you can perform any of the processing described in the Working With Files chapter.
Java properties files and reproducible builds
You can easily create Java properties files via the WriteProperties task, which fixes a well-known problem with Properties.store() that can reduce the usefulness of incremental builds.
The standard Java API for writing properties files produces a unique file every time, even when the same properties and values are used, because it includes a timestamp in the comments. Gradle’s WriteProperties task generates exactly the same output byte-for-byte if none of the properties have changed. This is achieved by a few tweaks to how a properties file is generated:
no timestamp comment is added to the output
the line separator is system independent, but can be configured explicitly (it defaults to ‘\n’ )
the properties are sorted alphabetically
Sometimes it can be desirable to recreate archives in a byte for byte way on different machines. You want to be sure that building an artifact from source code produces the same result, byte for byte, no matter when and where it is built. This is necessary for projects like reproducible-builds.org.
These tweaks not only lead to better incremental build integration, but they also help with reproducible builds. In essence, reproducible builds guarantee that you will see the same results from a build execution — including test results and production binaries — no matter when or on what system you run it.
Running tests
Alongside providing automatic compilation of unit tests in src/test/java, the Java Library Plugin has native support for running tests that use JUnit 3, 4 & 5 (JUnit 5 support came in Gradle 4.6) and TestNG. You get:
An automatic test task of type Test, using the test source set
An HTML test report that includes the results from all Test tasks that run
Easy filtering of which tests to run
Fine-grained control over how the tests are run
The opportunity to create your own test execution and test reporting tasks
You do not get a Test task for every source set you declare, since not every source set represents tests! That’s why you typically need to create your own Test tasks for things like integration and acceptance tests if they can’t be included with the test source set.
As there is a lot to cover when it comes to testing, the topic has its own chapter in which we look at:
How tests are run
How to run a subset of tests via filtering
How Gradle discovers tests
How to configure test reporting and add your own reporting tasks
How to make use of specific JUnit and TestNG features
You can also learn more about configuring tests in the DSL reference for Test.
Packaging and publishing
How you package and potentially publish your Java project depends on what type of project it is. Libraries, applications, web applications and enterprise applications all have differing requirements. In this section, we will focus on the bare bones provided by the Java Library Plugin.
By default, the Java Library Plugin provides the jar task that packages all the compiled production classes and resources into a single JAR. This JAR is also automatically built by the assemble task. Furthermore, the plugin can be configured to provide the javadocJar and sourcesJar tasks to package Javadoc and source code if so desired. If a publishing plugin is used, these tasks will automatically run during publishing or can be called directly.
If you want to create an ‘uber’ (AKA ‘fat’) JAR, then you can use a task definition like this:
See Jar for more details on the configuration options available to you. And note that you need to use archiveClassifier rather than archiveAppendix here for correct publication of the JAR.
You can use one of the publishing plugins to publish the JARs created by a Java project:
Modifying the JAR manifest
Each instance of the Jar , War and Ear tasks has a manifest property that allows you to customize the MANIFEST.MF file that goes into the corresponding archive. The following example demonstrates how to set attributes in the JAR’s manifest:
See Manifest for the configuration options it provides.
You can also create standalone instances of Manifest . One reason for doing so is to share manifest information between JARs. The following example demonstrates how to share common attributes between JARs:
Another option available to you is to merge manifests into a single Manifest object. Those source manifests can take the form of a text for or another Manifest object. In the following example, the source manifests are all text files except for sharedManifest , which is the Manifest object from the previous example:
Manifests are merged in the order they are declared in the from statement. If the base manifest and the merged manifest both define values for the same key, the merged manifest wins by default. You can fully customize the merge behavior by adding eachEntry actions in which you have access to a ManifestMergeDetails instance for each entry of the resulting manifest. Note that the merge is done lazily, either when generating the JAR or when Manifest.writeTo() or Manifest.getEffectiveManifest() are called.
Speaking of writeTo() , you can use that to easily write a manifest to disk at any time, like so:
Generating API documentation
The Java Library Plugin provides a javadoc task of type Javadoc, that will generate standard Javadocs for all your production code, i.e. whatever source is in the main source set. The task supports the core Javadoc and standard doclet options described in the Javadoc reference documentation. See CoreJavadocOptions and StandardJavadocDocletOptions for a complete list of those options.
As an example of what you can do, imagine you want to use Asciidoc syntax in your Javadoc comments. To do this, you need to add Asciidoclet to Javadoc’s doclet path. Here’s an example that does just that:
You don’t have to create a configuration for this, but it’s an elegant way to handle dependencies that are required for a unique purpose.
You might also want to create your own Javadoc tasks, for example to generate API docs for the tests:
These are just two non-trivial but common customizations that you might come across.
Cleaning the build
The Java Library Plugin adds a clean task to your project by virtue of applying the Base Plugin. This task simply deletes everything in the $buildDir directory, hence why you should always put files generated by the build in there. The task is an instance of Delete and you can change what directory it deletes by setting its dir property.
Building JVM components
All of the specific JVM plugins are built on top of the Java Plugin. The examples above only illustrated concepts provided by this base plugin and shared with all JVM plugins.
Read on to understand which plugins fits which project type, as it is recommended to pick a specific plugin instead of applying the Java Plugin directly.
Building Java libraries
The unique aspect of library projects is that they are used (or «consumed») by other Java projects. That means the dependency metadata published with the JAR file — usually in the form of a Maven POM — is crucial. In particular, consumers of your library should be able to distinguish between two different types of dependencies: those that are only required to compile your library and those that are also required to compile the consumer.
Gradle manages this distinction via the Java Library Plugin, which introduces an api configuration in addition to the implementation one covered in this chapter. If the types from a dependency appear in public fields or methods of your library’s public classes, then that dependency is exposed via your library’s public API and should therefore be added to the api configuration. Otherwise, the dependency is an internal implementation detail and should be added to implementation.
If you’re unsure of the difference between an API and implementation dependency, the Java Library Plugin chapter has a detailed explanation. In addition, you can explore a basic, practical sample of building a Java library.
Building Java applications
Java applications packaged as a JAR aren’t set up for easy launching from the command line or a desktop environment. The Application Plugin solves the command line aspect by creating a distribution that includes the production JAR, its dependencies and launch scripts Unix-like and Windows systems.
See the plugin’s chapter for more details, but here’s a quick summary of what you get:
assemble creates ZIP and TAR distributions of the application containing everything needed to run it
A run task that starts the application from the build (for easy testing)
Shell and Windows Batch scripts to start the application
You can see a basic example of building a Java application in the corresponding sample.
Building Java web applications
Java web applications can be packaged and deployed in a number of ways depending on the technology you use. For example, you might use Spring Boot with a fat JAR or a Reactive-based system running on Netty. Whatever technology you use, Gradle and its large community of plugins will satisfy your needs. Core Gradle, though, only directly supports traditional Servlet-based web applications deployed as WAR files.
That support comes via the War Plugin, which automatically applies the Java Plugin and adds an extra packaging step that does the following:
Copies static resources from src/main/webapp into the root of the WAR
Copies the compiled production classes into a WEB-INF/classes subdirectory of the WAR
Copies the library dependencies into a WEB-INF/lib subdirectory of the WAR
This is done by the war task, which effectively replaces the jar task — although that task remains — and is attached to the assemble lifecycle task. See the plugin’s chapter for more details and configuration options.
There is no core support for running your web application directly from the build, but we do recommend that you try the Gretty community plugin, which provides an embedded Servlet container.
Building Java EE applications
Java enterprise systems have changed a lot over the years, but if you’re still deploying to JEE application servers, you can make use of the Ear Plugin. This adds conventions and a task for building EAR files. The plugin’s chapter has more details.
Building Java Platforms
A Java platform represents a set of dependency declarations and constraints that form a cohesive unit to be applied on consuming projects. The platform has no source and no artifact of its own. It maps in the Maven world to a BOM.
The support comes via the Java Platform plugin, which sets up the different configurations and publication components.
This plugin is the exception as it does not apply the Java Plugin.
Enabling Java preview features
Using a Java preview feature is very likely to make your code incompatible with that compiled without a feature preview. As a consequence, we strongly recommend you not to publish libraries compiled with preview features and restrict the use of feature previews to toy projects.
To enable Java preview features for compilation, test execution and runtime, you can use the following DSL snippet:
Источник


