- GridView
- Знакомьтесь — GridView
- Свойства
- Базовый пример
- GridView с картинками
- GridView с картинками и пояснительным текстом
- res/layout/cellgrid.xml
- Убрать вертикальную прокрутку
- Галерея
- Загружаем картинки из внешнего накопителя
- ImageAdapter.java
- Полный список
- numColumns и columnWidth
- horizontalSpacing, verticalSpacing
- stretchMode
- GridView in Android with Example
- XML Attributes of GridView
- Example
- Android GridView Tutorial With Example For Beginners
- Adapter of GridView
- GridView XML Code
- 1. android:id=”@+id/gv”
- 2. android:layout_width
- 3. android:layout_height
- 4. android:numColumns=”3″
- 5. android:horizontalSpacing=”3dp”
- 6. android:verticalSpacing=”6dp”
- 7. android:columnWidth=”30dp”
- 8. android:gravity=”center”
- Methods of GridView
- 1. setAdapter(ListAdapter adapter)
- 2. setColumnWidth(int columnWidth)
- 3. setHorizontalSpacing(int horizontalSpacing)
- 4. setNumColumns(int numColumns)
- 5. setSelection(int position)
- 6. setVerticalSpacing(int verticalSpacing)
- 7. getColumnWidth()
- 8. getGravity()
- 9. getHorizontalSpacing()
- 10. getNumColumns()
- 11. getVerticalSpacing()
- GridView Android Studio Examples
- Step 1. Layout Work
- Step 2. Grid Model
- Step 3. Adapter Creation
- Step 4. Main Activity Code
- Output of GridView
- Second Example With ArrayAdapter
- Step 1. Layout Files Code
- Step 2. Write Main Code
- Step 3. Making an Array Adapter
GridView
Знакомьтесь — GridView
Компонент GridView представляет собой плоскую таблицу. Для GridView можно использовать собственные поля для отображения элементов данных, создав класс, производный от класса ArrayAdapter или BaseAdapter и т.п, и переопределив его метод getView().
В старых версиях студии находился в разделе Containers, сейчас находится в Legacy и считается устаревшим.
Число столбцов для GridView чаще задаётся статически. Число строк в элементе определяется динамически на основании числа элементов, которые предоставляет адаптер.
Свойства
- android:numColumns — определяет количество столбцов. Если поставлено значение auto_fit, то система вычислит количество столбцов, основанное на доступном пространстве
- android:verticalSpacing — устанавливает размер пустого пространства между ячейками таблицы
- android:columnWidth — устанавливает ширину столбцов
- android:stretchMode — указывает, куда распределяется остаток свободного пространства для таблицы с установленным значением android:numColumns=»auto_fit». Принимает значения columnWidth для paспределения остатка свободного пространства между ячейками столбцов для их увеличения или spacingWidth — для увеличения пространства между ячейками
Базовый пример
Если поместить GridView на форму, то увидим следующую картину.

Внесём небольшие правки
В коде реализуем наполнение таблицы через адаптер. Создадим новый файл DataAdapter.java:
Теперь напишем код для основного окна приложения. Как и у ListView, нам нужно использовать метод setAdapter(), а также методы setOnItemSelectedListener(), onItemSelected(), onNothingSelected().
Запустите проект и начинайте выбирать любой элемент — его название отобразится в текстовой метке в верхней части экрана. Я обратил внимание, что в эмуляторе с помощью джойстика можно выбрать нужный элемент, но в современных телефонах джойстика нет, поэтому я позже добавил метод setOnItemClickListener(), чтобы можно было щёлкать по элементам в GridView и выводить их названия в метке.

GridView с картинками
Вместо текста можно использовать и картинки. Немного модифицируем проект. В шаблоне разметки изменим GridView:
Создадим новый адаптер ImageAdapter.java, в котором будет возможность подключать картинки
Теперь код в основной активности:

Зная номер позиции можно доработать программу, чтобы при щелчке на картинке, она открывалась на весь экран. Давайте так и сделаем. Создадим новый XML-файл разметки в папке res/layout под именем full_image.xml:
Создадим новую активность, в которой будет выводиться изображение на весь экран (файл FullImageActivity.java):
Класс получает от намерения номер позиции и выводит по этому номеру изображение из ресурсов.
Теперь в основной активности модифицируем код для щелчка
Осталось добавить в манифест новую активность:
У нас получилась галерея с просмотром отдельной картинки.
GridView с картинками и пояснительным текстом
Модифицируем предыдущий пример и создадим сетку, состоящую из картинок с сопроводительным текстом внизу.
Можно было оставить предыдущую разметку для активности, но я решил чуть её изменить, убрав лишние элементы
Теперь создадим разметку для отдельной ячейки сетки — нам нужны ImageView и TextView:
res/layout/cellgrid.xml
Создадим новый класс ImageTextAdapter. Он практически не отличается от класса ImageAdapter, поменялся только метод getView(), разницу в коде я закоментировал для сравнения
Осталось вызвать нужный адаптер в активности:

Убрать вертикальную прокрутку
Прочитал заметку про убирание вертикальной прокрутки, которая возникает при движении пальцем вверх. Может пригодится кому-то:
Галерея
Рассмотрим вариант создания галереи на основе GridView.
Создаём новый проект. Также нужно подготовить фотографии для галереи, которые следует поместить в папку res/drawable-hdpi.
Поместим на главном экране приложения GridView:
Создадим новый класс ImageAdapter.java, наследующий от BaseAdapter, для размещения изображений в сетке GridView через собственный адаптер.
Открываем основной класс приложения и связываем через созданный адаптер изображения с GridView:
Запустим проект и проверим, что всё отображается нормально.

Не обращайте внимания, что картинки на скриншоте повторяются, просто было лень готовить пятнадцать разных фотографий.
На этом урок можно было закончить, но давайте доработаем приложение, чтобы выбранная картинка отображалась в полном размере на весь экран. Для этого нужно передать идентификатор выбранного изображения новой активности.
Создадим в папке layout файл разметки full_image.xml для этой цели.
Создадим новый класс FullImageActivity.java для активности, которая будет отображать картинку на весь экран. Активность через намерение будет получать идентификатор картинки и выводить её на экран.
Не забываем прописать новый класс в манифесте проекта.
Возвращаемся к главной активности и добавляем обработчик щелчков на сетке:
Снова запускаем проект и щёлкаем по любой миниатюре — должен запуститься новый экран с картинкой во весь рост. Теперь можно разглядеть кота получше.


Загружаем картинки из внешнего накопителя
Попробуем загрузить картинки с внешнего накопителя в GridView. Пример писался под Android 2.3, возможно сейчас уже не заработает.
Разметка основного экрана состоит из одного компонента GridView:
Для данного компонента нужен адаптер. Создадим новый класс ImageAdapter.
ImageAdapter.java
Код для главной активности:
В этом примере при щелчке выводится всплывающее сообщение. Вы можете запустить новую активность с показом выбранной картинки.
Источник
Полный список
GridView – еще один из компонентов, использующих адаптеры. Он выводит элементы в виде сетки/матрицы/таблицы, нужное подчеркнуть )
Сделаем простой пример. И рассмотрим интересные атрибуты этого компонента.
Project name: P0571_GridView
Build Target: Android 2.3.3
Application name: GridView
Package name: ru.startandroid.develop.p0571gridview
Create Activity: MainActivity
В экран main.xml поместим GridView:
Создадим в любой папке res/drawable-* файл rect.xml
Это просто прямоугольник, залитый синим цветом. Я буду использовать его как фон. Я эту тему еще не рассматривал в уроках, тут можно почитать подробнее .
Создадим свой layout для адаптера – item.xml
LinearLayout с фоном drawable/rect, который мы создали ранее. И TextView.
Кода немного. Определяем GridView и создаем адаптер. В качестве layout для адаптера используем созданный item.xml, а tvText – это элемент, в который адаптер будет вставлять текст. Метод adjustGridView пока пустой, в нем будем кодить настройки Grid-а.
Давайте смотреть, какие для GridView есть атрибуты.
numColumns и columnWidth
numColumns – кол-во столбцов в сетке. Если его не задавать, то столбец будет по умолчанию один. Запустим приложение и убедимся.

Давайте поменяем это свойство — укажем, например 3. Сделаем это в пустом пока что методе adjustGridView
Сохраним и запустим.

Все верно, получилось три столбца.
Это свойство также может иметь значение AUTO_FIT. В этом случае проверяется значение поля атрибута columnWidth (ширина столбца).
— если ширина столбца явно указана, то кол-во столбцов рассчитывается исходя из ширины, доступной GridView, и ширины столбцов.
— иначе, кол-во столбцов считается равным 2
Проверим. Укажем кол-во столбцов = AUTO_FIT, а ширину столбцов задавать пока не будем.
Запускаем, видим два столбца

Теперь укажем явно ширину столбцов, пусть будет 50.
Теперь кол-во столбцов рассчитывается исходя из их ширины.

Видно, что в экран влезло 6 столбцов. Вы можете поизменять параметр ширины столбцов и убедиться, что их кол-во будет меняться.
horizontalSpacing, verticalSpacing
Это горизонтальный и вертикальный отступы между ячейками. Пусть будет 5.

Между ячейками появилось расстояние.
stretchMode
Этот параметр определяет, как будет использовано свободное пространство, если оно есть. Используется в случае, когда вы указываете ширину столбца и кол-во ставите в режим AUTO_FIT. Изменим наш метод, добавим туда настройку stretch-параметра.
stretchMode может принимать 4 значения:
NO_STRETCH – свободное пространство не используется

Столбцы выровнены по левому краю. Все свободное пространство справа.
STRETCH_COLUMN_WIDTH – свободное пространство используется столбцами, это режим по умолчанию

Столбцы растянуты по ширине. Она уже может не соответствовать той, что указана в setColumnWidth.
STRETCH_SPACING – свободное пространство равномерно распределяется между столбцами

Ширина столбцов неизменна. Увеличены интервалы между ними.
STRETCH_SPACING_UNIFORM – свободное пространство равномерно распределяется не только между столбцами, но и справа и слева

Ширина столбцов неизменна. Увеличены интервалы между ними и с боков.
Разумеется, все эти параметры можно задавать не только программно, но и через атрибуты в layout-файлах. Вместо ArrayAdapter можно использовать любой другой. Можно прикрутить обработчик setOnItemClickListener и получать позицию или id нажатого элемента. Все как в обычных списках.
Есть также хороший гугловский пример по этой теме:
На следующем уроке:
Присоединяйтесь к нам в Telegram:
— в канале StartAndroid публикуются ссылки на новые статьи с сайта startandroid.ru и интересные материалы с хабра, medium.com и т.п.
— в чатах решаем возникающие вопросы и проблемы по различным темам: Android, Kotlin, RxJava, Dagger, Тестирование
— ну и если просто хочется поговорить с коллегами по разработке, то есть чат Флудильня
— новый чат Performance для обсуждения проблем производительности и для ваших пожеланий по содержанию курса по этой теме
Источник
GridView in Android with Example
A GridView is a type of AdapterView that displays items in a two-dimensional scrolling grid. Items are inserted into this grid layout from a database or from an array. The adapter is used for displaying this data, setAdapter() method is used to join the adapter with GridView. The main function of the adapter in GridView is to fetch data from a database or array and insert each piece of data in an appropriate item that will be displayed in GridView. This is how the GridView structure looks like. Note that we are going to implement this project using the Java language.
XML Attributes of GridView
- android:numColumns: This attribute of GridView will be used to decide the number of columns that are to be displayed in Grid.
- android:horizontalSpacing: This attribute is used to define the spacing between two columns of GridView.
- android:verticalSpacing: This attribute is used to specify the spacing between two rows of GridView.
Example
Now let us see an example in which we will implement a simple GridView in Android App. In the GridView, we are now displaying the list of courses available on GeeksforGeeks.
Step 1: Creating a New Project
To create a new project in Android Studio please refer to How to Create/Start a New Project in Android Studio. Note that select Java as the programming language.
Источник
Android GridView Tutorial With Example For Beginners

Welcome to Android GridView Tutorial With Example For Beginners.
GridView is a view group that displays the items in the two dimensional view. (Row and Column)
This grid view items are vertically scrollable but not horizontally.
GridView is the dynamical view, meaning that it inserts the data item automatically using the adapter.
Android gridview can adjust any number of data items with it’s scrollable feature.
Most common example of gridview is your android device’s gallery application.
Gallery displays the images and videos in a gridview with rows and columns.
Gridview also enable user to click on it’s any item. We will also learn how to deal with click event.
Adapter of GridView
Adapter will work as an agent between gridview and the data source.
It will fetch the data items one by one from the data source and passes it to the gridview.
GridView will create it’s cell using this data item.
Adapter is the simple JAVA class. We can make custom adapter by extending the ArrayAdapter or Base adapter.
We will see the usage of adapter in the example that we will create at the end of this article.
GridView XML Code
Following is the XML representation of the android gridview.
XML representation of grid view has various properties.
Let us see how this properties affects the gridview settings.
1. android:id=”@+id/gv”
id is the unique identity for the gridview.
In the java file, compiler will get the reference to gridview using this id.
Value of ID should be unique in the whole android app to reduce the runtime errors.
2. android:layout_width
It defines the actual width of the gridview.
Generally, it should be match_parent which means a full width gridview.
However, you can give specific value in dp in certain cases.
3. android:layout_height
This property gives the height to the gridview.
For making our gridview a responsive through various screen size, you can give it a full height or you can define weight with linearlayout.
For specific purpose, you can also define it in the dp values to make static height in any screen size.
4. android:numColumns=”3″
This property tells the grid view how many columns it need to create.
Two types of value can be there.
One is auto_fit and another is any integer number.
auto_fit means that gridview will decide itself how many columns to create according to the width of the android device.
Specific integer number is static and number of columns will be of this value regardless of screen width.
5. android:horizontalSpacing=”3dp”
It defines the default horizontal space amount among every columns.
The value of this property can be in pixel(px),density pixel(dp) or scale independent pixel(sp).
6. android:verticalSpacing=”6dp”
It defines the default vertical space amount among every rows.
The value of this property can be in pixel(px),density pixel(dp) or scale independent pixel(sp).
7. android:columnWidth=”30dp”
This property is giving the fixed width to the every column of the gridview.
8. android:gravity=”center”
It specifies the gravity within each cell.
Methods of GridView
Android gives us specific methods to control the gridview.
1. setAdapter(ListAdapter adapter)
It simply attach the adapter to the grid view.
2. setColumnWidth(int columnWidth)
It sets the column width programmatically.
3. setHorizontalSpacing(int horizontalSpacing)
Set the amount of horizontal (x) spacing to place between each item in the gridview.
4. setNumColumns(int numColumns)
Set the number of columns in the gridview.
5. setSelection(int position)
Sets the currently selected item
6. setVerticalSpacing(int verticalSpacing)
Set the amount of vertical (y) spacing to place between each item in the gridview.
7. getColumnWidth()
Return the width of a column in the grid.
8. getGravity()
Describes how the child views are horizontally aligned.
9. getHorizontalSpacing()
Returns the amount of horizontal spacing currently used between each item in the grid.
10. getNumColumns()
Get the number of columns in the grid.
11. getVerticalSpacing()
Returns the amount of vertical spacing between each item in the gridview.
GridView Android Studio Examples
Now let us make two gridview projects.
In the first one, we will use base adapter and in another, we will use array adapter.
Step 1. Layout Work
First of all, we will make a gridview using base adapter.
Create a new project in android studio.
I recommend you to select empty activity when making a new project.
Now in the activity_main.xml file, add the following code
Main layout contains one gridview.
This gridview will have three columns.
Now prepare a new XML layout file in res->layout directory.
Give this file a name like grid_item.xml
Code structure for grid_item.xml is as the following
This file creates the layout for the cell of the grid view.
Adapter will use this file when creating a cell with data items.
One imageview and one textview is there in this file.
Now let us add some car images in our project.
Download these images by clicking on the below link.
After downloading these images, copy them into the res->drawable directory.
Step 2. Grid Model
Let us create a model class for grid view.
This model will help us to maintain the data seamlessly.
Make a new JAVA class and give it a name ImageModel.java
Write down the following coding lines in ImageModel.java
Above model class has two main variables.
One is the string variable and another is integer variable.
String is for image name and another is integer reference to drawable image.
Now for both these variables, I have written getter and setter methods.
Step 3. Adapter Creation
Make a new JAVA class called GridBaseAdapter.java
Code structure for GridBaseAdapter.java should look like the below
You can see that the above class is extending the Base adapter.
So we have override some methods of the Base adapter.
Constructor of this class has two parameters.
First is giving us the context. Second is the arraylist with the objects of the ImageModel class.
This arraylist is the data source to populate the grid view.
We will create this arraylist in the MainActivity.java class in the next step.
Now focus on the getView() method.
Compiler will first inflate the grid_item.xml file.
Then it will get the textview and imageview id.
After this, it will set the image and the text in the imageview and textview respectively.
Step 4. Main Activity Code
Now in the MainActivity.java file, add the below source code
I have taken one string array and one integer array.
String array myImageNameList holds the names of the cars.
While integer array myImageList contains the integer reference to the images present in the drawable folder.
Now compiler will populate the arraylist (imageModelArrayList) using the populateList() method.
We will pass these imageModelArrayList to the second parameter of GridBaseAdapter constructor.
Finally, compiler will set the click event for gridview.
When the user clicks on the gridview, it will show a toast.
Output of GridView
When you run the above example, you should get the below output
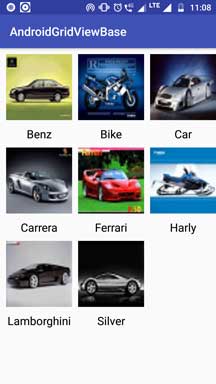 GridView
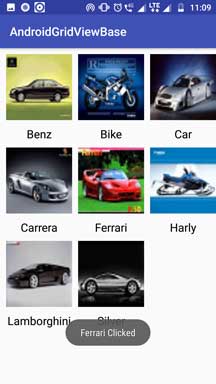 Click Event
Second Example With ArrayAdapter
In this example, our adapter will use ArrayAdapter instead of Base adapter.
So make a new fresh android studio project with empty activity.
Step 1. Layout Files Code
In the activity_main.xml file, write down the following lines
Simply one gridview in the main layout.
Now make a new XML layout resource file. Give it a name gv_cell.xml
You should write the below code snippet in the gv_cell.xml file.
This file is the responsible for the view layout of each cell of our gridview.
It has one imageview and one textview.
You can change the text color, text size, text style etc. in this file.
Step 2. Write Main Code
In the MainActivity.java file, add the below code snippet
There are same two variables as we have taken in the first example.
One is string array variable with names of the cars in the string format.
Second is the integer array variable with reference to the images in the drawable folder.
Now focus on the constructor of the GridArrayAdapter. We will create this class in the next step.
Right now let us just see it’s constructor.
First parameter is simply a context. Second one is the reference to the gv_cell.xml file.
Third one is integer array and fourth one is the string array.
Step 3. Making an Array Adapter
Prepare a new JAVA class and name it as GridArrayAdapter.java
Code layout for this file is as the below.
This class is extending the Array Adapter.
getView() method will create the view for each cell.
This method uses gv_cell.xml file to make the layout of the cell.
Then compiler will set the image and text using the integer and string array which are our data source.
See the below image which are outcome of above example.
Click Event GridView
Источник


