- Handler in Android
- Android Activity (MainActivity.java)
- Android Handler Tutorial and Examples
- Uses of Handler
- Handler and Looper
- Handler Quick Examples
- Handler post()
- 4. How to Execure a Specified Runnable on the Main thread
- Example 1: Various Handler Examples
- Step 1: Create Java or Kotlin Project
- Step 2: Dependencies
- Step 3: Permissions
- Step 4: Design Layout
- Step 5: Write Code
- Reference
- Example 2: Handler with ProgressBar Example
- (a). MainActivity.java
- (b). activity_main.xml
- Example 3: Simple Handler Example with Timer
- Step 1: Dependencies
- Step 2: Layouts
- Step 3: Write Code
- Reference
- Memory-Safe Handler
- Solution – Use Weak Handler
- Step 1: Install it
- Step 2: Write Code
- Reference
- Oclemy
- Русские Блоги
- Подробное использование Android Handler
- Зачем вам нужен Handler?
- Дочерним потокам не разрешен доступ к пользовательскому интерфейсу
- Знакомство с обработчиком
- Использование обработчика
- Метод 1: публикация (запускается)
- Метод 2: sendMessage (сообщение)
- Проблемы с обработчиком
- Аспект памяти
- Аномальный аспект
- избегать
- Улучшения обработчика
- Реализация обработчика
- Метод 1. Реализуйте исполняемый интерфейс, общайтесь через публикацию (Runnable) и уведомляйте об обновлениях Activity через данный интерфейс обратного вызова
- Метод 2: наследовать поток, общаться через sendMessage обработчика
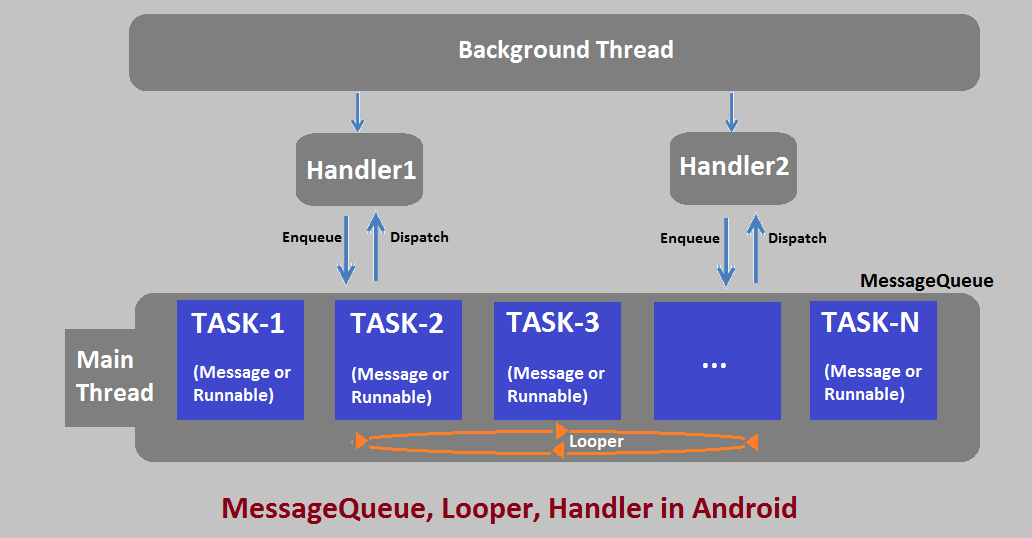
- Механизм связи обработчика
- Как Handler связывает Looper и MessageQueue
- 1. Обработчик отправляет сообщения
- 2. Сообщение попадает в очередь.
- 3. Looper обрабатывает сообщения
- 4. Обработчик обрабатывает сообщение.
- подводить итоги
Handler in Android

Jan 5, 2017 · 3 min read
Android handles all the UI operations and input events from one single thread which is known as called the Main or UI thread. Android collects all events in this thread in a queue and processes this queue with an instance of the Looper class.
Android supports Thread class to perform asynchronous processing. Android also supplies java.util.concurrent package to perform background task like using the ThreadPools and Executor classes.
If you need to update the UI from another main Thread, you need to synchronize with the main thread. Because of this restrictions and complexity, Android provides additional constructed classes to handle concurrently in comparison with standard Java i.e. Handler or AsyncTask.
A Handler allows communicating back with UI thread from other background thread. This is useful in android as android doesn’t allow other threads to communicate directly with UI thread.
How Handler works
A Handler allows you to send and process Message and Runnable objects associated with a thread’s MessageQueue. Each Handler instance is associated with a single thread and that thread’s message queue.
When you create a new Handler, it is bound to the thread / message queue of the thread that is creating it — from that point on, it will deliver messages and runnables to that message queue and execute them as they come out of the message queue.
There are two main uses for a Handler:
(1) To schedule messages and runnables to be executed as some point in the future. In other words perform action on same thread in future.
(2) To enqueue an action to be performed on a different thread than your own. In other words enqueue an action to perform on different thread.
How to schedule
Scheduling messages is accomplished with the post(Runnable), postAtTime(Runnable, long), postDelayed(Runnable, long), sendEmptyMessage(int), sendMessage(Message), sendMessageAtTime(Message, long), and sendMessageDelayed(Message, long) methods.
The post versions allow you to enqueue Runnable objects to be called by the message queue when they are received.
The sendMessage versions allow you to enqueue a Message object containing a bundle of data that will be processed by the Handler’s handleMessage(Message) method (requiring that you implement a subclass of Handler).
Difference between post() and sendMessage()
Conventionally you use post() when you want to execute some code on the UI Thread without having to know anything about your Handler object. It makes sense in many cases where arbitrary code needs to be executed on the UI Thread.
But in some cases you want to organize what is being sent to the UI Thread and have specific functions you want to execute that way you can use sendMessage().
Below are the code snipped explains use of Handler’s post() method-
Android Activity Layout (activity_main.xml)
Android Activity (MainActivity.java)
For the curious, you can check out the code on Github.
Источник
Android Handler Tutorial and Examples
Android Handler Tutorial and Examples
A Handler is a threading class defined in the android.os package through which we can send and process Message and Runnable objects associated with a thread’s MessageQueue .
You start by creating a Handler instance. Then that instance gets associated with a single thread as well as that thread’s message queue. The Handler you’ve just created will then get bound to the thread or message queue of the thread that is creating it. Hence it can then deliver messages and runnables to that message queue and execute them as they come out of the message queue.
Uses of Handler
Handler has two main uses
- Scehduling of messages and runnables that need to be executed in the future.
- Enqueueing actions that need to be performed in the background thread.
Handler and Looper
Handler is a class fundamental to how we do threading in android, at the infrastructure level. It works hand in hand with the Looper. Together they underpin everything that the main thread does—including the
invocation of the Activity lifecycle methods.
Looper will take care of dispatching work on its message-loop thread. On the other hand Handler will serve two roles:
- First it will provide an interface to submit messages to its Looper
queue.
2.Secondly it will implement the callback for processing those messages when they are dispatched by the Looper.
Each Handler gets bound to a single Looper and, by extension, to one thread and its looper MessageQueue.
We said Handler does provide an interface to submit work to Looper threads. Apart from that, Handler also defines the code that process the messages submitted.
For example in the following code, the MyHandler class will override the Handler ‘s handleMessage() method.
This is where we then write our message-handling code:
Let’s say we have created a thread called MyThread . We can then create our handler inside our MyThread thread over the default
constructor Handler() .
Hence myHandler will get attached to the current thread’s Looper instead of the main thread’s Looper:
Then once started, the Looper thread is going to wait inside loop() method of the Looper class for messages to be added to its queue.
Then another thread can add a message to that queue. It can do that using the submit() method.
When that happens, the waiting thread will dispatch the message to our target MyHandler by invoking the handler’s handleMessage() method.
Handler instance/object allows us to be able to send messages to the Handler class from any thread and as a consequence, it is always dispatched to the Looper thread and handled by the correct Handler,
Handler Quick Examples
Let’s look at Handler quick examples, snippets and howTos.
1. How to show a splash activity via Handler
Our aim is to show a splash activity via Handler.
Asssume you have this layout as our activity_splash . It has imageview and several textviews.
Then we can come create our SpashActivity . It’s deriving from the AppCompatActivity. We are making several imports including the Handler itself as well as Glide, an imageloader library.
We’ll have an ImageView as our background:
We’ll use glide to load the image into an imageview:
Finally we come and instantiate our handler:
Then invoke the postDelayed() method passing in a Runnable where we implement the run() method.
It is inside the run() method where we do our background stuff. Take note we are also passing the delay in milliseconds.
3. How to use a Handler to refresh WebView
In this quick sample we want to use Handler’s postDelayed() method refresh a webview. You referesh a webview using the reload() method of the webview. We pass the delay time in milliseconds.
4. How to use a Handler to load animation
Android is an animation rich framework. The ability to use animations has been made easier given the presence of a Hnadler. Let’s look at a sample snippet that can show us how to load an animation using a Handler.
We will pass the view to animate, the animation resource id, the delay time and the Context object. We will use Handler’s postDelayed method. There we pass our Runnable annonymous class as well as the delay time.
That was animation in, well we also have animation out:
Handler post()
Handler has a method called post() :
As you can see that method takes a runnable object. The post() method causes the Runnable r to be added to the message queue.
Let’s look at several real world examples of this method:
1. Use Handler’s post() method to open keyboard
Here’s how to use the Handler’s post() method to open a Keyboard.
2. Handler’s post() method with Executor
An Executor is an object that executes submitted Runnable tasks.
3. Full Handler Reusable Utility class
Here is an example of a utility class that further explores Handler usage:
4. How to Execure a Specified Runnable on the Main thread
We pass the action to be run on the UI thread.
Let’s look at some full Examples.
Example 1: Various Handler Examples
This example will explore various practical usage scenarios that you are likely to get into while using the android.os.Handler class.
Step 1: Create Java or Kotlin Project
Create a java project in android studio. You can also create a kotlin one and use the code converter to convert from java to kotlin.
Step 2: Dependencies
No dependencies are needed for this project.
Step 3: Permissions
No permissions are needed for this project.
Step 4: Design Layout
This involves adding a bunch of textviews to your main activity layout. Also add a button. You can organize them using a vertical linear layout:
activity_main.xml
Step 5: Write Code
We then wrote our code. you start by extending the AppCompatActivity to create our main activity.
The Main activity with methods to demonstrates the usage of Handlers, Runnables, and Messages:
First you can post a task with ordinary thread using the following code:
And here’s how you can post a task with handler onto the main thread:
Here’s how you can post task with handler on concurrent thread:
And here’s how you can post task inside the background thread:
Here’s how to use the @UiThread annotation to post task with this window and textview:
And here’s how you can post task with handler on background thread:
Here’s how you can post task with a non-leaky Handler and Runnable :
Here is the full code;
MainActivity.java
Finally run the project.
Reference
Below are the code reference links:
| Number | Link |
|---|---|
| 1. | Download code |
| 2. | Follow code author |
Example 2: Handler with ProgressBar Example
In this tutorial we want to see how to post updates from a background thread to the user interface thread using a Handler.
We click a button and simulate doing heavy work in the background. Meanwhile we are able to update our progressbar as the work continues.
(a). MainActivity.java
This is the main activity. We derive from the AppCompatActivity. One of the imports we add is the Handler from the android.os package.
We will maintain three instance fields:
- Handler – a class defined in the android.os package through which we can send and process Message and Runnable objects associated with a thread’s MessageQueue .
- ProgressBar – a widget that allows us to show progress.
- Button – an action button.
Here’s the full code:
(b). activity_main.xml
This is the main activity layout. At the root we have a LinearLayout. This element allows us to arrange it’s children linearly either horizontally or vertically. We also have TextView to display the header text of our app. Also we have a progressbar to display progress. We have also a button that when clicked will start the thread to perform our work in the background thread.
Example 3: Simple Handler Example with Timer
This example explores how to use Handler with Timer .
Step 1: Dependencies
No third party depedencies are needed for this example.
Step 2: Layouts
We do not need any layout for this example.
Step 3: Write Code
Here is the full code:
HandlerActivity.java
Reference
Download the code below:
| Number | Link |
|---|---|
| 1. | Download code |
| 2. | Follow code author |
Memory-Safe Handler
Original implementation of Handler always keeps hard reference to handler in queue of execution. Any object in Message or Runnable posted to android.os.Handler will be hard referenced for some time. If you create anonymous Runnable and call to postDelayed with large timeout, that Runnable will be held in memory until timeout passes. Even if your Runnable seems small, it indirectly references owner class, which is usually something as big as Activity or Fragment.
You can read more here.
Solution – Use Weak Handler
What is weak handler?
It is a Memory safer implementation of android.os.Handler.
WeakHandler is trickier than android.os.Handler , it will keep WeakReferences to runnables and messages, and GC could collect them once WeakHandler instance is not referenced any more.
![]()
How do you use it?
Step 1: Install it
Register Jitpack as a maven url in your project-level build.gradle file as follows:
Then add the implementation statement under the dependencies closure in your app-level build.gradle file:
Sync to install it.
Step 2: Write Code
You can simply use WeakHandler as a drop-in replacement of the android.os.Handler . Just use it the way you would use the Handler . Below is an example:
ExampleActivity.java
Reference
Find the reference links below:
| Number | Link |
|---|---|
| 1. | Read more |
Oclemy
Thanks for stopping by. My name is Oclemy(Clement Ochieng) and we have selected you as a recipient of a GIFT you may like ! Together with Skillshare we are offering you PROJECTS and 1000s of PREMIUM COURSES at Skillshare for FREE for 1 MONTH. To be eligible all you need is by sign up right now using my profile .
Источник
Русские Блоги
Подробное использование Android Handler
Handler: Это объект распространения сообщений для отправки и обработки сообщений, и его объект Runnable связан с MessageQueue потока.
эффект: Планирование сообщений, переключение задачи на указанный поток для выполнения.
Зачем вам нужен Handler?
Дочерним потокам не разрешен доступ к пользовательскому интерфейсу
Если дочернему потоку разрешен доступ к пользовательскому интерфейсу, элементы управления пользовательского интерфейса будут в неожиданном состоянии в случае одновременного доступа нескольких потоков.
Традиционное решение: блокировка, но это усложнит логику доступа к UI, а во-вторых, снизит эффективность доступа к UI.
Знакомство с обработчиком
Однопоточная модель используется для обработки операций пользовательского интерфейса, а обработчик переключается на поток пользовательского интерфейса для решения проблемы недоступности пользовательского интерфейса в дочернем потоке.
Использование обработчика
Метод 1: публикация (запускается)
Создайте рабочий поток, реализуйте интерфейс Runnable, реализуйте метод запуска и обработайте трудоемкие операции.
Создайте обработчик, опубликуйте созданный Runnable через handler.post/postDelay и обновите пользовательский интерфейс в методе run.
Метод 2: sendMessage (сообщение)
Создать рабочий поток, унаследовать поток, перезапустить метод запуска и обработать трудоемкие операции
Создайте объект сообщения, установите флаг what и данные
Доставить сообщения через sendMessage
Создайте обработчик, перепишите метод handleMessage, оцените в соответствии с информацией msg.what, получите соответствующую информацию и обновите пользовательский интерфейс здесь.
Проблемы с обработчиком
Аспект памяти
Обработчик называется Activity, если это нестатический внутренний класс, он будет ссылаться на объект внешнего класса. Когда действие завершается, обработчик может не завершить выполнение, что вызывает утечку памяти в действии. Следовательно, статические внутренние классы используются везде, где вызывается Handler.
Аномальный аспект
Когда действие завершается, некоторые ресурсы освобождаются в методе onDestroy. В это время Handler выполняет метод handlerMessage, но связанные ресурсы были освобождены, что вызывает исключение нулевого указателя.
избегать
Если вы используете handlerMessage, добавьте в метод try catch.
Если вы используете метод post, добавьте try catch в метод Runnable.
Улучшения обработчика
Аспект памяти: используйте статический внутренний класс для создания объекта-обработчика и удерживайте слабую ссылку на Activity
Аспект исключения: вместо добавления try catch сообщение в очереди сообщений MessageQueue удаляется в onDestory.
Затем используйте следующий метод для создания объекта-обработчика:
И уничтожить в onDesotry:
Реализация обработчика
Длительная операция предполагает загрузку изображения из сети
Поток, который наследует Thread или реализует интерфейс Runnable, отделен от потока пользовательского интерфейса. Runnable взаимодействует с основным потоком через интерфейс обратного вызова, чтобы уменьшить связь и улучшить возможность повторного использования кода.
Создайте объект-обработчик в Activity и вызовите рабочий поток для выполнения
Метод 1. Реализуйте исполняемый интерфейс, общайтесь через публикацию (Runnable) и уведомляйте об обновлениях Activity через данный интерфейс обратного вызова
Метод 2: наследовать поток, общаться через sendMessage обработчика
Механизм связи обработчика
- Создайте Handler и используйте Looper текущего потока для создания системы цикла сообщений;
- Обработчик отправляет сообщения через sendMessage (Message) или Post (Runnable) и вызывает enqueueMessage, чтобы вставить сообщение в список сообщений;
- Looper циклически обнаруживает сообщения в очереди сообщений, если есть сообщение, он извлекает сообщение и вызывает метод dispatchMessage обработчика, содержащегося в сообщении, и вызывает для исполнения handleMessage, перезаписанный в потоке Handler.
Как Handler связывает Looper и MessageQueue

1. Обработчик отправляет сообщения
Знакомый код из предыдущего абзаца:
Начать отслеживание с sendMessageQueue, связь вызова функции: sendMessage -> sendMessageDelayed -> sendMessageAtTime, в sendMessageAtTime сообщение, отправленное перевозчиком, и mQueue обработчика попадают в очередь вместе через enqueueMessage.
Для postRunnable runnable доставляется через post, вызывается getPostMessage, сообщение создается через runnable, а затем доставляется через sendMessageDelayed, а затем процесс такой же, как процесс sendMessage.
2. Сообщение попадает в очередь.
В enqueueMessage войдите в очередь через MessageQueue и назначьте цель сообщения текущему объекту-обработчику. Помните, что msg.target очень важен. После того, как Looper извлекает сообщение, его необходимо вызвать обработчику с помощью msg.target.dispatchMessage Обработайте сообщение.
В MessageQueue список сообщений Message помещен в очередь
3. Looper обрабатывает сообщения
Прежде чем говорить об обработке сообщений, давайте посмотрим, как создается и получается Looper:
- При создании Looper создайте очередь цикла сообщений и получите текущий поток
- Но эта функция является частной, и внешний мир не может напрямую создать Looper, но создается Looper.prepare:
- Создайте здесь Looper и сохраните объект Looper в sThreadLocal. Что такое sThreadLocal?
Это экземпляр TheadLocal, который сохраняет Looper, а ThreadLocal — это класс хранения частных данных потока, который может сохранять объект Looper потока, так что Handler может сохранять объект Looper через ThreadLocal.
- Как TheadLocal сохраняет и получает Looper?
В наборе экземпляр Looper текущего потока сохраняется через values.put и получается через values.getAfterMiss (this), где put и getAfterMiss имеют ключ и значение, которые сохраняются в массиве таблиц объекта Value, затем в массиве таблиц Как это хранится?
Очевидно, что в массиве первый содержит индекс, на который ссылается объект ThreadLocal, а последний хранит переданный экземпляр Looper.
- Затем давайте посмотрим, как Looper обрабатывает сообщения в цикле.
В цикле, цикл, сообщение в MessageQueue выводится через следующий
Если полученное сообщение пустое, завершите цикл и вернитесь.
Установите сообщение как пустое, вы можете уведомить очередь сообщений о выходе с помощью методов quit и quitSafely MessageQueue.
Если полученное сообщение не пустое, оно обратится к обработчику через msg.target.dispatchMessage.
4. Обработчик обрабатывает сообщение.
Looper возвращает сообщение в dispatchMessage обработчика для обработки сообщения:
Если сообщение имеет обратный вызов, сообщение доставляется с помощью Post (Runnable), потому что, когда запускаемый объект доставляется, запускаемый объект назначается обратному вызову сообщения.
Если mCallback обработчика не пуст, он будет обработан путем создания обработчика посредством обратного вызова.
В противном случае наиболее распространенным способом создания объектов-обработчиков является переопределение handlerMessage.
подводить итоги
Диаграмма последовательности используется для обобщения механизма сообщений обработчика, включая описанный выше процесс связывания Looper и MessageQueue.
Источник


