- Использование Intel HAXM при разработке приложений для Android Wear и TV
- Предварительные сведения
- Работа с универсальным приложением-примером для Android
- Создание AVD для Android TV и Wear
- Эмуляция Android Wear
- Эмуляция Android TV
- Создание и запуск необходимого количества экземпляров эмуляторов
- Hardware acceleration for emulator performance (Hyper-V & HAXM)
- Accelerating Android emulators on Windows
- Accelerating with Hyper-V
- Verifying support for Hyper-V
- Enabling Hyper-V acceleration
- Accelerating with HAXM
- Verifying HAXM support
- Installing HAXM
- Troubleshooting
- Accelerating Android emulators on macOS
- Accelerating with the Hypervisor Framework
- Accelerating with HAXM
- Verifying HAXM support
- Installing HAXM
- Troubleshooting
Использование Intel HAXM при разработке приложений для Android Wear и TV
Предварительные сведения
Intel Hardware Accelerated Execution Manager (HAXM) – это Android-эмулятор, который поддерживает аппаратную виртуализацию. Он создаёт невысокую нагрузку на систему, обладает отличной производительностью и быстрым интерфейсом.
Используя Intel HAXM, можно запустить несколько экземпляров Android-эмулятора на одном компьютере, не особо беспокоясь о производительности, о нагрузке на систему или о «тормозах» интерфейса. Подобный подход может быть весьма полезным в итеративном процессе создания и тестирования приложений, он способен дать огромный прирост производительности труда разработчиков.
Образы Android-эмуляторов, рассчитанные на архитектуры, отличные от x86, могут медленно запускаться и с задержкой откликаться на команды пользователя. Кроме того, в отличие от некоторых Android-эмуляторов сторонних производителей, с помощью Intel HAXM вы получаете возможность работать с последними версиями API и платформ Android сразу же после их выпуска.
Здесь вы можете найти подробное руководство по работе с HAXM.
В этом материале мы поговорим о том, как пользоваться возможностями Intel HAXM при создании приложений, рассчитанных на всевозможные варианты платформы Android. Такие приложения могут работать на обычных смартфонах разных форм-факторов, и на устройствах, несущих на борту Android Wear и Android TV.
Работа с универсальным приложением-примером для Android
Компания Google недавно выпустила приложение, на примере которого показано, как охватить одной кодовой базой множество различных Android-устройств.
В примере продемонстрированы передовые подходы к разработке универсальных приложений. Для сборки проекта воспользуйтесь инструкциями, которые можно найти по вышеупомянутой ссылке. Мы, в данном практическом руководстве, будем испытывать пример на x86 HAXM-эмуляторах Android TV, Wear и смартфона.
Проект можно импортировать в Android Studio и воспользоваться возможностями этой среды по сборке и запуску приложения на эмуляторе. Если вы предпочитаете работать с другой IDE, то, о чём пойдёт речь дальше, так же окажется полезным.
Если вам близок интерфейс командной строки, можете просто запустить Gradle-скрипт для сборки приложения из папки с исходным кодом примера.
Результирующий APK-файл можно найти в папке «mobile/build/outputs/apk/mobile-debug.apk».
Создание AVD для Android TV и Wear
Для начала нужно удостовериться в том, что у нас имеются самые свежие образы эмуляторов для платформ Android TV, Wear, а так же – для обычных смартфонов.
Откроем Android SDK Manager. Его можно запустить из интерфейса Android Studio или из командной строки (папка /tools должна быть указана в переменных среды) с помощью такой команды:

Окно Android SDK Manager. Образы систем, которые нужно загрузить, выделены
После того, как необходимые пакеты загружены, нужно, для использования соответствующих образов систем, настроить конфигурации эмуляторов (то есть, создать набор AVD). Для этого нам понадобится Android Virtual Device Manager. Запустим его из командной строки:
Окно Android Virtual Device Manager, здесь можно создавать новые AVD и настраивать существующие
Эмуляция Android Wear
Создадим конфигурацию виртуального устройства для Android Wear так, как показано на рисунке ниже.
Настройка конфигурации эмулятора для Android Wear
После того, как настройки выполнены, нажмём кнопку OK, после чего – запустим эмулятор. Для этого его нужно выделить в окне AVD Manager и нажать на кнопку Start. Вот как выглядит окно эмулятора.
Окно эмулятора Android Wear
Для того чтобы смартфон мог взаимодействовать с устройством, работающим под управлением Android Wear (или с соответствующим эмулятором), нужно дополнительное приложение. Единственный способ установить это приложение на устройство – загрузка из Магазина Google Play. Соответственно, нам понадобится Android-смартфон, который имеет доступ к Магазину.
Устройство должно быть доступно для ADB. Для того чтобы оно смогло подключиться к эмулятору, нужно, чтобы и смартфон, и эмулятор, присутствовали в списке устройств, который можно получить следующей командой:
Список подключенных устройств
Теперь перенаправим TCP-порты такой командой:
Теперь всё готово для сопряжения эмулятора Android Wear и аппаратного устройства. Осталось лишь запустить на смартфоне приложение Android Wear, и, из его меню, выполнить команду подключения к эмулятору. Если подключение удалось, экран эмулятора будет выглядеть так, как показано в левой части рисунка. В правой части показан экран эмулятора, не подключенного к смартфону.
Экраны эмулятора Android Wear в подключенном (слева) и неподключенном (справа) состоянии
Подробные сведения о создании приложений для Android Wear можно найти здесь. APK-файл тестового приложения ничем не отличается от других APK, его можно установить на эмулятор Android Wear с использованием ADB.
Проверить, установлено ли приложение на эмуляторе, можно с помощью такой команды:
Установка приложения на эмулятор и проверка установки
Имя пакета приложения-примера (com.example.android.uamp) присутствует в списке. Из командной строки можно и запустить приложение:
Теперь приложение запущено на эмуляторе Android Wear
Эмуляция Android TV
Создадим конфигурацию виртуального устройства для Android TV так, как показано на рисунке ниже.
Настройка конфигурации эмулятора для Android TV
После настройки нажмём на кнопку OK и запустим эмулятор кнопкой Start в окне ADV Manager.
Проверить доступность эмулятора для ADB можно такой командой:
Запишите или запомните идентификатор эмулятора (что-то вроде emulator-55xx). Он понадобится для указания целевого устройства при работе с эмулятором с помощью ADB. Для установки приложения на эмулятор можно воспользоваться такой командой:
Запустить приложение на эмуляторе Android TV можно так:
Вот как приложение выглядит на экране эмулятора.
Приложение, запущенное на эмуляторе Android TV
Создание и запуск необходимого количества экземпляров эмуляторов
Если в ходе разработки и тестирования приложения возникает необходимость создания и запуска нескольких экземпляров эмуляторов – всё это достижимо с использованием Intel HAXM. При установке HAXM можно настроить размер оперативной памяти, который отводится для его работы. Вот набор конфигураций AVD для Android Wear, TV и смартфона.
Список виртуальных устройств Android
Ниже вы можете видеть приложение-пример, запущенное одновременно на трёх виртуальных устройствах (Android TV, Wear и эмулятор смартфона). Здесь же показаны сведения об использовании CPU. Как видно, все эти экземпляры эмулятора не создают чрезмерной нагрузки на систему.
Три одновременно запущенных эмулятора и сведения о нагрузке на систему, которую они создают
В ходе работы можно настраивать выделение памяти для эмуляторов, оптимизируя потребление ими системных ресурсов. Для того, чтобы перенастроить параметры выделения памяти, заданные при установке HAXM, нужно повторно запустить его установку и указать нужные параметры.
Источник
Hardware acceleration for emulator performance (Hyper-V & HAXM)
This article explains how to use your computer’s hardware acceleration features to maximize Android Emulator performance.
Visual Studio makes it easier for developers to test and debug their Xamarin.Android applications by using the Android emulator in situations where an Android device is unavailable or impractical. However, the Android emulator runs too slowly if hardware acceleration is not available on the computer that runs it. You can drastically improve the performance of the Android emulator by using special x86 virtual device images in conjunction with the virtualization features of your computer.
| Scenario | HAXM | WHPX | Hypervisor.Framework |
|---|---|---|---|
| You have an Intel Processor | X | X | X |
| You have an AMD Processor | X | ||
| You want to support Hyper-V | X | ||
| You want to support nested Virtualization | Limited | ||
| You want to use technologies like Docker | (with WSL2) | X | X |
Accelerating Android emulators on Windows
The following virtualization technologies are available for accelerating the Android emulator:
Microsoft’s Hyper-V and the Windows Hypervisor Platform (WHPX). Hyper-V is a virtualization feature of Windows that makes it possible to run virtualized computer systems on a physical host computer.
Intel’s Hardware Accelerated Execution Manager (HAXM). HAXM is a virtualization engine for computers running Intel CPUs.
For the best experience on Windows, it is recommended that you use WHPX to accelerate the Android emulator. If WHPX is not available on your computer, then HAXM can be used. The Android emulator will automatically make use of hardware acceleration if the following criteria are met:
Hardware acceleration is available and enabled on your development computer.
The emulator is running a system image created for an x86-based virtual device.
You can’t run a VM-accelerated emulator inside another VM, such as a VM hosted by VirtualBox, VMware, or Docker (unless using WSL2). You must run the Android emulator directly on your system hardware.
For information about launching and debugging with the Android emulator, see Debugging on the Android Emulator.
Accelerating with Hyper-V
Before enabling Hyper-V, read the following section to verify that your computer supports Hyper-V.
Verifying support for Hyper-V
Hyper-V runs on the Windows Hypervisor Platform. To use the Android emulator with Hyper-V, your computer must meet the following criteria to support the Windows Hypervisor Platform:
Your computer hardware must meet the following requirements:
- A 64-bit Intel or AMD Ryzen CPU with Second Level Address Translation (SLAT).
- CPU support for VM Monitor Mode Extension (VT-c on Intel CPUs).
- Minimum of 4-GB memory.
In your computer’s BIOS, the following items must be enabled:
- Virtualization Technology (may have a different label depending on motherboard manufacturer).
- Hardware Enforced Data Execution Prevention.
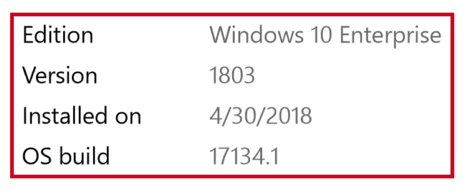
Your computer must be updated to Windows 10 April 2018 update (build 1803) or later. You can verify that your Windows version is up-to-date by using the following steps:
Enter About in the Windows search box.
Select About your PC in the search results.
Scroll down in the About dialog to the Windows specifications section.
Verify that the Version is at least 1803:
To verify that your computer hardware and software is compatible with Hyper-V, open a command prompt and type the following command:
If all listed Hyper-V requirements have a value of Yes, then your computer can support Hyper-V. For example:

Enabling Hyper-V acceleration
If your computer meets the above criteria, use the following steps to accelerate the Android emulator with Hyper-V:
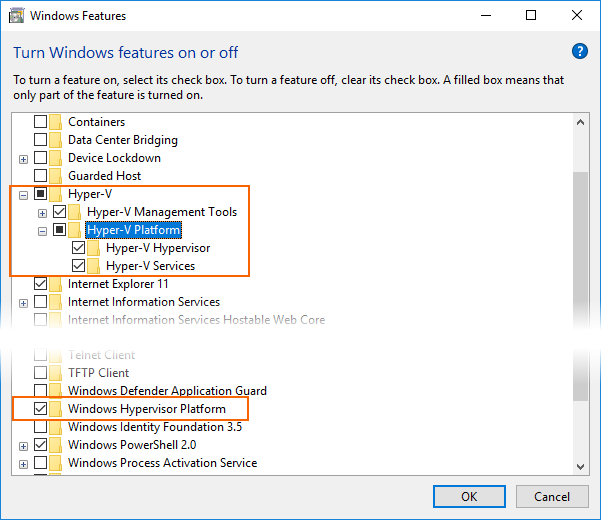
Enter windows features in the Windows search box and select Turn Windows features on or off in the search results. In the Windows Features dialog, enable both Hyper-V and Windows Hypervisor Platform:
After making these changes, reboot your computer.
On Windows 10 October 2018 Update (RS5) and higher, you only need to enable Hyper-V, as it will use Windows Hypervisor Platform (WHPX) automatically.
Install Visual Studio 15.8 or later (this version of Visual Studio provides IDE support for running the Android emulator with Hyper-V).
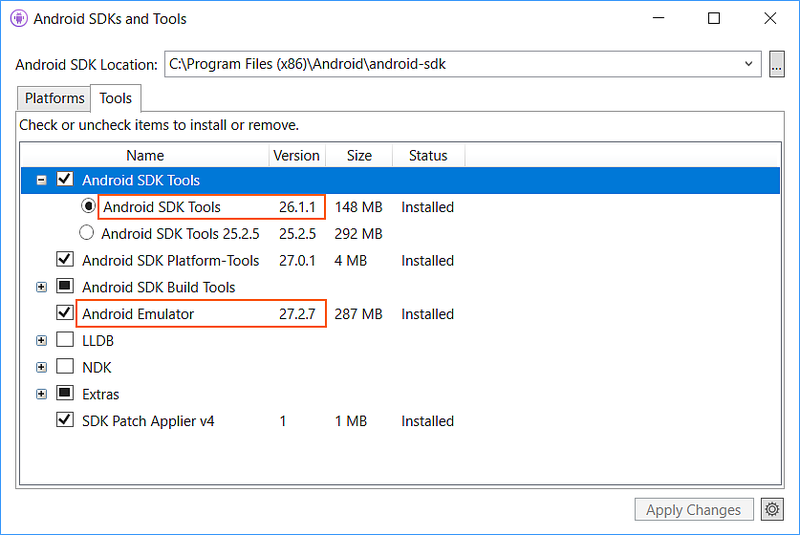
Install the Android Emulator package 27.2.7 or later. To install this package, navigate to Tools > Android > Android SDK Manager in Visual Studio. Select the Tools tab and ensure that the Android emulator version is at least 27.2.7. Also ensure that the Android SDK Tools version is 26.1.1 or later:
When you create a virtual device (see Managing Virtual Devices with the Android Device Manager), be sure to select an x86-based system image. If you use an ARM-based system image, the virtual device will not be accelerated and will run slowly.
Hyper-V should now be enabled and you can run your accelerated Android emulator.
Accelerating with HAXM
If your computer does not support Hyper-V, you may use HAXM to accelerate the Android emulator. You must disable Device Guard if you want to use HAXM.
Verifying HAXM support
To determine if your hardware supports HAXM, follow the steps in Does My Processor Support Intel Virtualization Technology?. If your hardware supports HAXM, you can check to see if HAXM is already installed by using the following steps:
Open a command prompt window and enter the following command:
Examine the output to see if the HAXM process is running. if it is, you should see output listing the intelhaxm state as RUNNING . For example:
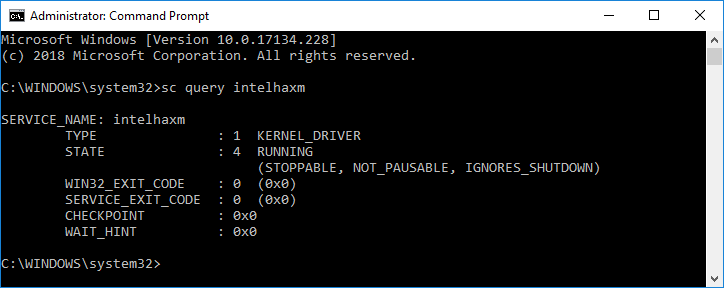
If STATE is not set to RUNNING , then HAXM is not installed.
If your computer can support HAXM but HAXM is not installed, use the steps in the next section to install HAXM.
Installing HAXM
HAXM install packages for Windows are available from the Intel Hardware Accelerated Execution Manager GitHub releases page. Use the following steps to download and install HAXM:
From the Intel website, download the latest HAXM virtualization engine installer for Windows. The advantage of downloading the HAXM installer directly from the Intel website is that you can be assured of using the latest version.
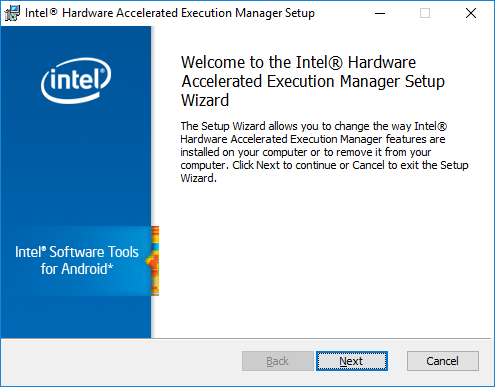
Run haxm-N.N.N-setup.exe (where N.N.N is the version number) to start the HAXM installer. Accept the default values in the installer dialogs:
When you create a virtual device (see Managing Virtual Devices with the Android Device Manager), be sure to select an x86-based system image. If you use an ARM-based system image, the virtual device will not be accelerated and will run slowly.
Troubleshooting
For help with troubleshooting hardware acceleration issues, see the Android emulator Troubleshooting guide.
Accelerating Android emulators on macOS
The following virtualization technologies are available for accelerating the Android emulator:
Apple’s Hypervisor Framework. Hypervisor is a feature of macOS 10.10 and later that makes it possible to run virtual machines on a Mac.
Intel’s Hardware Accelerated Execution Manager (HAXM). HAXM is a virtualization engine for computers running Intel CPUs.
It is recommended that you use the Hypervisor Framework to accelerate the Android emulator. If the Hypervisor Framework is not available on your Mac, then HAXM can be used. The Android emulator will automatically make use of hardware acceleration if the following criteria are met:
Hardware acceleration is available and enabled on the development computer.
The emulator is running a system image created for an x86-based virtual device.
You can’t run a VM-accelerated emulator inside another VM, such as a VM hosted by VirtualBox, VMware, or Docker. You must run the Android emulator directly on your system hardware.
For information about launching and debugging with the Android emulator, see Debugging on the Android Emulator.
Accelerating with the Hypervisor Framework
To use the Android emulator with the Hypervisor Framework, your Mac must meet the following criteria:
Your Mac must be running macOS 10.10 or later.
Your Mac’s CPU must be able to support the Hypervisor Framework.
If your Mac meets these criteria, the Android emulator will automatically use the Hypervisor Framework for acceleration. If you are not sure if Hypervisor Framework is supported on your Mac, see the Troubleshooting guide for ways to verify that your Mac supports Hypervisor.
If the Hypervisor Framework is not supported by your Mac, you can use HAXM to accelerate the Android emulator (described next).
Accelerating with HAXM
If your Mac does not support the Hypervisor framework (or you are using a version of macOS earlier than 10.10), you can use Intel’s Hardware Accelerated Execution Manager (HAXM) to speed up the Android emulator.
Before using the Android emulator with HAXM for the first time, it’s a good idea to verify that HAXM is installed and available for the Android emulator to use.
Verifying HAXM support
You can check to see if HAXM is already installed by using the following steps:
Open a Terminal and enter the following command:
This command assumes that the Android SDK is installed at the default location of
/Library/Developer/Xamarin/android-sdk-macosx; if not, modify the above path for the location of the Android SDK on your Mac.
If HAXM is installed, the above command will return a message similar to the following result:
If HAXM is not installed, a message similar to the following output is returned:
If HAXM is not installed, use the steps in the next section to install HAXM.
Installing HAXM
HAXM installation packages for macOS are available from the Intel Hardware Accelerated Execution Manager page. Use the following steps to download and install HAXM:
From the Intel website, download the latest HAXM virtualization engine installer for macOS.
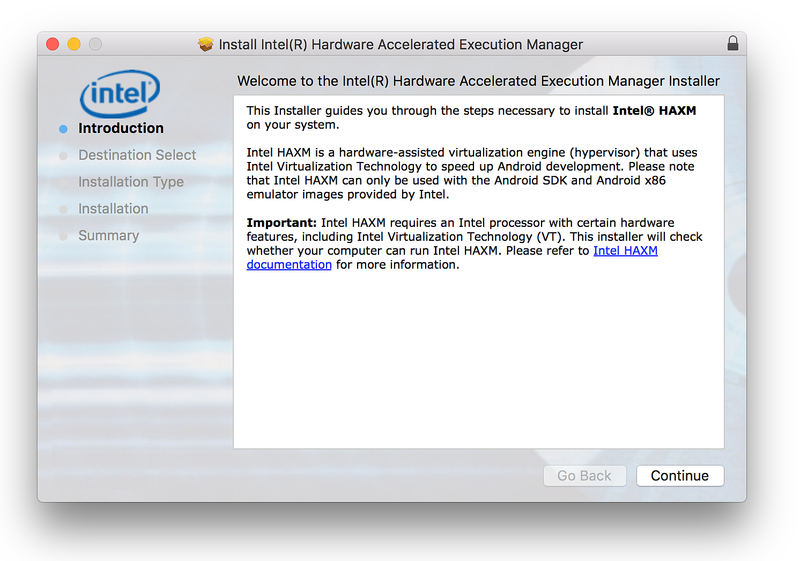
Run the HAXM installer. Accept the default values in the installer dialogs:
Troubleshooting
For help with troubleshooting hardware acceleration issues, see the Android emulator Troubleshooting guide.
Источник


