- How to fix HDMI audio in Android-x86 if it doesn’t work out of the box
- Share this:
- Me gusta esto:
- Relacionado
- Publicado por hernaaan
- 19 comentarios sobre “ How to fix HDMI audio in Android-x86 if it doesn’t work out of the box ”
- How to Fix HDMI No Sound after Connecting Computer to Monitor and TV
- Solution 1: Check if all hardware devices work properly
- Solution 2: Set HDMI Device as Default Device
- Solution 3: Update the Sound Driver
- Solution 4: Switch to ChromeOS
How to fix HDMI audio in Android-x86 if it doesn’t work out of the box
Okay. I’m writing this mini tutorial after several hours of reading and trying different things. I hope it works for you too.
Let’s say you have a laptop and boot Android-x86 from there. Maybe from HDD or maybe from USB, I think it doesn’t matter. And you connect your TV to it. You modify Grub to set HDMI-only output (‘video=LVDS-1:d’ did for me), and you get video.
If you then notice you have no sound at all, try this. Oh, and beforehand, have a short WAV file stored in the system.
1) Open a terminal (from Android menu) and ask for root access with ‘su’.
2) Check what number your HDMI card is:
# cat /proc/asound/cards
Generally, «0» is onboard audio and «1» is HDMI.
3) Check which devices are associated to your HDMI card:
# ls -l /dev/snd/
Here you have you take note of all the pcmC*D*p values, where C* is the number of the card from step 2.
4) Activate sound for the card with the following commands:
# alsa_amixer -c 1 set ‘IEC958’,0 on
# alsa_amixer -c 1 set ‘IEC958’,1 on
# alsa_amixer -c 1 set ‘IEC958’,2 on
# alsa_amixer -c 1 set ‘IEC958’,3 on
In this example, I’m using card «1» (check step 2 for yours).
5) Then, testing. To check which is the correct device you’ll need the WAV file mentioned before:
# alsa_aplay -Dplughw: 1 , 3 /storage/path_to_file/sample.wav
# alsa_aplay -Dplughw: 1 , 7 /storage/path_to_file/sample.wav
# alsa_aplay -Dplughw: 1 , 8 /storage/path_to_file/sample.wav
# alsa_aplay -Dplughw: 1 , 9 /storage/path_to_file/sample.wav
In this example, I checked devices «3», «7», «8» and «9» from card «1» (check step 2 for your card, and step 3 for its devices). You’ll hear sound in the right one.
6) When you get the correct device, proceed to edit the boot script to make the changes permanent:
# vi /system/etc/init.sh
Add these lines in the «function init_hal_audio()» section, right below «esac»:
alsa_amixer -c 1 set ‘IEC958’,0 on
alsa_amixer -c 1 set ‘IEC958’,1 on
alsa_amixer -c 1 set ‘IEC958’,2 on
alsa_amixer -c 1 set ‘IEC958’,3 on
mv /dev/snd/pcm C1D3 p /dev/snd/pcm C1D3 p.original
ln -sf /dev/snd/pcm C1D7 p /dev/snd/pcm C1D3 p
Where:
«c1» is your HDMI card (step 2),
«pcmC1D7p» is your audible device (step 5),
and «pcmC1D3p» is the FIRST one of the card (as seen in step 3).
This will allow you to keep the onboard sound if you choose to boot without HDMI video.
7) Reboot to check if you did everything okay.
Share this:
Me gusta esto:
Relacionado
Publicado por hernaaan
19 comentarios sobre “ How to fix HDMI audio in Android-x86 if it doesn’t work out of the box ”
Hi! I can’t proceed because Termux says that i don’t have alsa….what can i do?
Hi. I wrote this tutorial for Android-x86, if you are using another distribution I wouldn’t know what replaces it. However, ALSA is present in all current distros, what sometimes changes are the commands to run it.
I’m using Android Tv x86 for windows, and for terminal i’m using Terminux…Android TV 7.1.2
Hi,
thanks for the explaination works for me but not completely
I explain
I followed the steps , found out the correct device (was pcmC1D3p for me, so didin’t make anything for the move)
in terminal when I play the sample sound is clear as should be
when I modify init and restart I can hear the sound but it is very very scratchy
if i try again from the terminal it is clear
tried also to make the move for pcmC1D3p but had the same result
Have you an idea of what can be the problem?
Can you please help me?
thanks again
‘alsa_amixer -c1 set ‘IEC958′,0 on’ just returns ‘Invalid Card number’
C1 is the HDMI
For step 2 you need to use:
to list the valid cards.
I see cards under /proc/asound/cards but alsa_mixer said «invalid card number» with both card 0 and 1 which are both listed in /proc/asound/cards. the alsa_aplay -l reports the following:
aplay: device_list:242: no soundcards found…
I will continue looking for a solution.
Thank You very much. It’s work 🙂
Hi , may I ask how do I save the changes on the script? I type everything but after reboot if I open again the script it doesn’t show anything I typed on step 6. Thank you
Hi. In Vi editor, usually «:wq» does it.
perfect its works. thanks for saving time
Good day Hernaaan.
Thank you for the tutorial, unfortunately I`m not that Android savvy to understand all the commands in the list.
Is there no other way to get the audio to work on PC? HDMI video plays, but there`s no sound out of the analog or HDMI audio sources.Everything works fine in Windows.
Thank you sir.
Hi Gerard. I don’t think there is another method. Not that I know of. That’s why I tried to be as specific as possible in this one, so (almost) anyone can figure it out. Sorry if I wasn’t explicit enough!
I know nothing. I followed your steps, everything good upto trying to save the init.sh. No matter what I cannot delete or save the original file. I have tried terminal window and using a gui via es file explorer. It will not save or delete I can copy to a different location make the changes but cannot save over or delete original. Is there a way around this?
@tman have you found a solution?
I’ve recently managed to install android x86 8.1 r5 on my Dell Latitude E6530 and got video out through HDMI to TV using LVDS-1:d via grub.
However I’m unable to get audio through HDMI.
Can anyone tell me why?
Here is what I get on terminal:
x86_64:7 # cat /proc/asound/cards
0 [PCH ]: HDA-Intel – HDA Intel PCH
HDA Intel PCH at 0xf7e30000 irq 30
X86_64:/ # ls -l /dev/snd
cru-rw— 1 system audio 116, 5 2020-08-07 00:49 controlC0
crw-rw—- 1 system audio 116, 4 2020-08-07 00:49 hwC0D0
crw-rw—- 1 system audio 116, 3 2020-08-07 00:49 pcmC0D0c
crw-rw—- 1 system audio 116, 2 2020-08-07 00:49 pcmC0D0p
crw-rw—- 1 system audio 116, 33 2020-08-07 00:49 timer
I found out why card 1 was not showing up. I had to disable Nvidia Optimus in the Bios settings.
Now I can get sound on pcmC1D9p.
However when I add the lines in step 6 and modify mine from 7 to 9, I don’t get sound at all.
I have to go into terminal and run the scripts by typing them, only then I get sound again.
So why is the script not running in init.sh? I placed it under esac and double checked everything but still no sound.
Only way to get sound is to run the script manually through terminal with su.
Hola Hernán, puedes ayudarme con este problema no se mucho de Android, si me apoya gustoso podre recompensarte tu tiempo.
Since this page is the only solution available on the entire Internet for this problem, I wanted to say in the guide, instead of step 5, which is said to find the correct audio output, that not worked for me. you can find the correct output with the help of the following commands:
# alsa_amixer controls
Which shows you a list of all controls and
# alsa_amixer contents
Which shows you the content values of the controls
When the HDMI cable is connected and you see the image in it. The control that contains the image content has a longer value than other values similar to the following:
numid=12,iface=PCM,name=’ELD’,device=7
; type=BYTES,access=r–v—-,values=36
: values=0x10,0x00,0x08,0x00,0x67,0x22,0x00,0x0f,0x00,0x00,0x00,0x00,0x00,0x00,0x00,0x00,0x4d,0xd9,0x03,0x4b,0x53,0x4f,0x4e,0x59,0x20,0x54,0x56,0x0d,0x07,0x07,0x15,0x07,0x50,0x00,0x00,0x00
Here is the correct number of my device «7».
And earlier by command number 2 in the guide:
# cat /proc/asound/cards
0 [HDMI ]: HDA-Intel – HDA Intel HDMI
HDA Intel HDMI at 0xb0a10000 irq 65
1 [PCH ]: HDA-Intel – HDA Intel PCH
HDA Intel PCH at 0xb0a14000 irq 47
I had found the correct card number, which was «0» for me.
That way, the correct number of my card and device will be «pcmC0D7p» for me.
And later by command number 3 in the guide:
# ls -l /dev/snd/
total 0
crw-rw—- 1 system audio 116, 7 2021-07-15 21:16 controlC0
crw-rw—- 1 system audio 116, 2 2021-07-15 21:16 controlC1
crw-rw—- 1 system audio 116, 13 2021-07-15 21:16 hwC0D0
crw-rw—- 1 system audio 116, 6 2021-07-15 21:16 hwC1D0
crw-rw—- 1 system audio 116, 12 2021-07-15 21:16 pcmC0D10p
crw-rw—- 1 system audio 116, 8 2021-07-15 21:16 pcmC0D3p
crw-rw—- 1 system audio 116, 9 2021-07-15 21:16 pcmC0D7p
crw-rw—- 1 system audio 116, 10 2021-07-15 21:16 pcmC0D8p
crw-rw—- 1 system audio 116, 11 2021-07-15 21:16 pcmC0D9p
crw-rw—- 1 system audio 116, 4 2021-07-15 21:16 pcmC1D0c
crw-rw—- 1 system audio 116, 3 2021-07-15 21:16 pcmC1D0p
crw-rw—- 1 system audio 116, 5 2021-07-15 21:16 pcmC1D1p
crw-rw—- 1 system audio 116, 33 2021-07-15 21:16 timer
I found the number of the first card in the list, which for me was «pcmC0D10p» and is basically the current audio output.
So I have to replace these two with commands 6 in the guide, which for me is as follows:
alsa_amixer -c0 set ‘IEC958’,0 on
alsa_amixer -c0 set ‘IEC958’,1 on
alsa_amixer -c0 set ‘IEC958’,2 on
alsa_amixer -c0 set ‘IEC958’,3 on
alsa_amixer -c0 set ‘IEC958’,4 on
mv /dev/snd/pcmC0D10p /dev/snd/pcmC0D10p.original
ln -sf /dev/snd/pcmC0D7p /dev/snd/pcmC0D10p
Oh and the reason for adding the fifth line, which also adds «4 on», is that in my system, which is a MacBook Pro 13 inch, I have 4 audio channels listed in my device with the following command:
# alsa_amixer
Simple mixer control ‘IEC958’,0
Capabilities: pswitch pswitch-joined penum
Playback channels: Mono
Mono: Playback [on]
Simple mixer control ‘IEC958’,1
Capabilities: pswitch pswitch-joined penum
Playback channels: Mono
Mono: Playback [on]
Simple mixer control ‘IEC958’,2
Capabilities: pswitch pswitch-joined penum
Playback channels: Mono
Mono: Playback [on]
Simple mixer control ‘IEC958’,3
Capabilities: pswitch pswitch-joined penum
Playback channels: Mono
Mono: Playback [on]
Simple mixer control ‘IEC958’,4
Capabilities: pswitch pswitch-joined penum
Playback channels: Mono
Mono: Playback [on]
As a result, I added it to my final instructions.
Which worked well for me on both my laptop and desktop.
And of course, to get the correct image output, as stated by «Martin», the command «video=LVDS-1:d video=1920×1080-32» must be added in GRUB, but for some monitors, the value is «video=eDP-1:d video=1920×1080-32» which was worked for me. As you can see i added the output resolution to the grub command too. You have to try and find the right option for your monitor or TV with trial and error.
It is unfortunate that Google has not yet made this feature easily available to Android users.
I wish developers would design an application for selecting sound output in Android that can be easily switched.
Источник
How to Fix HDMI No Sound after Connecting Computer to Monitor and TV
Last Updated: 9 months ago
If you get HDMI no sound error in Windows 10, don’t worry. You’re not alone. Many Windows users have reported this issue. You can fix the error with one of the solutions below. You may not have to try them all. Just work your way down at the top of the list until you find the one that works for you.
Try these fixes, one at a time:
Solution 1: Check if all hardware devices work properly
Broken hardware devices probably cause HDMI not working. So before moving on to other solutions, check if all hardware devices work properly:
1. Check if the cable has any problem. Use another cable to and see if the problem resolves.
2. Check if the output port works fine. If your PC has multiple HDMI output ports, try different ports and see if the problem resolves.
3. Check if the monitor works properly. Make sure the monitor’s speaker volume is not turned down or muted. Then try connecting the monitor to another PC.
Solution 2: Set HDMI Device as Default Device
If the HDMI device is not set as default device, you cannot hear the sound from HDMI output. Follow steps below to set the HDMI device as Default Device:
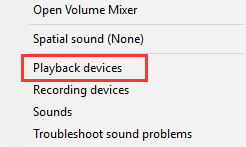
1) Right-click on the sound volume icon in the lower right corner of Windows. A context menu will pop up.

2) Click Playback devices.
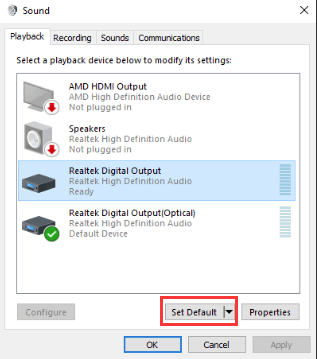
3) In the Playback tab, select Digital Output Device or HDMI option. Click Set Default and click OK. Then the HDMI sound output will be set as default.
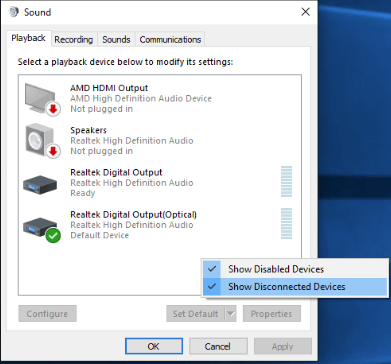
If you do not see the Digital Output Device or HDMI option in the Playback tab, right-click on the blank place, then click Show disconnected devices and Show disabled devices on the context menu. Then set it as default device.
Solution 3: Update the Sound Driver
Your HDMI no sound problem can be caused by corrupt or missing audio driver issues. To fix the problem, you can try to update the sound driver.
There are two ways you can get the right drivers for your sound card: manually or automatically.
Manual driver update – You can update your sound drivers manually by going to the manufacturer’s website for your sound card, and searching for the most recent correct sound driver. Be sure to choose only drivers that are compatible with your variant of Windows 10.
Automatic driver update – If you don’t have the time, patience or computer skills to update your audio drivers manually, you can, instead, do it automatically with Driver Easy. Driver Easy will automatically recognize your system and find the correct drivers for your sound card, and your variant of Windows 10, and it will download and install them correctly :
1) Download and install Driver Easy.
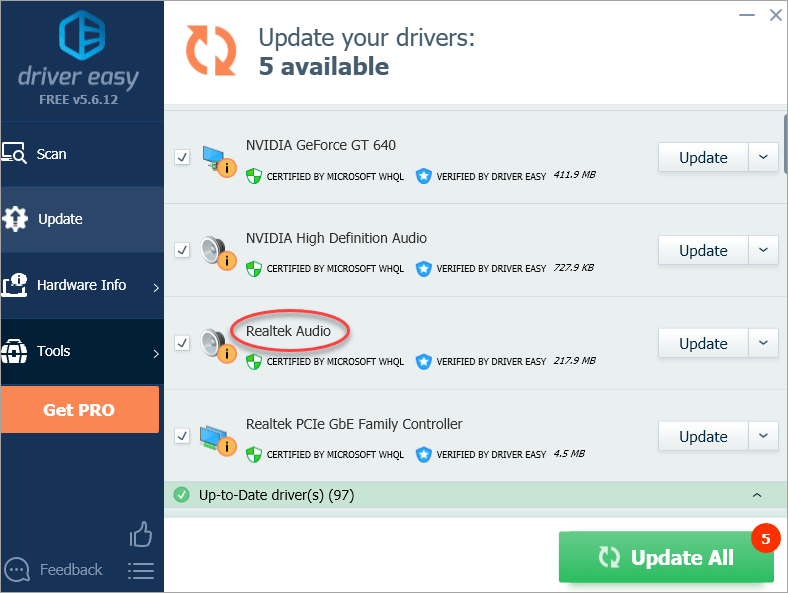
2) Run Driver Easy and click the Scan Now button. Driver Easy will then scan your computer and detect any problem drivers.

3) Click the Update button next to a flagged audio driver to automatically download and install the correct version of this driver (you can do this with the FREE version).
Or click Update All to automatically download and install the correct version of all the drivers that are missing or out of date on your system (this requires the Pro version – you’ll be prompted to upgrade when you click Update All).
Solution 4: Switch to ChromeOS
Windows is a very old technology. Sure, Windows 10 is relatively new, but it’s still just the latest iteration of a decades-old operating system, designed for a bygone era (pre-internet).
Now that we have the internet, fast connection speeds, free cloud storage, and endless web apps (like Gmail, Google Docs, Slack, Facebook, Dropbox and Spotify), the entire Windows way of doing things – with locally installed programs and local file storage – is totally outdated.
Why is that a problem? Because when you’re constantly installing uncontrolled third-party programs, you’re constantly opening the door to viruses and other malware. (And Windows’ insecure permission system compounds this problem.)
Plus the way Windows manages installed software and hardware has always been a problem. If your computer shuts down unexpectedly, or a program installs, uninstalls or updates incorrectly, you can get ‘registry’ corruptions. That’s why Windows PCs always slow down and become unstable over time.
Also because everything’s installed and saved locally, it doesn’t take long before you run out of disk space, and your disk gets fragmented, which makes everything even slower and more unstable.
For most people, the simplest way to solve Windows problems is to ditch Windows altogether, and switch to a faster, more reliable, more secure, easier to use and cheaper operating system…
ChromeOS feels much like Windows, but instead of installing heaps of programs to email, chat, browse the internet, write documents, do school presentations, create spreadsheets, and whatever else you normally do on a computer, you use web apps. You don’t need to install anything at all.
That means you don’t have virus and malware problems, and your computer doesn’t slow down over time, or become unstable.
And that’s just the start of the benefits…
To learn more about the benefits of ChromeOS, and to see comparison videos and demos, visit GoChromeOS.com.
Hope the instructions above helps you resolve the problem. If you have any questions or ideas, please feel free to leave your comments. I’d love to hear of any ideas or suggestions.
Источник


