Here maps api android
HERE SDK 4.x (Lite, Explore & Navigate Edition) — Examples for Android, iOS and Flutter
![]()
![]()
![]()
![]()
The HERE SDK enables you to build powerful location-aware applications. Explore maps that are fast and smooth to interact with, pan/zoom across map views of varying resolutions, and enable the display of various elements such as routes and POIs on highly customizable map views.

The HERE SDK consumes data from the HERE Platform and follows modern design principles incorporating microservices and modularized components. Currently, the HERE SDK supports three platforms: Android, iOS and Flutter.
For an overview of the existing features, please check the Developer’s Guide for the platform of your choice. Here you will also find numerous code snippets, detailed tutorials, the API Reference and the latest Release Notes:
For now, the Navigate Edition is only available upon request. Please contact your HERE representative to receive access including a set of evaluation credentials.
List of Available Example Apps (Version 4.9.4.0)
In this repository you can find the latest example apps that show key features of the HERE SDK in ready-to-use applications:
- HelloMap: Shows the classic ‘Hello World’.
- HelloMapWithStoryboard: Shows the classic ‘Hello World’ using a Storyboard (iOS only).
- Camera: Shows how to change the target and the target anchor point and how to move to another location using custom map animations.
- CustomMapStyles: Shows how to load custom map schemes made with the HERE Style Editor. Exclusively available for the Explore Edition and the Navigate Edition).
- Gestures: Shows how to handle gestures.
- OfflineMaps: Shows how the HERE SDK can work fully offline and how offline map data can be downloaded for continents and countries. Exclusively available for the Navigate Edition.
- MapItems: Shows how to add circles, polygons and polylines, native views, 2D and 3D map markers to locate POIs (and more) on the map. 3D map markers are exclusively available for the Explore and Navigate Editions.
- CartoPOIPicking: Shows how to pick embedded map markers with extended place details. Embedded map markers are already visible on every map, by default. This app is exclusively available for the Explore and Navigate Editions.
- Routing: Shows how to calculate routes and add them to the map.
- RoutingHybrid: Shows how to calculate routes and add them to the map. Also shows how to calculate routes offline, when no internet connection is available. Exclusively available for the Navigate Edition.
- EVRouting: Shows how to calculate routes for electric vehicles and how to calculate the area of reach with isoline routing. Also shows how to search along a route.
- Public Transit: Shows how to calculate routes for public transportation vehicles such as subways, trains, or busses.
- Search: Shows how to search POIs and add them to the map. Shows also geocoding and reverse geocoding.
- SearchHybrid: Shows how to search POIs and add them to the map. Shows geocoding and reverse geocoding. Also shows how to search offline, when no internet connection is available. Exclusively available for the Navigate Edition.
- NavigationQuickStart: Shows how to get started with turn-by-turn navigation. Exclusively available for the Navigate Edition.
- Navigation: Gives an overview of how to implement many of the available turn-by-turn navigation and tracking features. Exclusively available for the Navigate Edition.
- NavigationCustom: Shows how the guidance view can be customized. Exclusively available for the Navigate Edition.
- Positioning: Shows how to integrate HERE Positioning. Exclusively available for the Navigate Edition.
- Traffic: Shows how to search for real-time traffic and how to visualize it on the map.
- StandAloneEngine: Shows how to use an engine without a map view.
- IndoorMap: Shows how to integrate private venues. Exclusively available for the Navigate Edition.
- UnitTesting: Shows how to mock HERE SDK classes when writing unit tests (Android only, the example app is available for the Explore Edition and the Navigate Edition).
Most example apps contain a class named «XY-Example» where XY stands for the feature, which is in most cases equal to the name of the app. If you are looking for example code that shows how to use a certain HERE SDK feature, then please look for this class as it contains the most interesting parts. Note that the overall app architecture is kept as simple as possible to not shadow the parts in focus.
Not all examples are available for all editions and platforms.
Find the latest examples for the edition and platform of your choice:
Example Apps for Older Versions
Above you can find the example app links for the latest HERE SDK version. If you are looking for an older version, please check our release page where you can download tagged older releases.
What You Need to Execute the Example Apps
- Acquire a set of credentials by registering yourself on developer.here.com — or ask your HERE representative.
- Download the latest HERE SDK artifacts for your desired platform. These can be found on developer.here.com unless otherwise noted.
- Please refer to the minimum requirements and supported devices as listed in our Developer’s Guide.
Get Started for Android
- Copy the AAR file of the HERE SDK for Android to the example app’s app/libs folder.
- Open Android Studio and sync the project.
- To run the app, you need to add your HERE SDK credentials to the AndroidManifest.xml file.
Get Started for iOS
- Copy the heresdk.framework file of the HERE SDK for iOS to the example app’s root folder.
- To run the app, you need to add your HERE SDK credentials to the Info.plist file.
Get Started for Flutter
- Unzip the HERE SDK for Flutter plugin to the plugins folder that can be found inside the example app project. Renname the folder to ‘here_sdk’: hello_map/plugins/here_sdk
- Set your HERE SDK credentials to
- hello_map/android/app/src/main/AndroidManifest.xml
- hello_map/ios/Runner/Info.plist
- Start an Android emulator or an iOS simulator and execute flutter run from the app’s directory — or run the app from within your IDE.
- If you have more questions, please check stackoverflow.com/questions/tagged/here-api.
- Information on how to contribute to this project can be found here.
- If you have questions about billing, your account, or anything else Contact Us.
Thank you for using the HERE SDK.
Copyright (C) 2019-2021 HERE Europe B.V.
See the LICENSE file in the root of this repository for license details.
About
Android, iOS and Flutter example apps for the HERE SDK 4.x (Lite Edition, Explore Edition, Navigate Edition)
Источник
Here maps api android

HERE Mobile SDK 3.x for Android example projects
Copyright (c) 2011-2021 HERE Europe B.V.
This repository holds a series of Java-based projects using the HERE Mobile SDK 3.x for Android. More information about the API can be found on the HERE Developer Portal’s Mobile SDKs page.
This set of individual, use-case based projects is designed to be cloned by developers for their own use.
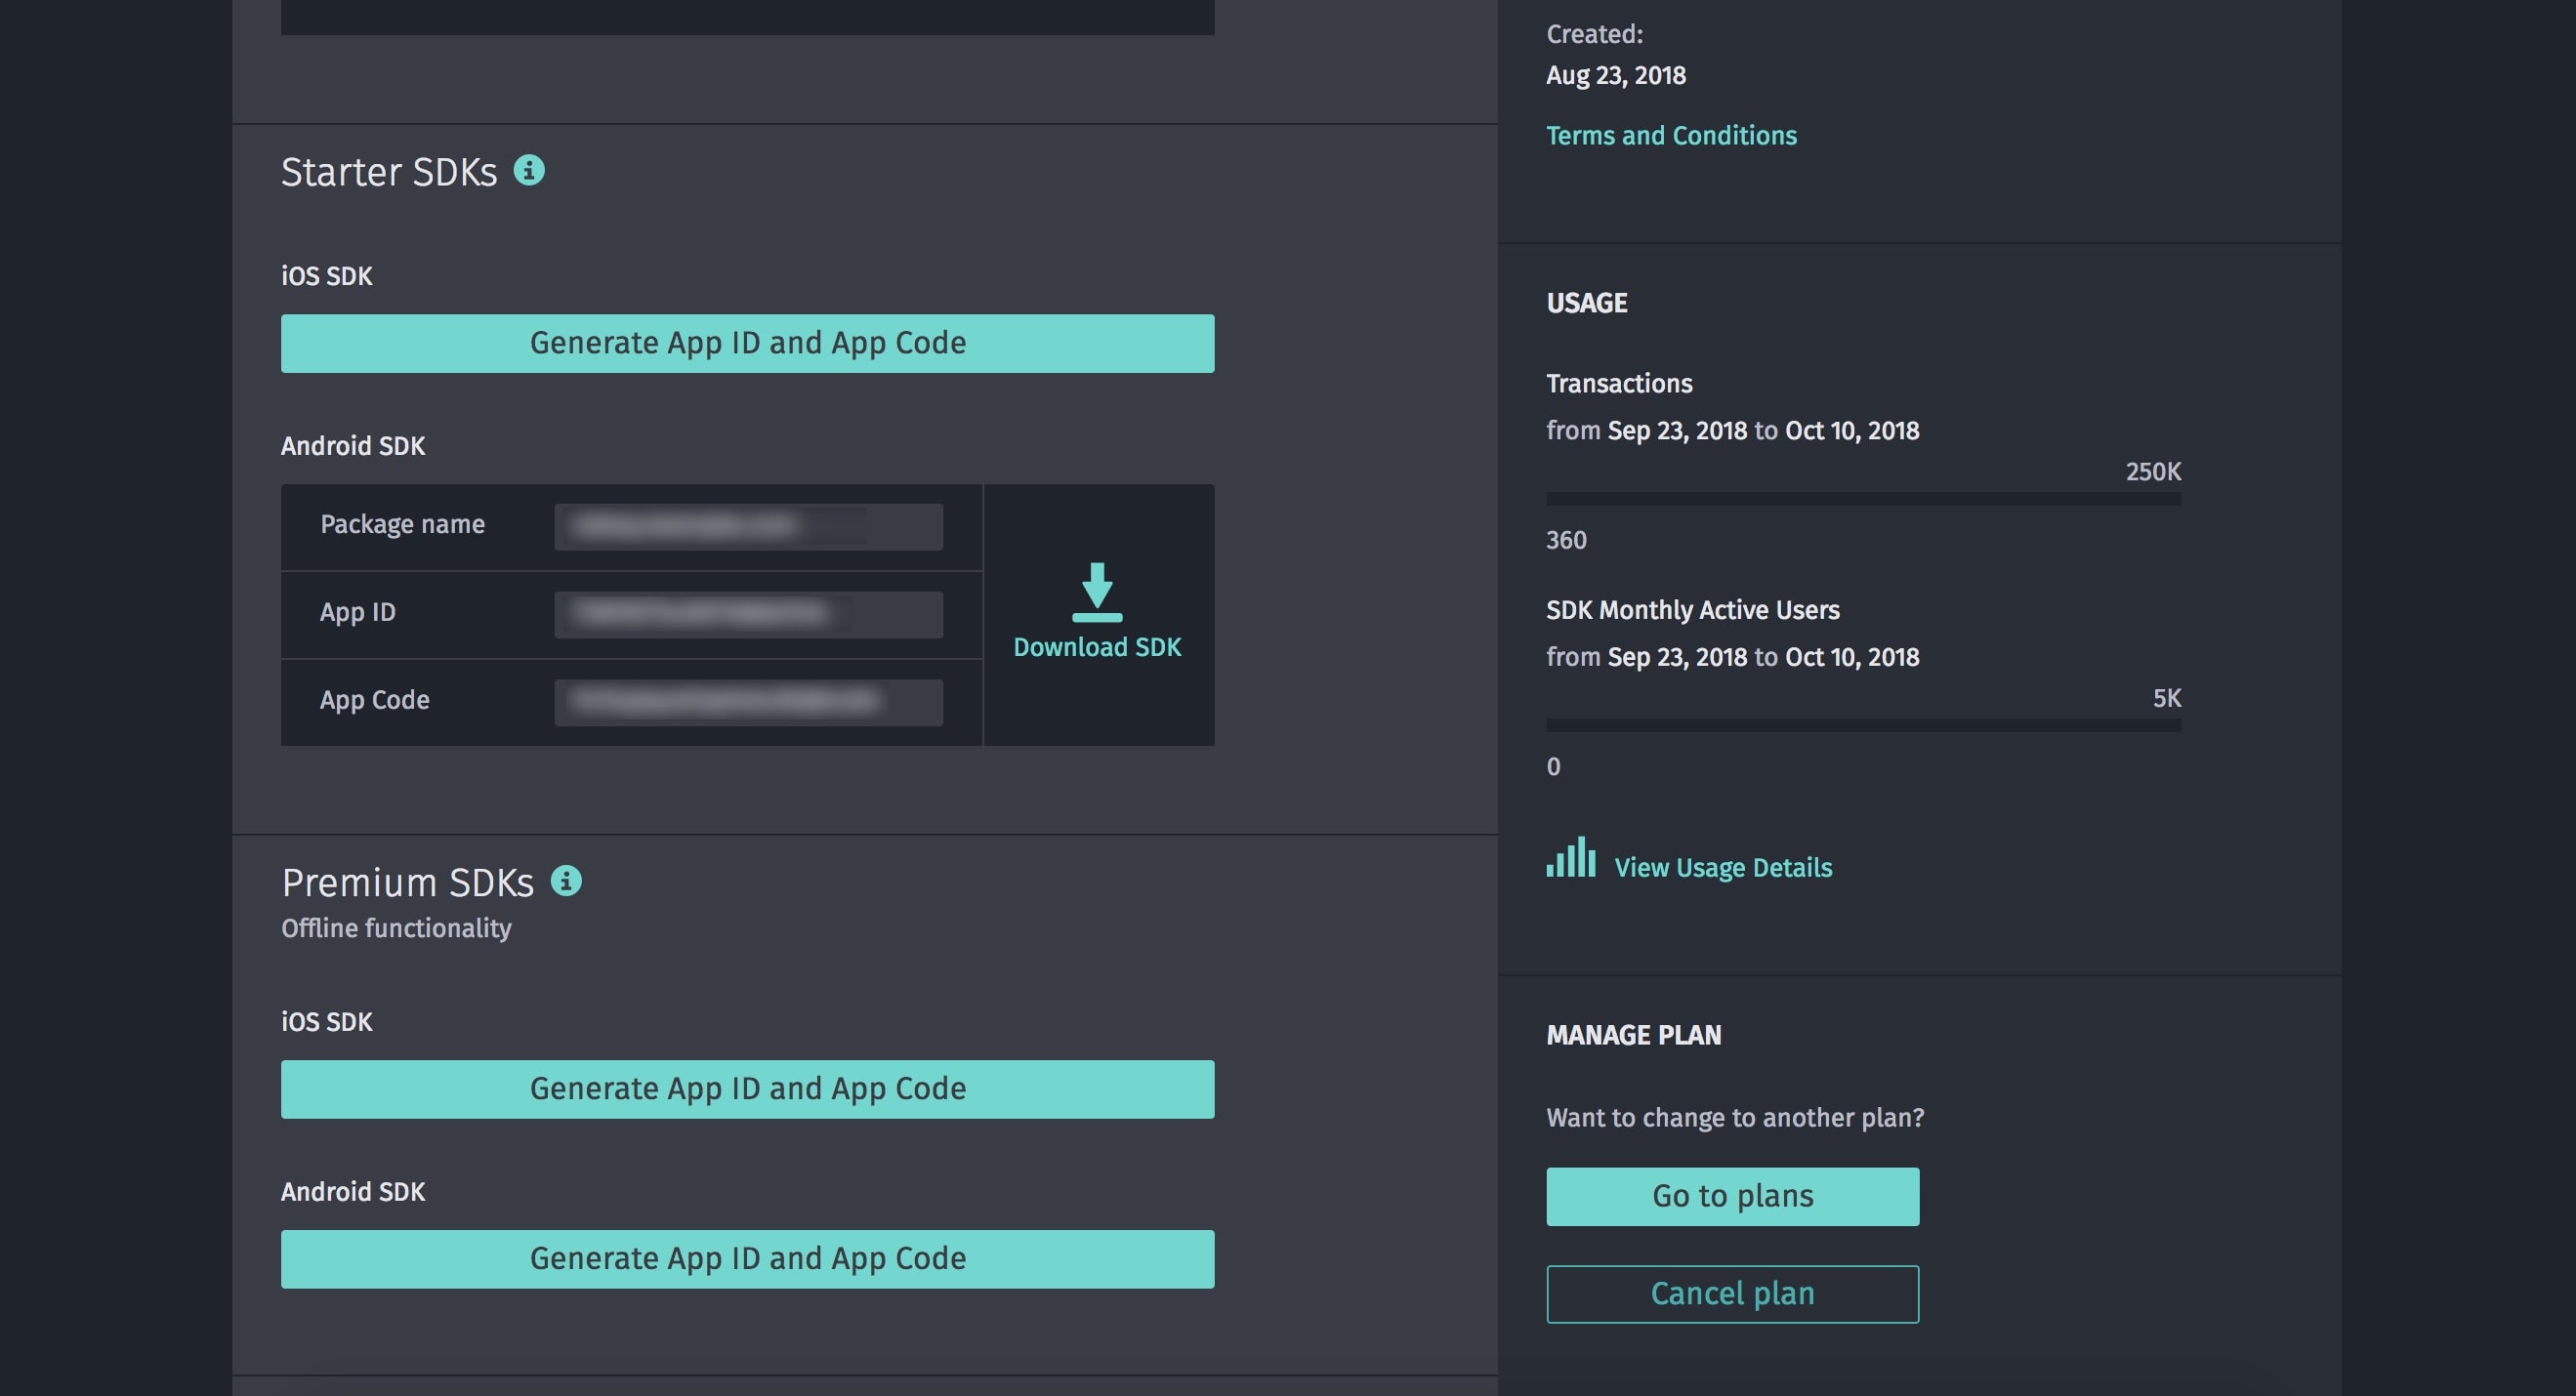
Note: In order to be able to build the examples, you have to sign up for a 90-day Free Trial. After signing in with a HERE account, follow these steps to download the HERE Mobile SDK (Premium):
Choose to Generate App ID and App Code for use with the HERE Mobile SDK for Android: 
Enter the package name of the example you want to build, e.g. com.here.android.example.map.basic. The package name entered here must match the name in your app: 
Click on GENERATE to obtain the App ID, App Code, and License Key: 
Click on Download SDK to get a files named like HERE_Android_SDK_Premium_v3.16.2_101.zip (your version number might differ).
Extract HERE_Android_SDK_Premium_v3.16.2_101.zip as well as the contained HERE-sdk.zip .
Copy the contained HERE-sdk/libs/HERE-sdk.aar file to your example’s libs directory. Again taking the map-rendering example, the libs directory would be here.
Replace the instances of the
Replace the instances of the
Launch Android Studio and import the example’s build.gradle file.
Unless otherwise noted in LICENSE files for specific files or directories, the LICENSE in the root applies to all content in this repository.
HERE Mobile SDK for Android (Premium)
All of the following projects use latest version(currently 3.16) of the HERE Mobile SDK for Android (Premium)
- 3D Model — Show 3D model on the map
- 3D Venues — Show venues in 3D mode
- Advanced Navigation — Handle user interactions and position updates during navigation
- CLE2 — Use custom location extensions
- Geocoding and Reverse Gecoding — Trigger a Geocode and Reverse Geocode request in HERE Mobile SDK
- Map Attribute — Map attributes manipulations
- Map Customization — Customize the map scheme
- Map Downloader — Download offline map data
- Map Gestures — Define custom gesture actions
- Map Objects — Add map objects onto HERE map
- Map Rendering — Display the HERE map on a device
- Routing — Create a route from HERE Burnaby office to Langely BC and display it on the map
- Routing TTA — Create a route and retrieves Time To Arrival
- Venue Positioning — Use HERE location data source in venue
- Positioning — Use HERE location data source
- Search — Send different types of search requests
- AutoSuggest — Send different types of AutoSuggest requests
- Turn-by-Turn Navigation — Trigger a turn-by-turn navigation from HERE Burnaby office to Langley BC
About
Java-based projects using the HERE SDK for Android.
Источник
Getting Started with HERE Maps in an Android Application
Try HERE Maps
Create a free API key to build location-aware apps and services.
There are plenty of use-cases as to why you’d want to include maps and location services in your Android application. Maybe you want to build the next great ride sharing application or maybe you need to track dolphins in the ocean in real-time. Including maps in your Android applications has never been easier with the HERE Android SDK and Java.
We’re going to see how to get started with HERE by including a simple, but interactive map in an Android application using Java and Android Studio.
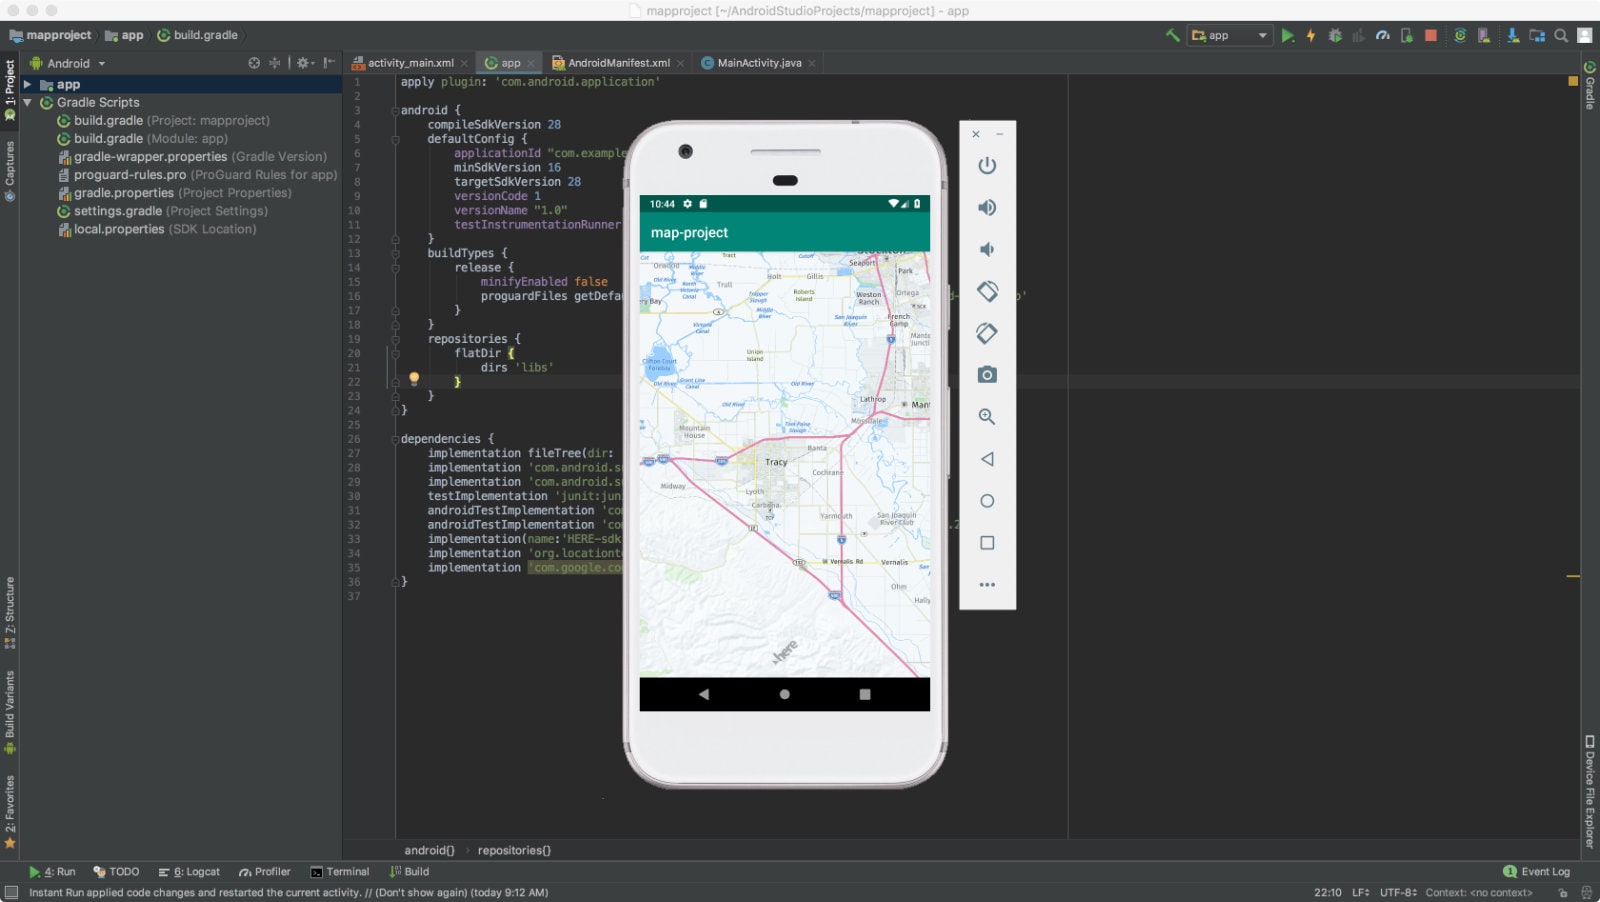
To get an idea of what we hope to accomplish, take a look at the following image:
As you can see, there is a map within a fragment on the screen. What isn’t obvious is that pan and zoom works on the map, making it interactive.
Creating a New Android Project with Android Studio
There are many ways to create Android applications, but we’re going to focus on the most popular which is with Android Studio. Assuming that you have Android Studio installed and the appropriate Android Developer Toolkit (ADT) available, we can create a new project.
Choose to create a new project in Android Studio. The first step is rather important for using the HERE Android SDK.
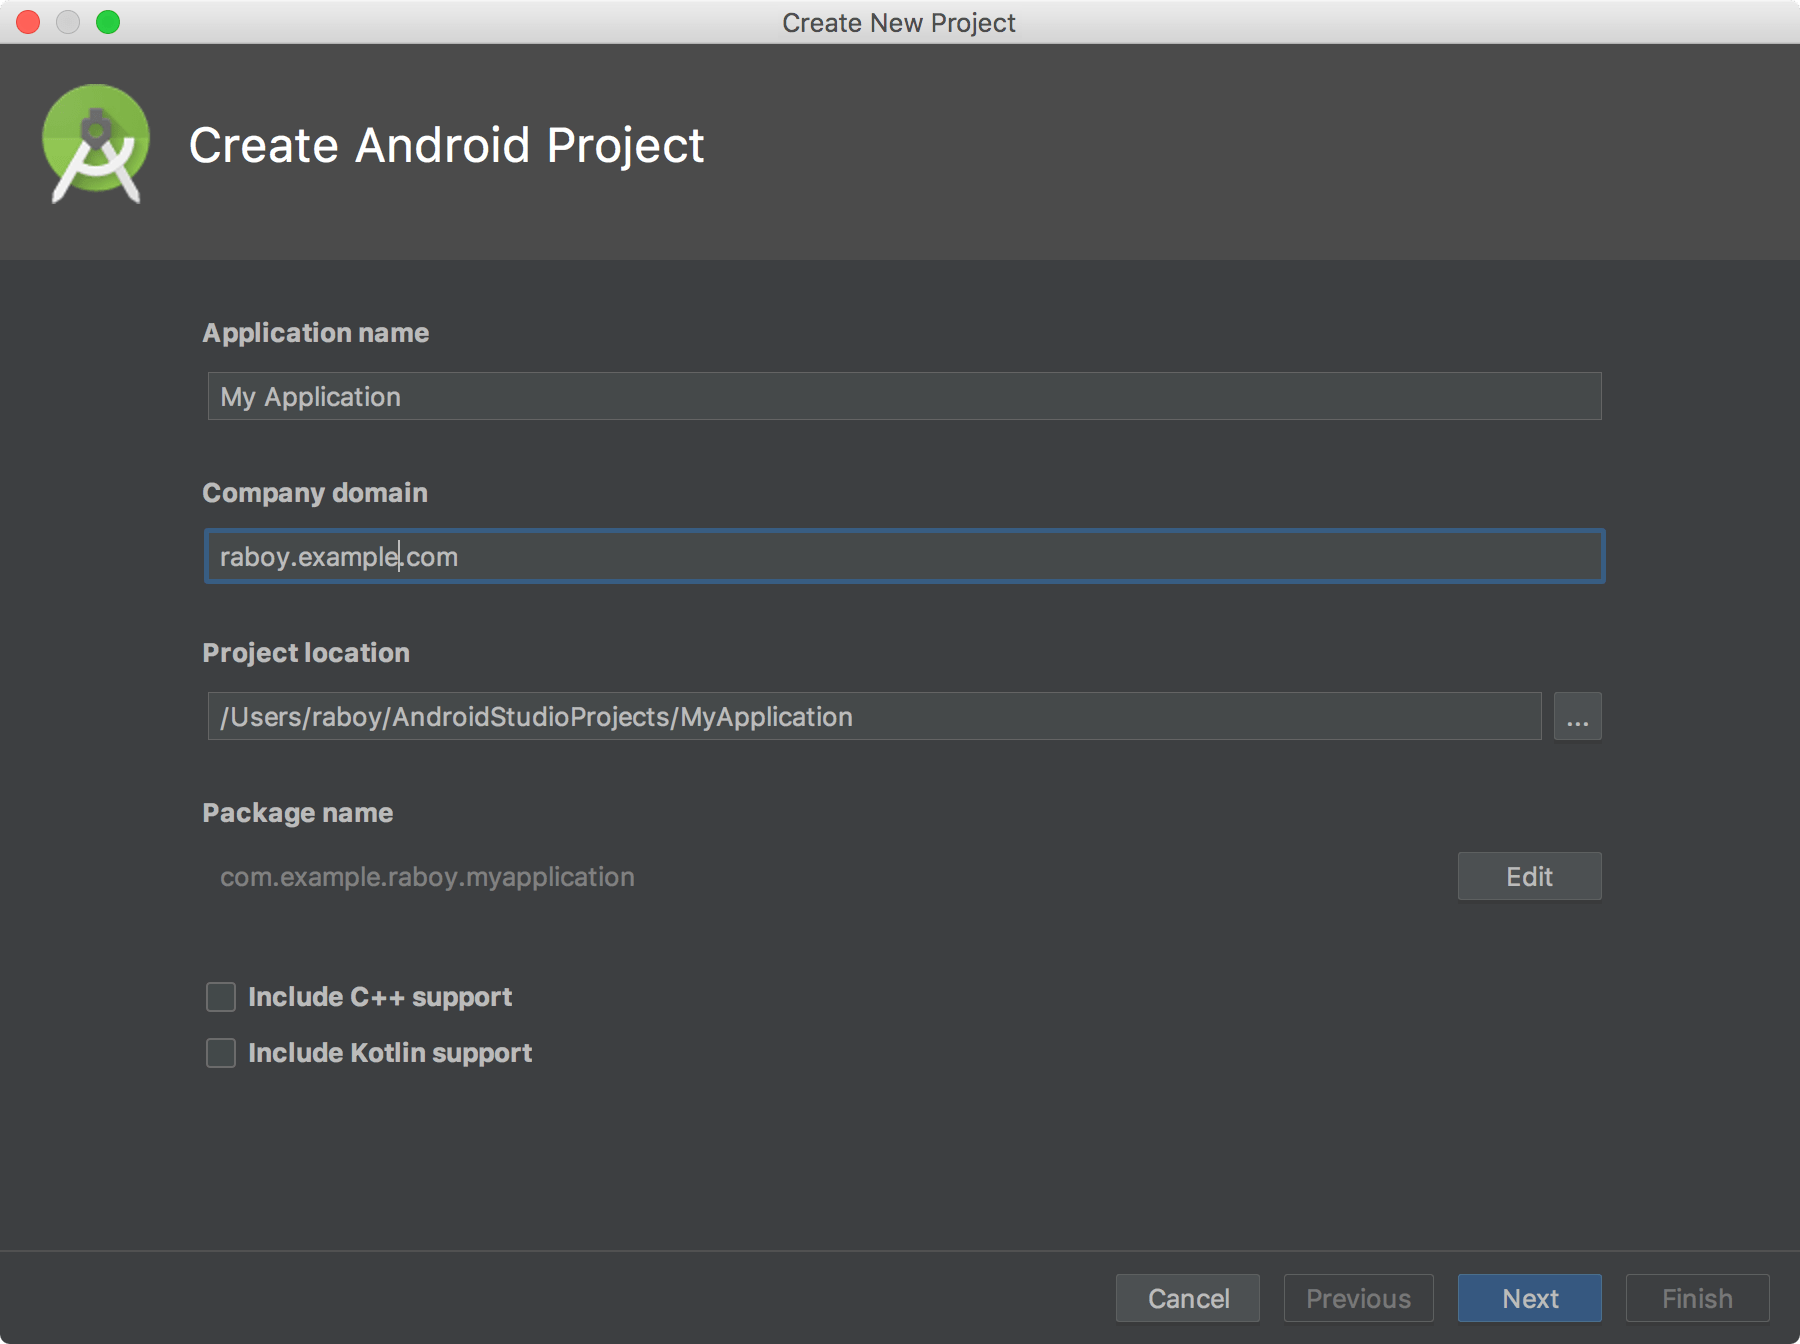
Each application that uses the HERE Android SDK must have an appropriately registered Android package name. In our example, the package name is com.example.raboy.myapplication . If you decide to change it, fine, but whatever you choose will have to be supplied to HERE to get your developer tokens.
All of this project linking can be done for free with a HERE developer account.
The next step is to define the deployment platforms.
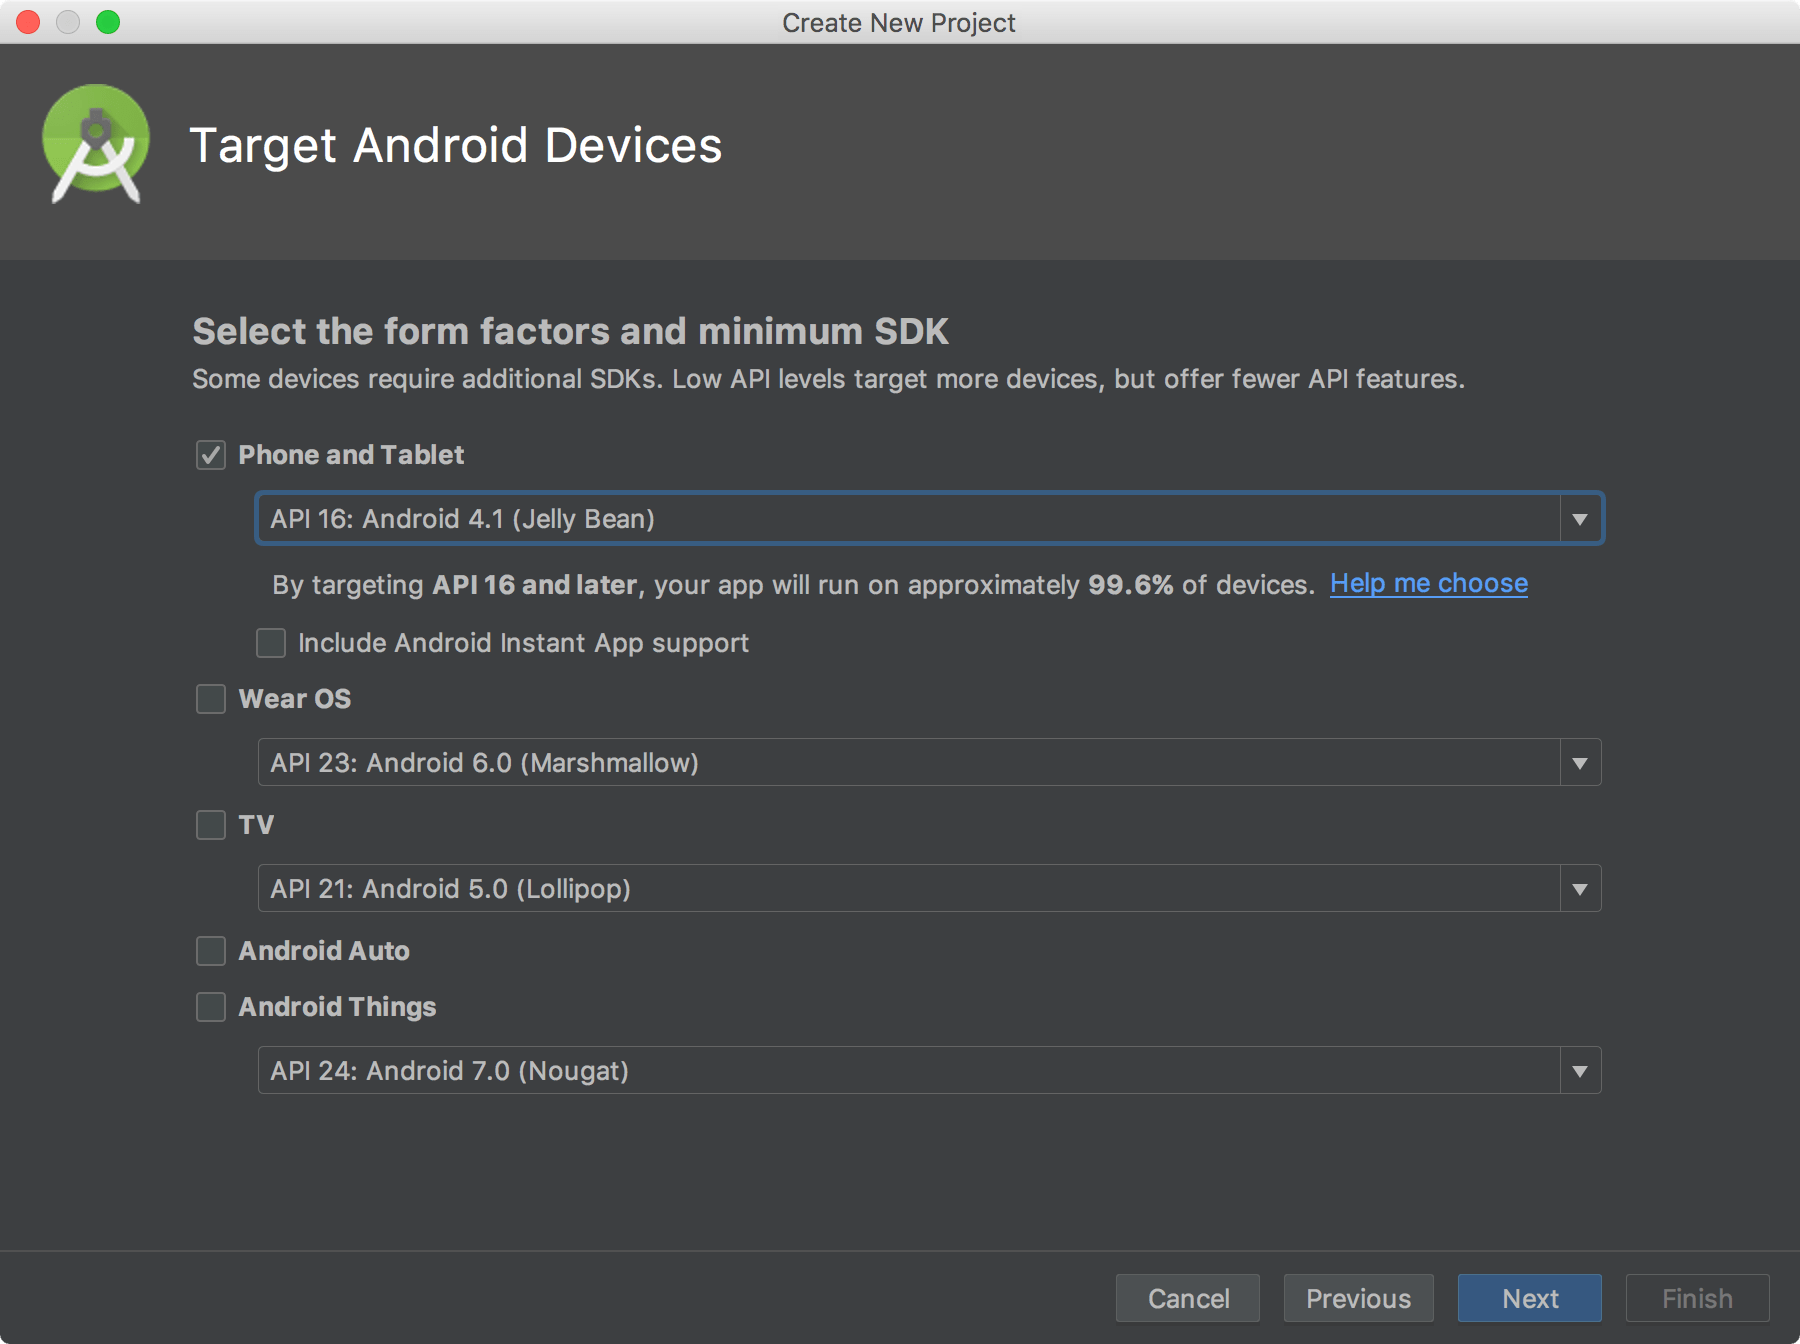
Even though you can still create projects for Android 4.0, you’ll need to be supporting a minimum API of 16 if you wish to use HERE. As of right now the maximum supported API doesn’t really matter.
After defining the target, the next step is to add an activity.
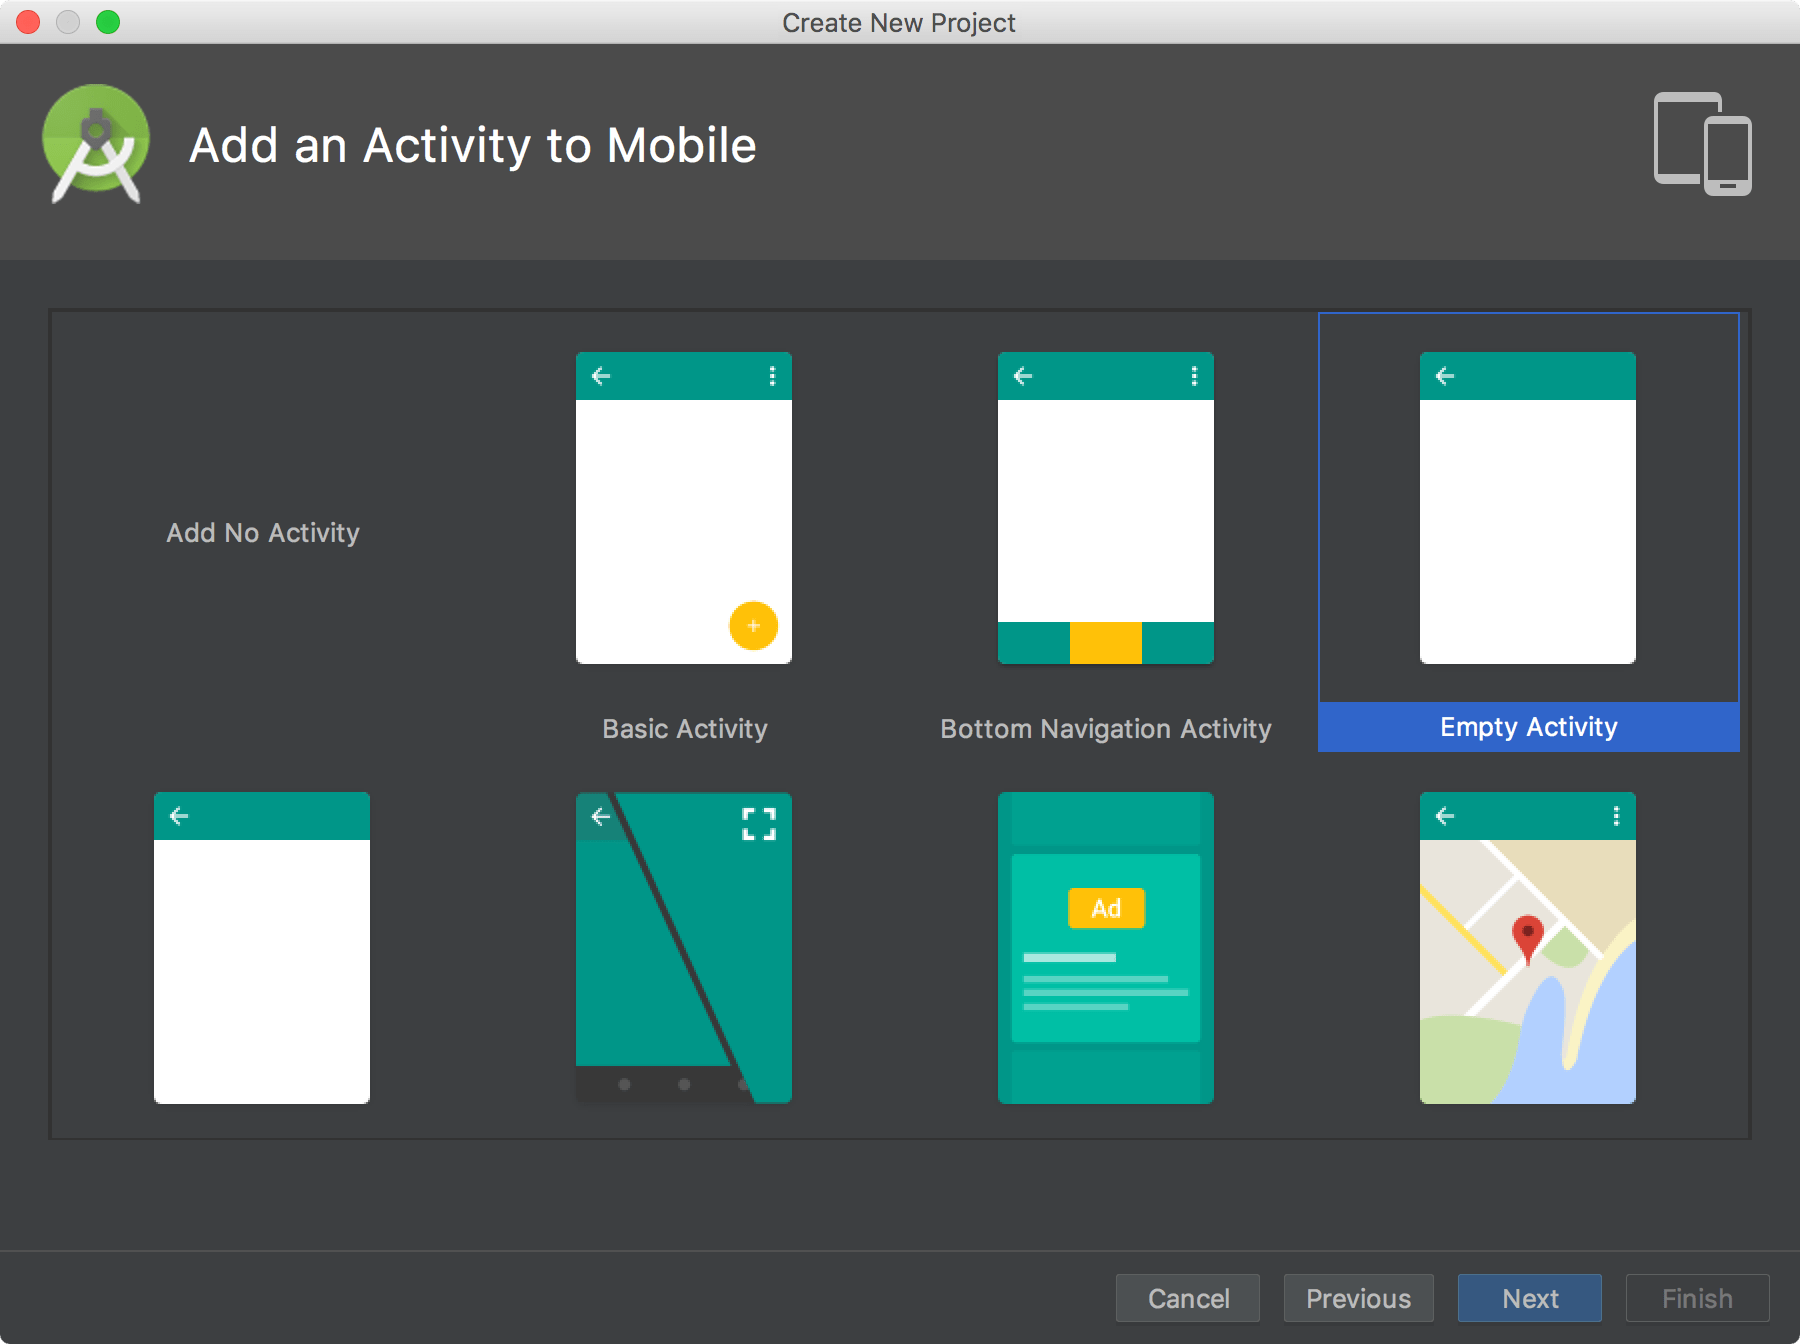
For simplicity, we are going to use an Empty Activity , but feel free to choose whatever makes the most sense to you. When it comes to development, we’re going to include the map as a Fragment within the Activity.
The final step towards creating a new Android project is to name the Activity.
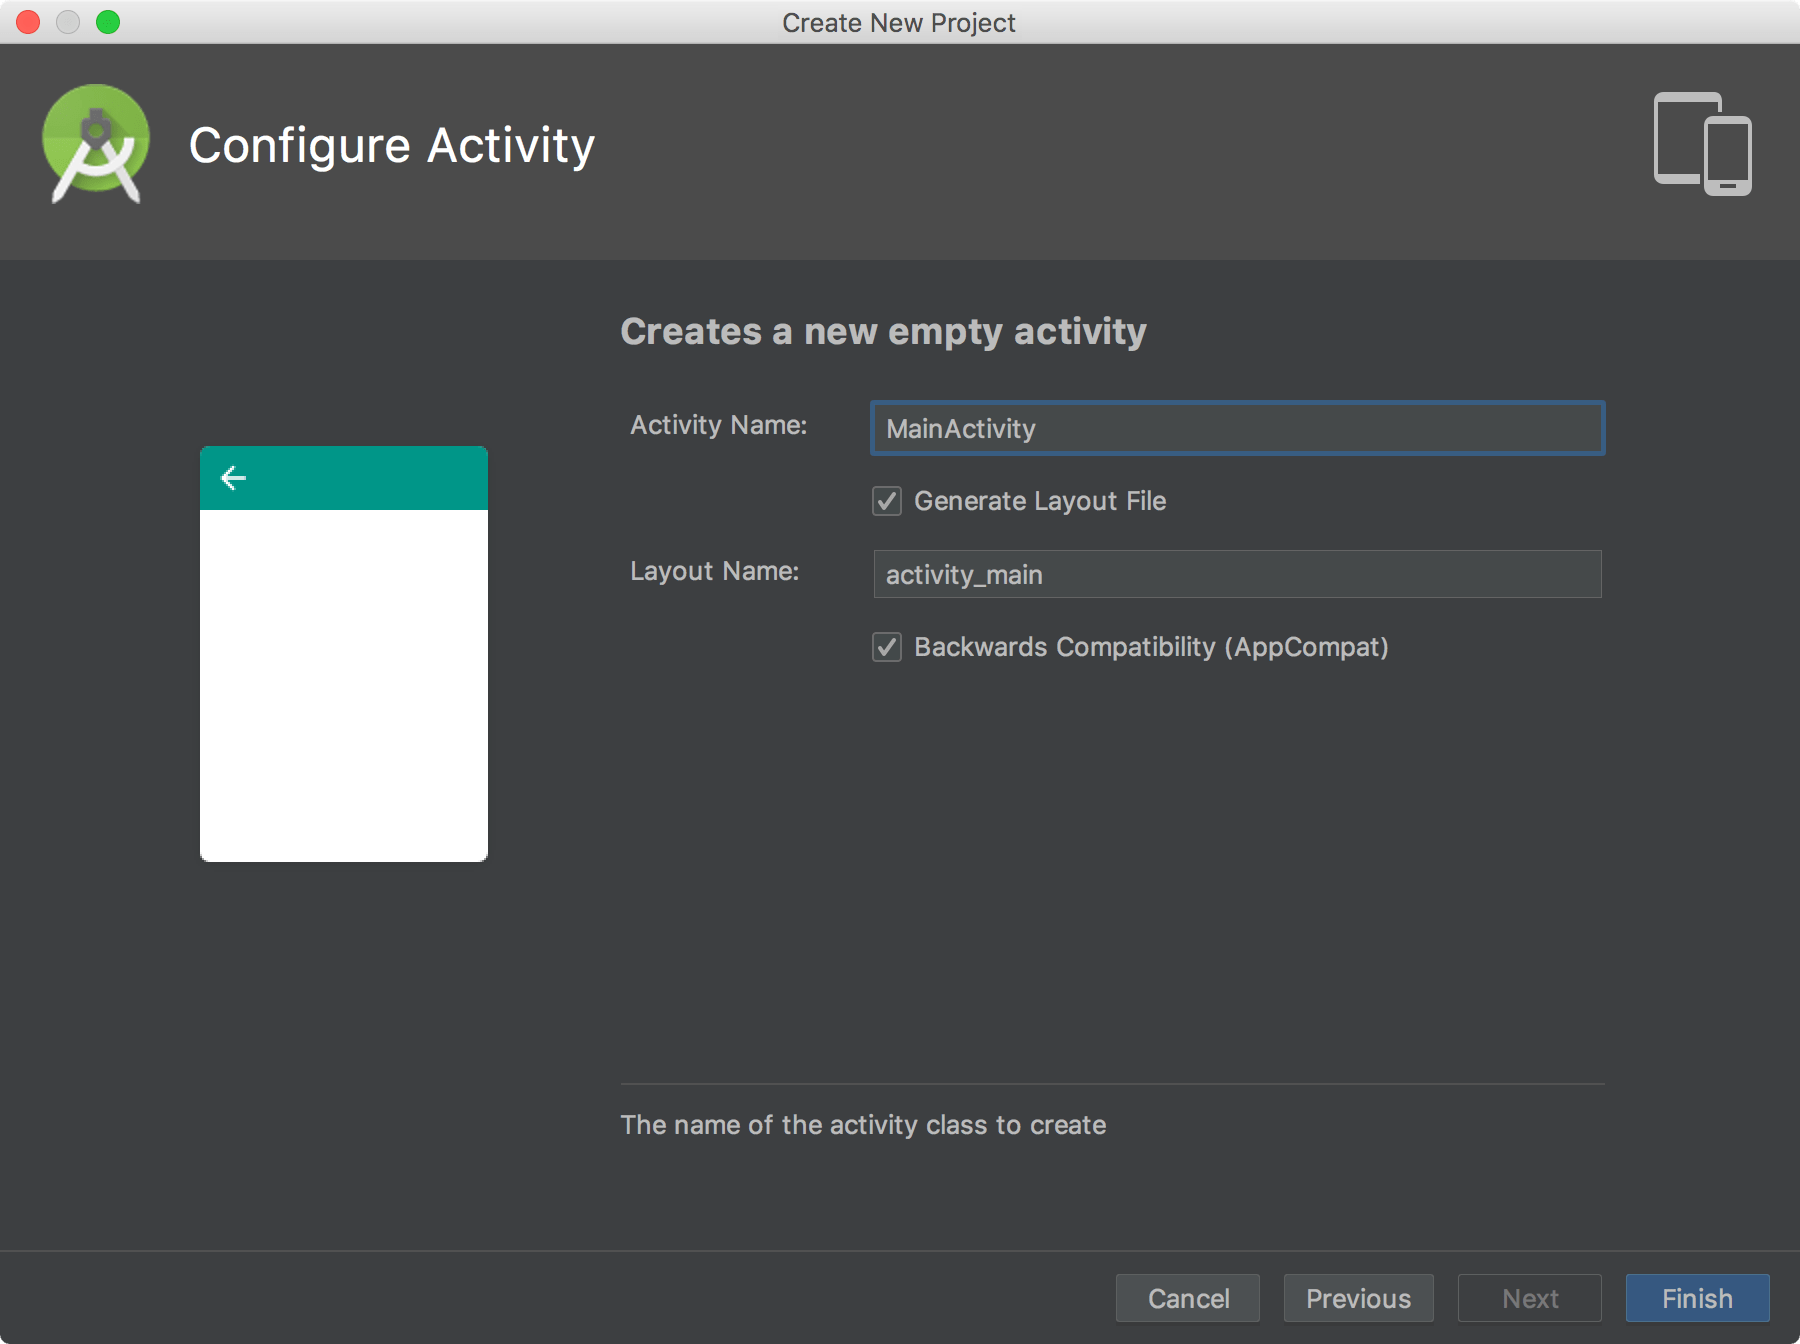
The defaults are fine for the naming in this example. Before we start including the HERE Android SDK, we should probably make a few revisions to the project’s AndroidManifest.xml file:
In the above XML, a few things were added, in particular around the application permissions. The following permissions are required when using HERE Location Services (HLS) in your application:
In addition to various permissions, the application also needs hardware acceleration enabled, which is disabled by default. In the there is the android:hardwareAccelerated=»true» attribute which will enable acceleration.
Now we can consider the new Android project ready for the next step of including the HERE Android SDK.
Downloading and Configuring the HERE Android SDK
To use HERE within your Android application, the package name that was previously created must be registered in your HERE Developer Portal. Having a HERE account is free and very easy to configure.
After providing your package name, you’ll be given an application id and an application code to be used in the project. However, we’re not going to skip ahead quite yet. Instead, we need to download the SDK from the portal.
Within the archive that was downloaded, there should be a HERE-sdk.aar file, probably within the libs directory. The HERE-sdk.aar file should be placed in your project’s app/libs directory.
With the SDK in place, we need to apply the application id and application code values found in the portal. Open the project’s AndroidManifest.xml file and include the following lines:
We’re not quite done configuring the HERE Android SDK. While it is in our project and the appropriate tokens are in place, it hasn’t been imported to be used in our code. To import the AAR file, it needs to be included in our Gradle configuration.
Open the project’s .build.gradle file and include the following:
To be clear on what has changed between our version and the original, we first added a path as a possible repository for libraries:
What we’re doing is we’re saying that Gradle should look in the libs directory when building in addition to any of the remote repositories that are configured by default.
Now that the libs directory is linked up to Gradle, we need to define the AAR library that we had moved over:
At this point in time the SDK is installed, configured, and ready for development. To sum it up, we applied our package name, copied our application id and application code, downloaded the AAR file, and configured Gradle to use the AAR file as a local dependency.
Displaying an Interactive Map within the Mobile Application
The difficult part, in regards to configuring our project, is behind us. Now we can focus on actually developing with HERE, and it actually isn’t very difficult.
As of right now we have a single Activity. This Activity has XML as well as Java. Starting with the XML, we need to create a Fragment to hold our map. Open the project’s activity_main.xml file and include the following:
Take note of the class and the id that we’ve given the Fragment. Using this information, we can take a look at the corresponding MainActivity.java file. Inside the Java file, include the following:
Inside the onCreate method we are setting the view of our XML file and we are obtaining the Fragment of our map based on the id. Just because we have a map Fragment doesn’t mean that it is immediately ready for use. We need to call the init method and listen for when the map is ready.
When the map is ready, assuming that the engine received no errors, we can set the center coordinates as well as the zoom. While this example doesn’t drop any markers on the map, we do end up with a map that we can pan and zoom with as part of the user experience.
Conclusion
You just saw how to get started with the HERE Android SDK for mobile development. A lot of the material found in the above tutorial was taken from the official documentation, but I’ve added my own spin on it from experiencing the setup myself.
Like I mentioned previously, the most consuming part is configuring the SDK itself, not necessarily trying to develop with HERE Location Services.
Nic Raboy is an advocate of modern web and mobile development technologies. He has experience in Java, JavaScript, Golang and a variety of frameworks such as Angular, NativeScript, and Apache Cordova. Nic writes about his development experiences related to making web and mobile development easier to understand.
Источник


