Hex rays decompiler android
Сообщение отредактировал hahanov — 28.11.21, 03:52
Судя по версии это то, что утекло из eset в 2011 году. Посвежее бы 😉
Сообщение отредактировал vedmysh — 15.06.13, 15:04
IDA Pro Advanced v5.5
..версия старенькая, пусть будет для архива
IDA Pro v6.5 (TEAM DVT) (без Hex-Rays декомпиллера)
 Hex-Rays_IDA_Pro_v6.5.part1.rar ( 80 МБ )Hex-Rays_IDA_Pro_v6.5.part2.rar ( 70.59 МБ )
Сообщение отредактировал LinXP — 15.08.14, 15:52

Привет, подскажите скачал IDA 6.6 потому что IDA6.1FIX у меня не запускается (ругается на ключ)
Скинул в папку плагины RDMAP из Radialix, а он не работает
пишет ошибку:
LoadLibrary(C:\Program Files\IDA 6.6\plugins\rdmap.plw) error: Не найден указанный модуль.
C:\Program Files\IDA 6.6\plugins\rdmap.plw: can’t load file
Сообщение отредактировал d0sperad0s — 28.03.15, 06:30
я бы в тему залил но 6.8 весит 176мб поэтому «обменик» :beee:
я думаю разобраться можно что к чему
добавте в шапку
6.8+rus+key-ckreak
,если ссылка будет бита в qms я перезалью 😛
Сообщение отредактировал soyuzapolon — 16.03.16, 15:13
Мужики, всех приветствую! Кто-нибудь может помочь в данной программе?
Кратко опишу проблему: установил на китайский телефон с Андроид 4.2.2 прошивку от более нового родственника с Андроид 4.4.2.
Просто залил UBOOT, BOOT и system, без каких-либо манипуляций по портированию и без замены файлов и ядра.
Встала как влитая, работает абсолютно всё идеально, единственная проблема — не работает акселерометр (совсем не работает).
Пробовал менять файл libsensorservice.so (файл содержащий драйвер акселерометра) в прошивке 4.4.2 на родной, после этого бутлуп
— висит на логе Андроид и дальше не загружается. Видимо дело в неродном ядре 3.4.67 для этого файла (родное ядро 3.4.5 было).
Остается только ручное ковыряние и сравнивание файлов libsensorservice.so двух прошивок для добавления драйвера моего акселерометра
в файл libsensorservice.so прошивки Андроид 4.4.2.
В теме по портированию прошивок отправили к вам, точнее посоветовали программу IDA. Скачал, открыл в ней оба файла, вроде бы нашел
адреса с разными данными связанными с акселерометром. Но редактировать не получается, и знаний в этой области практически нет 🙁
Может есть профессионалы кто поможет проанализировать и подкорректировать данный файл сравнивая его со стоковым файлом?
Источник
Hex-Rays Decompiler
The Hex-Rays Decompiler brings binary software analysis within reach of millions of programmers. It converts native processor code into a readable C-like pseudocode text.
Advantages of the Decompiler
In comparison to low level assembly language, high level language representation in the Decompiler has several advantages:
- concise: requires less time to read it;
- structured: program logic is more obvious;
- dynamic: variable names and types can be changed on the fly;
- familiar: no need to learn the assembly language;
The pseudocode text is generated on the fly. Our technology is fast enough to analyze 99% of functions within a couple of seconds.
Currently the decompiler supports compiler generated code for the x86, x64, ARM32, ARM64, and PowerPC processors. We plan to port it to other platforms in the future. The programmatic API allows our customers to improve the decompiler output. Vulnerability search, software validation, coverage analysis are the directions that immediately come to mind.
The decompiler runs on MS Windows, Linux, and Mac OS X. The GUI and text IDA versions are supported.
 A limited demo version of the x64 decompiler
is bundled with the IDA evaluation package!
The Decompiler software is available for 7 platforms
Decompilers require IDA Pro. Check out the decompiler limitations before ordering.
Источник
HexRaysPyTools: декомпилируй с удовольствием

В этой статье я собираюсь рассказать о плагине для IDA Pro, который написал прошлым летом, еще находясь на стажировке в нашей компании. В итоге, плагин был представлен на ZeroNights 2016 (Слайды), и с тех пор в нём было исправлено несколько багов и добавлены новые фичи. Хотя на GitHub я постарался описать его как можно подробнее, обычно коллеги и знакомые начинают пользоваться им только после проведения небольшого воркшопа. Кроме того, опущены некоторые детали внутренней работы, которые позволили бы лучше понять и использовать возможности плагина. Поэтому хотелось бы попытаться на примере объяснить, как с ним работать, а также рассказать о некоторых проблемах и тонкостях.
HexRaysPyTools, как можно догадаться из названия, предназначен для улучшения работы декомпилятора Hex-Rays Decompiler. Декомпилятор, создавая псевдо-С код, существенно облегчает работу ревёрсера. Основым его достоинством, выделяющим инструмент на фоне других, является возможность трансформировать код, приводя его к удобному и понятному виду, в отличие от ассемблерного кода, который, даже при самом лучшем сопровождении, требует некоторой доли внимания и сосредоточенности для понимания его работы. У Hex-Rays Decompiler, как и самой IDA Pro, есть API, позволяющий писать расширения и выходить за рамки стандартного функционала. И хотя API очень широк, и в теории позволяет удовлетворить самые изысканные потребности разработчика дополнений, у него есть несколько существенных недостатков, а именно:
- Слабая документированность. Для того, чтобы найти подходящие функции или классы, самый эффективный способ — произвести поиск регулярными выражениями по файлам, угадывая ключевые слова
- Произвольные названия функций и структур — часто их название не говорит ни о чём
- Deprecated методы, для которых не предложено замены
- Общая запутанность работы. Например, для изменения типа аргумента у функции, нужно написать 8 строк кода и задействовать 3 класса. И это не самый странный пример
- API для языка Python не совсем совпадает с тем, что для C++. idaapi содержит новые методы, наткнуться на которые получилось чисто случайно
- Есть неочевидные вещи: например, IDA Pro будет падать, если не отключать Garbage Collector для объектов, добавленных с помощью idaapi в абстрактное синтаксическое дерево (оно всегда строится, когда происходит декомпиляция, и в нём можно изменять объекты или вставлять свои).
Чтобы разобраться во всем этом, помогали рабочие примеры, собранные в Интернете (что-то интересное нашлось даже в китайском сегменте). Так что теперь, если кто-то захочет создать что-то своё для декомпилятора, можно обратиться еще и к исходным кодам моего плагина.
Перейдем к описанию плагина. В HexRaysPyTools можно выделить две отдельные категории — это помощь по трансформации дефолтного вывода Hex-Rays Decompiler к удобному виду и реконструкция структур и классов.
Работа с кодом
Изначально, после запуска декомпилятора клавишей F5, IDA Pro выдаёт не очень понятый код, состоящий преимущественно из стандартных типов и имён переменных. И несмотря на то, что местами пытается угадать типы, создать массивы или назвать эти переменные (которым повезло оказаться аргументами у стандартных функций), получается это не очень хорошо. В целом, задача ревёрсера — привести в адекватный вид декомпилированный код. К сожалению, есть вещи, которые невозможно сделать, не прибегая к IDA SDK. Например, отрицательные обращения к полям структур, которые всегда выглядят безобразно (порой превращаясь в массивы с отрицательными индексами), а также длинные условные вложения, тянущиеся из левого верхнего угла в правый нижний. Кроме этого, очень не хватает горячих клавиш и опций для более быстрой трансформации кода. По мере получения информации в процессе анализа программы приходится изменять сигнатуры функций, переименовывать переменные и изменять типы. Всё это требует большого количества манипуляций мышкой и копирований-вставок. Перейдем к описанию того, что предлагает плагин для решения этих проблем.
Отрицательные смещения
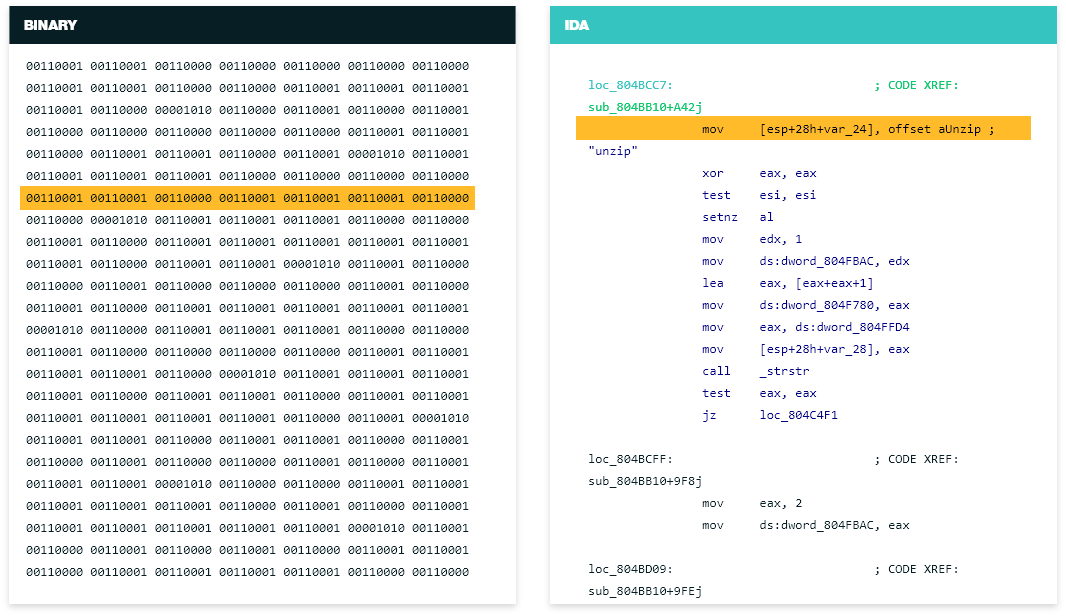
Очень часто встречаются при реверсинге драйверов или ядра Windows или модулей ядра Linux. Например, несколько разных структур может быть расположено в двусвязном списке с использованием структуры LIST_ENTRY. При этом у каждой структуры обращение к двусвязному списку может производиться из произвольного поля.
В результате, когда мы смотрим на то, что получается в IDA Pro, видим следующую картину:

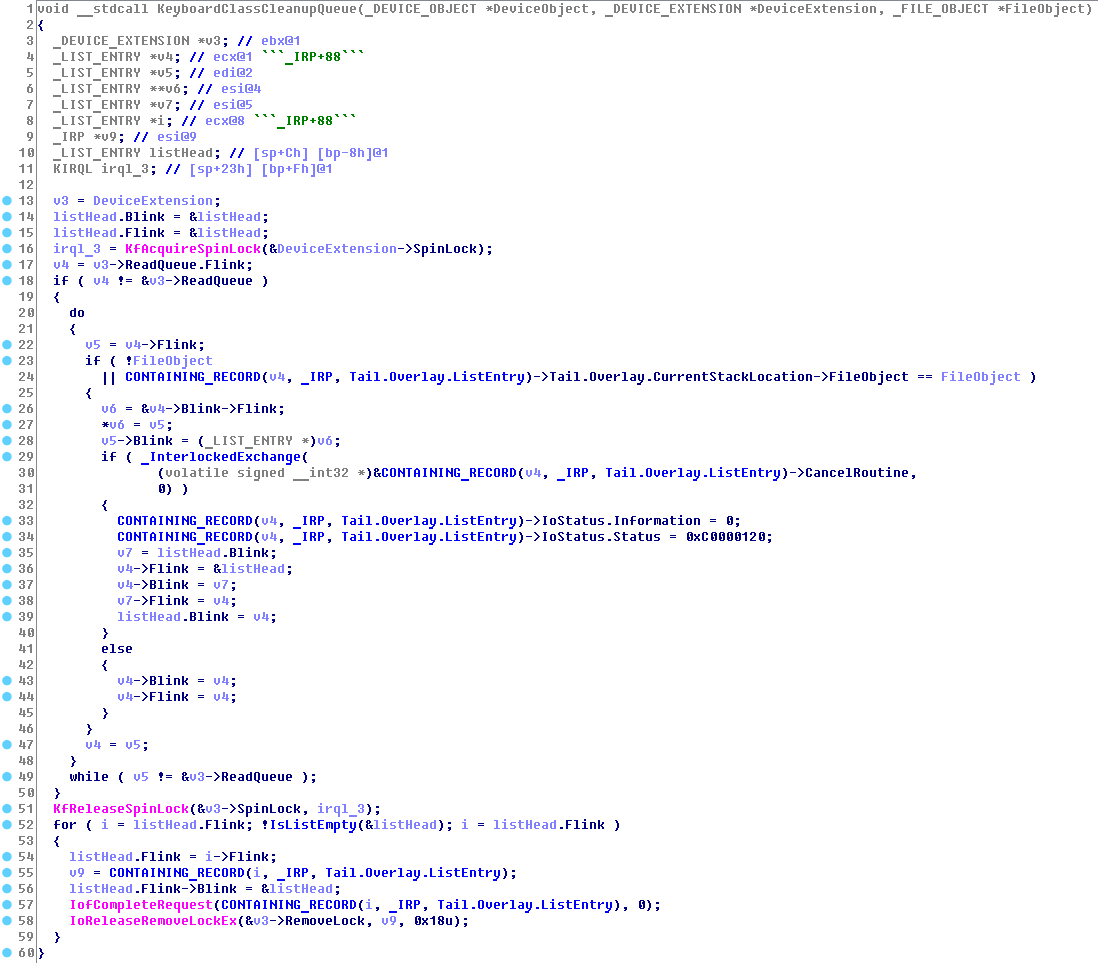
Такой вывод будет всякий раз, когда в исходных кодах программ используются макросы CONTIAINING_RECORD (windows) и container_of (linux). Эти макросы возвращают указатель на начало структуры по её типу, адресу и названию поля. И именно их плагин позволяет вставлять в дизассемблер. Вот как выглядит пример после его применения:
Еще с отрицательными смещениями можно встретиться при множественном наследовании, но это довольно изысканный пример, он редко встречается на практике.
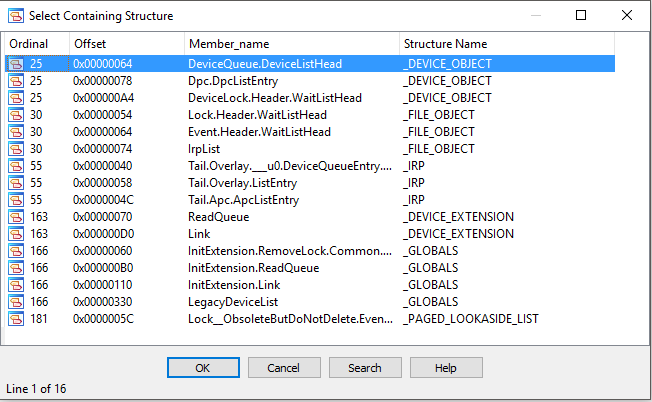
Для того, чтобы вставить макрос в дизассемблер, нужно, чтобы подходящая в данном контексте структура существовала в Local Types или в одной из библиотек в Types Library (их может быть несколько). Мы кликаем по вложенной структуре правой кнопкой и выбираем Select Containing Structure. Далее определяем, где искать структуру, — либо в Local Types, либо в Types Library, и плагин составляет список подходящих структур. Для этого он анализирует, как указанная переменная используется в коде и определяет минимальную и максимальную границы, в которых может находиться поле типа этой переменной. Затем, используя эти сведения, проходит по всем структурам, содержащим поле, у которых все в порядке с границей. При поиске плагин смотрит вложенные структуры и объединения на любую глубину.
В примере выше у exe-файла есть символы, поэтому список подходящих структур получился довольно большой:
Помимо этого, существует ситуация, когда плагин автоматически может вставить макрос. Дело в том, что если есть явное присвоение указателя, IDA Pro догадывается (иногда неправильно) его вставить, но не распространяет его дальше в коде.
Источник
SDK Reference
There are 2 representations of the binary code in the decompiler:
- microcode: processor instructions are translated into it and then the decompiler optimizes and transforms it
- ctree: ctree is built from the optimized microcode and represents AST-like tree with C statements and expressions. It can be printed as C code.
Microcode is represented by the following classes:
- mba_t keeps general info about the decompiled code and array of basic blocks. usually mba_t is named ‘mba’
- mblock_t a basic block. includes list of instructions
- minsn_t an instruction. contains 3 operands: left, right, and destination
- mop_t an operand. depending on its type may hold various info like a number, register, stack variable, etc.
- mlist_t list of memory or register locations; can hold vast areas of memory and multiple registers. this class is used very extensively in the decompiler. it may represent list of locations accessed by an instruction or even an entire basic block. it is also used as argument of many functions. for example, there is a function that searches for an instruction that refers to a mlist_t.
Ctree is represented by:
- cfunc_t keeps general info about the decompiled code, including a pointer to mba_t. deleting cfunc_t will delete mba_t too (however, decompiler returns cfuncptr_t, which is a reference counting object and deletes the underlying function as soon as all references to it go out of scope). cfunc_t has ‘body’, which represents the decompiled function body as cinsn_t.
- cinsn_t a C statement. can be a compound statement or any other legal C statements (like if, for, while, return, expression-statement, etc). depending on the statement type has pointers to additional info. for example, the ‘if’ statement has poiner to cif_t, which holds the ‘if’ condition, ‘then’ branch, and optionally ‘else’ branch. Please note that despite of the name cinsn_t we say «statements», not «instructions». For us instructions are part of microcode, not ctree.
- cexpr_t a C expression. is used as part of a C statement, when necessary. cexpr_t has ‘type’ field, which keeps the expression type.
- citem_t a base class for cinsn_t and cexpr_t, holds common info like the address, label, and opcode.
- cnumber_t a constant 64-bit number. in addition to its value also holds information how to represent it: decimal, hex, or as a symbolic constant (enum member). please note that numbers are represented by another class (mnumber_t) in microcode.
Both microcode and ctree use the following class:
- lvar_t a local variable. may represent a stack or register variable. a variable has a name, type, location, etc. the list of variables is stored in mba->vars.
- lvar_locator_t holds a variable location (vdloc_t) and its definition address.
- vdloc_t describes a variable location, like a register number, a stack offset, or, in complex cases, can be a mix of register and stack locations. very similar to argloc_t, which is used in ida. the differences between argloc_t and vdloc_t are:
- vdloc_t never uses ARGLOC_REG2
- vdloc_t uses micro register numbers instead of processor register numbers
- the stack offsets are never negative in vdloc_t, while in argloc_t there can be negative offsets
The above are the most important classes in this header file. There are many auxiliary classes, please see their definitions in the header file.
Источник
Hex rays decompiler android
![]()


The Hex-Rays Decompiler plugin for better code navigation in RE process. CodeXplorer automates code REconstruction of C++ applications or modern malware like Stuxnet, Flame, Equation, Animal Farm .
The CodeXplorer plugin is one of the first publicly available Hex-Rays Decompiler plugins. We keep updated this project since summer of 2013 and continue contributing new features frequently. Also most interesting feutures of CodeXplorer have been presented on numerous security conferences like: REcon, ZeroNights, H2HC, NSEC and BHUS 👾
Contributors:
Supported versions of Hex-Rays products: everytime we focus on last versions of IDA and Decompiler because trying to use new interesting features in new SDK releases. It’s also mean we tested just on last versions of Hex-Rays products and not guaranteed stable work on previous ones.
Why not IdaPython: all code developed on C/C++ because it’s more stable way to support complex plugin for Hex-Rays Decompiler.
Supported Platforms: x86/x64 for Win, Linux and Mac.
HexRaysCodeXplorer — Hex-Rays Decompiler plugin for easier code navigation. Right-click context menu in the Pseudocode window shows CodeXplorer plugin commands:

💎 Here are the main features of the CodeXplorer plugin: 💎
- Automatic type REconstruction for C++ objects. To be able to reconstruct a type using HexRaysCodeXplorer one needs to select the variable holding pointer to the instance of position independed code or to an object and by right-button mouse click select from the context menu «REconstruct Type» option:

The reconstructed structure is displayed in “Output window”. Detailed information about type Reconstruction feature is provided in the blog post “Type REconstruction in HexRaysCodeXplorer”.
Also CodeXplorer plugin supports auto REconstruction type into IDA local types storage.

- Virtual function table identification — automatically identifies references to virtual function tables during type reconstruction. When a reference to a virtual function table is identified the plugin generates a corresponding C-structure. As shown below during reconstructing struct_local_data_storage two virtual function tables were identified and, as a result, two corresponding structures were generated: struct_local_data_storage_VTABLE_0 and struct_local_data_storage_VTABLE_4 .

- C-tree graph visualization – a special tree-like structure representing a decompiled routine in citem_t terms (hexrays.hpp). Useful feature for understanding how the decompiler works. The highlighted graph node corresponds to the current cursor position in the HexRays Pseudocode window:

- Ctree Item View – show ctree representation for highlighted element:

- Extract Ctrees to File – dump calculate SHA1 hash and dump all ctrees to file.

Extract Types to File – dump all types information (include reconstructed types) into file.
Navigation through virtual function calls in HexRays Pseudocode window. After representing C++ objects by C-structures this feature make possible navigation by mouse clicking to the virtual function calls as structure fields:

- Jump to Disasm — small feature for navigate to assembly code into «IDA View window» from current Pseudocode line position. It is help to find a place in assembly code associated with decompiled line.

- Object Explorer – useful interface for navigation through virtual tables (VTBL) structures. Object Explorer outputs VTBL information into IDA custom view window. The output window is shown by choosing «Object Explorer» option in right-button mouse click context menu:

Object Explorer supports following features:
Auto structures generation for VTBL into IDA local types
Navigation in virtual table list and jump to VTBL address into «IDA View» window by click
Show hints for current position in virtual table list
Shows cross-references list by click into menu on «Show XREFS to VTBL»

- Support auto parsing RTTI objects:

The Batch mode contains following features:
- Batch mode — useful feature to use CodeXplorer for processing multiple files without any interaction from user. We add this feature after Black Hat research in 2015 for processing 2 millions samples.
Compiling:
Windows:
- Open the solution in Visual Studio
- Open file src/HexRaysCodeXplorer/PropertySheet.props in notepad(++) and update values of IDADIR and IDASDK paths to point to IDA installation path and IDA7 SDK path accordingly. HexRays SDK should be in $IDADIR\plugins\hexrays_sdk (like by default)
- Build Release | x64 and Release x64 | x64 configurations
- cd src/HexRaysCodeXplorer/
- IDA_DIR=
EA64=0 make -f makefile.lnx
IDA_DIR=
EA64=0 make -f makefile.lnx install
- cd src/HexRaysCodeXplorer/
- IDA_DIR=
make -f makefile.mac
With CMake:
- cd src/HexRaysCodeXplorer/
- mkdir build && cd build
- cmake .. -DIdaSdk_ROOT_DIR=
Conference talks about CodeXplorer plugin:
- 2015
- «Distributing the REconstruction of High-Level IR for Large Scale Malware Analysis», BHUS [slides]
- «Object Oriented Code RE with HexraysCodeXplorer», NSEC [slides]
- 2014
- «HexRaysCodeXplorer: object oriented RE for fun and profit», H2HC [slides]
- 2013
- «HexRaysCodeXplorer: make object-oriented RE easier», ZeroNights [slides]
- «Reconstructing Gapz: Position-Independent Code Analysis Problem», REcon [slides]
About
Hex-Rays Decompiler plugin for better code navigation
Источник


