- How to hide/show Toolbar when list is scrolling (part 3)
- Preparation
- Scrolling Toolbar and FloatingActionButton
- How to hide/show toolbar while scrolling
- What to do
- How to hide/show Toolbar when list is scroling (part 1)
- Let’s get started!
- Adding a header to the RecyclerView :
- Showing/hiding views when list is scrolling.
How to hide/show Toolbar when list is scrolling (part 3)
This is a third (and the really last) post of this series 🙂 If you haven’t read part 1 or part 2 that’s ok because they are deprecated now. In previous parts I showed how to manually achieve hiding/showing Toolbar when list is scrolling. But now we have the Design Support Library and we don’t have to write it on our own! I will show how to use CoordinatorLayout and create a simple Behavior to hide/show Toolbar and FAB when list scrolls up/down. Many of you had a problem with tabs and lists that contain too few items to scroll. I’m happy to tell you that thanks to CoordinatorLayout all these problems are gone 🙂 Let’s begin!
This is what we want to achieve: 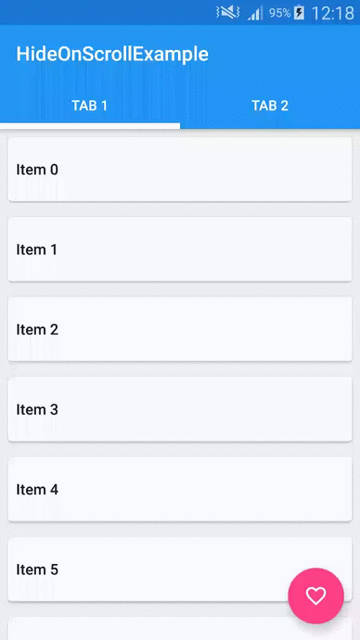
Preparation
In order to use the new cool features that Design Support Library has to offer we need to modify our build.gradle file:
It’s just updated SDK, build tools and libraries to the newest version. And as you can see there is also a new one at the end compile ‘com.android.support:design:22.2.0’ .
Now we can create our PartThreeActivity and fill it with some data. Our demo will have 2 tabs with lists of items on each tab. So we’ll need a ViewPager which will be showing two Fragments . In our case both Fragments will display a list of items, so they will be the same. The only difference is that we will show 20 items on first page and only 5 items on second page. This is because I want to show you that even if list is too short to scroll we will be able to show/hide the Toolbar and FAB. So let’s start from creating a PartThreeFragment class. Here is it’s layout file:
Nothing special here, just a RecyclerView . Let’s jump to PartThreeFragment code:
It’s an ordinary Fragment so I won’t describe it. The only interesting part is that we can give it a number of items that our list will contain (look at createInstance(int itemsCount) and createItemList() methods). RecyclerAdapter and the layout of a single list item is exactly the same as we created in part 2.
So we have it, now we need to setup our PartThreeActivity . Let’s look at the layout file:
Let’s stop a little bit. There are a few new things in there. First is the CoordinatorLayout. It’s a new layout that let’s you create interactions between Views that you put inside it. As the documentation says it’s a FrameLayout on steroids. It intercepts touch events and let’s you inject your own [Behaviors]. We’ll see an example of this a little bit later. Next new thing is the [AppBarLayout]. It’s an enhanced version of Linearlayout that allows you to specify scrolling interactions. You can for example create a collapsing Toolbar effect or some other things with it. It’s as simple as puttng it into your layout and setting some attributes. But it’s designed to work in pair with CoordinatorLayout so if you use it in some other ViewGroup you will loose it’s functionality. The last new thing that you can see here is the TabLayout which i think is self-explanatory. It’s basically a new material version of tabs for Android. In our case we want to have the Tabs below the Toolbar so we wrap them in an AppBarLayout . The last part of our layout is a ViewPager . Let’s glue it all together using some Java code:
The only interesting fragment of this class is ViewPager and TabLayout initialization which you can see above. PagerAdapter is a simple implementation of FragmentPagerAdapter so I assume that you are familiar with it. In lines 4 and 5 we are adding two pages to our adapter. First page will contain our PartThreeFragment with 20 items and second page will contain the same Fragment but with only 5 items.
We can now compile it and see how it looks like: 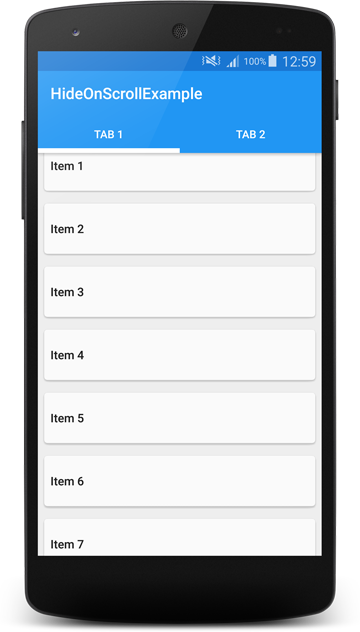
It works but as you can see, the top of the list is not fully visible. It seems that it’s partially covered by our AppBarLayout . To fix this we need to add a Behavior to a ViewPager . It looks like this:
This string value points to android.support.design.widget.AppBarLayout$ScrollingViewBehavior so it’s a fully qualifed Behavior class name. It’s a static inner class inside AppBarLayout class. Behavior is a mechanism that let’s you specify interactions between the Views that you put inside a CoordinatorLayout . The CoordinatorLayout parses Behaviors and handles interactions between Views . Thanks to the fact that you can add it using xml attribute allows adding a Behavior to any View . This is a very powerful API and I really encourage you to play with it. In our case adding ScrollingViewBehavior to the ViewPager causes that it will be positioned correctly according to AppBarLayout and its position will be updated as AppBarLayout scrolls. The new Design Support Library source is not available yet but you can use Android Studio built in decompiler to see what exactly ScrollingViewBehavior is doing. If we run our app now we should see something like this: 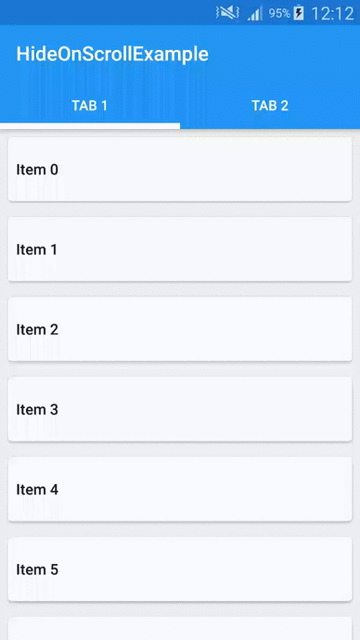
It looks ok, so we can move on.
Scrolling Toolbar and FloatingActionButton
Now it’s time to make our Toolbar scrollable. If you have seen two previous parts of this post you’re probably thinking that we will be creating another OnScrollListener or something. But it’s not the case. Actually we need to add only one line of code to out layout file:
And that’s it! The app:layout_scrollFlags=»scroll|enterAlways» line will cause that our Toolbar will scroll of the screen when user scrolls down the list and as soon as he starts scrolling up the Toolbar will show up again. Clean and simple, that’s the power of CoordinatorLayout !
The app now looks like this: 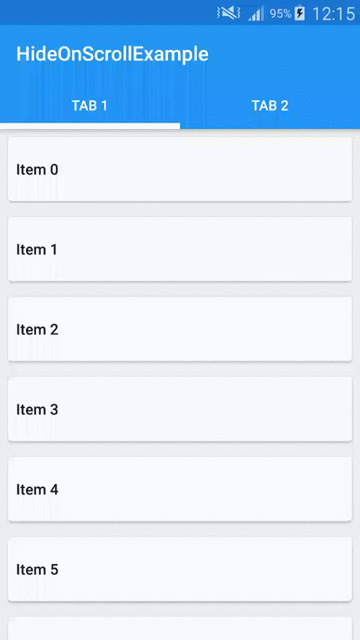
As you can see if you scroll the Toolbar off the screen and change tabs, it remains scrolled off. And even that on the second page we have only 5 items, so list itself cannot be scrolled, you can still show the Toolbar . The CoordinatorLayout makes it possible.
So the last part is adding a FAB. In part 1 we had to create it manually. We were using an ImageButton with a circular drawable as a background. From now on we have a FloatingActionButton widget in the Design Support Library! Let’s add it to our activity_part_three.xml layout file:
There are some known issues with FAB and other widgets from Design Support Library but most of them are already fixed so all we have to do is to wait for the release of the updated version. More on using new FAB widget you can read on Antonio blog. Our app now have a FloatingActionButton : 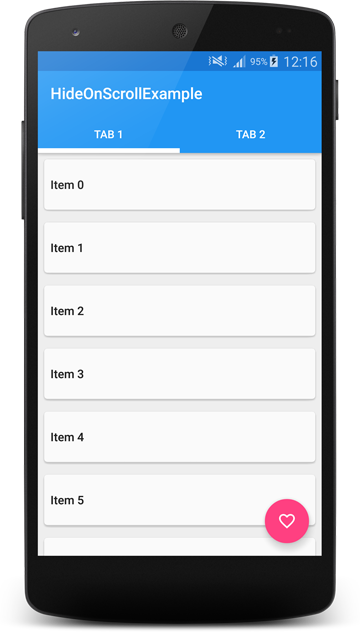
But if we start scrolling, the FAB stays in place and only the Toolbar is moving. To address this issue we will create a custom Behavior for our FAB. Let’s look at the code:
It’s not a lot of code as you can see. Let’s look at the important parts. First we extend from CoordinatorLayout.Behavior class. Note that we have to override constructor taking Context and AttributeSet as parameters in order to use this Behavior in our layout (xml) files. Next method that we need to override is layoutDependsOn . This method tells CoordinatorLayout that we want our FAB to depend on AppBarLayout . So from now on we will be notified about changes of an AppBarLayout size or position. To receive this notification we have to override another method which is onDependentViewChanged . In this method we are calculating how much of the AppBarLayout is scrolled off the screen and we are scrolling our FAB accordingly. So if a half of our AppBarLayout is scrolled off then a half of FAB should also be scrolled off. That’s basically it. Calculating ratio and moving FAB. We return true from this method because it changes position of child view (FAB in our case). What we need to do right now is to add this behavior to our FAB. Let’s do it then:
As you can see we are using fully qualified name of our Behavior class.
Let’s see how it works:
Great, now the FAB moves with our Toolbar !
As you can see the new Design Support Library is really powerful. Using it is pretty simple but it takes some time to get used to new stuff. I again encourage you to play with it and see what else you can do. Behaviors are very flexible and there is a lot more methods available in there. As I have said there are still some rough edges. For example the Toolbar is not snapping to the position, there is some issue with Overscroll which shows when you fling up but not when you scroll up etc. Most of these issues has status FutureRelease so we will get the fixes soon 🙂
Source code of the full project described in this post is available on GitHub repo.
Источник
How to hide/show toolbar while scrolling
In this blog,
I showed how to achieve hiding/showing Toolbar when the list is scrolling by Design Support Library and we don’t need to do it manually.
I will show how to use CoordinatorLayout and create a simple Behavior to hiding/show Toolbar when list scrolls up/down.
What to do
In below example, I will use a CoordinatorLayout as a parent Layout and use a ToolBar with AppBarLayout. And a recylerView which will be scrolled.
Step 1: Create a ToolBar separately for use it in an entire application
toolbar.xml
toolbar: – A Toolbar is a generalized form of action bars for use within application layouts.
Set this flag to your ToolBar.
this app:layout_scrollFlags attribute, performs scroll events in the RecyclerView trigger changes inside views declared within AppBarLayout.
enterAlways : The view will become visible when scrolling up.
snap : Using this option will determine what to do when a view only has been partially reduced.
Step 2: Create the other XML file where you want to apply hide/show property
hide_show.xml
CoordinatorLayout: – CoordinatorLayout has the ability to achieve many of the Google’s Material Design scrolling effects.
AppBarLayout: – AppBarLayout is a vertical LinearLayout which performs many of the features of material designs app bar concept, namely scrolling gesticulation.
recylerView: – Android now give the RecyclerView widget, a new and enhanced view group for displaying very large collections of data.
Set the behavior in recycler view
We have to define AppBarLayout and the View that will be scrolled.
Add a app:layout_behavior to a RecyclerView or any other View prepared of nested scrolling such as NestedScrollView.
By Adding the above property in your XML, you can achieve the ability to hide and showing toolbar while scrolling.
Источник
How to hide/show Toolbar when list is scroling (part 1)
This post is outdated, you should jump to part 3 or stay if you are bored 🙂
In this post we will see how to achieve an effect that you can observe in Google+ app — hiding Toolbar and FAB (and any other views) when list is scrolling down and showing it again when it’s scrolling up. This behavior is mentioned in Material Design Checklist.
“Where appropriate, upon scrolling down, the app bar can scroll off the screen, leaving more vertical space for content. Upon scrolling back up, the app bar should be shown again.”
This is how our goal should look: 
We will be using RecyclerView for our list but it’s possible to implement it in any other scrolling container (with a little more work in some cases i.e. ListView ). There are two ways that come to my mind on how to achieve this:
- With adding a padding to the list.
- With adding a header to the list.
I decided to implement only the second one because I saw multiple questions on how to add a header to RecyclerView and this is a good opportunity to cover this but I will also briefly descripe the first one.
Let’s get started!
We will begin from creating our project and adding necesarry libraries:
Now we should define styles.xml so that our app will use Material Theme but without ActionBar (we will be using Toolbar ):
The next thing is to create our Activity layout:
It’s a simple layout with RecyclerView , Toolbar and ImageButton which will be our FAB. We need to put them in a FrameLayout because Toolbar needs to be overlayed on RecyclerView . If we don’t do this, there will be an empty space visible above the list when we hide the Toolbar .
Let’s jump into the code of our MainActivity :
As you can see it’s a relatively small class. It only implements onCreate which does the following things:
- Initializing Toolbar
- Getting a reference to our FAB
- Initializing RecyclerView
Now we will create an adapter for our RecyclerView . But first, we have to add a layout for our list items:
And corresponding ViewHolder :
Our list will be showing cards with only text so this is it — easy!
Now we can jump to the RecyclerAdapter code:
It’s a basic RecyclerView.Adapter implementation. There is nothing special about it. If you want to find about more about RecyclerView , I recommend you reading Mark Allison’s great series of posts
We got all the pieces in place so let’s run it! 
Oh wait.. what is this? The Toolbar hides our list items and as you have probably noticed it’s because we are using FrameLayout in our activity_main.xml . This is the moment when we have two options that I mentioned at te beginning. First option will be to add a paddingTop to our RecyclerVie w and set it to Toolbar height. But we have to be careful because RecyclerView will clip it’s chilren to padding by default so we have to turn it off. Our layout would look like this:
And it would do the thing. But as I said, I wanted to show you another way — maybe a little more complicated which involves adding a header to the list.
Adding a header to the RecyclerView :
First we need to modify our Adapter a little:
Here is how it works:
- We need to define types of items that the Recycler will display. RecyclerView is a very flexible component. Item types are used when you want to have different layout for some of your list items. And this is exactly what we want to do — our first item will be a header view, so it will be different from the rest of items (lines 3-4).
- We need to tell the Recycler which type item it wants to display is (lines 49-54).
- We need to modify onCreateViewHolder and onBindViewHolder() methods to return and bind a normal item if it’s type is TYPE_ITEM and a header item if it’s type is TYPE_HEADER (lines 14-34).
- We need to modify getItemCount() — we return a number of items in our dataset +1 because we have also a header (lines 43-45).
Now let’s create a layout and ViewHolder for the header view.
The layout is very simple. Important thing to notice is that it’s height needs to be equal to our Toolbar height. And it’s ViewHolder is also pretty straightforward:
Ok, it’s done so we can try it out! 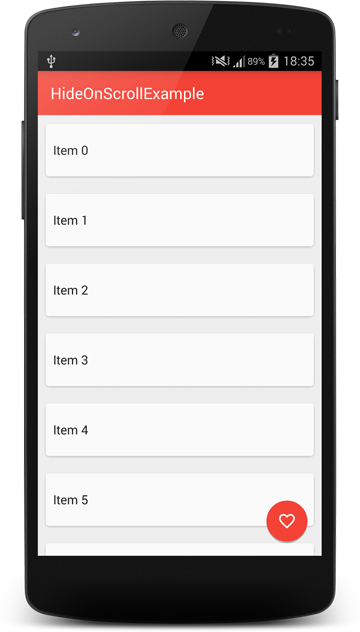
Much better, right? So to sum up, we have added a header to our RecyclerView that has the same height as Toolbar and now our Toolbar hides header view (which is an empty view) and all of our list items are perfectly visible. And finally we can implement showing/hiding views when list is scrolling.
Showing/hiding views when list is scrolling.
To achieve this we will create only one more class — OnScrollListener for RecyclerView .
As you can see there is only one method where all the magic happens — onScrolled() method. It’s parameters — dx, dy are the amounts of horizontal and vertical scrolls. Actually they are deltas, so it’s the amount between two events, not total scroll amount.
Basically an algorithm works like this:
We are calculating total scroll amount (sum of deltas) but only if views are hidden and we are scrolling up or if views are visible and we are scrolling down because these are the cases that we care about.
Now if this total scroll amount exceeds some threshold (that you can adjust — the bigger it is, the more you have to scroll to show/hide views) we are showing/hiding views depending on the direction (dy>0 means that we are scrolling down, dy RecyclerView :
And here are the methods where we animate our views:
We have to take margins into account when we are hiding views, otherwise fab would’t fully hide.
It’s time to test our app! 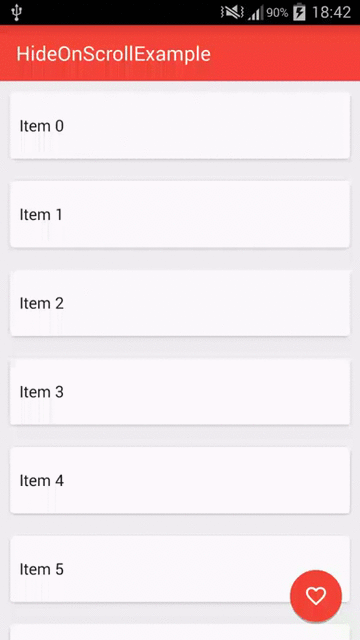
It looks almost good. Almost because there is a little bug — if you are at the top of the list and threshold is small, you can hide the Toolbar and have empty space at the top of the list visible. Fortunately there is an easy fix for this. All we need to do is to detect if the first item of the list is visible and trigger our show/hide logic only if it’s not.
After this change if the first item is visible and views are hidder, we are showing them, otherwise it works as before. Let’s run our project again and see if it helped.
Yup! It seems like everything is working like a charm now 🙂
It was the first blog post in my life so forgive me if it was boring or if I have made some mistakes. I will improve in the future.
And if you don’t want to use the method with adding a header, you can still use the second one with adding padding to the RecyclerView . Just add the padding and use HidingScrollListener that we’ve just created and it will work 🙂
In the next part I will show you how to make it to behave like scrolling in Google Play Store app.
If you have any questions feel free to ask them in the comments below.
Source code of the full project described in this post is available on GitHub repo.
Thanks to Mirek Stanek for proof reading this post.
Источник


