- Hms core android studio
- Overview
- What You Will Create
- What You Will Learn
- Hardware Requirements
- Software Requirements
- Adding Build Dependencies
- 1. Open the build.gradle file in the app directory.
- 2. Configure build dependencies.
- 3. Open the modified build.gradle file. You will find a Sync Now link in the upper right corner of the page. Click Sync Now and wait until synchronization is complete.
- 4. Define multi-language settings.
- Configuring Obfuscation Scripts
- 1. Open the obfuscation configuration file proguard-rules.pro of your Android project.
- 2. Add configurations to exclude the HMS Core SDK from obfuscation.
- 3. If you are using AndResGuard, add it to the trustlist in the obfuscation script file.
- Signing In with a HUAWEI ID
- Handling a LOGIN Button Event
- Calling the Files.create API to Create a Folder and Upload a File
- API Description
- Setting the Read and Write Permissions
- Handling a CREATE FOLDER AND UPLOAD FILE Button Event
- Calling the Files.list API to Query File Details by File Name
- API Description
- Handling a QUERY FILE Button Event
- Calling the Files.Get API to Download a File
- API Description
- Handling a Download THE FILE Button Event
- Calling the Comments.Create API to Comment on a File
- API Description
- Handling a COMMENT THE FILE Button Event
- Calling the Comments.List API to List Comments on a File
- API Description
- Handling a QUERY COMMENTS Button Event
- Calling the Replies.Create API to Reply to a Comment
- API Description
- Handling a REPLY THE COMMENT Button Event
- Calling the Replies.List API to List Replies to a Comment
- API Description
- Handling a QUERY REPLIES Button Event
- Calling the HistoryVersion.List API to List Historical Versions of a File
- API Description
- Handling a LIST HISTORYVERSION Button Event
- Follow-up
- Downloading the Drive Sample Code
- What Else You Can Do
- Hms core android studio
Hms core android studio

Overview
HMS Core Drive SDK allows you to create apps that use the HUAWEI Drive Kit service. HUAWEI Drive Kit provides cloud storage for your apps, enabling users to store files that are created when using your apps, including photos, videos, and documents, in HUAWEI Drive (Drive for short), as well as download and synchronize these files on demand. HUAWEI Drive Kit also provides comprehensive data protection, empowering users to manage their data securely and conveniently.
The current core capabilities include uploading, downloading, searching for, and commenting on files in Drive, replying to comments, querying file changes, and obtaining notifications.
What You Will Create
In this codelab, you will create an Android app that is capable of using HUAWEI Drive Kit. By integrating Drive Kit into your app, the app will allow users to manage and edit files in Drive with optimal convenience, with the ability to store photos, drawings, recordings, videos, and designs in Drive, and access files in Drive from any smartphone, tablet, or computer.
What You Will Learn
- How to develop Android apps using Android Studio.
- How to create apps and configure Drive services for the apps on HUAWEI Developers.
- How to obtain the HMS Core Drive SDK and develop apps based on the Drive SDK.
Hardware Requirements
- A computer (desktop or laptop)
- A Huawei phone (with the USB cable), which is used for debugging
Software Requirements
- Java JDK installation package
- Android SDK package
- Android Studio 3.X
- HMS Core (APK) 3.X or later
To integrate HUAWEI HMS Core, you must complete the following preparations:
- Create an app in AppGallery Connect.
- Create an Android Studio project.
- Generate a signing certificate.
- Generate a signing certificate fingerprint.
- Configure the signing certificate fingerprint.
- Add the app package name and save the configuration file.
- Add the AppGallery Connect plug-in and the Maven repository in the project-level build.gradle file.
- Configure the signature file in Android Studio.
Note: You need to register as a developer to complete the operations above.
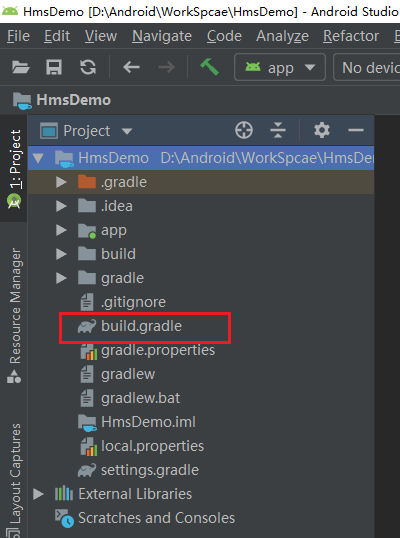
Adding Build Dependencies
1. Open the build.gradle file in the app directory.

2. Configure build dependencies.
Note: To use HUAWEI Drive Kit, you will need to integrate HUAWEI Account Kit.
3. Open the modified build.gradle file. You will find a Sync Now link in the upper right corner of the page. Click Sync Now and wait until synchronization is complete.

Note: If an error occurs, check your network connection and the configurations in the build.gradle file.
4. Define multi-language settings.
● Skip this step if your app does not require support for additional languages. By default, your app supports all languages provided by the HMS Core SDK.
● If your app uses only some of these languages, follow the operation procedure in this section to complete the required configuration.
Open the build.gradle file in the app directory of your project.
Go to android > defaultConfig and add the resConfigs configuration. For example, if your app supports only English and Simplified Chinese, the configuration is as follows:
Configuring Obfuscation Scripts
Before building the APK, configure obfuscation scripts to prevent the HMS Core SDK from being obfuscated. If obfuscation arises, the HMS Core SDK may not function properly.
1. Open the obfuscation configuration file proguard-rules.pro of your Android project.
2. Add configurations to exclude the HMS Core SDK from obfuscation.
3. If you are using AndResGuard, add it to the trustlist in the obfuscation script file.
The sample code provided in this section contains undefined global variables and methods. You can download the sample code to view their definitions.
Signing In with a HUAWEI ID
Handling a LOGIN Button Event
To implement the sign-in function through the HMS Core SDK, you will need to set the Drive scope for obtaining the permission to access Drive APIs.
Each Drive scope corresponds to a certain type of permissions. You may apply for the permissions as needed. For details about the corresponding APIs, please refer to HUAWEI Account Kit Development Guide. If the app user has not signed in with a HUAWEI ID, the HMS Core SDK will prompt the user to sign in.
Possible causes for a sign-in failure:
1. The HUAWEI Mobile Services (APK) version is incorrect. The required version is 3.0 or later.
2. Required services are not enabled. Enable the services on HUAWEI Developers.
3. The agconnect-services.json file is in the wrong directory. Copy the file to the app’s root directory.
Note:
1. For details about the currently supported locations, please refer to Supported Locations.
2. To initialize Drive, your app needs to prompt the user to go to the account center and ensure that Drive Kit has been enabled.
Calling the Files.create API to Create a Folder and Upload a File
API Description
API description:
This API is used to create a file and a folder. For details about the API, please refer to HUAWEI Drive Kit Development Guide.
Setting the Read and Write Permissions
Add the read and write permissions on the phone storage to app/src/main/AndroidManifest.xml.
Add a permission request to MainActivity.java.
Add the code snippet for requesting the permissions to the onCreate method.
Handling a CREATE FOLDER AND UPLOAD FILE Button Event
Create a folder in the root directory of Drive, and upload the file in the designated directory to the folder. Note that the code contains global variables and functions, and you can download the sample code to view their meanings.
After the folder is created and the file is uploaded, the user can view the file by going to Files > HUAWEI Drive.
If applicationData is selected, the operation will be performed on the app data folder. The app data folder is invisible to users and is used to store app-specific data.
FAQs:
Q: What should I do if the folder already exists and cannot be created?
A: Sign in to Drive and delete the existing folder.
Q: Why cannot the file be read?
A: Verify that the path is correct, and that the permissions have been set successfully.
Q: Why did a file upload fail?
A: Go to Account center > Cloud and check whether available storage space is sufficient.
Calling the Files.list API to Query File Details by File Name
API Description
Handling a QUERY FILE Button Event
In the query input box, enter a file name to query file details. If applicationData is selected, the operation will be performed on the app data folder.
In this demo, the file details include the file name (fileName), file ID (id), and file size (size). If two files share the same name, only the details of one such file are shown in this demo. For more information about file details, please refer to HUAWEI Drive Kit References.
Calling the Files.Get API to Download a File
API Description
Handling a Download THE FILE Button Event
Tap the DOWNLOAD THE FILE button to download the file queried using the QUERY FILE function.
After the file is successfully downloaded, you can view it in the /Huawei/Drive/DownLoad/ directory.
Calling the Comments.Create API to Comment on a File
API Description
Handling a COMMENT THE FILE Button Event
In the comment input box, enter a comment on the file queried using the QUERY FILE function.
After the comment is successfully added, you can view all comments on the file by using the QUERY COMMENTS function.
Calling the Comments.List API to List Comments on a File
API Description
Handling a QUERY COMMENTS Button Event
List all comments on the file queried using the QUERY FILE function.
The following figure shows an example of the listed comments. In this demo, the comment details include the comment content (description), comment ID (id), and reply content (replies/description).
Calling the Replies.Create API to Reply to a Comment
API Description
Handling a REPLY THE COMMENT Button Event
In the reply input box, enter a reply to the comment created using the COMMENT THE FILE function.
After the reply is successfully added, you can view all replies to the comment using the QUERY REPLIES function.
Calling the Replies.List API to List Replies to a Comment
API Description
Handling a QUERY REPLIES Button Event
List all replies to the comment created using the COMMENT THE FILE function.
The following figure shows an example of listed replies. In this demo, the reply details include the reply content (description) and reply ID (id).
Calling the HistoryVersion.List API to List Historical Versions of a File
API Description
Handling a LIST HISTORYVERSION Button Event
List all historical versions of the file queried using the QUERY FILE function.
The following figure shows an example of listed historical versions. In this demo, the historical version details include the version ID (id) and version SHA256 (sha256).
Follow-up
In your Android Studio, click Run. Select your mobile phone as the target, and click OK to run the Drive demo on the mobile phone. The following page will display.


Downloading the Drive Sample Code
You can click the following button to download the Drive Kit sample code used in this codelab:
Well done. You have successfully developed your first app using Drive Kit!
In this codelab, you have learned:
- How to integrate the Drive SDK and create an app using Drive Kit.
- How to run the Drive Demo project in Android Studio.
You have now learned all of the key operations required to create an app that uses Drive Kit.
What Else You Can Do
You can read code snippets in the following file:
com/huawei/www/driveapplication/MainActivity.java
For more information, please click the following link:
Источник
Hms core android studio
In this section, you will create a project and an app in AppGallery Connect.
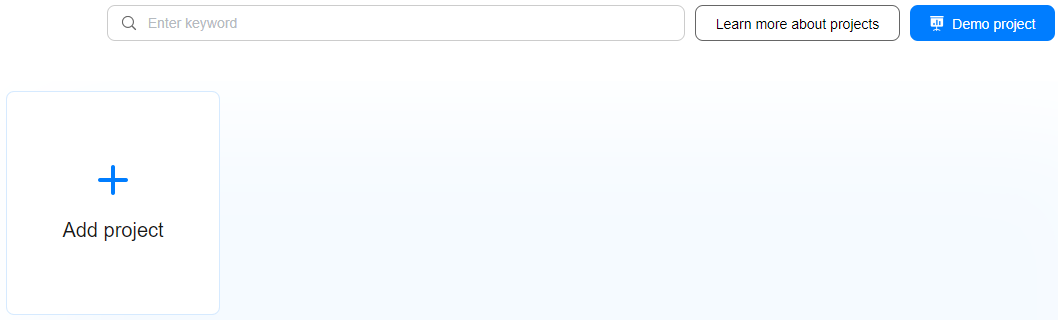
- Sign in to AppGallery Connect and click My projects.
- On the page displayed, click Add project.

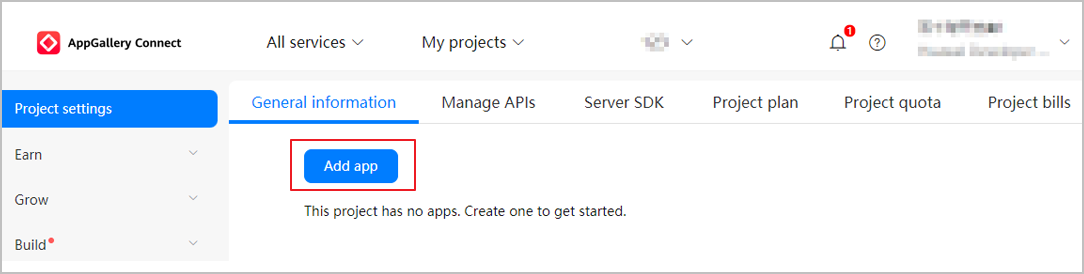
- On the New project page, enter a project name and click OK.
- On the General information tab page, click Add app.
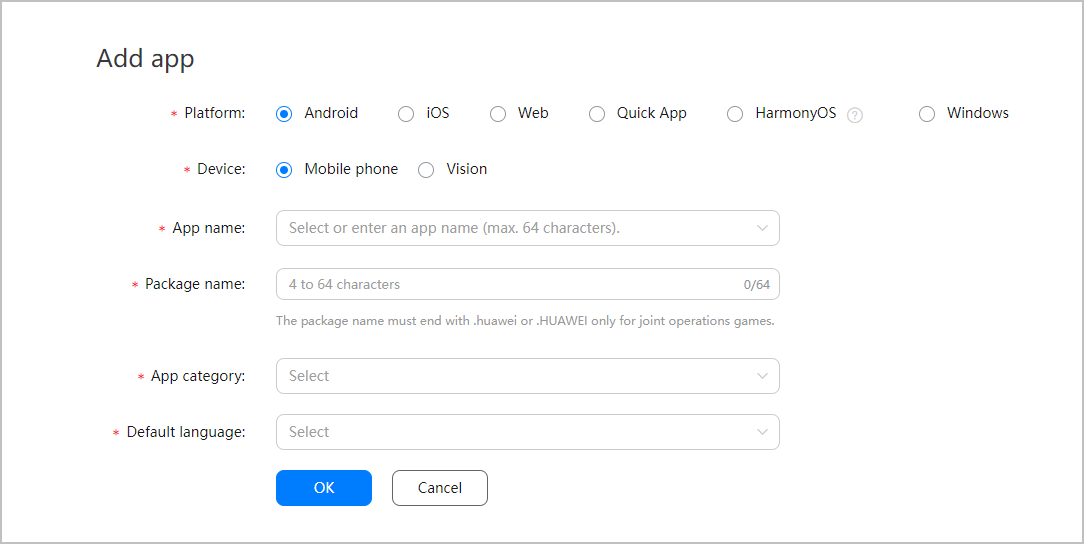
- On the Add app page, set Platform and Device, enter an app name and package name, select an app category (App or Game) and default language as needed, and click OK.
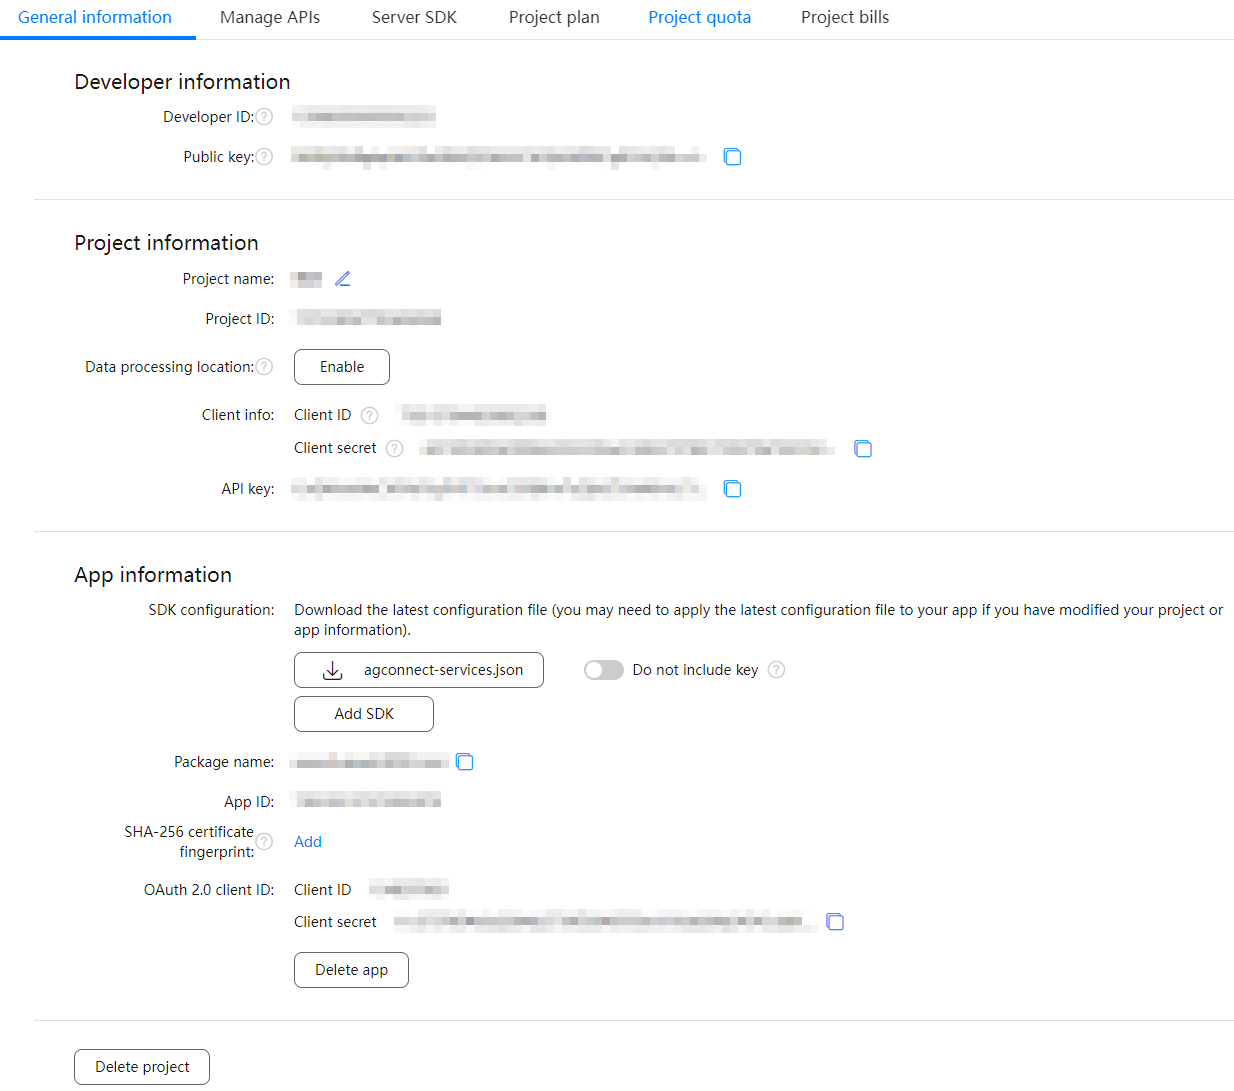
- View app information such as the allocated app ID and client secret in the App information area on the General information tab page after app creation.

In this section, you will create an Android Studio project for your app. During the creation, you will need to use the app name and package name that you have specified in AppGallery Connect.
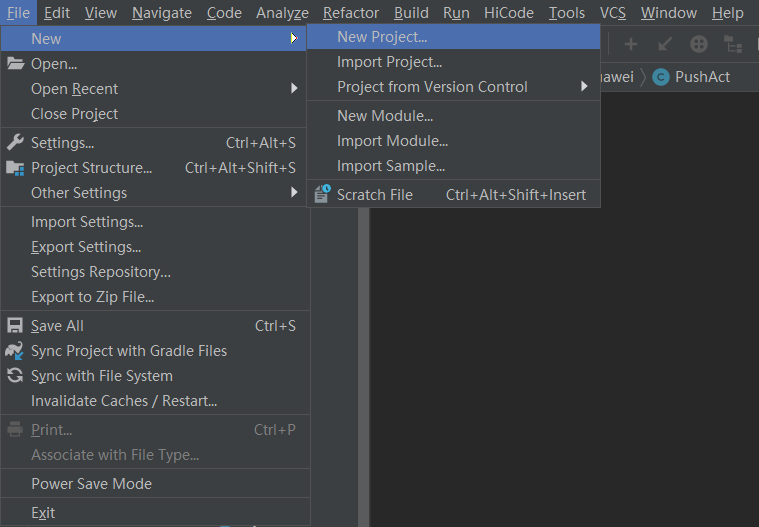
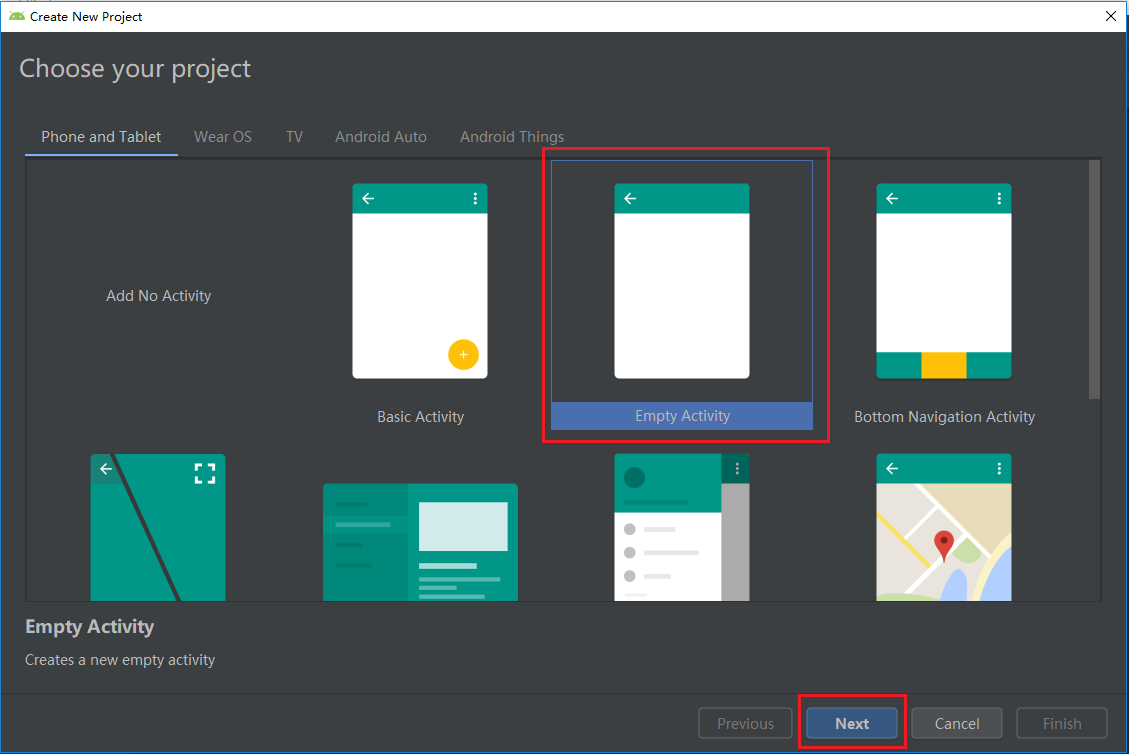
- Start Android Studio and go to File >New >New Project.
- On the Choose your project page, click Empty Activity and then Next.
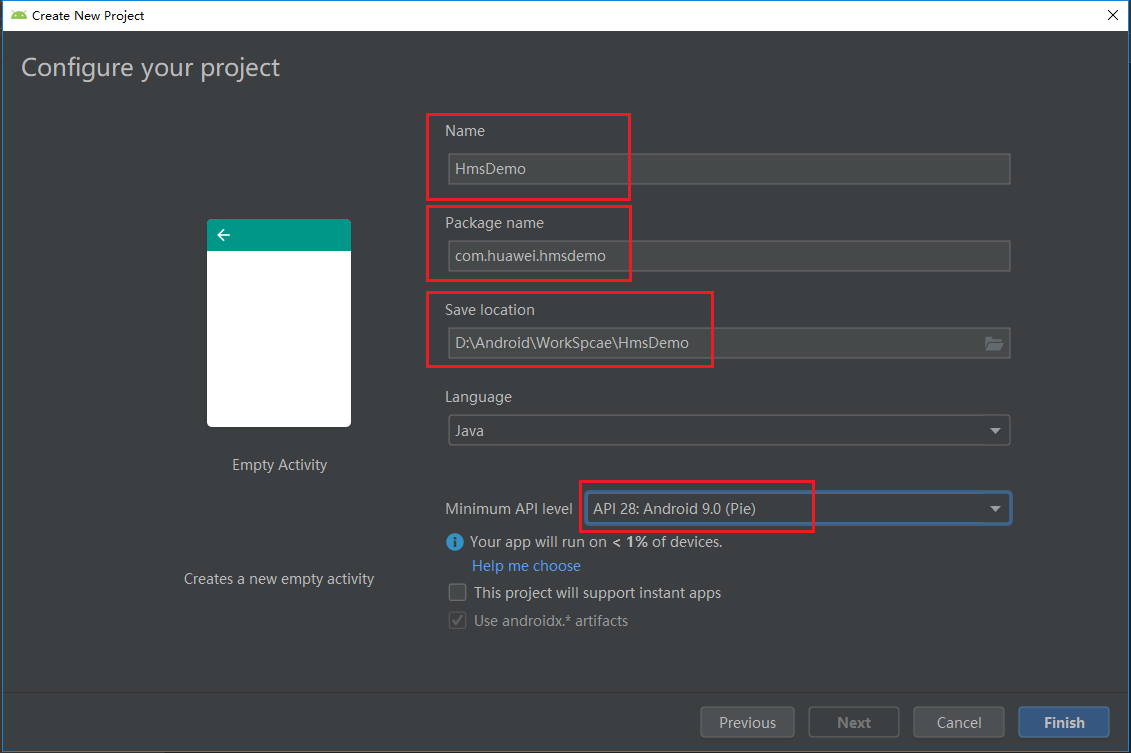
- On the Configure your project page, enter your app name and package name (configured in AppGallery Connect) in the Name and Package name text boxes, set Save location and Minimum API level, and click Finish. You have now created a project for your app.
In this section, you will create a signing certificate file and use it to sign your APK in Android Studio. This signing certificate file will be used to generate an SHA-256 fingerprint later.
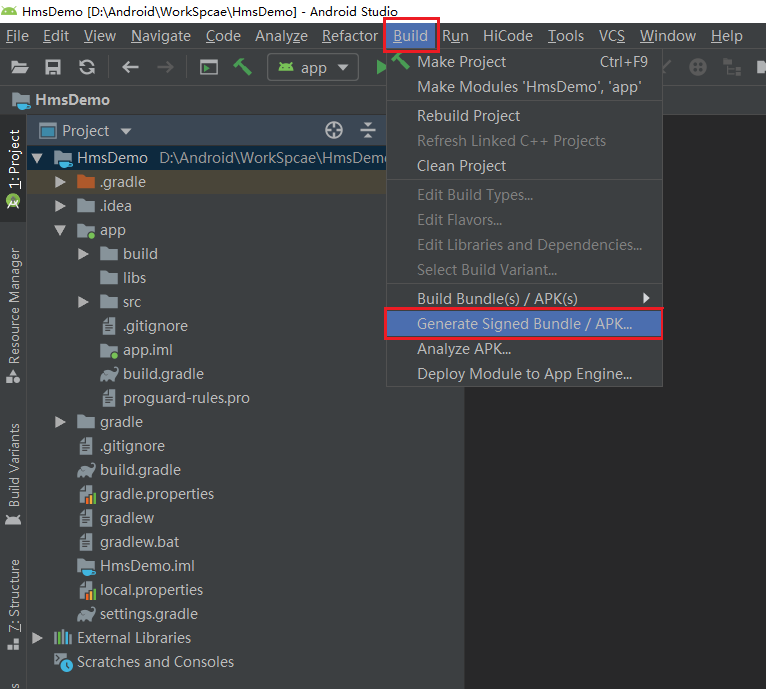
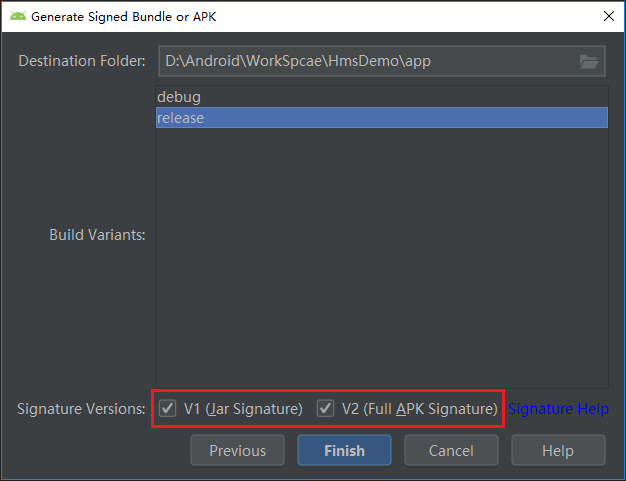
- Go to Build >Generate Signed Bundle/APK in Android Studio.
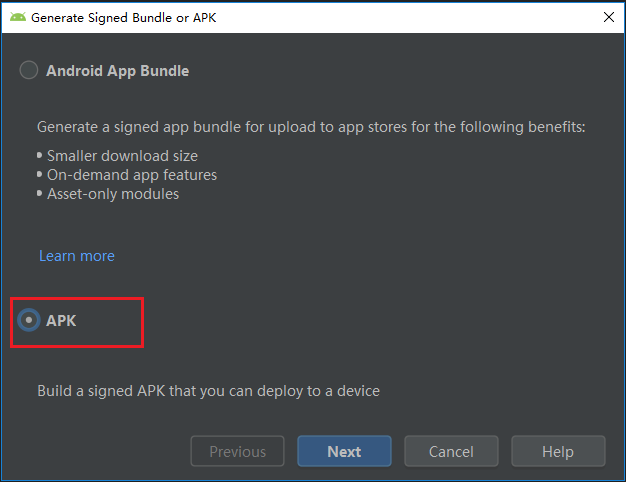
- On the Generate Signed Bundle or APK page, select APK and click Next.
- If you already have a signing certificate file, click Choose existing, select the signing certificate file, and enter the key store password, key alias, and key password of the file. Then, click Next.
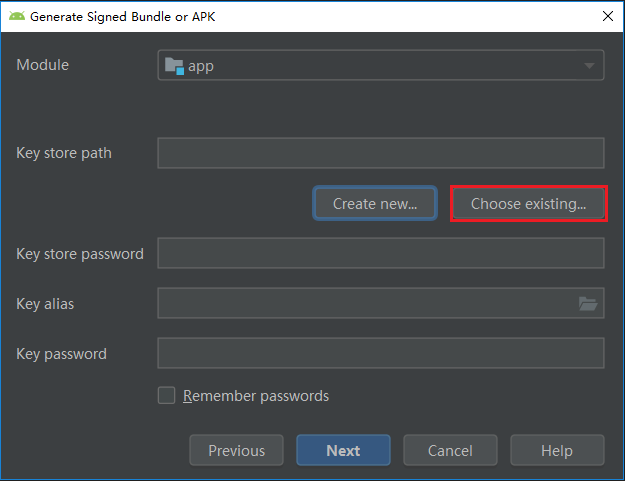
If you do not have a signing certificate file, click Create new.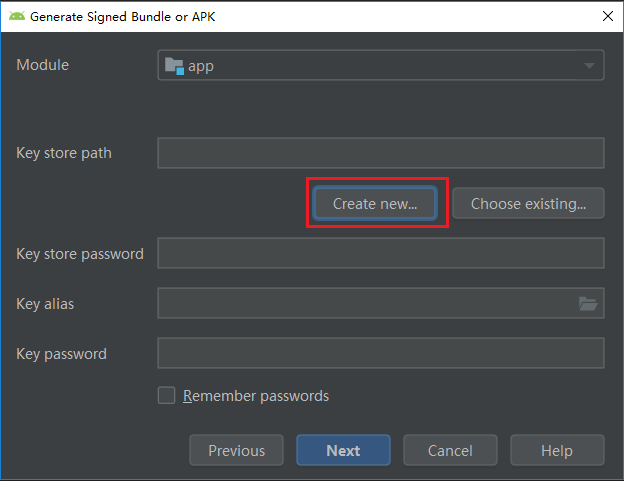
On the page displayed, set related parameters including Key store path, Password, and Alias.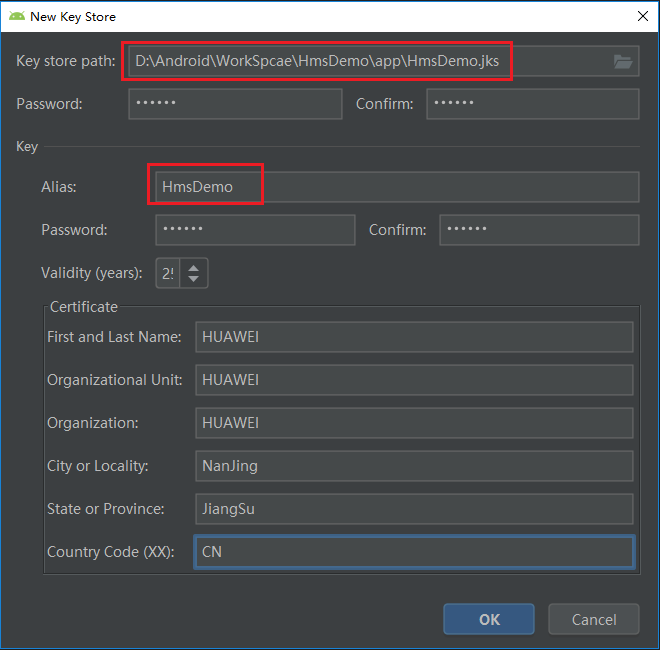
After the signing certificate file is created successfully, the Generate Signed Bundle or APK page will be displayed, showing the signing certificate file information. Click Next on this page.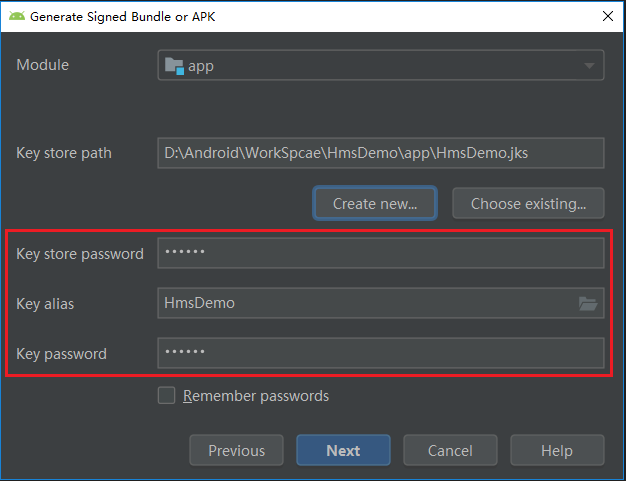
In this section, you will generate an SHA-256 fingerprint using the signing certificate file and keytool provided by the JDK.
- Windows
a) Open the command-line interface (CLI) using the cmd command, and run the cd command to go to the directory where keytool.exe is located. In the following example, the JDK is installed in the Program Files folder in drive C.
cd C:\Program Files\Java\jdk\bin
b) Run keytool -list -v -keystore and respond as prompted. In the command, indicates the absolute path to the app’s signing certificate.
Example:
keytool -list -v -keystore C:\TestApp.jks
c) Obtain the SHA-256 certificate fingerprint.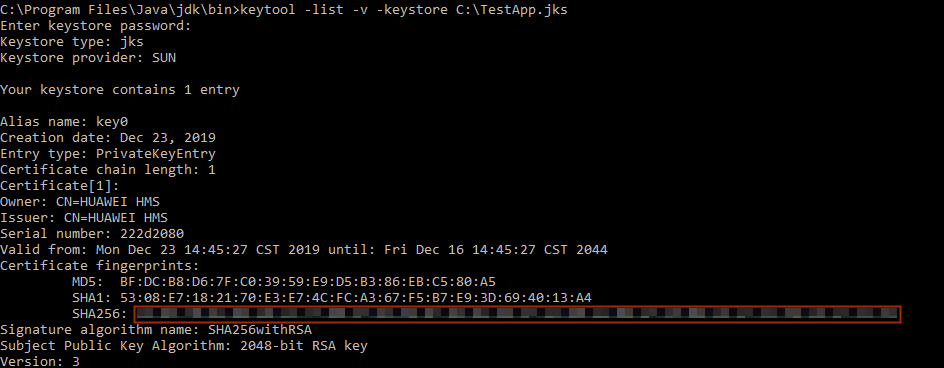
macOS
a) Open Terminal.
b) Run keytool -list -v -keystore and respond as prompted. In the command, indicates the absolute path to the app’s signing certificate.
Example:
keytool -list -v -keystore /Users/admin/Downloads/HmsDemo.jks
c) Obtain the SHA-256 certificate fingerprint.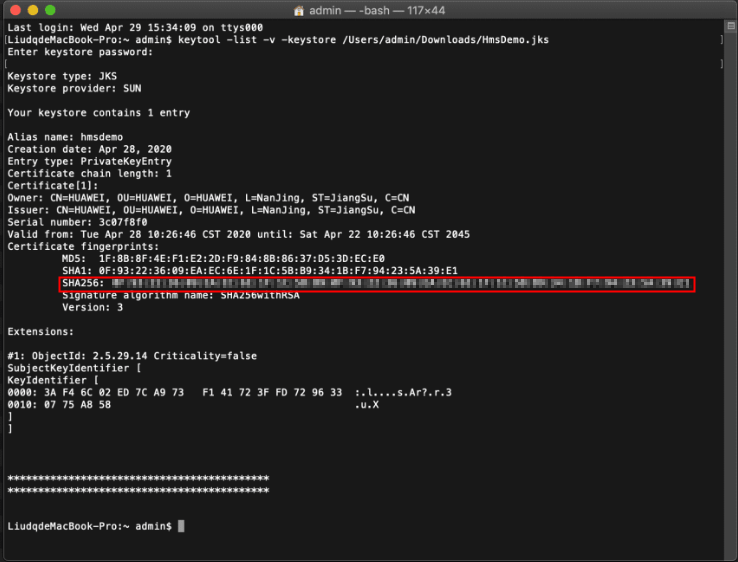
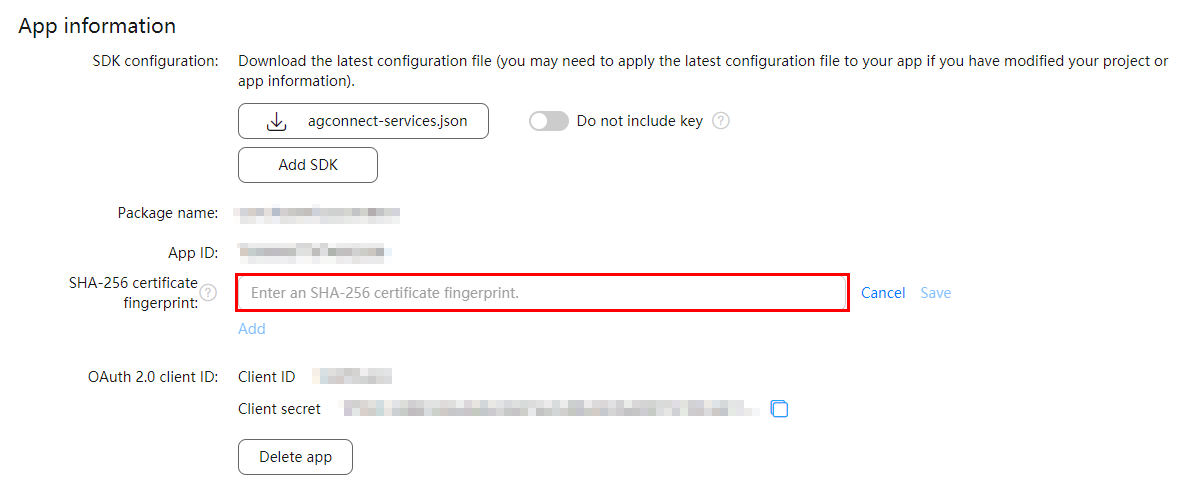
In this section, you will configure the generated SHA-256 certificate fingerprint in AppGallery Connect.
- Sign in to AppGallery Connect and click My projects.
- Find your app project, and click the desired app name.
- Go to Project settings >General information. In the App information area, click Add under SHA-256 certificate fingerprint, and enter the obtained SHA-256 certificate fingerprint.
- Click Save.
- On the Project settings page, click the Manage APIs tab.
- On the Manage APIs tab page, toggle on switches of the services to be enabled.
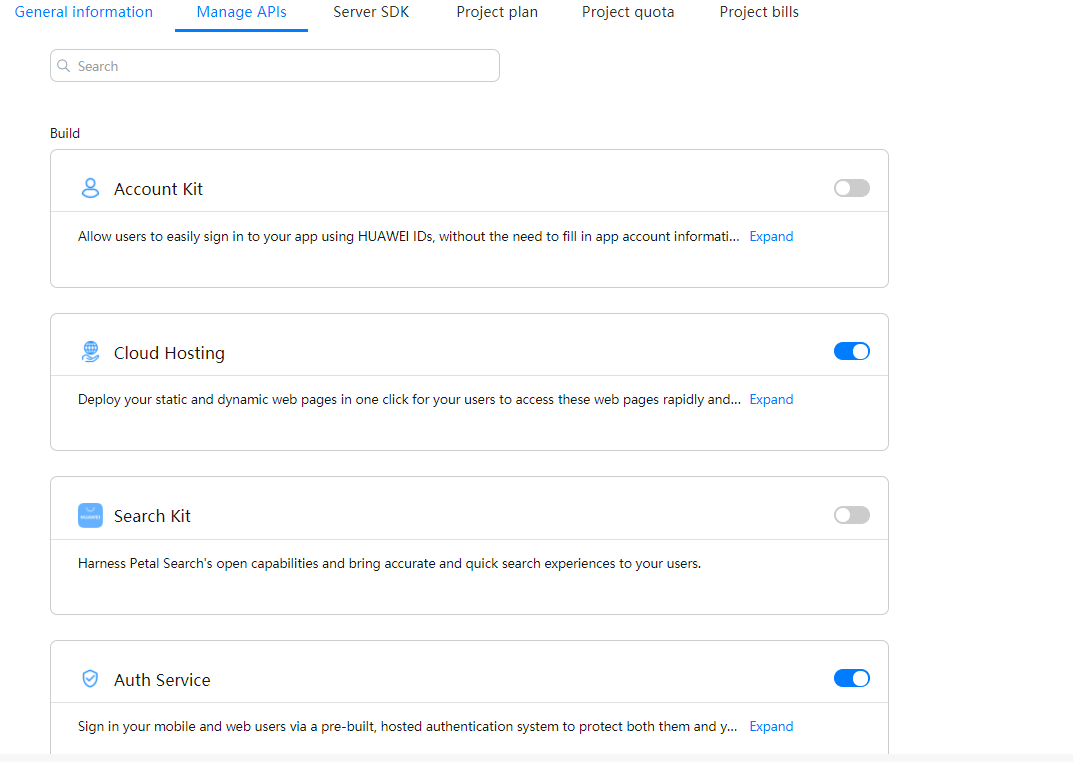

Enable required services for your app as needed.
- In the project-level build.gradle file, add related configurations, including the AppGallery Connect plugin and Huawei Maven repository.
In Gradle 7.0 or later, configuration under allprojects > repositories is migrated to the project-level settings.gradle file.
The following is a configuration example of the settings.gradle file:

- Method 1: Add the following configuration under the declaration in the file header:
- Method 2: Add the plugin configuration in the plugins block.


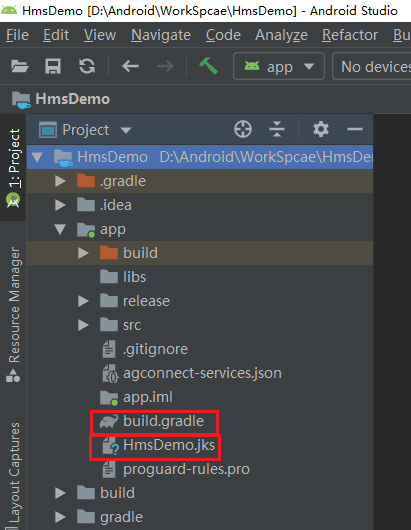
- Copy the generated signing certificate file HmsDemo.jks to your app’s root directory and open the app-level build.gradle file (usually app/build.gradle).
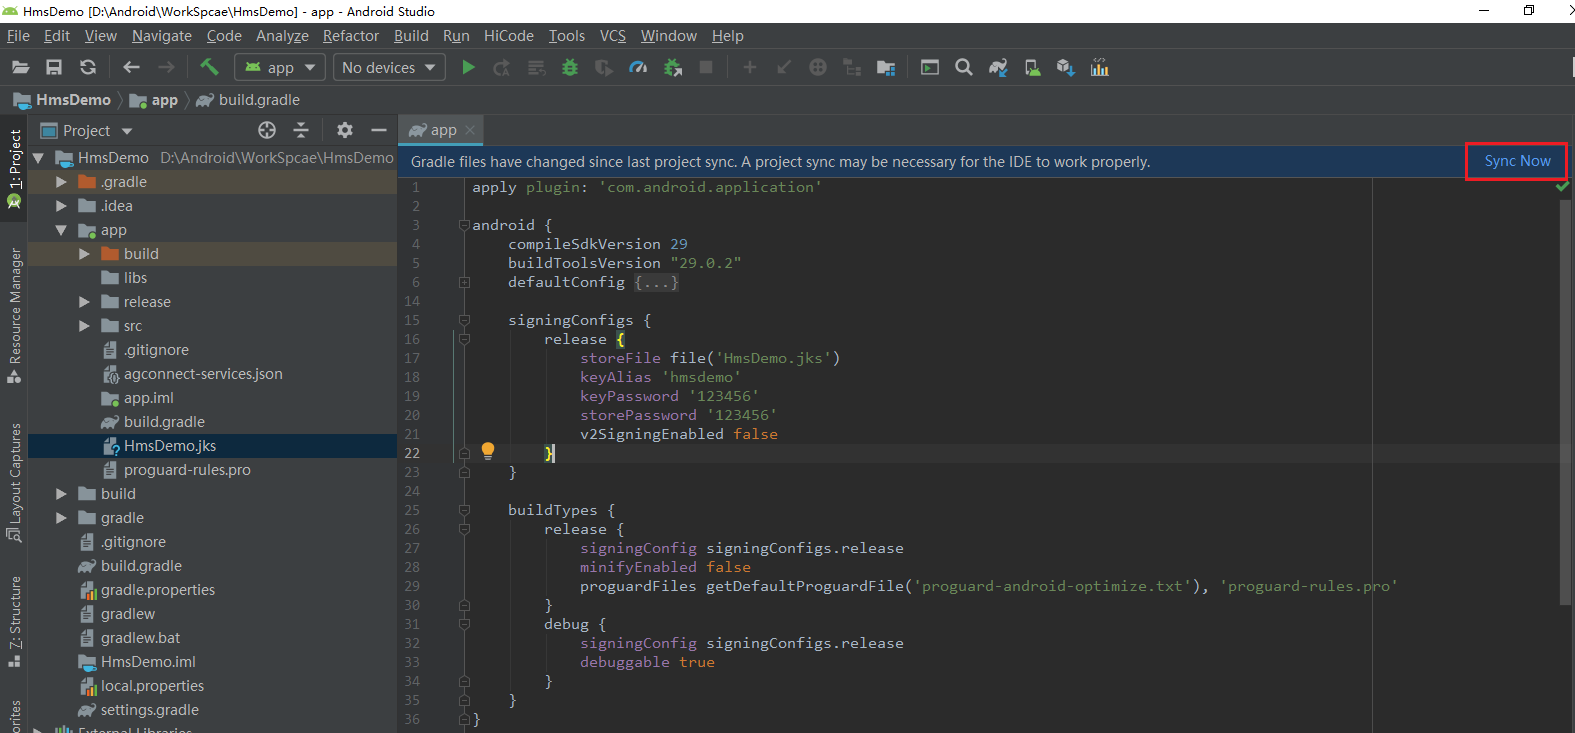
- Add signing information to the android block in the build.gradle file.
Click Sync Now to synchronize the project.
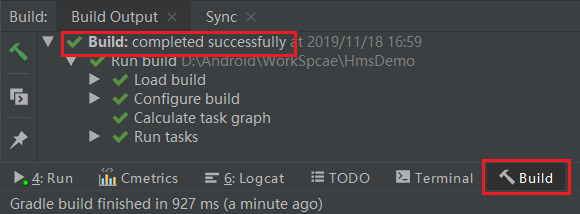
If «completed successfully» is displayed, the project is synchronized successfully. Integration preparations are now completed.
Источник