- Home assistant push notification android
- Notifications
- Service
- Test if it works
- Actionable Notifications
- Building actionable notifications
- Android specific options
- specific options
- Icon Values
- uri values
- Android specific
- specific
- Building notification action scripts
- Migrating from iOS 2021.4 and macOS 2021.8 and earlier
- macOS before 2021.10 and iOS before 2021.5
- Definitions
- Category parameters
- Actions parameters
- Building automations for notification actions
- Compatibility with different devices
- iOS 13 and later
- Prior to iOS 13
Home assistant push notification android
- Главная
- Блог
- Уведомления из HomeAssistant в Push
Home Assistant — это open-source платформа для организации автоматизации системы умный дом. Home Assistant представляет собой модульное приложение с открытым исходным кодом, работающее на языке программирования Python 3. С помощью платформы можно отслеживать и контролировать все установленные устройства в доме. Платформа устанавливается на любой девайс, в том числе и на одноплатный компьютер Raspberry PI. Используя Home Assistant вся умная техника в доме, выстраивается в одну логическую цепь, взаимодействуя с пользователем через интуитивно понятный интерфейс приложения. В программе предустановлено множество устройств бытовой техники, датчиков, сенсоров, роботизированной техники, как именитых брендов, так и менее известных. Продвинутые пользователи при необходимости могут самостоятельно дописать недостающее устройство в приложение, создав отдельный модуль. Устанавливая Home Assistant пользователь настраивает график работы, или по другому автоматизацию, для любого электронного-процессорного устройства в доме, а в совокупности слаженную работу всех девайсов. На современном рынке с элементами умного управления уже есть холодильники, стиральные машины, печи, мелкая бытовая техника, освещение и розетки, а также роботизированная техника, такая как робот-пылесос или мойщик окон. Использование платформы объединяющей всю умную технику в одном интерфейсе значительно снижают вовлеченность человека в повседневную рутину. Каждое устройство сработает согласно заранее заданному алгоритму.
Примеры автоматизаций в Home Assistant:
- Отопление полов включится на заданный промежуток времени за час до будильника и за час до возврата жильцов;
- Кондиционирование воздуха запускается только в присутствии человека с учетом данных с наружных датчиков;
- Наружное освещение автоматически включается с заходом солнца при приближении человека;
- Запись веб-камеры включается при движении в зоне ее видимости;
- Робот-пылесос начинает уборку строго по расписанию;
- Метеостанция выводит данные на стену после срабатывания будильника;
- Освещение в помещениях автоматически включается при срабатывании датчика движения;
Четкая и слаженная работа каждого девайса это результат тщательно прописанного алгоритма автоматизации. Основные характеристики и преимущества платформы:
- Поддержка подключения OpenZWave. Z-wave помогает решать точечные потребности. В Home Assistant можно использовать специальные Z-wave стики или плату Razberry;
- Широкий набор плагинов и устройств. Среди подобных платформ, Home Assistant обладает наибольшим количеством;
- Возможность полностью кастомизировать веб-интерфейс приложения;
- Полная автоматизация всех подключенных устройств. Даже не владея навыками программирования пользователь сможет настроить свою автоматизацию опираясь на примеры в сети;
- Постоянные обновления, включающие в себя новые устройства, функционал и возможности;
- Можно устанавливать дополнительные кастомные компоненты найденные, к примеру на GitHub;
- Широкое распространение в сети. Благодаря популярности Home Assistant в сети много пабликов, блогов, каналов и других источников информации, где пользователи делятся своим опытом взаимодействия с Home Assistant;
- Простая установка. Дистрибутив Hass.io устанавливается на карту памяти, с плагинами и бэкапами одним нажатием кнопки.
Приложение Home Assistant поддерживает в той или иной мере совместную работу с другими приложениями “умный дом”. К примеру, совместная работа с Apple HomeKit может быть частично некорректной, тогда как при работе с Xiaomi Smart Home нареканий практически нет. На данный момент приложение Home Assistant можно установить на любой девайс, поддерживается работа со всеми известными операционными системами. Поддерживаемые ОС:
- Windows 10;
- Mac OS X;
- Ubuntu 14.04;
- Raspbian (Raspberry PI);
- iOS App – beta;
Поддерживаемые компоненты: 545 шт., включая почти все TV/AV receivers, Broadlink, ZigBee, iCloud, Yandex TTS и многое другое. Начало и окончание каждой автоматизации дублируется системой уведомления. Получать данные от Home Assistant можно на любой канал связи. Среди возможных способов получения есть достаточно простой ‒ получение PUSH уведомлений на Android. Создать такую связку можно используя интеграцию Notify Events.
Источник
Notifications
The notify integration makes it possible to send notifications to a wide variety of platforms. To use it you have to setup at least one notification target (notifier), check the integrations list for one that fits your use case.
If you want to send notifications to the Home Assistant web interface, you may use the Persistent Notification integration.
Service
Once loaded, the notify platform will expose a service that can be called to send notifications.
| Service data attribute | Optional | Description |
|---|---|---|
| message | no | Body of the notification. |
| title | yes | Title of the notification. |
| target | yes | Some platforms allow specifying a recipient that will receive the notification. See your platform page if it is supported. |
| data | yes | On platforms who have extended functionality. See your platform page if it is supported. |
The notify integration supports specifying templates. This will allow you to use the current state of Home Assistant in your notifications.
In an action of your automation setup it could look like this with a customized subject.
Test if it works
After you setup a notifier a simple way to test if you have set up your notify platform correctly, is to open Developer Tools from the sidebar and then select the Services tab. Choose your service from the Service dropdown menu, enter the sample below into the Service Data field, and press the CALL SERVICE button.
Источник
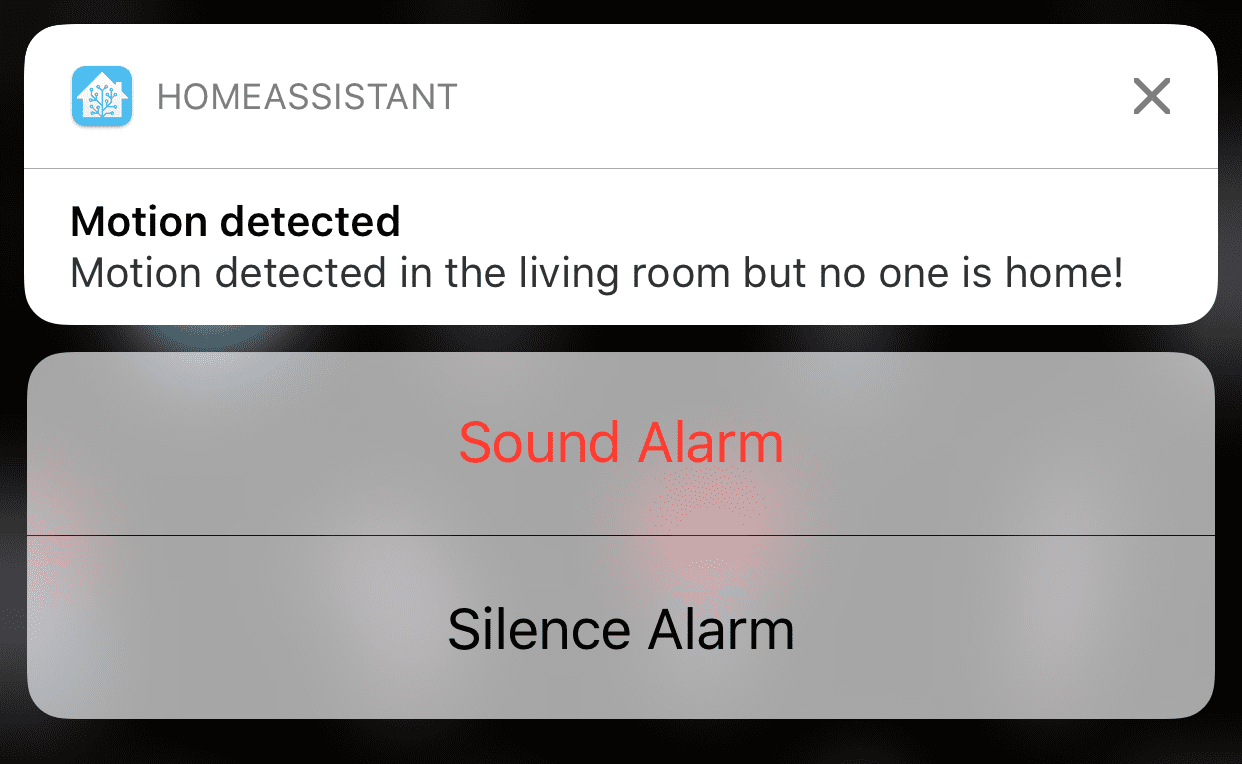
Actionable Notifications
Actionable notifications are a unique type of notification as they allow the user to add buttons to the notification which can then send an event to Home Assistant once clicked. This event can then be used in an automation allowing you to perform a wide variety of actions. These notifications can be sent to either iOS or Android.
Some useful examples of actionable notifications:
- A notification is sent whenever motion is detected in your home while you’re away or asleep. A «Sound Alarm» action button is displayed alongside the notification, that when tapped, will sound your burglar alarm.
- Someone rings your front doorbell. You receive a notification with a live camera stream of the visitor outside along with action buttons to lock or unlock your front door.
- Receive a notification whenever your garage door opens with action buttons to open or close the garage.
If you have multiple servers connected to an iOS or mac app, the notification actions will be fired on the server that sent the notification.
You must use the defined-in-advance category-based method for iOS prior to iOS-2021.5 and for macOS prior to macOS-2021.10. See migration guide for more info on converting existing notifications.
Dynamic actions on watchOS require having the Watch App installed. You can do this in the system Watch app if not already installed.
Building actionable notifications
You can include an actions array in your service call.
Android allows 3 actions.
allows around 10 actions. Any more and the system UI for actions begins having scrolling issues.
Each action may consist of the following keys:
| Key | Meaning | Notes |
|---|---|---|
| action | Required. The identifier passed back in events | When set to REPLY , you will be prompted for text to send with the event. |
| title | Required. The title of the button shown in the notification | |
| uri | Optional. The URL to open when tapped | Android requires setting the action to URI to use this key. See notes below. |
Android specific options
All of the following keys are optional.
| Key | Meaning | Notes |
|---|---|---|
| None | There are no Android-specific keys at this time. |
specific options
All of the following keys are optional.
| Key | Meaning | Notes |
|---|---|---|
| activationMode | Set to foreground to launch the app when tapped. Defaults to background which just fires the event. | This is automatically set to foreground when providing a uri . |
| authenticationRequired | true to require entering a passcode to use the action. | |
| destructive | true to color the action’s title red, indicating a destructive action. | |
| behavior | textInput to prompt for text to return with the event. This also occurs when setting the action to REPLY . | |
| textInputButtonTitle | Title to use for text input for actions that prompt. | |
| textInputPlaceholder | Placeholder to use for text input for actions that prompt. | |
| icon | The icon to use for the notification. | Requires version 2021.10. See notes below. |
Icon Values
This requires iOS app version 2021.10 or later on iOS 15 or later, or a future version of the macOS app on macOS 12 or later.
Icons for notification actions are only allowed from the SF Symbols library, which is different than other icons in Home Assistant which come from Material Design Icons library. This is due to limitations placed on these actions from Apple.
You must prefix the icon name in the catalogue with sfsymbols: (similar to prefixing with mdi: elsewhere), since we hope to expand this to support MDI in the future. For example:
uri values
To navigate to a frontend page, use the format /lovelace/test where test is replaced by your defined path in the defined view. If you plan to use a lovelace dashboard the format would be /lovelace-dashboard/view where /lovelace-dashboard/ is replaced by your defined dashboard URL and view is replaced by the defined path within that dashboard. For example:
Android specific
If you want to open an application you need to set the action to URI . The format will be app://
is replaced by the package you wish to open (ex: app://com.twitter.android ). If the device does not have the application installed then the Home Assistant application will open to the default page.
With action set to URI you can also trigger the More Info panel for any entity. The format will be entityId: where is replaced with the entity ID you wish to view. Ex: entityId:sun.sun
specific
You can also use application-launching URLs. For example, to make a telephone call:
Or to launch a page in your default browser:
Building notification action scripts
There are some important things to keep in mind when building actionable notifications:
- Your script or automation could be run multiple times
- The actions for your notification are shared across all notifications
To avoid issues, you can create unique actions for each time your script is run. By combining context and variables, this can be fairly straightforward:
The above sends a notification, waits for a response, and then performs whichever action is being requested. You can control how automations or scripts run when an existing one is already executing by changing the automation mode.
When the notification action is performed, the mobile_app_notification_action event fires with the following data:
You can also create automations that trigger for any notification action. For example, if you wanted to include a SILENCE action on a variety of notifications, but only handle it in one place:
Migrating from iOS 2021.4 and macOS 2021.8 and earlier
Initially upgrading to 2021.5 may require a restart to allow dynamic actions to show up. This will only be necessary once.
Starting in iOS version 2021.5, actions are specified inline with notifications. To migrate, do the following:
- Add the actions array to each notification. For example:
- Convert your event triggers to the new values
macOS before 2021.10 and iOS before 2021.5
In advance of sending a notification:
- Define a notification category in your Home Assistant configuration which contain 1-4 actions.
- At launch iOS app requests notification categories from Home Assistant (can also be done manually in notification settings).
When sending a notification:
- Send a notification with data.push.category set to a pre-defined notification category identifier.
- Push notification delivered to device.
- User opens notification.
- Action tapped.
- Identifier of action sent back to HA as the actionName property of the event ios.notification_action_fired , along with other metadata such as the device and category name.

Definitions
- Category — A category represents a type of notification that the app might receive. Think of it as a unique group of actions.
- Actions — An action consists of a button title and the information that iOS needs to notify the app when the action is selected. You create separate action objects for distinct action your app supports.
Category parameters
| Name | Default | Description |
|---|---|---|
| name: | required | A friendly name for this category. |
| identifier: | required | A unique identifier for the category. Must be lowercase and have no special characters or spaces (underscores are ok). |
| actions: | required | A list of actions. See below. |
Actions parameters
| Name | Default | Description |
|---|---|---|
| identifier: | required | A unique identifier for this action. Can be entirely either upper or lower case (but should not mix the two) and have no special characters or spaces (underscores are ok). Only needs to be unique to the category, not unique globally. |
| title: | required | The text to display on the button. Keep it short. |
| activationMode: | optional | The mode in which to run the app when the action is performed. Setting this to foreground will make the app open after selecting. Default value is background . |
| authenticationRequired: | optional | If true , the user must unlock the device before the action is performed. |
| destructive: | optional | When true , the corresponding button is displayed with a red text color to indicate the action is destructive. |
| behavior: | optional | When textInput the system provides a way for the user to enter a text response to be included with the notification. The entered text will be sent back to Home Assistant. Default value is default . |
| textInputButtonTitle: | optional* | The button label. Required if behavior is textInput . |
| textInputPlaceholder: | optional | The placeholder text to show in the text input field. Only used if behavior is textInput |
Here’s a fully built example configuration:
Rather than defining categories using YAML within configuration.yaml , you can create them directly within the Companion App. This can be done from the Notifications page of the App Configuration Menu (accessed from the sidebar menu).
Two variables are available for use in the Hidden preview placeholder and Category summary . %u will give the total number of notifications which have been sent under the same thread ID (see this document for more details). %@ will give the text specified with summary: in the push: section of the notification payload.
Building automations for notification actions
Here is an example automation to send a notification with a category in the payload:
If you want to navigate to a Lovelace page or launch an app for a notification, you can use the url key.
To navigate to a dashboard when tapping a notification:
To navigate to a specific dashboard when tapping a notification action:
You can also use application-launching URLs. For example, launch an external website using https://example.com or make a phone call using tel:2125551212 .
When an action is selected an event named ios.notification_action_fired will be emitted on the Home Assistant event bus. Below is an example payload:
Here’s an example automation for the given payload:
Compatibility with different devices
iOS 13 and later
- All devices support notification expanding by performing a right to left swipe and pressing ‘View’ in the lock screen or pressing and holding, but on 3D Touch-enabled devices you may still need to apply some force to do it. If you’re not in the lock screen, you can also pull the notification down to expand it.
Prior to iOS 13
For devices that support 3D Touch — a firm press on the notification will expand it, showing the action buttons underneath. Supported devices include the iPhone 6S, iPhone 6S Plus, iPhone 7, iPhone 7 Plus, iPhone 8, iPhone 8 Plus, iPhone X, iPhone XS and iPhone XS Max. If not in lock screen, you can also pull the notification down to expand it.
For devices that do not support «3D Touch» (such as the iPhone 6 and below, iPhone SE, iPhone XR and iPads), you perform a left to right swipe on the notification, then tap on the ‘View’ button. This will expand the notification and show the relevant action buttons underneath. If not in lock screen, you need to pull the notification down to expand it.
Источник


