- How To : Change Your Home Screen Icon Shapes on Android 10
- Step 1: Unlock Developer Options (If Not Yet Done)
- Step 2: Open the Developer Options in System
- Step 3: Choose Your Preferred Icon Shapes
- This Doesn’t Just Change App Icons Anymore
- Square
- Teardrop
- Squircle
- Rounded Rectangle
- Circular
- Tutorial to Delete Icons on Android Devices from Samsung, HTC and More
- Part 1 : How to Delete Icon for All Android Devices
- Method 1 : Delete icons on Android home screen
- Method 2 : Delete icons on Android by removing them out of screen
- Troubleshooting : cannot delete icons on Android
- Part 2 : How to Delete Icon from Google Store
- Recommendation : Android Data Recovery
- Conclusion
- Home icon in android
- How to Create Android App Icons using Image Asset Studio
- Run Image Asset Studio
- Custom Image
- Clip Art
- Text String
- Creating Launcher Icon
- Adaptive and legacy launcher icon
- Legacy launcher icon only
- Creating ActionBar Icons and Tab Icons
- Creating Notification icons
- How to Delete an App Icon from a project
How To : Change Your Home Screen Icon Shapes on Android 10
For those of you who like to frequently change the icon shapes on your home screen, the process has changed in Android 10. The setting is buried and now applies to more than just home screen icons.
In previous versions of Android, specifically Oreo and Pie, you could long-press your home screen, choose «Home settings,» select «Change icon shapes,» then choose between the circular default option, square, rounded square, squircle, or teardrop icon shapes. Super easy. This was first available on Pixels but expanded to other devices by Nokia, Essential, Moto, et al.
Well, in Android 10, which is only available for Google Pixel, Pixel XL, Pixel 2, Pixel 2 XL, Pixel 3, and Pixel 3 XL (and their 3a counterparts) right now, the «Change icon shapes» option is nowhere to be found in «Home settings.» In fact, you won’t find it anywhere unless you just happen to have «Developer options» unlocked. If you don’t have that menu unhidden, that’s the first place to start if you want to change your home screen look.
Step 1: Unlock Developer Options (If Not Yet Done)
Go to «System» in the Settings app, then tap on «Advanced» to expand those options. Next, hit «About phone,» then expand its own «Advanced» section. Finally, rapid-tap at least seven times on the «Build number» until you see «You are now a developer!» You may need to enter your PIN to continue.
Step 2: Open the Developer Options in System
If you just unlocked the «Developer options,» you can just hit back a few times to return to the «Advanced» menu in the «System» settings. Otherwise, go to Settings –> System –> Advanced –> Developer options.
Step 3: Choose Your Preferred Icon Shapes
Once inside, scroll all the way to the bottom, and tap on «Icon shape.» Just like before, a few different options pop up: the circular device default, square, teardrop, squircle, and rounded rectangle. In case you’re wondering, «Rounded square» is now called «Rounded rectangle» for some reason.
This Doesn’t Just Change App Icons Anymore
Why did the icon shapes settings move from the «Home settings» to «Developer options» in Android 10? Because it applies to more than just the home screen now. Quick Settings (the pull-down menu), Overview (the multitasking UI), and the Share menu are all affected by a change, as well as other areas where icons appear.
Below are examples of the shape options available for Pixels, showing their looks in the app drawer, Quick Settings, Overview menu, and Share menu.
Square
Teardrop
Squircle
Rounded Rectangle
Circular
Keep Your Connection Secure Without a Monthly Bill. Get a lifetime subscription to VPN Unlimited for all your devices with a one-time purchase from the new Gadget Hacks Shop, and watch Hulu or Netflix without regional restrictions, increase security when browsing on public networks, and more.
Источник
Tutorial to Delete Icons on Android Devices from Samsung, HTC and More
Posted by Jane Winston May 21, 2021 16:27
The home screen on Android device provides a convenient access for people to store the apps that you use on a regular basis. However, the home screen is a limited real estate, and you cannot save all apps’ icons on it. Some people complained that the icons appear on their home screen without installing anything, and cannot delete icons on Android.
In this tutorial, we are going to talk about how to delete icons on Android under various situations. When clean up your Home screen or do troubleshooting on home-screen icons, you will discover that our guides are helpful.
Part 1 : How to Delete Icon for All Android Devices
In this part, you can learn the common methods to delete icons on Android home screen but not uninstall the apps. First of all, you should understand that the home screen is the first screen after unlock an Android phone. The icon on your home screen is the shortcut of an app. So, you can delete it without damaging the app. On the other hand, the icons on app screen are the entrances of apps, and you cannot delete them except uninstall.
Method 1 : Delete icons on Android home screen
Step 1 . Unlock your Android phone with your PIN code or pattern password. An Android device home screen usually has multiple screens, swipe left and right to navigate the screen contains the icon you want to delete.
Step 2 . Press and hold the icon to delete on Android until you see some menus pop up on top of the screen.
Step 3 . Keep press and drag the icon to the «Remove» menu with a trash icon to delete an icon on Android immediately.
Step 4 . Repeat Step 2 and Step 3 to other icons and delete them from your home screen.
This way is available to most Android devices, but you have to know that there are many manufacturers producing Android devices and redesigned the OS. So, the operations may be a bit different. For example, on some Samsung Galaxy phones, you need to tap «Remove shortcut» on the pop-up menu after long pressing the icon.
Method 2 : Delete icons on Android by removing them out of screen
Step 1 . Also, unlock your Android phone and access the home screen. Swipe left and right to locate the screen with icons to delete on Android.
Step 2 . long press the screen or tap the «Home» button to evoke the menu bar. You can select «Edit page» to switch into the edit mode.
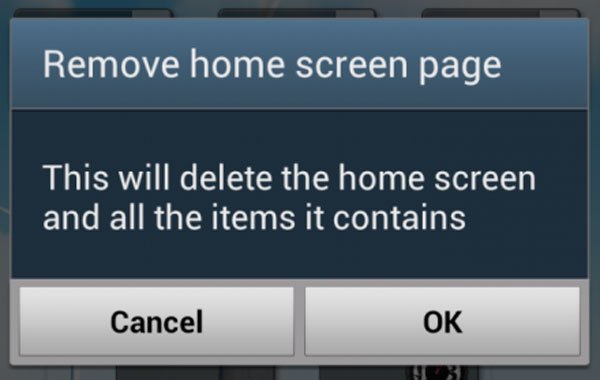
Step 3 . Now, you can see the thumbnail of all screens, press and drag the screen with icons you want to delete into the «Trash» icon on bottom of the screen. When prompted, tap «OK» to delete icons on Android.
Troubleshooting : cannot delete icons on Android
Some people report that they cannot delete icons on Android. When you face such problem, you can try the tips below.
1. Make sure that the screen where you want to delete icons is the home screen but not app screen. The former contains shortcuts of the apps, while the later displays real apps.
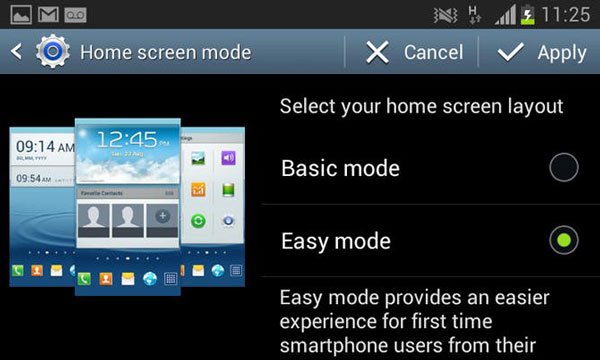
2. Go to «Settings» > «Home screen mode» and select «Easy Mode». Now you should be able to remove icons on Android.
3. To be clear that the icon you want to delete is an app or a widget. If you want to delete a widget on your home screen, you have to switch to widget manager screen.
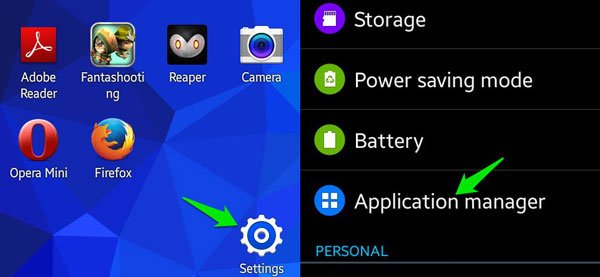
4. If the problem persists, go to «Settings» > «Application Manager» and open the app with the same name of the icon to delete. Tap Uninstall to delete the app from your device and reinstall it again. Now, you can delete the icon as you wish.
Part 2 : How to Delete Icon from Google Store
Another way to delete icons on Android is to prevent from adding icons to your home screen. In Google Store, there is a feature called Add icon to Home screen, which is able to add shortcuts to your home screen automatically when install new apps. To disable this feature, follow the steps below.
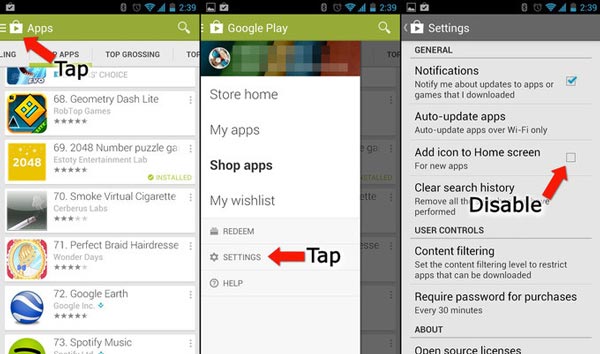
Step 1 . Start the Google Play app on your Android phone. At upper left corner, you can see the «menu» icon with three horizontal lines. Tap on it to open the menu bar.
Step 2 . Scroll down until you see the «Settings» option, tap on it to go into the Google Play settings screen. Uncheck the box next to the «Add icon to Home screen» option
Step 3 . Next time when you install a new app on your Android phone, the icon will not go to your home screen.
On some versions of Android, the Add icon option also can be found in «Settings» > «Home screen» or something similar.
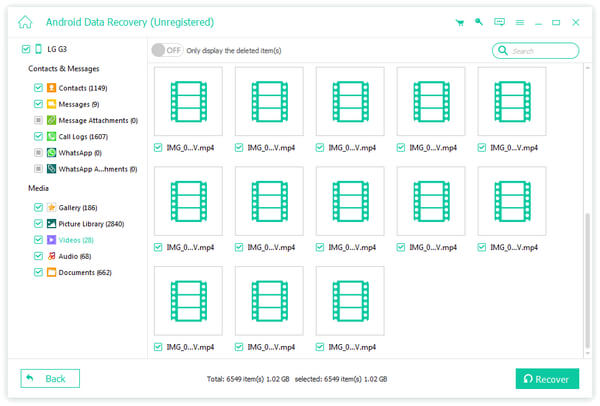
Recommendation : Android Data Recovery
Apeaksoft Android Data Recovery is one of the best recovery tools for Android devices. With it you can feel free to delete icons on Android. And once you discover erased important apps, Android Data Recovery could help you to get them back. Its key features include:
- 1. It has the capacity to recover deleted data from Android devices without backup.
- 2. The Android data recovery software is able to get back a wider variety of data types, like contacts, call history, SMS/MMS, music, photos, videos, apps and more.
- 3. It can retrieve the erased files and data from your internal storage and SD card.
- 4. Before recovery, you can preview details about the lost files and make a better decision.
- 5. Android Data Recovery restores the erased files to your computer without interrupting current data on the device.
- 6. It supports almost all Android devices from major manufacturers, such as Samsung, HTC, LG, Sony, Moto, Huawei, Google, Sharp, etc.
In a word, it is the best way to get back lost data when you delete icons on Android by mistake.
Conclusion
Advanced technologies make our life more convenient than ever before. A simple tap on our smartphone’s home screen, we can access a different world immediately. However, many people do not like the crowd home screen. With our guides, you can delete icons on Android home screen easily. If not like it, you can delete a whole page of home screen directly. To avoid Android add icons to your home screen automatically, you can set it in Google Play. Uninstall an important app by mistake when delete icons on Android? Apeaksoft Android Data Recovery can help you get it back in a few seconds.
Источник
Home icon in android
You have no collections yet
All collections displayed here
What can I do with my collections?
Click on any icon you’d like to add to the collection.
Organize your collections by projects, add, remove, edit, and rename icons.
Use the «Paint collection» feature and change the color of the whole collection or do it icon by icon.
Download your collections in the code format compatible with all browsers, and use icons on your website.
Save a backup copy of your collections or share them with others- with just one click!
You have reached your collections limit. Upgrade to get unlimited collections
Register and create new collections
Are you sure you want to delete this collection?
We are sorry you canceled your Premium subscription
You can still enjoy Flaticon Collections with the following limits:
- You can choose only 3 collections to keep
- You can only add up to 100 icons per collection
- You cannot add Premium icons to your collection
The advantages of your collections changed
- You can choose only 3 collections to keep
- You can only add up to 100 icons per collection
- You cannot add Premium icons to your collection
Keep making the most of your icons and collections
Get 20% OFF our
Annual Premium Plan
Источник
How to Create Android App Icons using Image Asset Studio
Creating an application interface that the user will like and will be unlikely to forget can be intimidating. But creating an attractive launcher icon for your app, that the user will first come across while looking at your app, anyway needs more brainstorming. For Android, you need to create these graphics that have to be compatible and supporting to all devices running Android, sizes varying from a smartphone to TV. The introduction of Android Image Asset Studio in Android Studio has made it easy. In this article, you will see how you can easily create your application icon in one go.
Image Asset Studio is a tool introduced in Android Studio 3. It can be used to generate app icons for all the screen densities in one go, using custom images, material design icons as well as text strings. Application icon in Android includes the following,
- Launcher Icon: represents your app and the first thing that user sees
- ActionBar Icon & Tab Icon: representing actions in the ActionBar and Tabs of the app
- Notification Icon: represents your app notification when a user is outside your app

Here is a list of icon/image sizes that you need to create for different screen densities, for each image that you use in your application. No matter if you are a good designer, creating each of these is tedious!

Image Asset Studio helps to create all these icons for all screen densities and stores them in respective density folders. It provides a preview of all the icons that will be created, in different shapes, with options to edit them. Let’s see how to create each one of them.
Run Image Asset Studio
- In the Project Window, select the project hierarchy.
- Right-click on the res folder and choose New -> Image Asset.

3. Create the icon for your app i.e.
- Launcher icon which may be Adaptive and Legacy Launcher Icon (if your app supports Android 8.0 or above) or just the Legacy Launcher Icon(for Android version less than or equal to 7.1)
- ActionBar Icons and Tab Icons
- notification icon as per your requirement.
4. You can select the following Asset Type. The icon appears on the right side, in the preview panel.
Custom Image
You can use custom images of PNG (recommended), JPG or GIF (avert) format and adjust it to create icons. Set the path of your custom image if you select this.
Clip Art
You can select the icons from the list of Google Material Design Icons provided in the dialog. Click on the clip art icon to get the dialog with icon set.
Text String
You can use the fonts installed on your computer to generate the icons out of the text strings. It will create these text-based icons in PNG format in respective drawable-density folders. Set the string and select the font to use it.
If you are comfortable learning from video, you can refer to this for Launcher Icons and App Bar Icons:
Creating Launcher Icon
Launcher Icons represent our app in the device home screen, on the app list screen, in the Google Play Store and everywhere else. Android 8.0 (Oreo) and above supports Adaptive Icons and can be displayed in different shapes across various platforms. Image Asset Studio provides the option to create these adaptive icons as well as the legacy icons for Android 8.0 below. It also creates web icons(512 x 512 px) that represents our app on the Google Play Store.
The Launcher Icons are stored in the res/mipmap-density folder.
Adaptive and legacy launcher icon
If your app doesn’t support android version 8.0 or above, create legacy icon only for your app.
After opening Image Asset Studio, follow the steps below to create the legacy icons for your android app.
- For Icon Type field, select Launcher Icons (Adaptive & Legacy).
- For Foreground Layer tab, select the Asset type to be an image, clip art or text.
- Then for the Background Layer tab, select a Color or set the Image path for the Asset type to set the background.
- Then the Legacy tab, check the default settings. You can choose whether you want to generate the legacy icon, round icon and the icon for the web(Google Play Store Icon).
- Optionally
- Name: Change the name of the foreground and background layer. If the resource with the specified name exists, it will be indicated by an error message. The name can contain lowercase characters, digits and underscore only.
- Trim: Chose yes to adjust the margin between the foreground icon graphic and the background, else select no to keep the source asset as it is.
- Color: Set the color for the clip art or the text asset. Click the field, select the color, click chose and preview your icon.
- Resize: Use the slider to resize your icon. It is disabled for background layer where Color is the asset type.
7. Chose the resource directory for your image asset.
- main/res: For all source set including debug and release
- debug/res: For debugging only
- release/res: For only one version of build, overrides main source set
- custom source set: To define a new source set File -> Project structure -> app -> Build Types. Refer to Configure Build Variants for details
Output Directories shows the list of folders in which the icons will be created in the Project view in Project Window.
Check the mipmap folders for the Launcher Icons.
Legacy launcher icon only
If your app supports android version 8.0 or above, create adaptive and legacy launcher icon for your app.
After opening Image Asset Studio, follow the steps below to create adaptive and legacy icons for your android app.
- For Icon Type field, select Launcher Icons (Legacy Only).
- Select the Asset type to be an image, clip art or text.
- Optionally
- Name: Change the name of the icon if you don’t want to use the default name. If the resource with the specified name exists, an error message will indicate it. The name can contain lowercase characters, digits and underscore only.
- Trim: Chose yes to adjust the margin between the foreground icon graphic and the background, else select no to keep the source asset as it is.
- Padding: Adjust the source set padding for all four sides. You will have the review on the right side.
- Foreground: Set the color for the clip art or the text asset. Click the field, select the color, click chose and preview your icon.
- Background: Set the color for the background. Click the field, select the color, click chose and preview your icon.
- Scaling: Select crop or S hrink to fit to fit the icon size
- Shape: Select the shape to set a backdrop for the icon. For transparent, select none.
- Effect: Select dogear if you want the dogear effect for your icon, else select none.
5. Chose the resource directory for your image asset.
- main/res: For all source set including debug and release
- debug/res: For debugging only
- release/res: For only one version of the build, overrides main source set
- custom source set: To define a new source set File -> Project structure -> app -> Build Types. Refer to Configure Build Variants for details
Check the mipmap folders for the Launcher Icons.
Creating ActionBar Icons and Tab Icons
ActionBar icons are the ones present on the ActionBar that represents individual action. Whereas, the tab icons are used in the apps having multiple tabs. Using material icons for this category is recommended.
The ActionBar and Tab Icons are stored in the res/drawable-density folder.
You can also use Vector Asset Studio to have XML vectors for these categories of icons. It will reduce the size of your APK considerably.
After opening Image Asset Studio, follow the steps below to create action bar and tab icons for your android app.
- For Icon Type field, select Action Bar and Tab Icons.
- Select the Asset type to be an image, clip art or text.
- Optionally
- Name: Change the name of the icon if you don’t want to use the default name. If the resource with the specified name exists, an error message will indicate it. The name can contain lowercase characters, digits and underscore only.
- Trim: Chose yes to adjust the margin between the foreground icon graphic and the background, else select no to keep the source asset as it is.
- Padding: Adjust the source set padding for all four sides. You will have the review on the right side.
- Theme: Select holo_light or holo_dark as per your app theme. Select custom to set a custom color for the icon.
5. Chose the resource directory for your image asset.
- main/res: For all source set including debug and release
- debug/res: For debugging only
- release/res: For only one version of build, overrides main source set
- custom source set: To define a new source set File -> Project structure -> app -> Build Types. Refer to Configure Build Variants for details
Check the drawable folders for the Icons created.
Creating Notification icons
To learn from the video:
The user sees the notification when he is outside your app. Notification icons come up with these notifications.
The Notification Icons are stored in the res/drawable-density folder. There are a few other folders created too.
- for Android 2.2 (API 8) or lower — icons stored in res/drawable-density
- for Android 2.3 to 2.3.7 (API 9 & 10) — icons stored in res/drawable-density-v9. Gray version of the icon is created
- Android 3 (API 11) or higher — icons stored in res/drawable-density-v11. A white version of the icon is created.
After opening Image Asset Studio, follow the steps below to create notification icons for your android app.
- For Icon Type field, select Notification Icons.
- Select the Asset type to be an image, clip art or text.
- Optionally
- Name: Change the name of the icon if you don’t want to use the default name. If the resource with the specified name exists, an error message will indicate it. The name can contain lowercase characters, digits and underscore only.
- Trim: Chose yes to adjust the margin between the foreground icon graphic and the background, else select no to keep the source asset as it is.
- Padding: Adjust the source set padding for all four side. You will have the review on the right side.
5. Chose the resource directory for your image asset.
- main/res: For all source set including debug and release
- debug/res: For debugging only
- release/res: For only one version of build, overrides main source set
- custom source set: To define a new source set File -> Project structure -> app -> Build Types. Refer to Configure Build Variants for details
Check the drawable folders for the Icons created.
How to Delete an App Icon from a project
To delete the app icon,
- Select Android View in Project Window
- Expand the mipmap and drawable folder for the launcher and other icons respectively.
- Select the sub-folder that matched the name of your icon. It contains the icons of all densities that you created.
- Right-click on the sub-folder and hit delete.
Dialog for Safe Delete appears. - If you want, select options to find the places where the icon is used and hit OK.
If you chose to search for usage and the icon has any use in the project, you can view it and then confirm delete. You should delete or replace this reference to successfully compile the project. Android Studio then deletes the file from the project and the drive. - Chose Build -> Clean Project.
Источник


