- If your iPhone, iPad, or iPod touch is lost or stolen
- Look for your device on a map
- Mark as Lost
- Report your missing device to local law enforcement
- File a Theft and Loss claim
- Remotely erase your device
- Contact your wireless carrier
- Remove your missing device from your account
- iOS 15 Update: iPad or iPhone Disabled? The 4 Best Ways to Unlock Your Device
- Help, my iPhone is disabled! Learn how to unlock iPhone without password.
- Why Is My iPhone Disabled?
- iPhone Disabled? How to Unlock iPhone without Passcode
- iPad or iPhone Disabled? Connect to iTunes
- Fix Your Disabled iPad or iPhone Using Finder
- Fix Your Disabled iPhone or iPad with iCloud
- Use Recovery Mode to Fix Your Disabled iPhone or iPad
- My iPhone Is Disabled. Connect To iTunes? Here’s The Fix!
- Why Do iPhones Become Disabled?
- How Many Guesses Do I Have Before My iPhone Becomes Disabled?
- I’m Not Good With The iPhone Keypad. Can I Disable My iPhone By Accident?
- Can I Unlock My iPhone After It Is Disabled?
- How Do I Erase My iPhone If It Is Disabled?
- iTunes
- iCloud
- Set Your iPhone Up Again
- iPhone is Enabled!
If your iPhone, iPad, or iPod touch is lost or stolen
If you lose your iPhone, iPad, or iPod touch or think it might be stolen, use Find My and protect your data.
Look for your device on a map
To find your device, sign in to iCloud.com/find. Or use the Find My app on another Apple device that you own.
If your iPhone, iPad, or iPod touch doesn’t appear in the list of devices, Find My was not turned on. But you can still protect your account if Find My was not turned on.
Mark as Lost
When you mark your device as lost, you remotely lock it with a passcode, keeping your information secure. This also disables Apple Pay on the missing device. And you can display a custom message with your contact information on the missing device.
Report your missing device to local law enforcement
Law enforcement might request the serial number of your device.
File a Theft and Loss claim
If your missing iPhone is covered by AppleCare+ with Theft and Loss, file a claim for an iPhone replacement.
Remotely erase your device
After you erase a device, you can’t track its location, so make sure that you no longer need to search for the device. If you have AppleCare+ with Theft and Loss, do not erase your iPhone until your claim has been approved.
Contact your wireless carrier
If the missing device is an iPhone or an iPad with cellular, report your missing device to your wireless carrier. Ask the carrier to disable your account to prevent calls, texts, and data use. And if your device is covered under your wireless carrier plan, file a claim.
Remove your missing device from your account
If you have AppleCare+ with Theft and Loss, do not remove your lost iPhone from your account until your claim has been approved.
Go to appleid.apple.com to remove the missing device from your list of trusted devices.
AppleCare+ with Theft and Loss is not available in all countries and regions.
Information about products not manufactured by Apple, or independent websites not controlled or tested by Apple, is provided without recommendation or endorsement. Apple assumes no responsibility with regard to the selection, performance, or use of third-party websites or products. Apple makes no representations regarding third-party website accuracy or reliability. Contact the vendor for additional information.
Источник
iOS 15 Update: iPad or iPhone Disabled? The 4 Best Ways to Unlock Your Device
Help, my iPhone is disabled! Learn how to unlock iPhone without password.
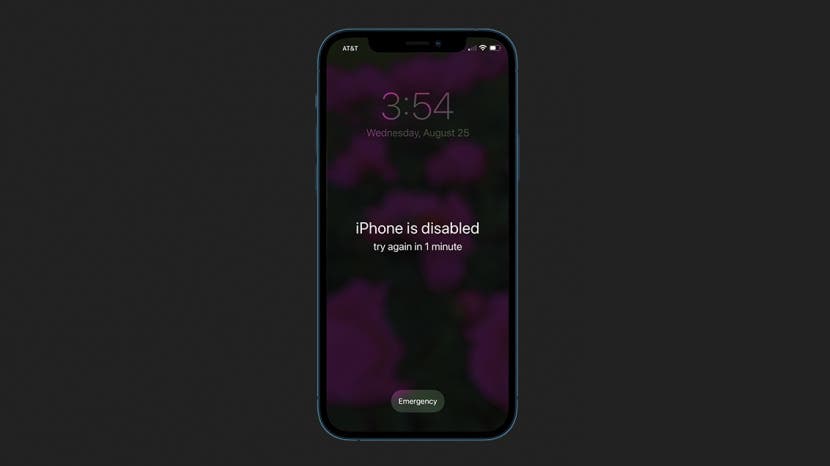
If someone unsuccessfully attempts to unlock an iPhone or iPad too many times, an «iPhone is Disabled» message will inevitably pop up. If you forgot your iPhone passcode, you may enter too many wrong attempts and end up with a disabled iPhone. Below, we’ll cover how to fix a disabled iPhone without your device password by using Finder, connecting to iTunes or iCloud, or using Recovery Mode.
Why Is My iPhone Disabled?
An iPhone will become disabled after six different failed passcode attempts. That means you can try to unlock your device five times before it will lock you out. On the sixth attempt, your iPhone will be disabled for one minute. The seventh attempt will lock you out of your disabled iPhone for five minutes, the eighth attempt for fifteen, and the tenth for sixty minutes. But if you reach attempt number ten and have still not successfully entered the correct passcode, you’ll receive the message that your iPhone is Disabled. Unless, of course, you have your iPhone set to erase after ten failed passcode attempts.
iPhone Disabled? How to Unlock iPhone without Passcode
Unfortunately, there is no way to unlock a disabled iPhone or iPad, which means you’ll be using Finder, iTunes, iCloud, or Recovery Mode to erase your device. You’ll then need to restore your device with an iTunes or iCloud backup. Once you’ve erased your device and gotten it out of disabled mode, you can focus on restoring your device. Here are some guidelines on what method might work best for you:
- If your Mac isn’t updated to macOS Catalina or you have a PC, you’ll use the iTunes method.
- If you’re using a Mac updated to macOS Catalina or later, you’ll use the Finder method.
- If you’re signed into iCloud and have Find My iPhone enabled, use the iCloud method.
- If you don’t use iCloud and can’t use the Finder or iTunes, the Recovery Mode method is for you.
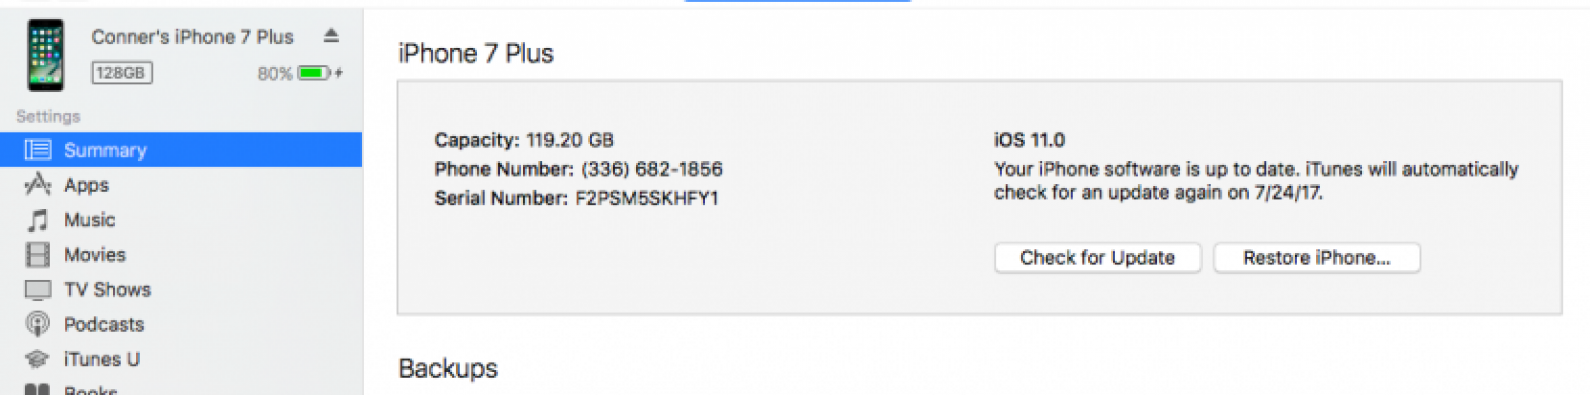
iPad or iPhone Disabled? Connect to iTunes
Prior to macOS Catalina, an «iPhone is Disabled, Connect to iTunes» message would appear when you were locked out of your phone. If you have a locked or disabled iPhone or iPad and have a PC, or haven’t updated your Mac to Catalina, this is the first solution you should try.
- Plug your iPhone into your computer using your USB cord. If it doesn’t automatically open, launch iTunes.
- In iTunes, click on the icon of your device, located near the top and toward the left side of the screen. This will open all the information about your device and what’s on it.
- Tap Summary. There, you will see the option to Restore iPhone. Click on that.
If, for whatever reason, this doesn’t work for you (and you don’t meet the iCloud method requirements) skip to using Recovery Mode.
Fix Your Disabled iPad or iPhone Using Finder
If you have a Mac that’s been updated to Catalina or later, use Finder to unlock your device.
- Connect your device to your computer with a USB cable. Your computer may initiate Trust This Computer or ask for a passcode.
- Choose your device from the Finder menu, then choose Restore Backup.
- Choose your backup (the most recent before your device locked). If your backups are encrypted, you’ll need to enter a password.

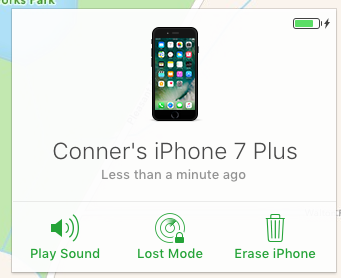
Fix Your Disabled iPhone or iPad with iCloud
- On your computer, open a browser and visit icloud.com/find.
- Log in with your Apple ID and password.
- Select All Devices at the top.
- Click on the device (iPhone, iPad, or iPod Touch) of yours that is currently disabled.
- Click Erase iPhone, then confirm.
Use Recovery Mode to Fix Your Disabled iPhone or iPad
If your computer doesn’t recognize your iPhone or iPad, or says it’s in recovery mode, you can use recovery mode to set up your device from scratch.
- Plug your iPhone into your computer with your USB cable. If it doesn’t launch automatically, open iTunes. If you’ve updated your Mac to Catalina or later, open the Finder.
- From here, you’ll need to force restart your iPhone.
- For iPhone 6s or earlier, iPad with a Home button, or iPod Touch 6th Generation and earlier: Hold down the Top (or Side) and Home buttons simultaneously. When you see the Apple logo on your screen, do notlet go of the buttons. Keep holding both until your device enters Recovery Mode.
- For iPhone 7 or 7 Plus and iPod Touch 7th Generation: Hold down your Top (or Side) and Volume Down buttons at the same time. When you see the Apple logo on your screen, do not let go of the buttons. Keep holding both until your device enters Recovery Mode.
- For iPhone 8, 8 Plus, X, or 11 models: Quickly press and release the Volume Up button, followed by the Volume Down button. Next press and hold the Side Button until your device enters recovery mode.
- For iPads with Face ID: Quickly press and release the Volume Up button, then the Volume Down button. Now, press and hold the Top Button until your device begins to restart, keep holding until your iPad goes into recovery mode.
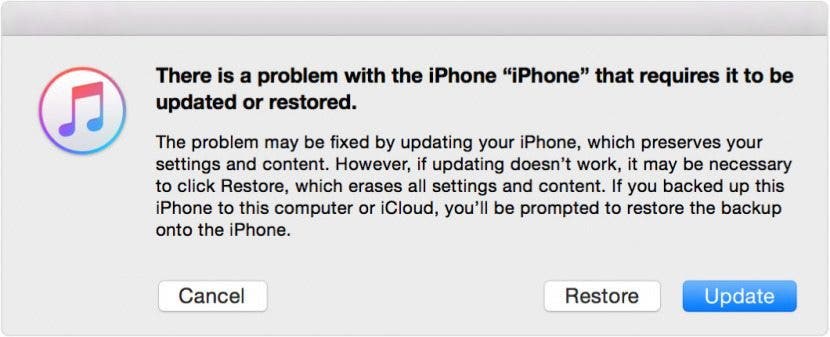
- Once your iPhone or iPad enters recovery mode, find your device in iTunes or the Finder and click on it. A box will appear asking if you want to Restore or Update your device. Select Restore.
- It may take some time for your iPhone to download its restored iOS or iPadOS software. If your download takes more than fifteen minutes and exits the recovery mode screen, let the download complete, then try over with the force restart and enter recovery mode again.
Источник
My iPhone Is Disabled. Connect To iTunes? Here’s The Fix!
iPhones get disabled for all sorts of reasons, and most of the time it’s an accident. You didn’t forget your iPhone passcode. Thieves usually won’t even try to figure out your passcode — they’ll just erase your iPhone or sell it for parts. That’s what makes this problem so frustrating. In this article, I’ll explain why your iPhone is disabled and says connect to iTunes, how to fix the problem, and explain the most common reasons why iPhones become disabled so you can prevent it from happening again.
Why Do iPhones Become Disabled?
I saw a lot of disabled iPhones when I worked at Apple. Here are two most common reasons why this happens:
- Kids. Kids love iPhones and they love pushing buttons. Timmy gets upset when the buttons stop working and Mommy isn’t happy that her iPhone is disabled.
- Snoopers. Friends and family members don’t always realize they don’t have an unlimited number of guesses to figure out your iPhone passcode.
How Many Guesses Do I Have Before My iPhone Becomes Disabled?
iPhones don’t become disabled on the first or second incorrect passcode attempt. Here’s how many times you can enter an incorrect passcode before your iPhone is disabled:
- 1–5 incorrect passcode attempts: No problem.
- 6 incorrect attempts: iPhone disabled for 1 minute.
- 7 incorrect attempts: iPhone disabled for 5 minutes.
- 8 incorrect attempts: iPhone disabled for 15 minutes.
- 9 incorrect attempts: iPhone disabled for 60 minutes.
- 10 incorrect attempts: “iPhone is disabled. Connect to iTunes” or iPhone is completely erased if Erase Data is turned on in Settings -> Touch ID & Passcode (or Settings -> Passcode for iPhones without Touch ID).
I’m Not Good With The iPhone Keypad. Can I Disable My iPhone By Accident?
No. It’s hard to accidentally disable an iPhone, and here’s why: You can enter the same incorrect passcode an unlimited number of times and it only counts as 1 incorrect passcode attempt. Let’s look at an example.
You’re at a wedding and you really need to know who won the football game, but your wife won’t be happy if she discovers you care more about your fantasy football team than her second cousin’s wedding vows. You try to enter your passcode without looking at your iPhone, but it’s not working because you’re entering 1536 instead of 1539, over and over again. Is your iPhone disabled? No. Your iPhone will only become disabled if you enter 6 different incorrect passcodes.
Can I Unlock My iPhone After It Is Disabled?
Unfortunately, the answer is no. Once your iPhone says “iPhone is disabled. Connect to iTunes”, there is nothing you can do to unlock it. People sometimes think Apple Stores have special tools that can unlock disabled iPhones, but they don’t. The only thing you can do is completely erase your iPhone and start over.
The good news is that you can restore from the last backup your made before your iPhone became disabled. If you’ve backed up your iPhone to iTunes or iCloud, you’ll be able to restore your data after you erase your iPhone. After your iPhone is disabled, however, there is no way to back up the current data on the device. If you don’t have a backup, you’ll have to set up your iPhone from scratch.
How Do I Erase My iPhone If It Is Disabled?
You can erase your iPhone using iTunes or iCloud, but I recommend using iTunes because it always works if you do it the way I describe. If you use iCloud, you need to know your Apple ID and password, and your iPhone has to be connected to the internet. Using iTunes is the simplest, easiest way, but I’ll describe how to do both.
iTunes
Apple’s support article recommends an unnecessary, overcomplicated trial-and-error process of determining which restore method to use based on the kind of relationship your iPhone had with your computer before it was disabled. Just move on if you didn’t understand that — that’s why I say it’s too complicated! There is absolutely no downside (in fact, there may be benefits) to erasing your iPhone the way I recommend, and it always works.
The type of restore I recommend when your iPhone is disabled is called a DFU restore. I wrote an article that describes exactly how to DFU restore your iPhone. Follow the instructions in that article (it’s easy!) and come back here when you’re done. Skip to the section called Set Your iPhone Up Again after you use iTunes to begin the DFU restore.
iCloud
If your iPhone was signed into iCloud and you had Find My iPhone turned on before it was disabled, you can use Find My iPhone to erase your iPhone. You need to sign in with your Apple ID and password, choose your iPhone from the All My Devices dropdown menu, and choose Erase iPhone. Continue to the next section after your iPhone finishes erasing.
Set Your iPhone Up Again
After you restore your iPhone with iTunes or erase it using iCloud, the way to proceed depends on whether you have an iTunes backup, iCloud backup, or no backup. Follow these instructions after you see the white Set Up screen on your iPhone. If the screen is dark and you’re not sure if the restore is finished, press the Home button on your iPhone. If you see the Set Up screen, move on.
- If you backed up your iPhone to iCloud before it was disabled and you used iTunes to DFU restore your iPhone, unplug your iPhone from your computer. (It’s already unplugged if you used iCloud to erase your iPhone). Choose Restore from iCloud Backup during the setup process on your iPhone.
- If you backed up your iPhone to iTunes before it was disabled and erased it using iCloud.com, choose Restore from iTunes backup during the setup process. If you restored your iPhone using iTunes, choose to restore from your iTunes backup using the Set Up screen in iTunes.
- If you don’t have a backup, I recommend you unplug your iPhone from your computer (it already is if you used iCloud.com to erase your iPhone) and set up your iPhone while it’s disconnected from iTunes. You can sync your iPhone with iTunes after you set it up, if that’s what you want to do. (I don’t.)
iPhone is Enabled!
Your iPhone is up and running and you’ve learned the common reasons why iPhones get disabled in the first place. If your iPhone is disabled again, you know exactly how to fix it. If you’d like to leave a comment, I’m interested to how your iPhone was disabled in the comments section below.
Thanks for reading and remember to Pay It Forward,
David P.
Источник


