- Take a screenshot on your iPhone
- How to take a screenshot on iPhone 13 and other models with Face ID
- How to take a screenshot on iPhone models with Touch ID and side button
- How to take a screenshot on iPhone models with Touch ID and top button
- Where to find screenshots
- How to take a screenshot on iPhone 12 mini, 12, and 12 Pro
- How to take a screenshot on iPhone 12 mini, 12, and 12 Pro
- How to use screenshot markup on iPhone 12
- How to screenshot secondary displays or CarPlay on iPhone 12
- Wrap up
- How to take screenshots on any model of iPhone or iPad
- How to take a screenshot on iPhone with Face ID
- How to take a screenshot on iPhone with Home button
- How to take a screenshot on iPad with no Home button
- How to take a screenshot on iPad with Home button
- FAQs about iPhone and iPad screenshots
- 1. Where can I find the screenshots I take?
- 2. For how long does the thumbnail remain on the screen?
- 3. Does a screenshot capture everything that’s on the screen?
- 4. What is the file format of an iPhone screenshot?
- 5. How to take iPhone screenshots in JPG format?
- 6. What is the average size of an iPhone screenshot?
- 7. Do iPhone screenshots show the Face ID notch?
- 8. Can I double tap to screenshot on iPhone?
- 9. Can I take a screenshot without pressing any button?
- Here’s how to take a screenshot on any generation of iPhone
- Taking screenshots with physical buttons
Take a screenshot on your iPhone
Quickly save what’s on your screen.
How to take a screenshot on iPhone 13 and other models with Face ID
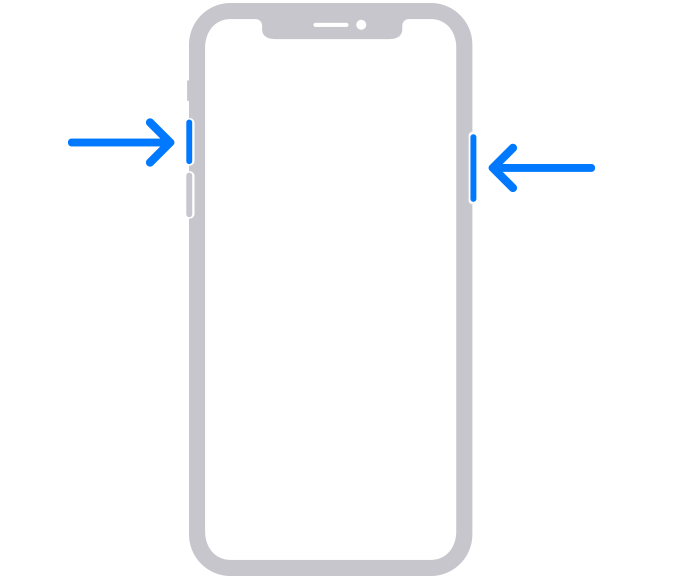
- Press the side button and the volume up button at the same time.

- Quickly release both buttons.
- After you take a screenshot, a thumbnail temporarily appears in the lower-left corner of your screen. Tap the thumbnail to open it or swipe left to dismiss it.

How to take a screenshot on iPhone models with Touch ID and side button
- Press the side button and the Home button at the same time.
- Quickly release both buttons.
- After you take a screenshot, a thumbnail temporarily appears in the lower-left corner of your screen. Tap the thumbnail to open it or swipe left to dismiss it.
How to take a screenshot on iPhone models with Touch ID and top button
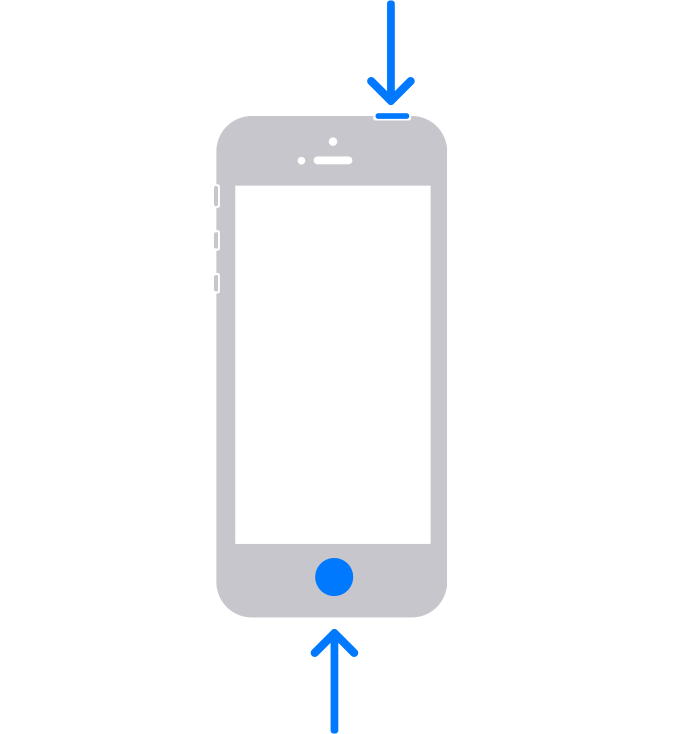
- Press the top button and the Home button at the same time.
- Quickly release both buttons.
- After you take a screenshot, a thumbnail temporarily appears in the lower-left corner of your screen. Tap the thumbnail to open it or swipe left to dismiss it.
Where to find screenshots
Open Photos, then go to Albums > Screenshots.
Источник
How to take a screenshot on iPhone 12 mini, 12, and 12 Pro
— Dec. 14th 2020 1:30 am PT

If you just picked up an iPhone 12 mini, iPhone 12, 12 Pro, or 12 Pro Max, one of the first things you might need to figure out how to do is take a screenshot. Thankfully, Apple has made the process fairly intuitive and it only takes a minute to learn!
How to take a screenshot on iPhone 12 mini, 12, and 12 Pro
- From any screen, click in the volume up and the side button (lock button) at the same time. You should see an animation for the screenshot taken.
- In the bottom left corner you’ll see a preview — tap it to make edits or tap-and-hold to immediately share the screenshot to an app, AirDrop, or other share.
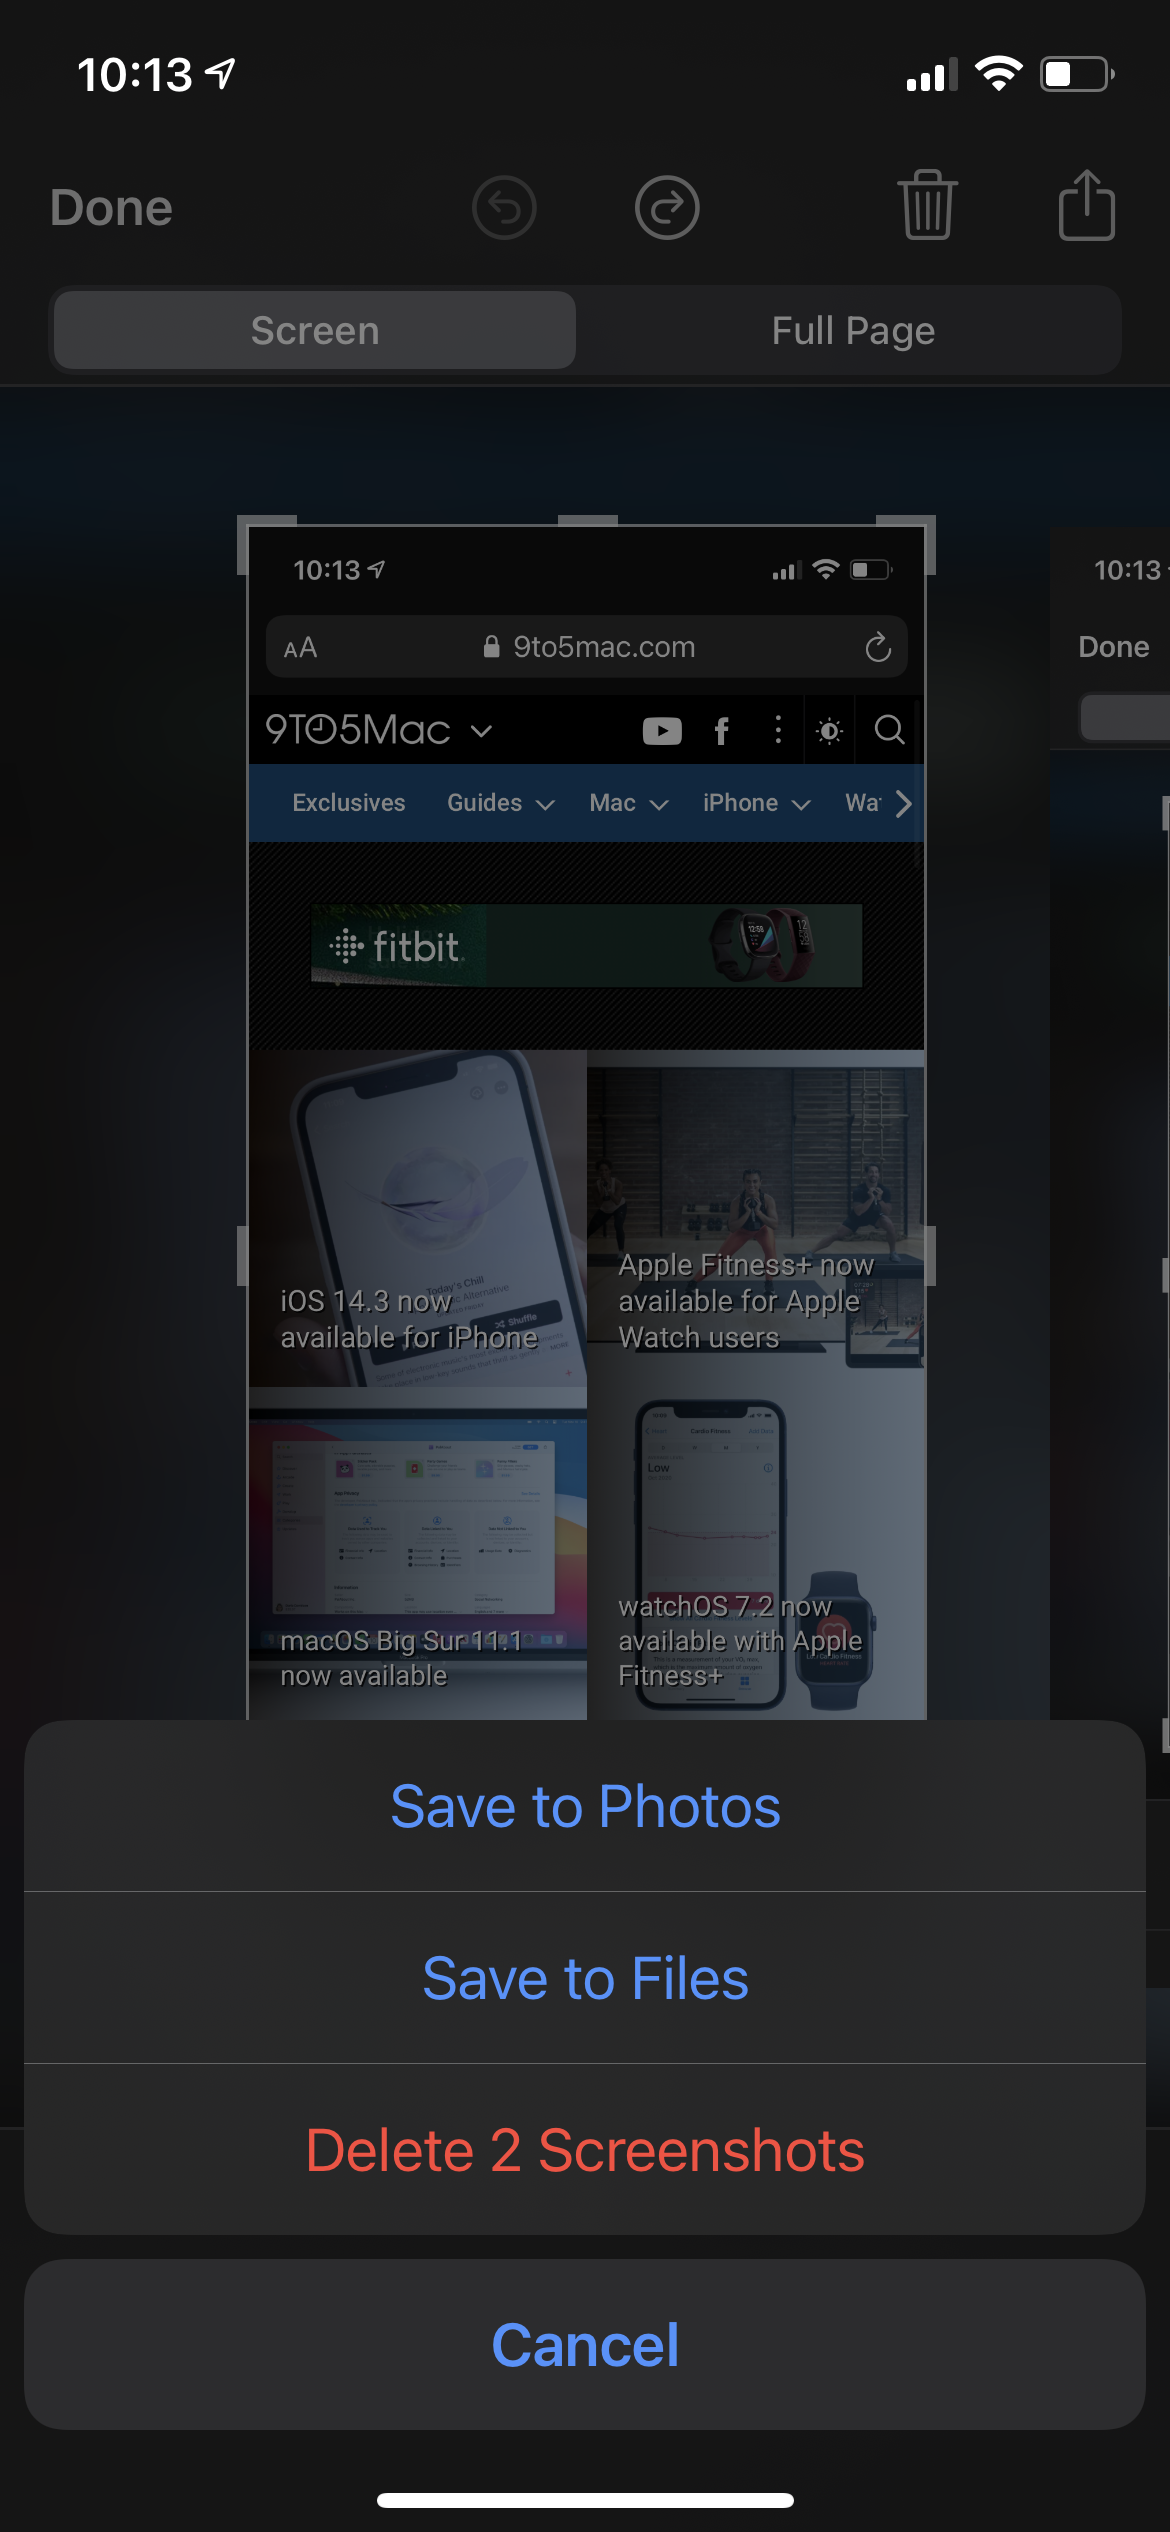
- If you decide to edit or markup your screenshot, you’ll see the below screens. Tap “Done” in the top-right corner and you’ll be given the option to either “Save to Photos” or delete the screenshot(s).
How to use screenshot markup on iPhone 12
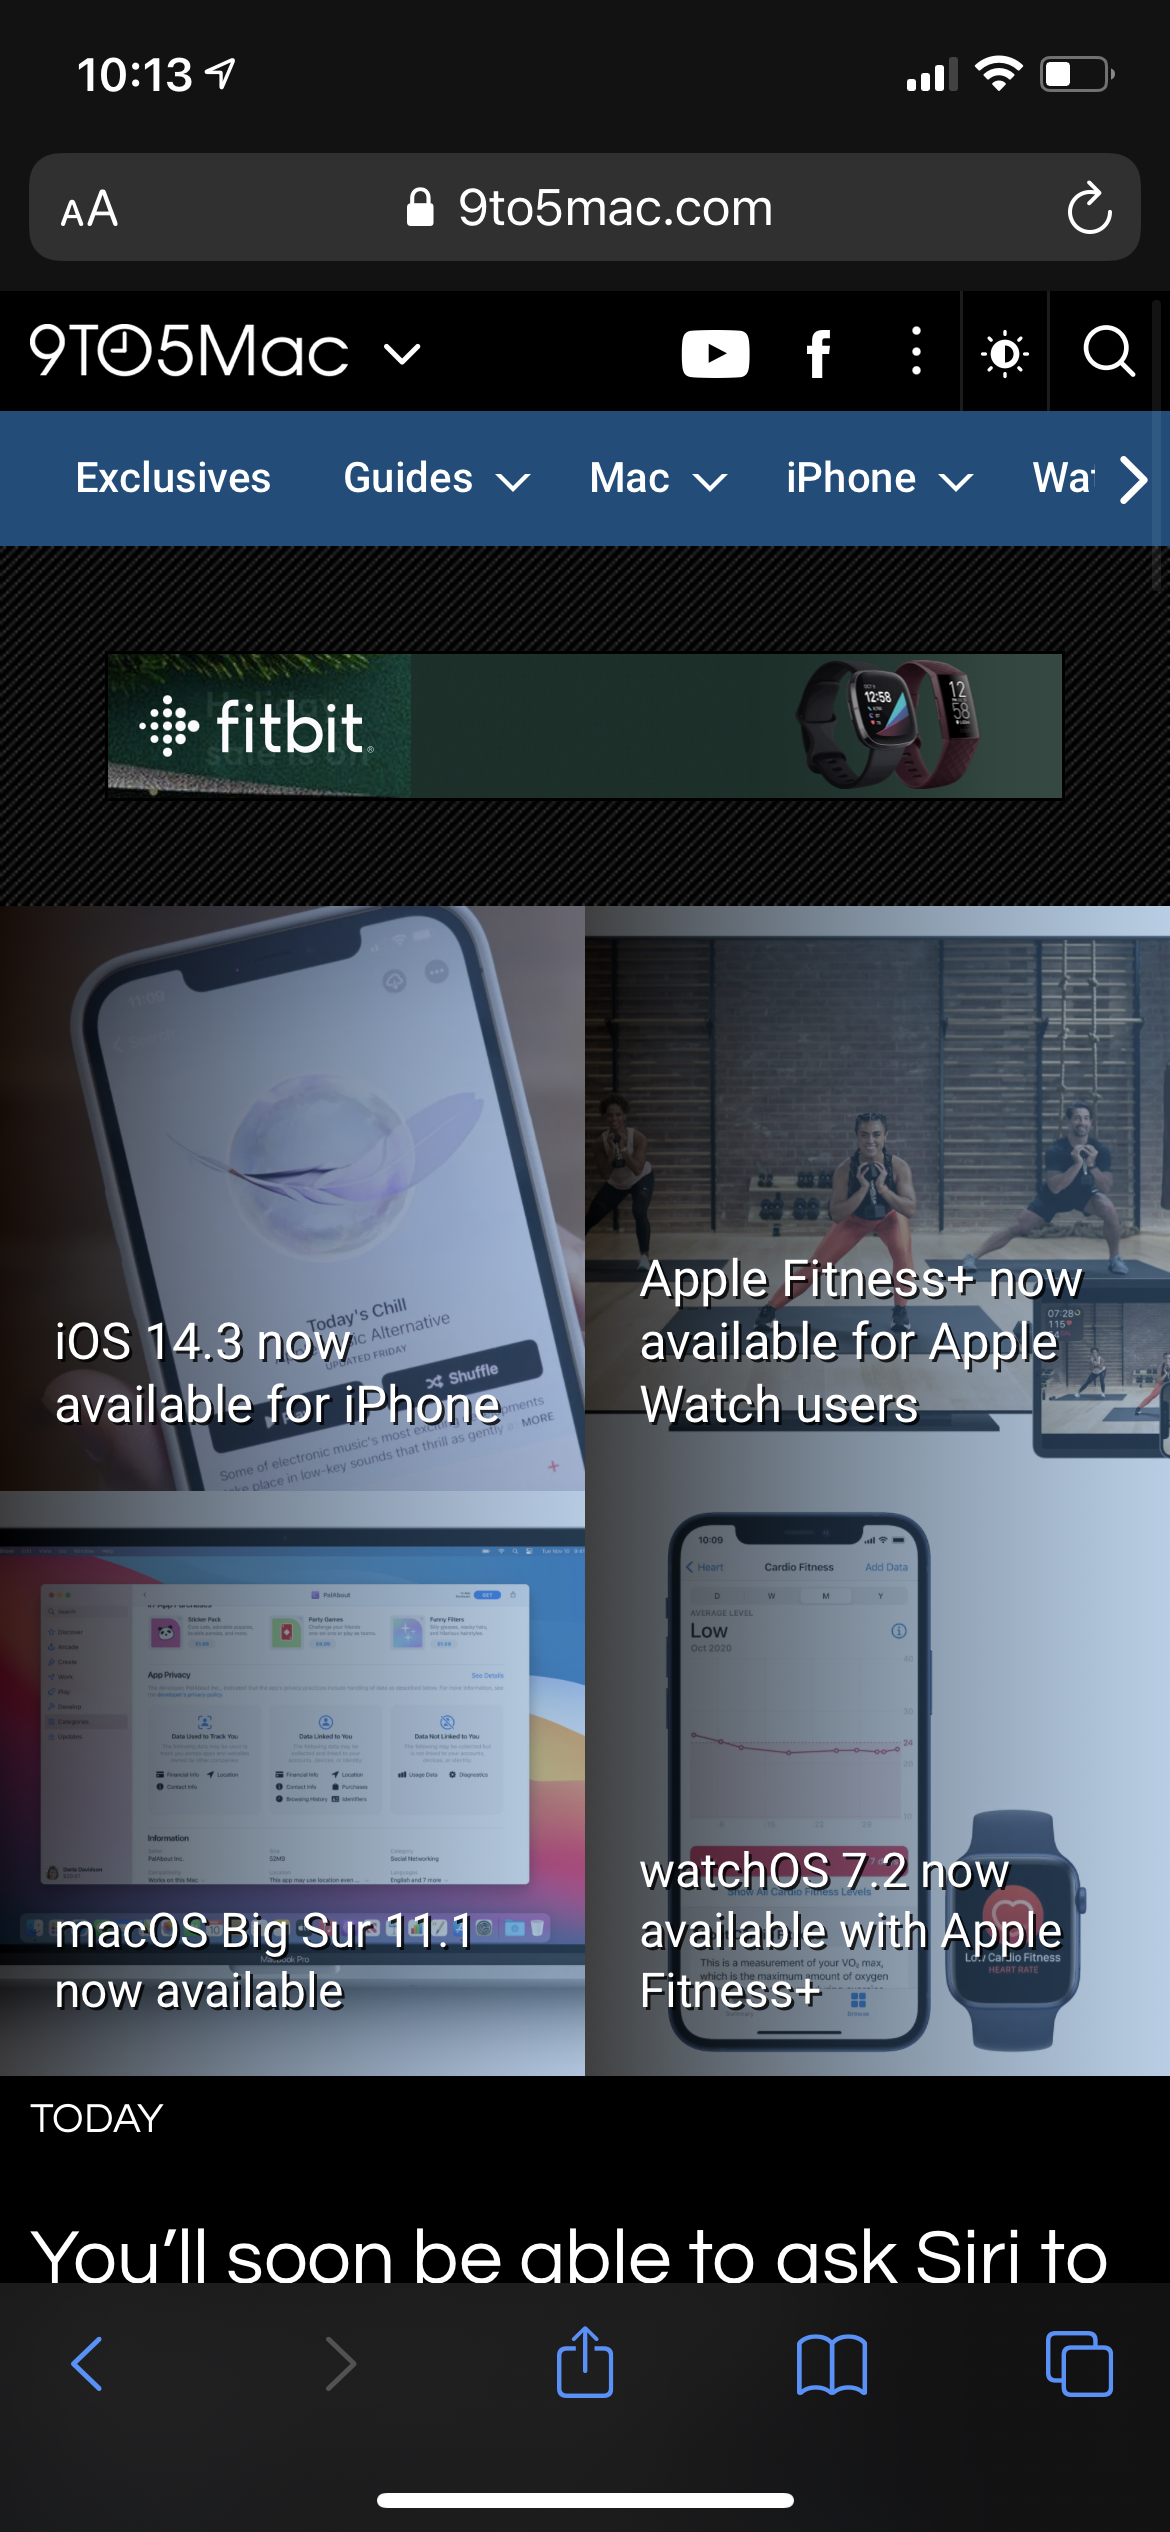
If you decide to edit or markup your screenshot, you’ll be shown the below screens. From left to right: the screen you want to screenshot, the edit/markup display, and the option to save or delete the screenshots.

The tools here are pretty self-explanatory, but here’s a quick primer if you’re unfamiliar: The top shows the undo and redo buttons, while the bottom offers various markup styles and tools, as well as a color picker. If you tap the “+” icon, you’ll also see options for adding text, a signature, a magnifier, opacity, and more.
If the page you’re screenshotting supports it (as in this example, I’m screenshotting a page in the Safari app), you’re also able to toggle between “Screen” and “Full Page”. In the case of Safari, this feature allows you to quickly save a screenshot of the entire Safari page — as if you scrolled all the way to the bottom and screenshotted it in its entirety. This can be helpful for design work or web development.
As mentioned, simply tap “Done” in the top-right corner to save your screenshots. Or, if you don’t care for them at all, you can easily delete them as well and save the headache of having to clean up your camera roll later.
How to screenshot secondary displays or CarPlay on iPhone 12
So how do you take a screenshot on your iPhone 12 or iPad with other displays attached, such as an external display via HDMI or a CarPlay? You’ll see those displays appear on this screen. To capture those, simply take a screenshot as you would normally following the instructions above and you’ll easily be able to save those screenshots (marked up or not) to your camera roll for quick sharing.
Wrap up
Taking screenshots might be a basic smartphone functionality, but at least on iOS, it has more to it than meets the eye. Let us know if you found this guide helpful or if you have any questions below.
FTC: We use income earning auto affiliate links. More.

Источник
How to take screenshots on any model of iPhone or iPad
This tutorial shows you the steps to take screenshots on any model of iPhone and iPad, including old and new ones.
About the different iPhone buttons:
- Side button: This is the button on the right side of the iPhone.
- Home button: This is the circular button on the front of the iPad or iPhone.
- Top button: This is the button on the top-right of all iPads, and smaller iPhones with a screen size of 4-inch or less (SE, 5S, and earlier).
- Volume buttons: Every iPhone has two volume buttons – Up and Down on the left side of the device. On iPad, both volume buttons are on the right side (or top-left in iPad mini 2021).
How to take a screenshot on iPhone with Face ID
Here are the steps to do a screenshot on all models of iPhone X, XR, XS, 11, 12, and 13:
- Start on the screen where you want to take the screenshot.
- Press the side button and the volume up button at the same time and release them immediately.
- The entire screen will flash white (or light gray, when in dark mode), confirming you have captured a screenshot.
How to take a screenshot on iPhone with Home button
Here’s how to do a screenshot on iPhone 6, 6s, 7, 8, iPhone SE 2020:
- Start on the screen where you want to take the screenshot.
- At the same time, press and release the side button and the Home button to capture a screenshot.
- The entire screen will flash to confirm a successful screenshot.
Please note: On iPhone SE, 5s, 5, 4s, 4, & earlier, as well as iPod touch, press the top button and the Home button to take a screenshot.
How to take a screenshot on iPad with no Home button
iPad Pro 11-inch (1st, 2nd, and 3rd generation), iPad Pro 12.9-inch (3rd, 4th, and 5th generation) have Face ID and no Home button.
iPad Air (4th generation) and iPad mini (6th generation) don’t have the Home button or Face ID.
Here’s how to take a screenshot on any iPad without the Home button:
- Start on the screen where you want to take the screenshot.
- At the same time, press and quickly release the top button and any one of the volume buttons.
Please note: On the iPad mini (6th generation), the volume buttons are on the top-left.
How to take a screenshot on iPad with Home button
All old iPad models and new affordable ones feature a circular Home button on the front of the device.
Here’s how to do a screenshot on iPads that have the Home button:
- Start on the screen where you want to take the screenshot.
- At the same time, press and quickly release the top button and the Home button to capture a screenshot.
FAQs about iPhone and iPad screenshots
Now that you know how to take a screenshot, here are some related frequently asked questions.
1. Where can I find the screenshots I take?
All screenshots you take are saved in the iPhone or iPad Photos app. Open the Photos app and tap Recents to see them. You can also scroll down in the Albums tab to see a separate section titled “Screenshots.”
2. For how long does the thumbnail remain on the screen?
After you take a screenshot, it appears as a thumbnail at the bottom of the screen. You can tap the thumbnail to edit the screenshot or share it. You can manually dismiss it by swiping away. And if you don’t do anything, it’ll automatically disappear in about 6 seconds.
3. Does a screenshot capture everything that’s on the screen?
For the most part, the iPhone screenshots capture everything except screens with a password, 2-step verification code, and such. For example, if you go to Settings > Passwords > any account and take a screenshot, the saved password and code won’t appear in the screenshot.
Similarly, if you take a screenshot of the zoomed iPhone screen, it will appear normal and zoomed out.
4. What is the file format of an iPhone screenshot?
By default, iPhone and iPad take screenshots in PNG format.
5. How to take iPhone screenshots in JPG format?
There is no setting to have the iPhone screenshots in JPEG/JPG format. But I have found a workaround to save iPhone screenshots in JPG format. Here’s how:
- After you take the screenshot, tap its thumbnail from the bottom.
- Make any tiny, almost non-visible edit (like, add a faint dot using the pencil tool).
- Finally, tap Done >Save to Photos. This iPhone screenshot will now be in JPEG format.
Related:
6. What is the average size of an iPhone screenshot?
The screenshot file size depends on what’s on the screen, the resolution of the iPhone screen, and more. For example, the screenshot size of the iPhone 11 Home Screen full of apps with the default iOS 15 wallpaper is around 3.6 MB. Whereas the screenshot of the first screen inside the Settings app is just 294 KB. In short, the iOS screenshot file size varies significantly.
7. Do iPhone screenshots show the Face ID notch?
No. The notch isn’t shown in any iPhone screenshot. The same adjacent screen colors cover the notch area in such a way that everything looks flawless as if there were no notch anywhere!
8. Can I double tap to screenshot on iPhone?
Yes. Starting with iOS 14, you can use the Back Tap feature on newer models to take a screenshot by a double or triple tap on the back of the iPhone. It works even when you have a case on. This feature isn’t available on the iPad.
9. Can I take a screenshot without pressing any button?
You can press the Side or Home button to call Siri and ask it to “take a screenshot.” If you don’t want to press any button, set up Hey Siri on your iPhone and say, “Hey Siri, take a screenshot.”
Other great posts related to screenshots:
Источник
Here’s how to take a screenshot on any generation of iPhone

The short answer is: Press the Home and Lock buttons on your phone at the same time to capture a screenshot. Unless you have an iPhone X or later, in which case it’s the Lock and Volume up buttons. For a more in-depth explanation on how to take a screenshot on an iPhone and an alternative method, read on.
Apple has made taking a screenshot on your iPhone easy. Doing so allows you to capture what is displayed on your screen as a PNG file, so you can quickly edit and share the image among friends via email, text, or on popular social networks such as Facebook and Twitter. Hell, you can even send screenshots to tech support for further analysis, or use them to make a guide rounding up various Pokemon Go tips and tricks. Regardless of the reasoning, here is everything you need to know.
Are you a MacOS user? If so, we have also have a comprehensive guide on how to take a screenshot on a Mac.
Taking screenshots with physical buttons
Step 1: Locate the necessary buttons — You will want to locate the Home button and the Lock button on your iPhone. Chances are, you probably know where these are because they’re literally the only physical buttons on the phone that aren’t the volume keys. If not, don’t sweat it. The Home button is circular and appears on the face of the phone, directly below the screen. The Home button has occupied the same real estate on every model of iPhone, except for the iPhone X. The Lock button — also known as the Sleep/Wake button — is located on the right-hand side of your phone, at least if you’re using an iPhone 6 or newer. Otherwise, it’s located on the top of your device.
If you have an iPhone X , iPhone XS, iPhone XS Max, or iPhone XR, then you will want to press the Lock (Sleep/Wake) button on the right side and the Volume up button on the left side.
Step 2: Capture the screenshot — Press the Home and Lock buttons at the same time when you see what you want to capture (or the Volume up and Lock buttons on the iPhone X or later). The iPhone display will then briefly flash white, signaling that the screen capture worked correctly. You will also hear a faint shutter noise, so long as your device isn’t in silent mode.

If you press the Lock button a fraction of a second before the Home button, your iPhone’s screen will turn off. If you press and hold the Home button for too long, then you will activate Siri. Timing is everything here, so if this is your first rodeo you may have to try it a couple of times to get the timing right.
Step 3: Edit the screenshots — Once you successfully capture the screenshot, a small preview appears in the bottom-left corner of your screen. This preview will automatically disappear in about five seconds, but you can also swipe it to the left to dismiss it. Tapping the thumbnail will allow you to crop or magnify the image, or mark it up with a pen and various shapes. When you’re finished making edits, tap Done in the upper-left corner, and choose whether you would like to Save to Photos or Delete Screenshot.
Источник


