- If you forgot your iPhone passcode
- Step 1: Make sure that you have a computer (Mac or PC)
- Step 2: Turn off your iPhone
- Step 3: Put your iPhone in recovery mode
- Step 4: Restore your iPhone
- Need more help?
- Restore your iPhone, iPad, or iPod to factory settings
- Get your device ready
- Restore your device to factory settings
- If you can’t access a computer
- How to Factory Reset an iPhone
- Are you planning to sell or give away your iPhone? Do this first
- What to Know
- How to Factory Reset an iPhone
- Back Up Your Data Before Starting Factory Resetting
- Back up to iTunes
- Back up Using Finder
- Back up to iCloud
- Disable iCloud & Find My iPhone Before Factory Resetting
- How to factory reset an iPhone
- How to factory reset an iPhone using iCloud
- Step 1: Prepare your iPhone by backing up first
- Step 2: Access the Reset menu
- Step 3: Reset your iPhone
- Step 4: Restore your iPhone
- How to factory reset an iPhone using iTunes (the old way)
- Step 1: Prepare your iPhone for restoration
- Step 2: Restore your iPhone
- Step 3: Ensure the phone was restored
- What do all those different reset options mean?
- Reset All Settings
- Erase All Content and Settings
- Reset Network Settings
- Reset Keyboard Dictionary
- Reset Home Screen Layout
- Reset Location & Privacy
If you forgot your iPhone passcode
Forgot your iPhone passcode? Learn how to get your iPhone into recovery mode so you can erase it and set it up again.
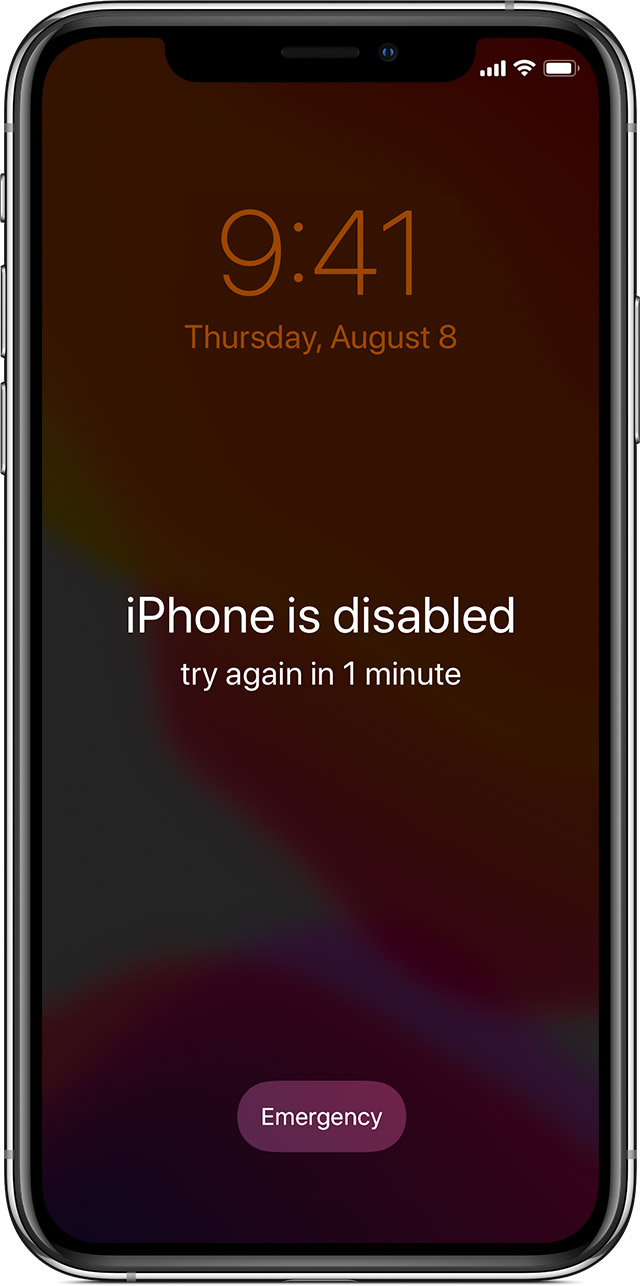
If you enter the wrong passcode on your iPhone Lock Screen too many times, an alert lets you know that your iPhone is disabled. If you can’t remember your passcode when you try again, you need to use a computer to put your iPhone in recovery mode. This process deletes your data and settings, including your passcode, giving you access to set up your iPhone again.
After you erase your iPhone, you can restore your data and settings from backup. If you didn’t back up your iPhone, you can set it up as a new device and then download any data that you have in iCloud.
![]()
Step 1: Make sure that you have a computer (Mac or PC)
This process requires a Mac or PC. If you’re using a PC, make sure that it has Windows 8 or later, and that iTunes is installed. You also need the cable that came with your iPhone, or another compatible cable, to connect your iPhone to the computer.
If you don’t have a computer and you can’t borrow one, you need to go to an Apple Retail Store or Apple Authorized Service Provider for help.

Step 2: Turn off your iPhone
- Unplug your iPhone from the computer if it’s connected.
- Turn off your iPhone using the method for your iPhone model:
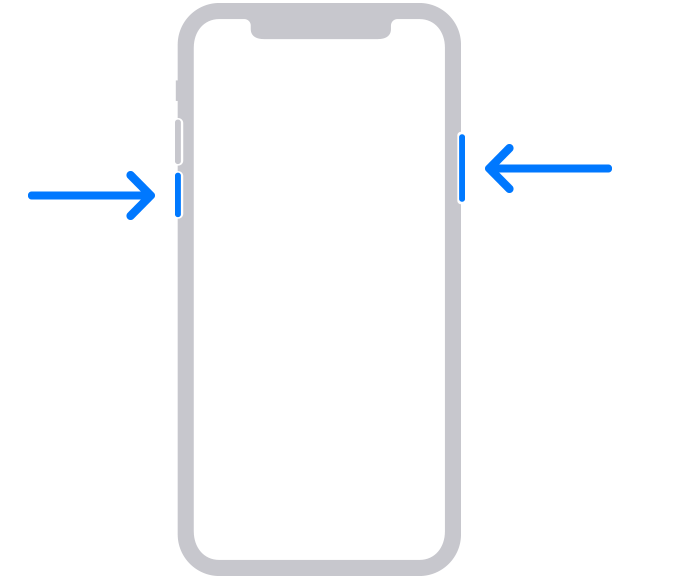
- iPhone X or later, iPhone SE (2nd generation), iPhone 8, and iPhone 8 Plus: Press and hold both the Side button and the Volume down button until the power off slider appears.

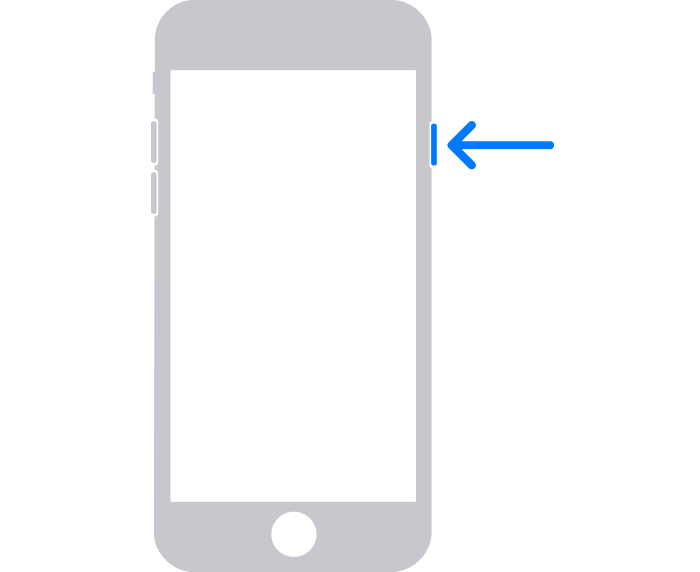
- iPhone 7 and iPhone 7 Plus: Press and hold the Side button until the power off slider appears.
- iPhone SE (1st generation), and iPhone 6s and earlier: Press and hold the Side (or Top) button until the power off slider appears.
- iPhone X or later, iPhone SE (2nd generation), iPhone 8, and iPhone 8 Plus: Press and hold both the Side button and the Volume down button until the power off slider appears.
- Drag the slider to turn off your iPhone, then wait a minute to make sure that it turns off completely.

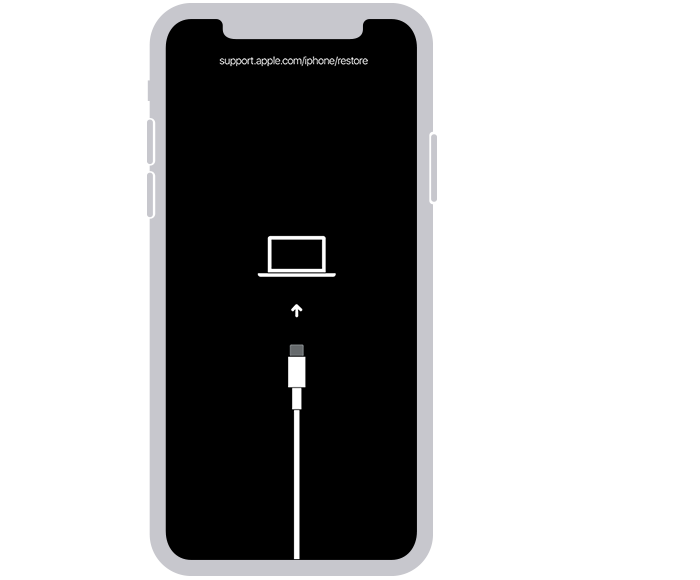
Step 3: Put your iPhone in recovery mode
- Get ready by finding the button on your iPhone that you’ll need to hold in the next step:
- iPhone X or later, iPhone SE (2nd generation), iPhone 8, and iPhone 8 Plus use the Side button.
- iPhone 7 and iPhone 7 Plus use the Volume down button.
- iPhone SE (1st generation), and iPhone 6s and earlier use the Home button.
- Press and hold the correct button for your iPhone while immediately connecting your iPhone to the computer. Don’t let go of the button.
- Keep holding the button until you see the recovery mode screen on your iPhone, then let go.
If you see the passcode screen, you need to turn off your iPhone and start again.
If you can’t get your iPhone to show the recovery mode screen and you need help, contact Apple Support.
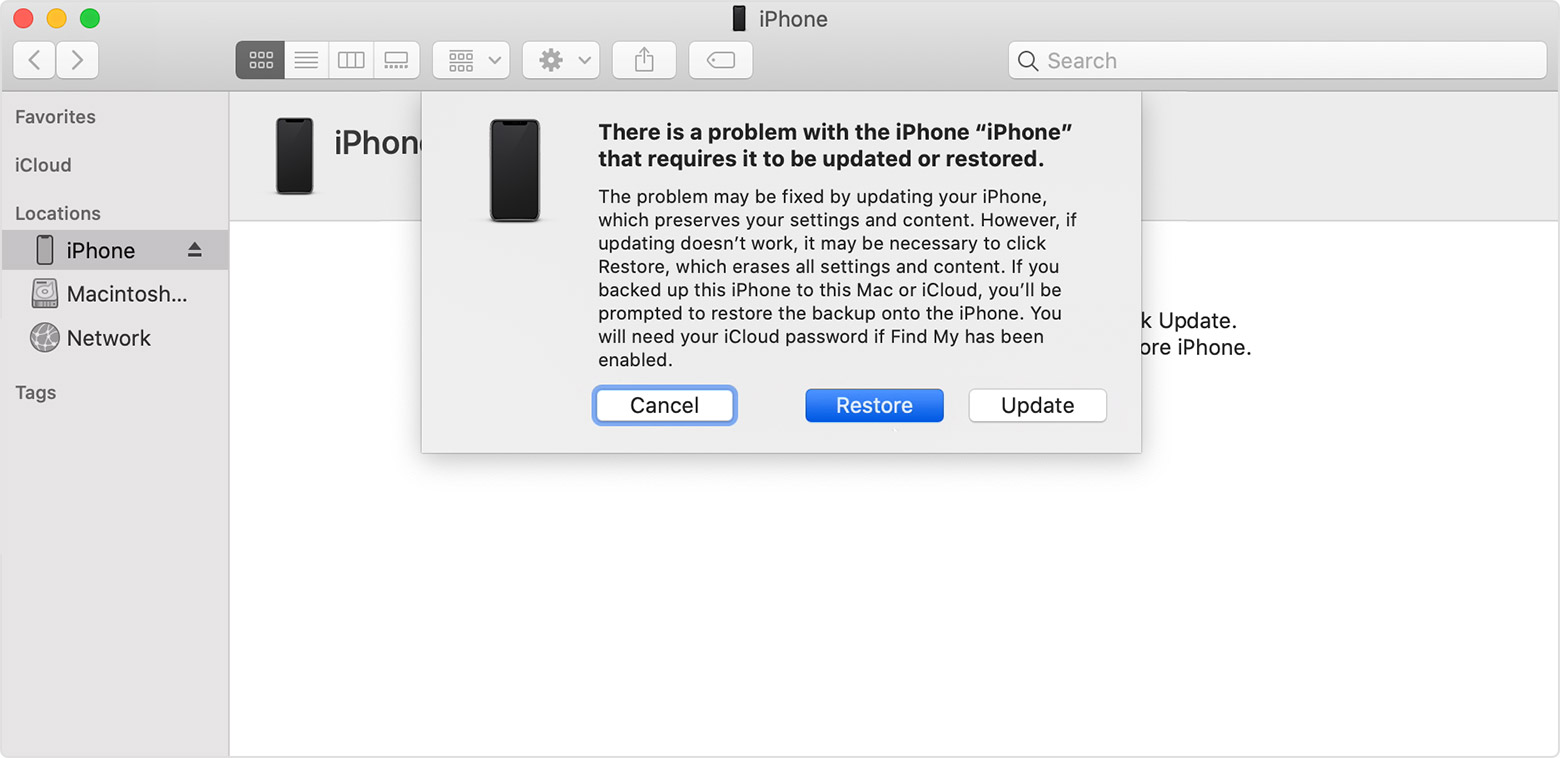
Step 4: Restore your iPhone
- Locate your iPhone in the Finder or in iTunes on the computer that it’s connected to. (Learn how to find your connected iPhone.)
- Choose Restore when you see the option to Restore or Update. Your computer downloads software for your iPhone and begins the restore process. If the download takes more than 15 minutes and your device exits the recovery mode screen, let the download finish, then turn off your iPhone and start again.
- Wait for the process to finish.
- Disconnect your iPhone from the computer, then set up and use your iPhone.
Need more help?
If you can’t complete any of these steps, if you’re still prompted for a passcode, or if you need any other assistance, contact Apple Support.
Источник
Restore your iPhone, iPad, or iPod to factory settings
A factory restore erases the information and settings on your iPhone, iPad, or iPod and installs the latest version of iOS, iPadOS, or iPod software.
Get your device ready
- Make sure that your Mac or PC is updated. If you’re using iTunes, make sure that you have the latest version.
- If you want to save the information on your iPhone, iPad, or iPod, make a backup.
- Go to Settings > [your name] > Find My, tap Find My iPhone, then turn it off. Learn what to do for an unresponsive device or one that won’t turn on. Get help if you forgot your passcode.
Restore your device to factory settings
- On a Mac with macOS Catalina or later, open the Finder. On a Mac with macOS Mojave or earlier, or on a PC, open iTunes. Find out which macOS your Mac is using.
- Connect your device to your computer.
- If a message asks for your device passcode or to Trust This Computer, follow the onscreen steps. Get help if you forgot your passcode.
- Select your device when it appears on your computer. Learn what to do if your iPhone, iPad, or iPod touch is unresponsive or won’t turn on. Or get help if your device doesn’t appear on your computer.
- Click Restore [device]. If you’re signed into Find My, you need to sign out before you can click Restore.
- Click Restore again to confirm. Your computer erases your device and installs the latest iOS, iPadOS, or iPod software.
- After your device restores to factory settings, it restarts. Now you can set it up as new.

If you can’t access a computer
If you can’t access a computer and your device still works, you can erase and restore your device without a computer.
Источник
How to Factory Reset an iPhone
Are you planning to sell or give away your iPhone? Do this first
:max_bytes(150000):strip_icc()/SamCostello-d7fcf106ec2048ccb06d1e2190b3396d.jpg)
What to Know
- Go to Settings >General >Reset >Erase All Content and Settings. Enter the passcode, read the warning, then choose Erase.
- To disable iCloud and Find My iPhone, go to Settings > [Your name] >iCloud >Find My iPhone. Toggle off, then sign out of your Apple ID.
- Always back up your data before doing a factory reset on an iPhone. Otherwise, you will lose your data.
A factory reset returns your iPhone to the condition it was in when it originally left the factory—with all your data gone. In this guide, we show you how to perform a factory reset on all iPhone models with iOS 12 and later, as well as how to disable iCloud and Find My iPhone, which is important to do before a factory reset in some situations explained below.
How to Factory Reset an iPhone
After you’ve backed up your data and turned off iCloud and Find My, you’re ready to get started. Follow these steps to factory reset your iPhone to its original state:
Tap Settings.
Scroll down and tap General.
Scroll to the bottom and tap Reset.
On the Reset screen, tap Erase All Content and Settings.
:max_bytes(150000):strip_icc()/004_how-to-restore-iphone-to-factory-settings-2000277-5c40002a46e0fb0001462211.jpg)
The screen displays a warning that all music, other media, data, and settings will be erased. Tap Erase to continue.
If you don’t want to restore the phone to its factory default state, tap Cancel.
It takes a few minutes to delete everything from the iPhone. When the process is done, the iPhone restart and the iPhone has been reset to factory settings.
If you’re selling your iPhone or sending it in for repairs, a factory reset protects your personal data and photos from prying eyes.
Back Up Your Data Before Starting Factory Resetting
When you factory reset an iPhone, you remove all data from it. That means you will lose all your music, apps, contacts, photos, and any other other data on the device. All that will be left is the iOS and the pre-installed apps.
That’s why it’s crucial to back up your data before you perform a factory reset. Keeping a copy of your data lets you restore the data from a back up later so you don’t lose anything important.
There are three options to back up data: using iTunes, Finder, or iCloud.
Back up to iTunes
To back up to iTunes, sync the phone to your computer, then click the Back up button on the main iPhone page.
Back up Using Finder
To back up on a Mac running macOS Catalina (10.15) or newer, plug the iPhone into the computer, open a Finder window, select the iPhone in the left-hand Devices menu, and back Back Up.
Back up to iCloud
To back up to iCloud, go to Settings > [your name] (skip this step on earlier versions of the iOS) > iCloud > iCloud Backup, then start a backup.
For more detailed instructions on backing up your iPhone, check out How to Backup Your iPhone 7 or How to Back Up iPhone X (despite the titles, the tips apply to all models).
Disable iCloud & Find My iPhone Before Factory Resetting
When factory resetting your iPhone, it’s also critical that you disable iCloud and Find My iPhone. A security feature called Activation Lock requires you to enter the Apple ID used to set up the phone if you want to reset it. The feature is disabled when you turn off iCloud/Find My iPhone.
Activation Lock has reduced iPhone thefts since it makes a stolen iPhone harder to use. If you do not disable Activation Lock, the next person who gets your iPhone—either a buyer or repair person—will not be able to use it.
Tap Settings.
Tap your name (skip this step on earlier versions of the iOS).
Tap iCloud > Find My iPhone > Find My iPhone. (On iOS 13 and up, skip iCloud and just tap Find My.)
:max_bytes(150000):strip_icc()/002_how-to-restore-iphone-to-factory-settings-2000277-5c400092c9e77c00019961d6.jpg)
Move the Find My iPhone slider to off/white.
Tap Find My in the top left corner to go back one screen. Then tap Apple ID to go back one more screen.
Scroll to the bottom of the screen and tap Sign Out.
If prompted, enter your Apple ID/iCloud password.
:max_bytes(150000):strip_icc()/003_how-to-restore-iphone-to-factory-settings-2000277-5c40000246e0fb0001281d83.jpg)
If you’re factory resetting your iPhone because you’re going to sell it, we have some suggestions for sites that offer the best price for your device.
Источник
How to factory reset an iPhone


At some point in a device’s life, comes the time of the dreaded memory wipe. This could be because you’re parting company, and you want to make sure it’s clean of any of your personal data. Or it could simply be that it’s become old and creaky, and it’s struggling under the weight of its years — and it desperately needs a new lease of life. In those cases, a factory reset is a useful option.
However, it’s something of a nuclear option — and if you don’t do it properly, you could lose all your data and, in the worst cases, break your iPhone. There’s a right way and a wrong way to reset your phone. We’ll show you exactly what you need to do so you don’t lose everything, including how best to back up your precious data before you begin.
Is your iPhone frozen or not responding? Follow our guide on how to reset an iPhone so that you can get back up and running again. You should also check out our troubleshooting guide, because there are many steps you can take to fix problems with your iPhone even if a factory reset doesn’t fix your issue.
How to factory reset an iPhone using iCloud

Whether you have an iPhone 12 Mini, iPhone 11 Pro, an iPhone SE (2020), or an even older model, like the iPhone 4 or 5, the easiest way to factory reset your iPhone is to use iCloud.
Step 1: Prepare your iPhone by backing up first


Apple’s iCloud is turned on by default nowadays when you sign in with your Apple ID. To decide what you want to back up, go to Settings > [Your Name] > iCloud — or go to Settings > iCloud in some older versions of iOS — and toggle on the items you’d like to back up. We recommend you choose to back up almost everything, but especially your Photos, Mail, Contacts, and Notes because the factory reset will wipe the lot.


Once you have toggled your picks on, scroll down and tap on iCloud Backup then toggle it On (if it isn’t already) and tap Back Up Now. Bear in mind that you’ll need to be connected to Wi-Fi and that it may take a while to complete the backup.
For more detailed instructions, check out our guide on how to use iCloud to back up your iPhone.
Alternatively, you can use your PC or laptop. Connect your iPhone to your computer via USB and click the gray Back Up Now button when viewing the Summary tab for your given device in iTunes. If you have a Mac running Catalina, look in Finder under the Devices or Locations tab.
Step 2: Access the Reset menu


Tap the main Settings icon when viewing the home screen, select General from the resulting menu, and tap the Reset button at the bottom of the page.
Step 3: Reset your iPhone


Tap the blue Erase All Content and Settings option near the top. If you haven’t backed up as we suggested, then you’ll be prompted to do so. You’ll then be prompted to enter your passcode. Tap the red Erase iPhone option in the resulting pop-up window to confirm your decision.
Step 4: Restore your iPhone
Once the reset process is complete — a process that may take up to several minutes — check to ensure your phone has been restored to its original factory settings. If done correctly, you’ll once again be presented with the iOS Setup Assistant upon startup.
You’ll have to log in and set up your iPhone from scratch once it has been factory reset. The prompts will ask you whether you want to restore from your iCloud account, set up a completely fresh phone without any of your previous settings, or use iTunes and a PC to put your old content onto the phone again.
If you’re interested in what all the iPhone Reset options mean, then skip to the last page of this article. If you want to perform a factory reset using iTunes, read on.
How to factory reset an iPhone using iTunes (the old way)

Performing a factory reset on an iPhone — whether it’s a 4S or an iPhone 11 Pro Max — is easier when you use iCloud and reset directly from the device, but you can still use Apple’s aging iTunes with a PC. This is useful if you have traditionally used this method and are a longtime iPhone owner.
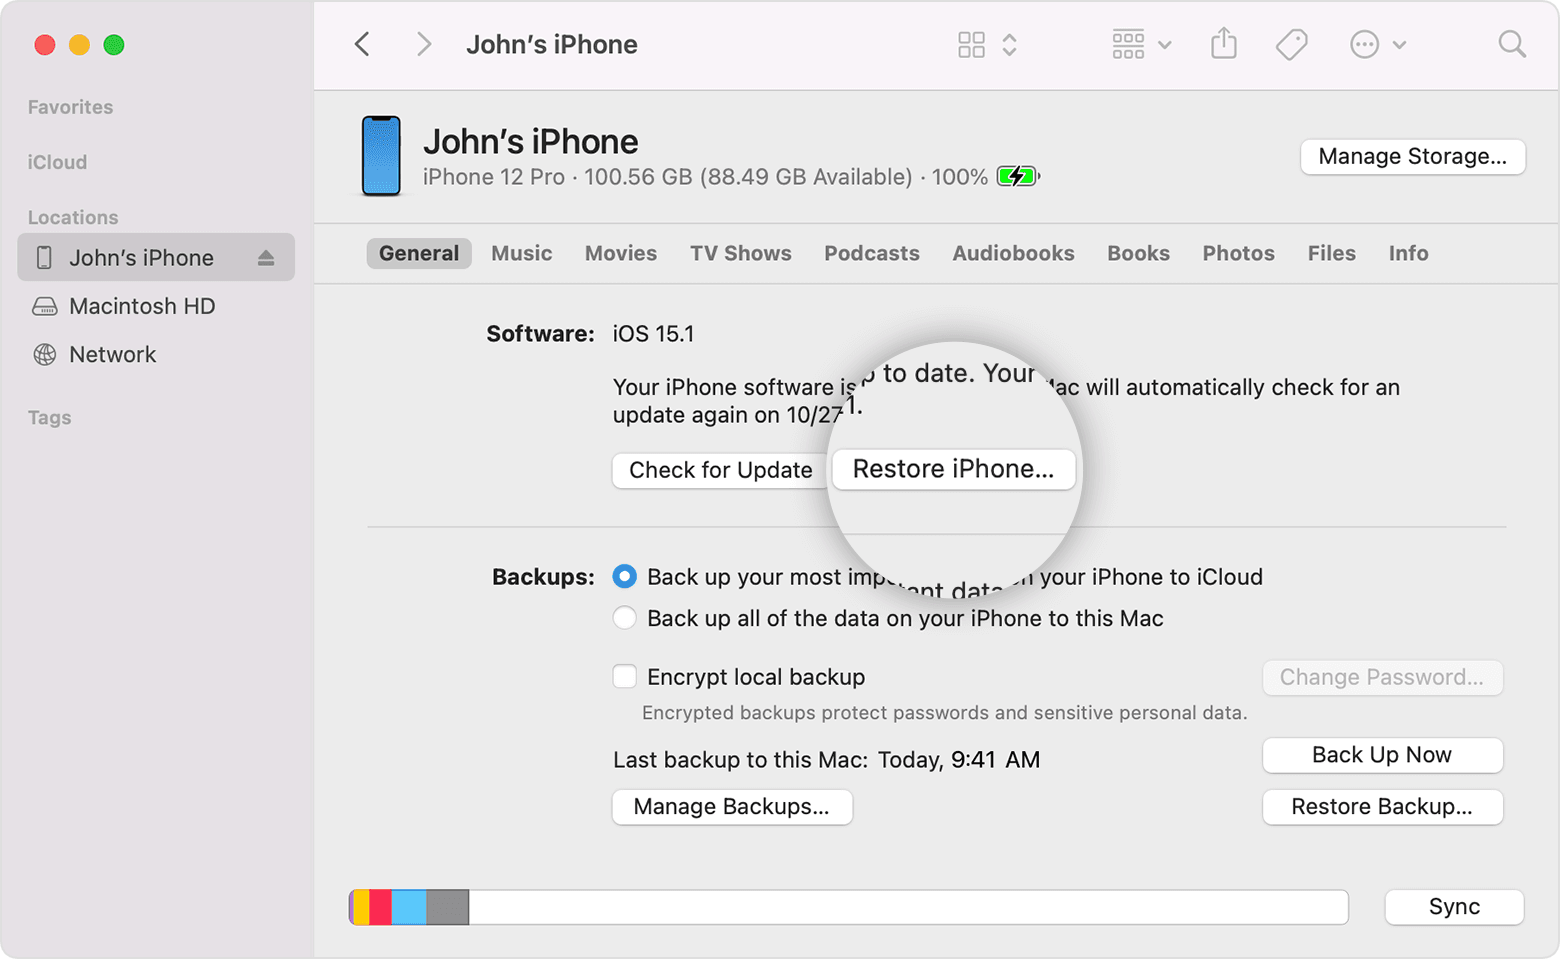
Apple has retired iTunes for MacOS, so if you’re running MacOS Catalina or a later, syncing on Mac computers will be handled via the Finder. You’ll find your connected iPhone under the Devices or Locations tab. The layout is much the same as your iPhone tab on iTunes, so the following instructions should work just fine. You can also still use iTunes on Windows computers or older Macs.
Step 1: Prepare your iPhone for restoration
First, launch iTunes as you would normally. If you’re on a Mac, click the iTunes menu located on the left side of the main toolbar, and if you’re on Windows, click the Help menu on the right. Select Check for Updates from the resulting drop-down menu, and ensure you have the latest version of iTunes. If not, download and install the latest version. If you’re using a Mac running Catalina, open the Finder instead. Afterward, connect your iPhone to your computer via USB and click the gray Back Up Now button when viewing the Summary tab for your given device. Alternatively, follow our guide on how to use iCloud to back up the device to Apple’s remote servers. Although backing up your device is not necessary, doing so will store your photos, apps, contacts, settings, and other data so you can automatically restore other iOS devices from the backup down the line.

If you’re using an iPhone 4S or a newer device, you’ll have to disable Find My iPhone. To do so, tap the main Settings icon when viewing the home screen, select iCloud, and tap Find My iPhone. Then, toggle the slider at the top to disable the feature if you haven’t done so already.
Step 2: Restore your iPhone
Once the backup is complete, click the gray Restore iPhone button when viewing the Summary tab for your given device. Click the Restore button in the resulting pop-up window to confirm your decision, and if prompted, click Agree to accept the software license agreement and begin downloading the necessary iOS software file before restoring.

Step 3: Ensure the phone was restored
Once the restoration process is complete — a process that may take up to several minutes — check to ensure your phone has been restored to its original factory settings. If done correctly, you’ll once again be presented with the iOS Setup Assistant upon startup, from which you can then restore your phone from a backup or continue the process as if you were setting it up anew. It’s like it just came off the assembly line all over again.
 Andrew Martonik/Digital Trends
What do all those different reset options mean?
When you’re resetting your iPhone, iOS presents you with a host of different options, and it can be confusing deciding which ones to choose. Usually, you’ll want to perform the aforementioned factory reset, but here’s an explanation of what the other options do so that you can choose the best reset for your needs.
Note: If you are selling your phone or turning it over to someone else, the only one that safely erases everything and takes your phone back to its original state is Erase All Contents and Settings.
Reset All Settings
If you choose this option, you won’t lose all your data, but you will lose your settings and Wi-Fi passwords. Manual settings will disappear, sure, but you’ll still have your pictures, apps, and other content.
Erase All Content and Settings
This is the option we described at the start of this post, which erases everything from your device. Your settings, pictures, apps, and other data will vanish for good — unless you’ve backed up your content.
Reset Network Settings
Sometimes you just need to refresh your network settings to set up a better connection. Choosing this option resets your network settings, flushes the cache, and deletes any temporary files you have stored on your device. It’s great for those who are experiencing trouble with various Wi-Fi connections.
Reset Keyboard Dictionary
While it can often lead to a good laugh, more times than not, your iPhone’s autocorrect system hopelessly botches a sentence or word that was fine in its original form. There is still hope if you’re constantly getting typo suggestions and irrelevant words when typing messages. There is a simple resolution to autocorrect failures that involves wiping your keyboard dictionary’s history.
Reset Home Screen Layout
Many users enjoy installing and rearranging apps on their smartphone’s home screen. If you get bored of the same old format, you have a surefire way to make a sporadic yet drastic change. Resetting is a great option if you want to return to your iPhone home screen’s factory default layout.
Reset Location & Privacy
Oftentimes when you’re pushing a bunch of buttons and experimenting with your settings, you can accidentally cause problems. If you need to reinstate your phone’s initial privacy and location settings, you may want to consider this reset. You don’t have to worry about losing any other information in the process.
Источник


