- What to do before you sell, give away, or trade in your Mac
- Should you use these steps?
- Back up or transfer your files
- Sign out of iTunes
- Sign out of iCloud
- Sign out of iMessage
- Reset NVRAM
- Optional: Unpair Bluetooth devices that you’re keeping
- Erase your Mac and reinstall macOS
- Use iTunes to sync your iPhone, iPad, or iPod with your computer
- What you can sync with iTunes
- Sync or remove content using iTunes
- Sync your content using Wi-Fi
- Locate and view your connected device on your computer
- View your device in the Finder
- View your device in iTunes
- What to do before you sell, give away, or trade in your Mac
- Should you use these steps?
- Back up or transfer your files
- Sign out of iTunes
- Sign out of iCloud
- Sign out of iMessage
- Reset NVRAM
- Optional: Unpair Bluetooth devices that you’re keeping
- Erase your Mac and reinstall macOS
- Locate backups of your iPhone, iPad, and iPod touch
- Find backups stored on your Mac or PC
- Search for the backup folder on your Mac
- Search for the backup folder on Windows 7, 8, or 10
- Delete or copy backups on your Mac or PC
- Copy backups to another location
- Delete backups
- Locate and manage backups stored in iCloud
What to do before you sell, give away, or trade in your Mac
To prepare your Mac for a new owner, use these steps restore it to factory settings.
Should you use these steps?
If you’ve upgraded to macOS Monterey on a Mac with Apple silicon or a Mac with the Apple T2 Security Chip, follow the steps to erase all content and settings instead of the steps in this article.
For any other Mac or macOS, follow the steps below.
Back up or transfer your files
Use an external storage device to back up your files, or use Migration Assistant to move your files to your new Mac.
Sign out of iTunes
If using macOS Catalina or later, you can skip this step.
Open iTunes. From the menu bar at the top of the screen or iTunes window, choose Account > Authorizations > Deauthorize This Computer. Then enter your Apple ID and password and click Deauthorize. Learn more about deauthorizing.
Sign out of iCloud
If using macOS Catalina or later, choose Apple menu > System Preferences, then click Apple ID. Select Overview in the sidebar, then click Sign Out.
If using an earlier version of macOS, choose Apple menu > System Preferences, click iCloud, then click Sign Out.
You will be asked whether to keep a copy of your iCloud data on this Mac. You can keep a copy, because you’re erasing your Mac later. Your iCloud data remains in iCloud and on any other devices that are signed in to iCloud with your Apple ID.
Sign out of iMessage
Open the Messages app, then choose Messages > Preferences from the menu bar. Click iMessage, then click Sign Out.
Reset NVRAM
If using a Mac with Apple silicon, you can skip this step.
Shut down your Mac, then turn it on and immediately press and hold these four keys together: Option, Command, P, and R. Release the keys after about 20 seconds. This clears user settings from memory and restores certain security features that might have been altered. Learn more about resetting NVRAM .
Optional: Unpair Bluetooth devices that you’re keeping
If your Mac is paired with a Bluetooth keyboard, mouse, trackpad, or other device that you plan to keep, you can unpair it. This optional step prevents accidental input when the Mac and device have separate owners but remain in Bluetooth range. If you do this on a Mac that doesn’t have a built-in keyboard or trackpad, you will need to plug in a USB keyboard and mouse to complete the remaining steps.
To unpair a Bluetooth device, choose Apple menu > System Preferences, then click Bluetooth. Move your pointer over the device that you want to unpair, then click the remove (x) button next to the device name.
Erase your Mac and reinstall macOS
Follow the steps to erase your Mac and reinstall macOS. After macOS installation is complete, your Mac restarts to a setup assistant. To leave the Mac in an out-of-box state, press Command-Q to shut down instead of continuing setup.
No matter the model or condition, we can turn your device into something good for you and good for the planet: Learn how to trade in or recycle your Mac with Apple Trade In.
Источник
Use iTunes to sync your iPhone, iPad, or iPod with your computer
Learn how to sync music, movies, and more using iTunes on your Mac or PC.
If you’re using macOS Mojave or earlier or a Windows PC, use iTunes to sync content to your devices. Before you use iTunes to sync content to your iOS or iPadOS device, consider using iCloud, Apple Music, or similar services to keep content from your Mac or PC in the cloud. This way, you can access your music, photos, and more on your devices when you aren’t near your computer. Learn more about using Apple Music or iCloud Photos instead of iTunes.
If you use iCloud or other services like Apple Music to keep your content up-to-date across all of your devices, some syncing features through iTunes might be turned off.
What you can sync with iTunes
- Albums, songs, playlists, movies, TV shows, podcasts, and audiobooks.
- Photos and videos.
- Contacts and calendars.
iTunes features might vary by country or region.
Sync or remove content using iTunes
- Open iTunes and connect your device to your computer with a USB cable.
- Click the device icon in the upper-left corner of the iTunes window. Learn what to do if you don’t see the icon.

- From the list under Settings on the left side of the iTunes window, click the type of content that you want to sync or remove. * To turn syncing on for a content type, select the checkbox next to Sync.
- Select the checkbox next to each item that you want to sync.
- Click the Apply button in the lower-right corner of the window. If syncing doesn’t start automatically, click the Sync button.


* You can only sync your device with one iTunes library at a time. If you see a message that your device is synced with another iTunes library, your device was previously connected to another computer. If you click «Erase and Sync» in that message, all content of the selected type on your device will be erased and replaced with content from this computer.
Sync your content using Wi-Fi
After you set up syncing with iTunes using USB, you can set up iTunes to sync to your device with Wi-Fi instead of USB.
- Connect your device to your computer with a USB cable, then open iTunes and select your device. Learn what to do if your device doesn’t appear on your computer.
- Click Summary on the left side of the iTunes window.
- Select «Sync with this [device] over Wi-Fi.»
- Click Apply.
When the computer and the device are on the same Wi-Fi network, the device appears in iTunes. The device syncs automatically whenever it’s plugged in to power and iTunes is open on the computer.
Источник
Locate and view your connected device on your computer
After you connect your iPhone, iPad, or iPod to your computer, you can view it and access its settings in the Finder or iTunes.
View your device in the Finder
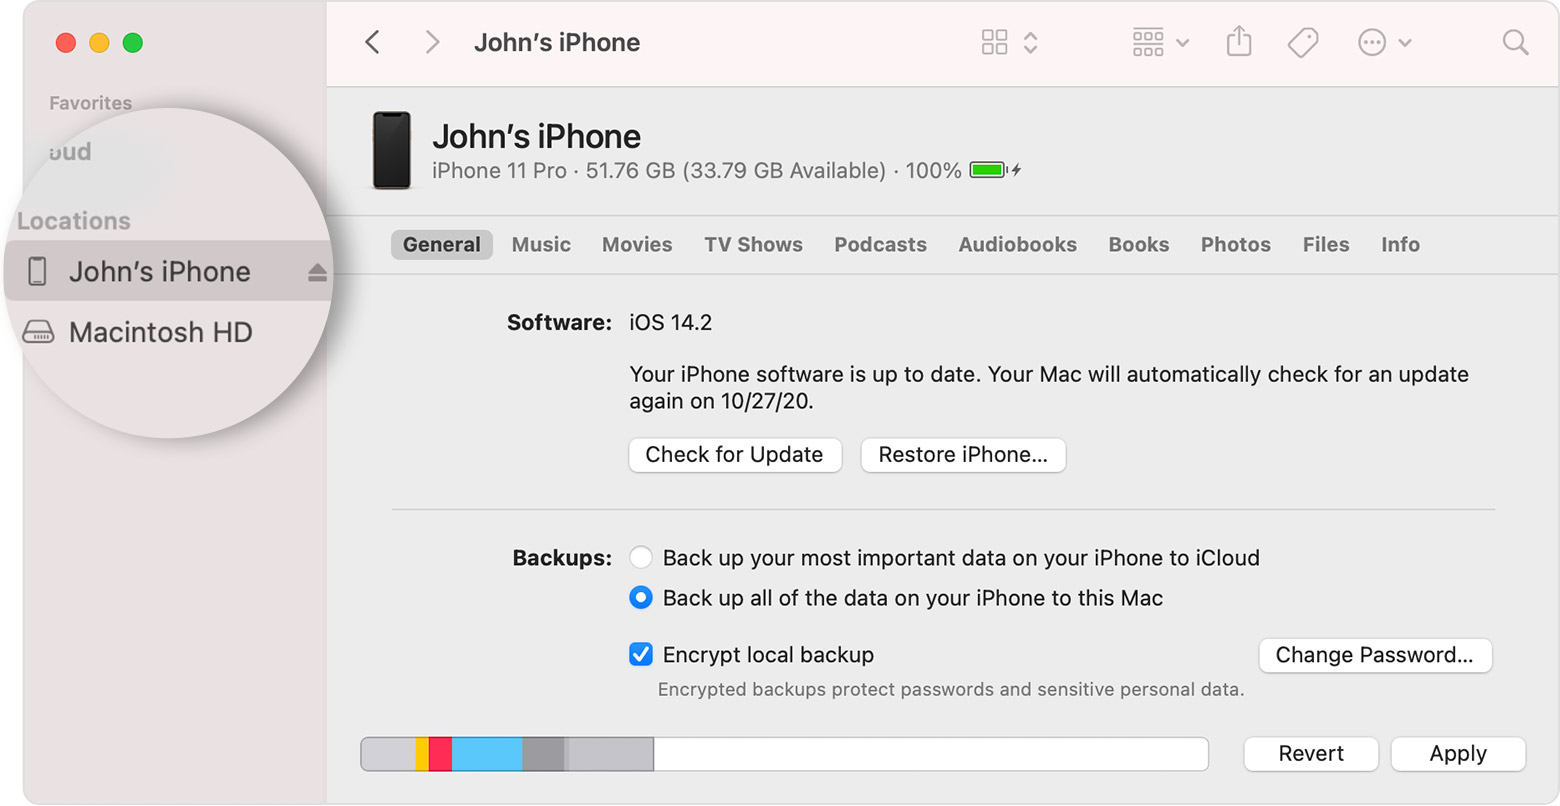
Starting with macOS Catalina, your devices appear in the sidebar of the Finder. Click the device to select it.
View your device in iTunes
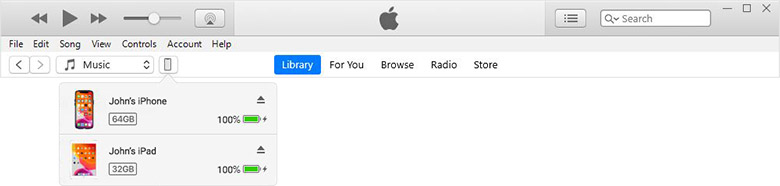
Make sure that you have the latest version of iTunes. If you’re using Windows or macOS Mojave or earlier, your device will show in the upper-left corner of the iTunes window. If you don’t see your device on your computer, learn what to do.

If you have multiple devices connected to your computer, click the device icon, then choose your device from the menu.
Information about products not manufactured by Apple, or independent websites not controlled or tested by Apple, is provided without recommendation or endorsement. Apple assumes no responsibility with regard to the selection, performance, or use of third-party websites or products. Apple makes no representations regarding third-party website accuracy or reliability. Contact the vendor for additional information.
Источник
What to do before you sell, give away, or trade in your Mac
To prepare your Mac for a new owner, use these steps restore it to factory settings.
Should you use these steps?
If you’ve upgraded to macOS Monterey on a Mac with Apple silicon or a Mac with the Apple T2 Security Chip, follow the steps to erase all content and settings instead of the steps in this article.
For any other Mac or macOS, follow the steps below.
Back up or transfer your files
Use an external storage device to back up your files, or use Migration Assistant to move your files to your new Mac.
Sign out of iTunes
If using macOS Catalina or later, you can skip this step.
Open iTunes. From the menu bar at the top of the screen or iTunes window, choose Account > Authorizations > Deauthorize This Computer. Then enter your Apple ID and password and click Deauthorize. Learn more about deauthorizing.
Sign out of iCloud
If using macOS Catalina or later, choose Apple menu > System Preferences, then click Apple ID. Select Overview in the sidebar, then click Sign Out.
If using an earlier version of macOS, choose Apple menu > System Preferences, click iCloud, then click Sign Out.
You will be asked whether to keep a copy of your iCloud data on this Mac. You can keep a copy, because you’re erasing your Mac later. Your iCloud data remains in iCloud and on any other devices that are signed in to iCloud with your Apple ID.
Sign out of iMessage
Open the Messages app, then choose Messages > Preferences from the menu bar. Click iMessage, then click Sign Out.
Reset NVRAM
If using a Mac with Apple silicon, you can skip this step.
Shut down your Mac, then turn it on and immediately press and hold these four keys together: Option, Command, P, and R. Release the keys after about 20 seconds. This clears user settings from memory and restores certain security features that might have been altered. Learn more about resetting NVRAM .
Optional: Unpair Bluetooth devices that you’re keeping
If your Mac is paired with a Bluetooth keyboard, mouse, trackpad, or other device that you plan to keep, you can unpair it. This optional step prevents accidental input when the Mac and device have separate owners but remain in Bluetooth range. If you do this on a Mac that doesn’t have a built-in keyboard or trackpad, you will need to plug in a USB keyboard and mouse to complete the remaining steps.
To unpair a Bluetooth device, choose Apple menu > System Preferences, then click Bluetooth. Move your pointer over the device that you want to unpair, then click the remove (x) button next to the device name.
Erase your Mac and reinstall macOS
Follow the steps to erase your Mac and reinstall macOS. After macOS installation is complete, your Mac restarts to a setup assistant. To leave the Mac in an out-of-box state, press Command-Q to shut down instead of continuing setup.
No matter the model or condition, we can turn your device into something good for you and good for the planet: Learn how to trade in or recycle your Mac with Apple Trade In.
Источник
Locate backups of your iPhone, iPad, and iPod touch
Find a list of your iOS or iPadOS backups on your Mac, PC, and iOS or iPadOS device. Learn how to delete backups, copy them, and more.
Find backups stored on Mac or PC
Delete or copy backups stored on Mac or PC
Find and manage backups stored in iCloud
Find backups stored on your Mac or PC
To avoid ruining any of your backup files, here’s what you should know:
- The Finder and iTunes save backups to a Backup folder. The location of the Backup folder varies by operating system. Though you can copy the Backup folder, you should never move it to a different folder, external drive, or network drive.
- Don’t edit, relocate, rename, or extract content from your backup files, because these actions might ruin the files. For example, to restore from a relocated backup file, you need to move it back or the file won’t work. Backups serve as a safe copy of your entire device. So while you might be able to view or access a backup file’s contents, the contents usually aren’t stored in a format that you can read.
Search for the backup folder on your Mac
To find a list of your backups:
- Click the magnifier icon in the menu bar.
- Type or copy and paste this:
/Library/Application Support/MobileSync/Backup/
To find a specific backup:
- On a Mac with macOS Catalina 10.15 or later, open the Finder. On a Mac with macOS Mojave 10.14 or earlier, or on a PC, open iTunes. Click your device.
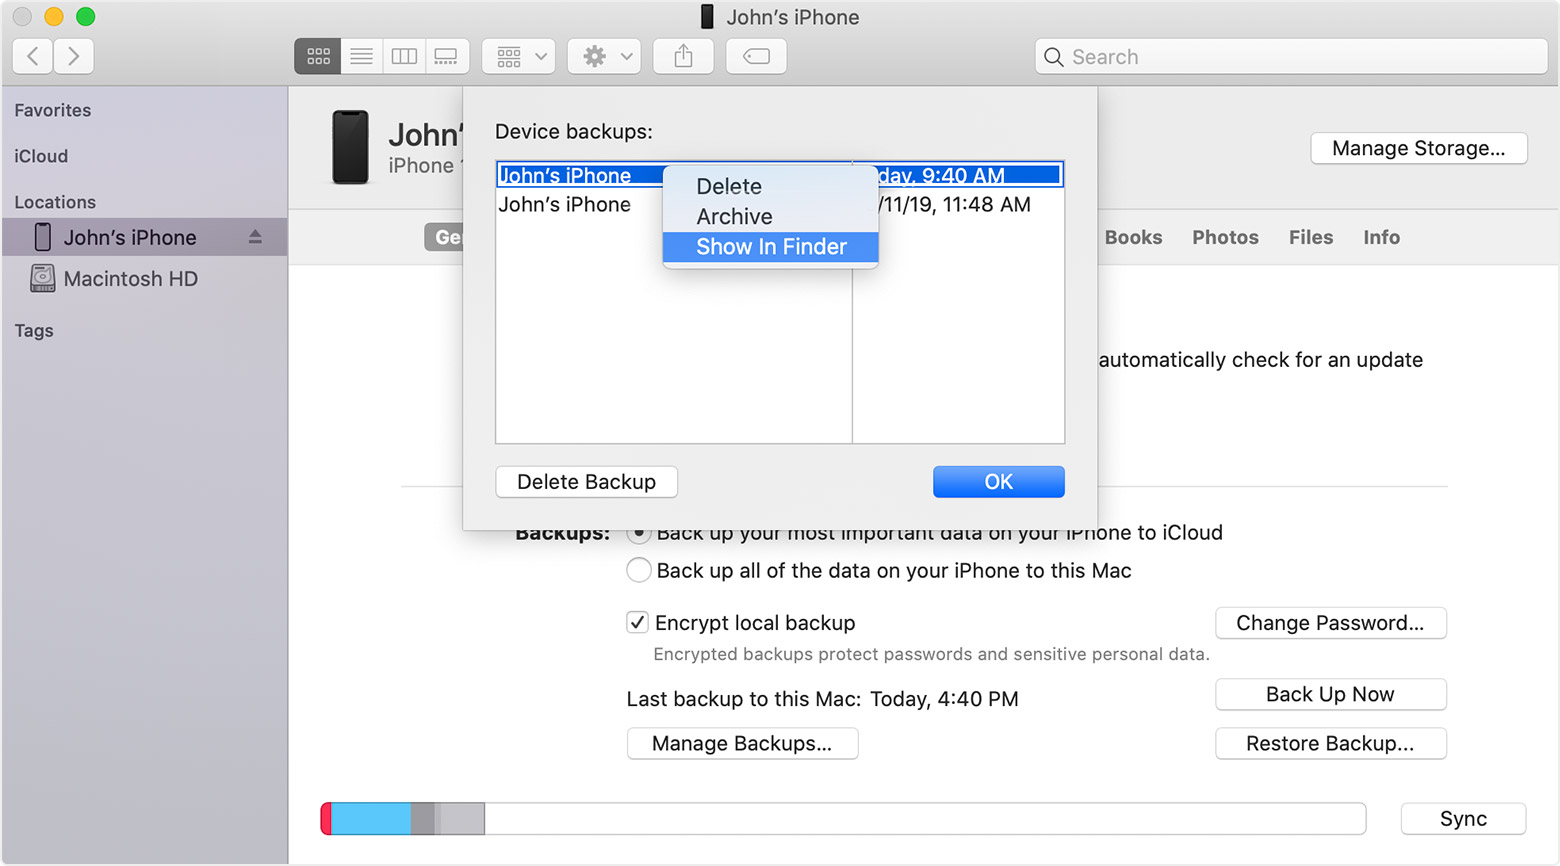
- In the Finder, under the General tab, click Manage Backups to see a list of your backups. From here, you can right-click on the backup that you want, then choose Show in Finder, or you can select Delete or Archive. In iTunes, choose Preferences, then click Devices. From here, you can right-click on the backup that you want, then choose Show in Finder, or you can select Delete or Archive.
- Click OK when you’re finished.
Search for the backup folder on Windows 7, 8, or 10
- Find the Search bar:
- In Windows 7, click Start.
- In Windows 8, click the magnifying glass in the upper-right corner.
- In Windows 10, click the Search bar next to the Start button.
- In the Search bar, enter %appdata%. If you don’t see your backups, enter %USERPROFILE%.
- Press Return.
- Double-click these folders: «Apple» or «Apple Computer» > MobileSync > Backup.

Delete or copy backups on your Mac or PC
Don’t edit, relocate, rename, or extract content from your backup files, because these actions might ruin the files. Use the following sections to make copies of your backups or delete backups that you no longer need.
Copy backups to another location
If you need copies of your backups, you can find the Backup folder and copy the entire folder (not just part of it) to another place, like an external drive or network-storage location.
When you use Time Machine, it automatically copies your Backup folder when you back up the Home folder on your Mac.
Delete backups
- On a Mac with macOS Catalina 10.15 or later, open the Finder. On a Mac with macOS Mojave 10.14 or earlier, or on a PC, open iTunes. Click your device.
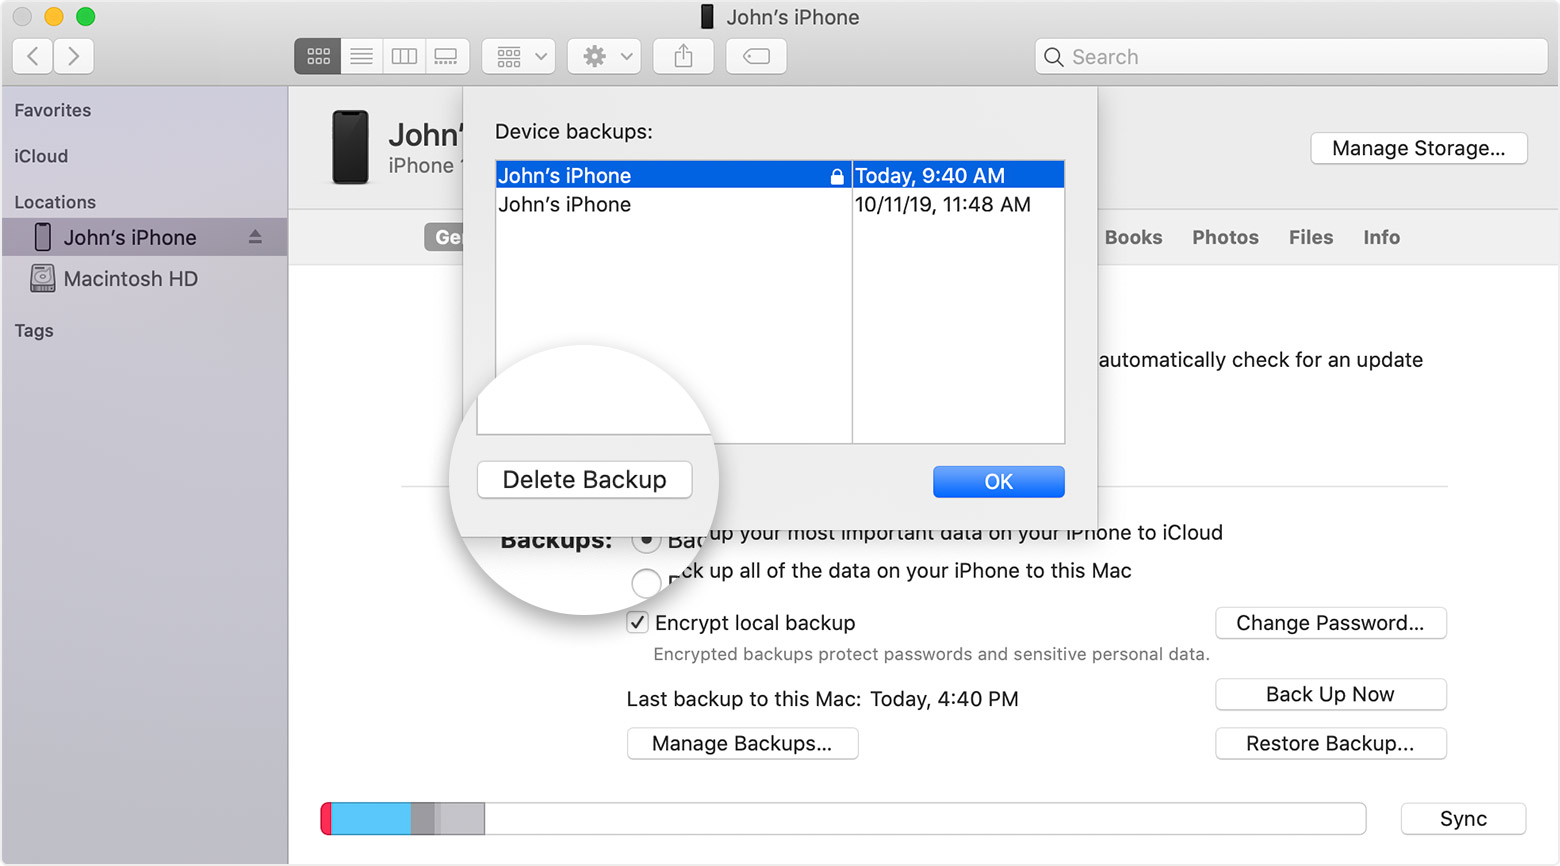
- In the Finder, under the General tab, click Manage Backups to see a list of your backups. From here, you can right-click on the backup that you want, then select Delete or Archive. In iTunes, choose Preferences, then click Devices. From here, you can right-click on the backup that you want, then choose Delete or Archive. Click OK when you’re finished.
- Click Delete Backup, then confirm.
Locate and manage backups stored in iCloud
If you use iCloud Backup, you won’t find a list of your backups on iCloud.com. Here’s how to find your iCloud backups on your iOS or iPadOS device, Mac, or PC.
On your iPhone, iPad, or iPod touch:
- Using iOS 11 or later and iPadOS, go to Settings > [your name] > iCloud > Manage Storage > Backups.
- Using iOS 10.3, go to Settings > [your name] > iCloud. Tap the graph that shows your iCloud usage, then tap Manage Storage.
Tap a backup to see more details about it, choose which information to back up, or delete the backup.
You can choose which content to back up only from the Settings menu of the device that stores that content. For example, while you can view your iPad backup from your iPhone, you can choose which iPad content to back up only from the Settings menu of your iPad.
On a Mac with macOS Catalina 10.15 or later:
- Choose Apple () menu > System Preferences.
- Click Apple ID.
- Click iCloud.
- Click Manage.
- Select Backups.
On a Mac with macOS Mojave 10.14 or earlier:
- Choose Apple () menu > System Preferences.
- Click iCloud.
- Click Manage.
- Select Backups.
- Open iCloud for Windows
- Click Storage.
- Select Backup.
Источник


