- Add a transit card to Apple Wallet
- Add a transit card on your iPhone or Apple Watch
- How to add a transit card on your iPhone
- How to add a transit card on your Apple Watch
- Transfer your physical transit card to Apple Wallet
- Transfer your physical transit card to your iPhone
- Transfer your physical transit card to your Apple Watch
- Use Express Mode with your transit card
- Move your transit card between devices
- How to move your transit card from your iPhone to your Apple Watch
- How to make Apple Card payments
- Check your balance
- Find your monthly balance
- Find your minimum payment due
- How to make payments
- Set up scheduled payments for Apple Card
- Make a one-time payment
- Pay now
- Pay later
- Make additional payments on your Apple Card Monthly Installments
- If your iPhone or iPad is unavailable
- Set up Apple Pay
- How to add a card for Apple Pay on your iPhone
- Add a new card on your iPhone
- Add a previous card on your iPhone
- How to add a card for Apple Pay on your Apple Watch
- Add a card for Apple Pay on your Apple Watch
- Add a card for Apple Pay with the Apple Watch app on your iPhone
- How to add a card for Apple Pay on your Mac or iPad
Add a transit card to Apple Wallet
Add a transit card to the Wallet app to pay for rides using Apple Pay.
To ride transit using Apple Pay, you need:
- A compatible iPhone or Apple Watch. Check with your transit agency to see which models are supported.
- The latest version of iOS and watchOS.
- An Apple ID signed in to iCloud 1 .
- To be in a location where you can use Apple Pay to ride transit.
To add a new transit card, you need an eligible payment card in the Wallet app.
Add a transit card on your iPhone or Apple Watch
You can add a transit card to the Wallet app on your iPhone or Apple Watch.
How to add a transit card on your iPhone
- On your iPhone, open the Wallet app.
- Tap the Add button .
- Tap Transit Card to add a new transit card or tap Previous Card to add a transit card you previously added to the Wallet app.
- Choose a transit card from the list, or search by location or card name.
- Tap Continue.
- Choose an amount to put on the card and tap Add. 2
- Follow the steps on the screen to confirm your purchase and add your transit card.
How to add a transit card on your Apple Watch
- On your Apple Watch, open the Wallet app.
- Scroll down and tap Add Card.
- Tap Transit Card to add a new transit card or tap Previous Card to add a transit card you previously added to the Wallet app.
- Choose a transit card from the list.
- Tap Continue.
- Choose an amount to put on the card and tap Add Money. 2
- Follow the steps on the screen to confirm your purchase and add your transit card.
When you add an eligible transit card, that card might be automatically set to Express Mode. You might also be able to add money to your transit card in the Wallet app.
Transit card use and availability might be limited based on region. Contact your transit agency to see if adding transit cards to the Wallet app is supported in your city or region.
Apple Watches managed with Family Setup might not be able to add cards directly on the Apple Watch.

Transfer your physical transit card to Apple Wallet
If you have a physical transit card, you might be able to move that card and its current balance to the Wallet app on your iPhone or Apple Watch.
Transfer your physical transit card to your iPhone
- On your iPhone, open the Wallet app.
- Tap the Add button .
- Tap Transit Card.
- Choose a card from the list, or search by location or card name.
- Tap Continue.
- Tap Transfer Existing Card.
- Enter your card number and other required information. 3
- Place your transit card on a flat surface and rest the top of your iPhone on the card until you see Card Added on the screen. This process could take a few minutes to complete.
Transfer your physical transit card to your Apple Watch
- On your iPhone, open the Apple Watch app.
- In the My Watch tab, tap Wallet & Apple Pay.
- Tap Add Card, then tap Transit Card.
- Choose a card from the list, or search by location or card name.
- Tap Continue.
- Tap Transfer Existing Card.
- Enter your card number and other required information. 3
- Place your transit card on a flat surface and rest the top of your iPhone on the card until you see Card Added on the screen. This process could take a few minutes to complete.
![]()
If you receive an error, such as No card detected or Could not add card:
- If your iPhone has a case, take off the case or remove any metal that might come between your iPhone and your physical card.
- Make sure that the top of your iPhone is resting on your physical card and remains still.
- Check with your transit agency to see if your physical card can be transferred.
After you transfer your physical card to the Wallet app, your physical card might no longer work.
Use Express Mode with your transit card
By using Express Mode, you can quickly pay for rides with just a tap. You don’t have to wake or unlock your device, or authenticate using Face ID, Touch ID, or a passcode.
When you add an eligible transit card, Express Mode might be enabled for that card by default. Or you can choose an eligible transit or payment card as your Express Mode card.
Move your transit card between devices
You can only have a transit card in the Wallet app on one device at a time. To use your transit card on a different device, you can move it from your iPhone to your Apple Watch or from one iPhone to another.
How to move your transit card from your iPhone to your Apple Watch
- On your iPhone, open the Apple Watch app.
- In the My Watch tab, tap Wallet & Apple Pay.
- Tap the Add button next to the transit card you want to move.
You can use the Apple Watch app to move the card back to your iPhone when you aren’t in transit.
Источник
How to make Apple Card payments
See how to make a payment, check your balance, and choose a payment source.
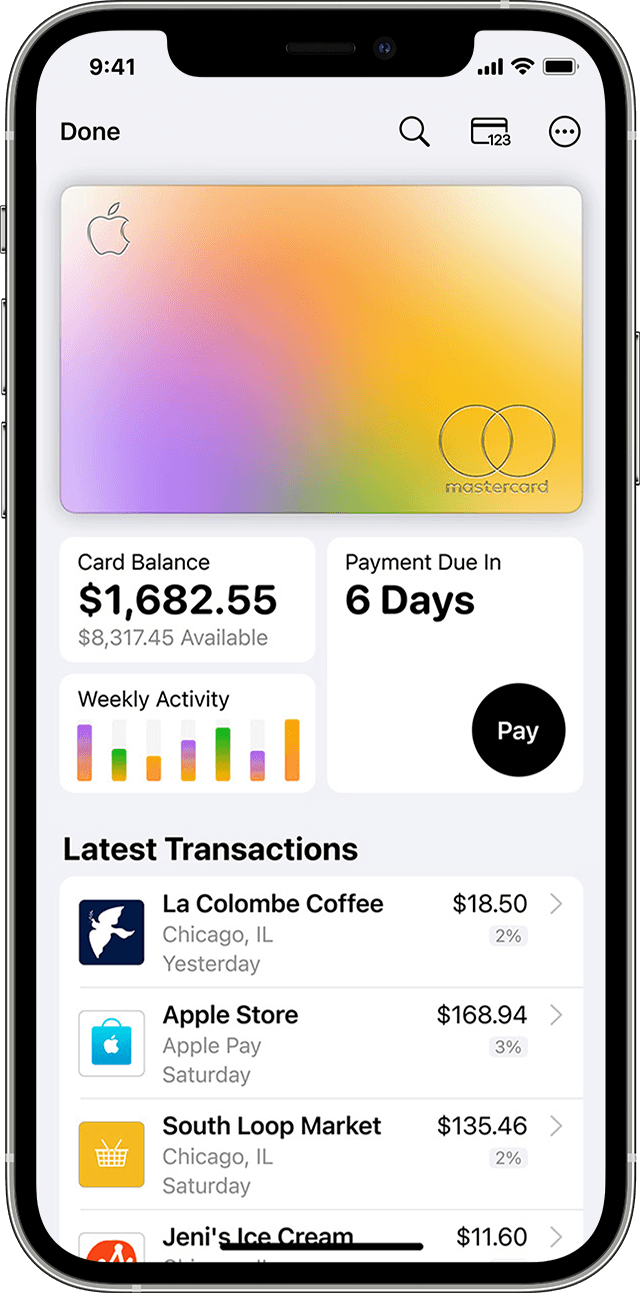
Check your balance
To see your Card Balance, open the Wallet app on your iPhone and tap Apple Card. 1 The Card Balance shows below your card. Card Balance includes all new spending and any remaining monthly balance. If you have Apple Card Monthly Installments, then your balance includes the newly billed monthly installment.
You can only pay off purchases after they clear, so Card Balance will continue to reflect pending transactions, even if you make a maximum payment.
Find your monthly balance
The monthly balance includes all of your spending in a calendar month (except for any pending transactions), interest charges, and credits posted to your account. It also includes any remaining balance from the previous month. If you have Apple Card Monthly Installments, 2 your monthly balance includes your interest-free monthly installment. When you pay the monthly balance, it stops additional interest charges on your account.
- Open the Wallet app on your iPhone and tap Apple Card.
- Tap to pay.
- Your monthly balance is automatically selected and you see a green checkmark.
If you already paid some of your monthly balance, your remaining monthly balance is shown. If you pay off your monthly balance each month by the due date, you aren’t charged interest.
Find your minimum payment due
The minimum payment is the minimum amount you must pay towards your Apple Card balance to keep your account current.
- Open the Wallet app on your iPhone and tap Apple Card.
- Tap to pay.
- Press and slide counterclockwise until the wheel turns red and stops.
- You see the minimum payment due.
When your minimum payment is due, Payment Due appears with the amount below your Apple Card. If you bought an iPhone, iPad, Mac, or other eligible Apple product with Apple Card Monthly Installments, your monthly installment is included in the minimum payment amount.
How to make payments
You can set up recurring scheduled payments or make a one-time payment in the Wallet app with just a few taps. If you don’t have an eligible iPhone or iPad, you can make an Apple Card payment online at card.apple.com.
For Apple Card Family, account owners and co-owners are responsible for all payments on the shared Apple Card account. On a co-owned account, each co-owner can make payments on the account and can add a bank account. Before making or scheduling a payment on a shared Apple Card acocunt, co-owners should verify that the correct bank account is selected. 3
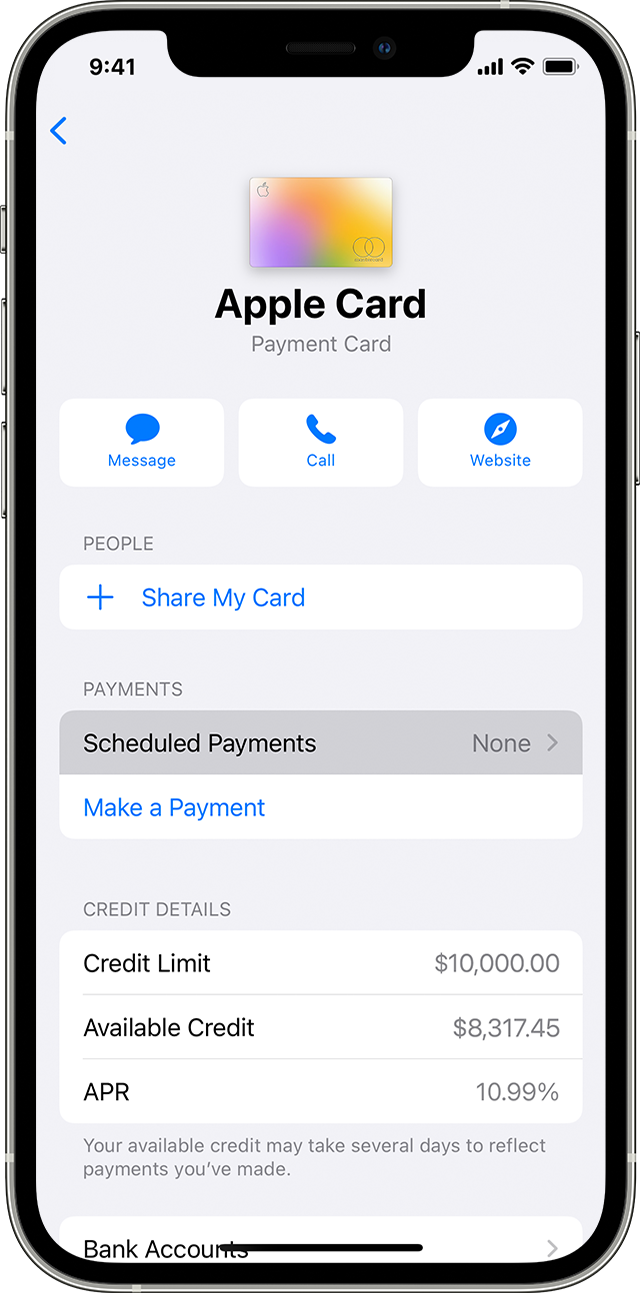
Set up scheduled payments for Apple Card
- Open the Wallet app on your iPhone and tap Apple Card.
- Tap the more button , tap Scheduled Payments, then tap Continue.
- Tap Pay My Bill to pay your previous monthly balance or tap Pay Different Amount to choose an amount. Then tap next:
- If you chose Pay My Bill, select when you want your payment to be made, then tap Next.
- If you chose Pay Different Amount, select your payment amount, when you want the payment to repeat, when you want the first payment to be made, then tap Next.
- Confirm with Face ID, Touch ID, or passcode.
- Tap Done.
If you want to change your scheduled payment, you need to first cancel your current scheduled payment. Just tap the more button , then tap your scheduled payment under Scheduled Payments. Tap Cancel Payments and tap Cancel Payments again to confirm your choice.
Make a one-time payment
On your iPhone in the Wallet app, you can make an immediate one-time payment or you can schedule a one-time payment.
Pay now
To make an immediate one-time payment, follow these steps:
- Open the Wallet app on your iPhone and tap Apple Card.
- Tap to pay.
- Hold and slide the payment wheel to choose a payment amount.
- Tap Pay Now to instantly make your payment, then follow the instructions on your screen.
Pay later
Here’s how to schedule a one-time payment:
- Open the Wallet app on your iPhone, tap Apple Card, then tap to pay.
- Hold and slide the payment wheel to choose a payment amount, then tap Pay Later.
- Choose the date you want to make the payment. 4
- Tap Pay on [your chosen date], then follow the instructions on your screen.
![]()
If you set up Apple Cash and verified your identity, you can use Apple Cash or your bank account to make an immediate one-time payment.
Make additional payments on your Apple Card Monthly Installments
If you pay your minimum payment due each month, you’re automatically paying your Apple Card Monthly Installment for that month. To make an additional payment or pay off your installment balance, you need to pay your Maximum Payment for all other Apple Card purchases before additional payments can be applied to your installment balance.
Apple Card Monthly Installments are interest-free and all other purchases you make with your Apple Card have a variable APR. 2 When you pay toward your Apple Card balance first, you can reduce or eliminate interest charges.
If you pay more towards your installment balance, you might reduce the number of payments, but you’re still required to pay your installment the next month.
If your iPhone or iPad is unavailable
If your iPhone is missing or stolen, you can call an Apple Card specialist to make a payment. You can also ask an Apple Card specialist to help you set up scheduled payments so you won’t miss a payment.
If you added your Apple Card to another iPhone, you can make a payment or set up scheduled payments in the Wallet app on that iPhone. If you added your Apple Card to your iPad, you can go to Settings > Wallet & Apple Pay > Apple Card, then tap Make a Payment or set up Scheduled Payments.
Источник
Set up Apple Pay
To set up Apple Pay, add a credit, debit, or prepaid card to the Wallet app on your iPhone, Apple Watch, or other compatible device.
To use Apple Pay, you need:
- A compatible device 1 with the latest version of iOS or iPadOS, watchOS, or macOS.
- A supported card from a participating card issuer.
- An Apple ID signed in to iCloud 2 .
Learn if your country/region supports Apple Pay. To check if your card is compatible with Apple Pay, contact your card issuer.
How to add a card for Apple Pay on your iPhone
Add a new debit or credit card to the Wallet app, or add a card you previously used on a device associated with your Apple ID.
Add a new card on your iPhone
- In the Wallet app, tap the Add button .
- Tap Debit or Credit Card.
- Tap Continue.
- Follow the steps on the screen to add a new card. If prompted, choose your bank or card issuer from the list or find them using the search bar.
- Verify your information with your bank or card issuer. They might ask you to provide additional information or to download an app before approving your card for use with Apple Pay.
- If you have a paired Apple Watch, you have the option to also add the card to your watch.
Add a previous card on your iPhone
- In the Wallet app, tap the Add button .
- Tap Previous Cards to see cards that you previously added to the Wallet app.
- Choose the card or cards that you want to add and tap Continue.
- Follow the steps on the screen to add your card.
- If necessary, verify your information with your bank or card issuer. They might ask you to provide additional information or to download an app before approving your card for use with Apple Pay.
- If you have a paired Apple Watch, you have the option to also add the card to your watch.
Once you’ve added your card, you can start using Apple Pay.
To remove a card from the Previous Cards screen, tap Edit > Remove button > Delete. Then, tap Delete Card to confirm and remove the card from all your devices.
How to add a card for Apple Pay on your Apple Watch
You can add a new debit or credit card, or a card you previously used on a device associated with your Apple ID, directly on your Apple Watch. You can also add a card with the Apple Watch app on your paired iPhone.
Add a card for Apple Pay on your Apple Watch
- On your Apple Watch, open the Wallet app.
- Scroll down and tap Add Card.
- Tap Debit or Credit Card to add a new card, or tap Previous Card to choose a card that you previously added to the Wallet app.
- Tap Continue.
- Follow the steps on the screen to enter your card information and add your card.
- If necessary, verify your information with your bank or card issuer using the Apple Watch app on your paired iPhone. They might ask you to provide additional information or to download an app before approving your card for use with Apple Pay.
Apple Watches managed with Family Setup might not be able to add cards directly on the Apple Watch.
Add a card for Apple Pay with the Apple Watch app on your iPhone
- On your paired iPhone, open the Apple Watch app.
- In the My Watch tab, tap Wallet & Apple Pay.
- Tap Add Card.
- Tap Debit or Credit Card to add a new card, or tap Previous Card to choose a card that you previously added to the Wallet app.
- Tap Continue.
- Follow the steps on the screen to add your card.
- If necessary, verify your information with the bank or card issuer. They might ask you to provide additional information or to download an app before approving your card for use with Apple Pay.
Once you’ve added your card, you can start using Apple Pay.
How to add a card for Apple Pay on your Mac or iPad
- Open Wallet settings on your device.
- On your Mac model with Touch ID, go to System Preferences > Wallet & Apple Pay.
- On your iPad, go to Settings > Wallet & Apple Pay.
- Tap Add Card. 3,4
- Follow the steps on the screen to add a card.
- Verify your information with your bank or card issuer. They might ask for more information.
Once you’ve added your card, you can start using Apple Pay.
On Mac models without built-in Touch ID, you can complete your purchase using Apple Pay on your compatible iPhone or Apple Watch: On your iPhone, go to Settings > Wallet & Apple Pay and turn on Allow Payments on Mac.
![]()
- Make sure that you sign in to iCloud on all your devices. On your iOS device, you need to set up Face ID, Touch ID, or a passcode. On your Apple Watch, you need to set up a passcode. If you sign out of iCloud or remove your passcode, all credit, debit, prepaid, transit, and student ID card will be removed from that device.
- If you’re less than 13 years old, Apple Pay isn’t available and you can’t add a card in the Wallet app. Age varies by country or region.
- In China mainland, you can use Apple Pay on the web in Safari only on compatible iPhone and iPad models using iOS 11.2 or later. In the Netherlands, you can use Apple Pay on the web only on a compatible iPhone or iPad.
- In Italy, you can’t add Maestro cards to iPad or Mac. In Australia, you can’t add eftpos cards to your iPad or Mac. In the Netherlands, you can add Maestro cards to all compatible devices except Mac.
Information about products not manufactured by Apple, or independent websites not controlled or tested by Apple, is provided without recommendation or endorsement. Apple assumes no responsibility with regard to the selection, performance, or use of third-party websites or products. Apple makes no representations regarding third-party website accuracy or reliability. Contact the vendor for additional information.
Источник


