- How to change your Project Name & Package Name in Android Studio
- Change the Project Name
- Change the App Name
- Change the Package Name
- How to change the App name and package name in Android Studio
- 3 Methods To Change Or Rename Android App Package Name in Android Studio
- Method I – How to rename android app package name in Android Studio
- STEP 1
- STEP 2
- STEP 3
- STEP 4
- STEP 5
- STEP 6
- STEP 7
- STEP 8
- STEP 9
- STEP 10
- STEP 11
- Method 2 – How to change full package name of project by creating new package
- STEP 1
- STEP 2
- STEP 3
- STEP 4
- STEP 5
- STEP 6
- STEP 7
- STEP 8
- STEP 9
- STEP 10
- STEP 11
- STEP 12
- Method III – How to rename android app package name in Android Studio using existing package
- STEP 1
- STEP 2
- STEP 3
- STEP 4
- STEP 5
- STEP 6
- STEP 7
- STEP 8
- STEP 9
- STEP 10
- Different Ways to Change the Project Name in Android Studio
- Method 1
- Method 2
- Method 3
- How To Change Package Name In Android Studio [Step By Step]
- How To Change Package Name In Android Studio [Step By Step]
How to change your Project Name & Package Name in Android Studio
Today, I’m going to show you how to change your project name and package name in your project very easily!
Let’s dive right into it!
Change the Project Name
Change the name of your project by closing the Android Studio, go to your project folder, rename it…

Delete the .idea folder and .iml file. (To show hidden folders, press Cmd + Shift + . (dot) ).
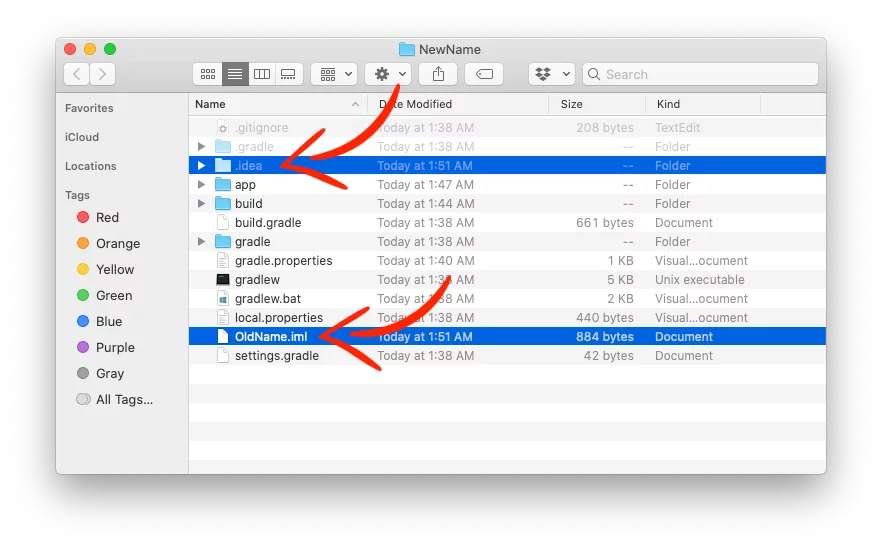
Open the settings.gradle file with a text editor, like VSCode, and change the rootProject.name to your new project name.

Done! Project name has been changed! Just open your project with the Android Studio and Gradle will sync again.
Change the App Name
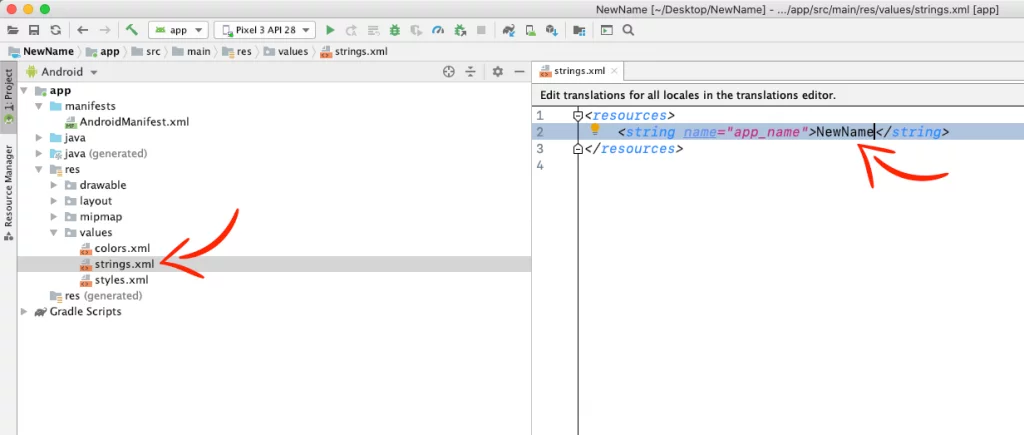
Usually, when you change the project name, you wanna change the name of your app too.
Go to the res folder > values > strings.xml and change the app_name to your new name.
Change the Package Name
To rename your package name, all you have to do is go to your AndroidManifest.xml file, put your mouse cursor in front of the part of the package name you want to change.
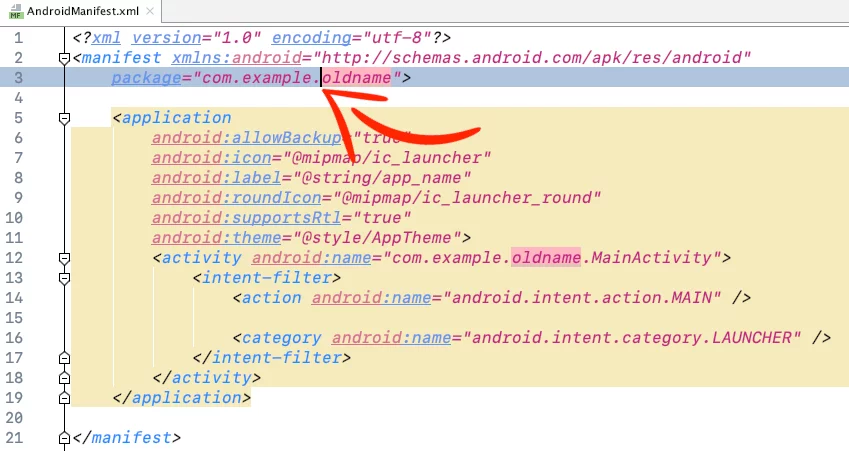
Right-Click > Refactor > Rename

In the new window press Rename package

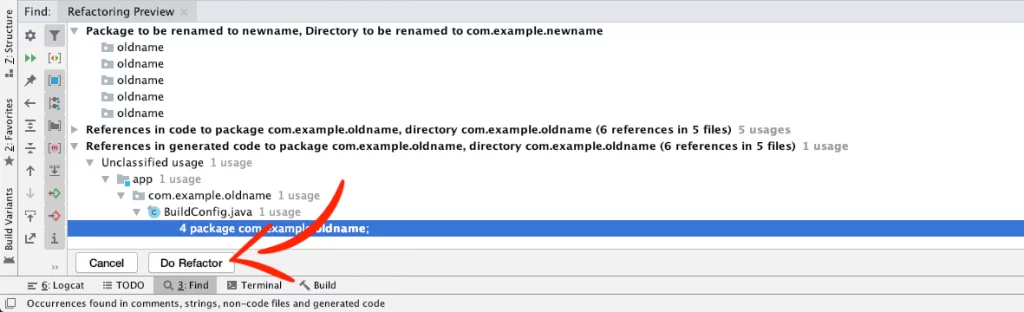
Change name and press Refactor

…and press Do Refactor at the bottom.
Your package name is usually in format com.domain.appname, in this example, we changed the appname part, but you can do the same steps for the domain.
Last, go to your module-level build.gradle file and change the package name in applicationId

Done! Package name has changed!
If you have any questions, please feel free to leave a comment below
Источник
How to change the App name and package name in Android Studio
How to change the App name and package name in Android Studio:
Application name can be changed at anytime you want. Even after you publish the App on playstore. The package name is more important. You can’t change it once you publish an App on PlayStore. You will have to publish a different App with a different name if you want a different package.
In this post, I will show you how to change the App name and package name in Android Studio.
Changing the app name:
Changing the application name is easy. It is defined in res -> values -> strings.xml. By default, it is the string under key name app_name.
Just change it and you are done.
Changing the package name:
Changing the package name is bit difficult than changing the name because it is used in multiple places of the App. But Android Studio provides an easy way to do that.
- First, click on the gear icon on left project panel of Android Studio and unselect the Compact Middle Packages selection.
You need to change middle or last part one by one. Right click on it, click Refactor -> Rename
Click on Rename package and rename it as showing below :
Click on Refactor and click on Do Refactor button shown below. Done.
If you want to revert the change, just use Ctrl + Z or Cmd + Z. Here, I renamed the last part of the package. Similarly, you can also use the same approach to rename the middle part of the package.
Источник
3 Methods To Change Or Rename Android App Package Name in Android Studio

Sometimes, we make our app using the code from youtube tutorials and blogs and may forget to change the package name at the start. Yes, this happens, most of the time.
We don’t want to display other website name or Youtube channel name to be as our package name, We want a package name that defines us. If you are searching for a tutorial about how to change or rename the Android app package name in Android Studio, then this post is for you.
Method I – How to rename android app package name in Android Studio
In this example, we will change package name com.androidride.myapplication” to “com.xyz.yourapplication”.
STEP 1
- Open Android Studio project, Select package name or Java, Click the gear icon.
STEP 2
- Deselect Hide Empty Middle Packages. This breaks your folder structure into parts.
- The package is brocken down.
STEP 3
- Right Click on AndroidRide, Refactor -> Rename . You can also use Shift + F6.
A warning will appear.
STEP 4
- Click on Rename package
STEP 5
- Clear AndroidRide and put new Name in it. Here “xyz”
STEP 6
- Click Do Refactor
STEP 7
- Repeat the same process.
- Right click on myapplication,Refactor -> Rename and Rename package.
STEP 8
- Change myapplication to yourapplication
STEP 9
- Click on Do Refactor.
STEP 10
- After changing the package name, open build.gradle(module) and change Application Id
STEP 11
- change applicationid “com.androidride.myapplication” to “com.xyz.yourapplication”.
- After changing applicationid, click on sync now.
Method 2 – How to change full package name of project by creating new package
In this method, We are going to change package name “com.androidride.myapplication” to “info.xyz.yourapplication”
STEP 1
- Right click on com.androidride.myapplication package and select Refactor->Move
STEP 2
- Choose Move package “com.androidride.myapplication” to another package and click on OK.
STEP 3
Now you will get a warning dialog shows Multiple directories correspond to package com.androidride.myapplication
- Click on Yes
STEP 4
- Enter the new package name except the last level, For example. If you want to make package name as “info.xyz.yourapplication” then type “info.xyz” only, like above. Avoid the last part, here “yourapplication”.
STEP 5
- Click YES for creating new package.
STEP 6
- Click on Do Refactor. Now package name “com.androidride.myapplication” changes into “info.xyz.myapplication“.
STEP 7
Now we have to change the last package level name,
- Right click on package name -> Refactor -> Rename
STEP 8
- Click on Rename package
STEP 9
- Rename “myapplication” in to “yourapplication”.
STEP 10
- Click on “Do Refactor”
STEP 11
- Use CTRL key and select each package related to old package name and delete. You can use DELETE key in keyboard or right click after selecting old packages and click on delete option from the menu.
STEP 12
- Open build.gradle file, change applicationId and Click on sync now.
Package name successfully changed to “info.xyz.yourapplication“.
Method III – How to rename android app package name in Android Studio using existing package
This method is also same as the second method. Just like second, we change package name “com.androidride.myapplication” to “info.xyz.yourapplication“.
STEP 1
- Right click on Java and select New -> Package
STEP 2
- Next dialog box appears, choose …app\src\main\java as Destination Directory.
STEP 3
- Enter your package name, here info.xyz.yourapplication
STEP 4
- Now move old package files into new package. Here move files from “com.androidride.myapplication” to “info.xyz.yourapplication“. Just use CTRL key to select all files and drag it to new package.
STEP 5
- Open AndroidManifest.xml and change package name into “info.xyz.yourapplication“
STEP 6
- Open build.gradle (Module: app) file, change applicationId also. Change it to “info.xyz.yourapplication” and Click on Sync now.Now you might get errors. It is due to the R file import. There are two scenarios, we can do.
- Remove R file import line from both files and check the error still exists. If not then you can delete old package files now
It’s done. You have successfully changed the package name.
Otherwise, If the error still exists, do the below steps.
STEP 7
- Select R file import line just like above and press CTRL + SHIFT + R . Replace with new package name. Click on replace all.
STEP 8
- Click on replace
STEP 9
- Delete old package and related files
STEP 10
Yes, the package name is changed.
Express your thoughts below and tell your friends about this post. Thank you.
Источник
Different Ways to Change the Project Name in Android Studio
When you have worked a lot on an Android project and then if you need to rename the project there are lots of configuration files, .xml files, and gradle files in Android Studio that you’re afraid to break things up. Sometimes we end up creating a new Android Studio project, with the correct name and then pass the source files from the old project to the new one. Here we are changing the project name only. While changing the name make sure that the project name is written without spaces. Now the point that comes here is how we can Change Project Name in Android Studio . So in this article, we are going to discuss five different methods to change the Project Name in Android Studio.
Method 1
Step 1: Click on the Setting Icon and Uncheck Compact Middle Packages
Step 2: Click on your Project Name and Go to Refractor > Rename
Step 3: Click on Rename Packages
Step 4: Change the package name and click on Refractor
Step 5: Click on Do Refractor and then you will fill in finding that the project name is changed
Method 2
Open app/build.gradle and change this line:
Method 3
Doing this name of your app will be changed.
Источник
How To Change Package Name In Android Studio [Step By Step]
There might be many situations when you want to change package name of the App in Android Studio. You might have download source code from internet and wants to rename the package name according to your App details. Here in this tutorial I am going to discuss step by step how to rename/change package name in Android Studio:
How To Change Package Name In Android Studio [Step By Step]
Step 1: First make sure you are viewing the project in Android view. For that follow the below image to change from project to Android view in Android Studio:

Step 2: Now click on setting gear icon and deselect Compact Empty Middle Package
Step 3: Now you will see each package folder is broken into parts
Step 4: Now right click on the first package folder, refactor and rename. Now a warning will be displayed but you go ahead and click Rename Package. After that enter your domain name for the package name.
Step 5: Now in the bottom of Android Studio it will display ‘Find Refactoring Preview’. Here click on ‘Do Refactor’
Step 6: Now it has change the package domain name of the App. Now go ahead, change the domain extension and App folder name according to your requirement:
Источник


