- How to rename your iPhone or iPad
- How to change the name of your iPhone or iPad
- How to change your device name using Finder
- How to Change the Name of Your iPhone
- Change iPhone Name
- 1. Change iPhone Name Using Settings
- 2. Change iPhone Name Using Mac
- 3. Change iPhone Name Using iTunes
- How to change the name of your iPhone
- How to change your iPhone name
- Apple ID
- Contacts
- Teach Siri how to pronounce names
- Read more tutorials from 9to5Mac:
- How To Change the Name of Your iPhone
- The name assigned to your iPhone is how you’ll recognize it when you sign into iCloud or view it from other devices.
- Add or remove your phone number in Messages or FaceTime
- Set up your phone number
- Remove your phone number
- Turn your phone number on or off for your Mac
- Turn your phone number on or off for your iPad or iPod touch
- If you can’t see or select your number in Messages or FaceTime
How to rename your iPhone or iPad
You may have seen Sebastien’s quick tutorial explaining how to change your Mac computer’s name so you can recognize it easily when using AirDrop, or simply when looking for it on the local network.
It’s a little known fact that you can just as easily change the name of your iPhone, iPad or iPod touch. Choosing a custom name for your device helps keep it distinguishable from other devices you may own and when using services like Find My.
Obviously, this is a tutorial for beginners as power users are probably aware how to do this. Regardless of your level of expertise, this how-to serves as a nice reminder to check and maybe choose a proper name for your device other than the default name iOS assigns to it after a restore or on first use…
How to change the name of your iPhone or iPad
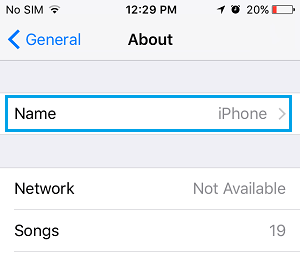
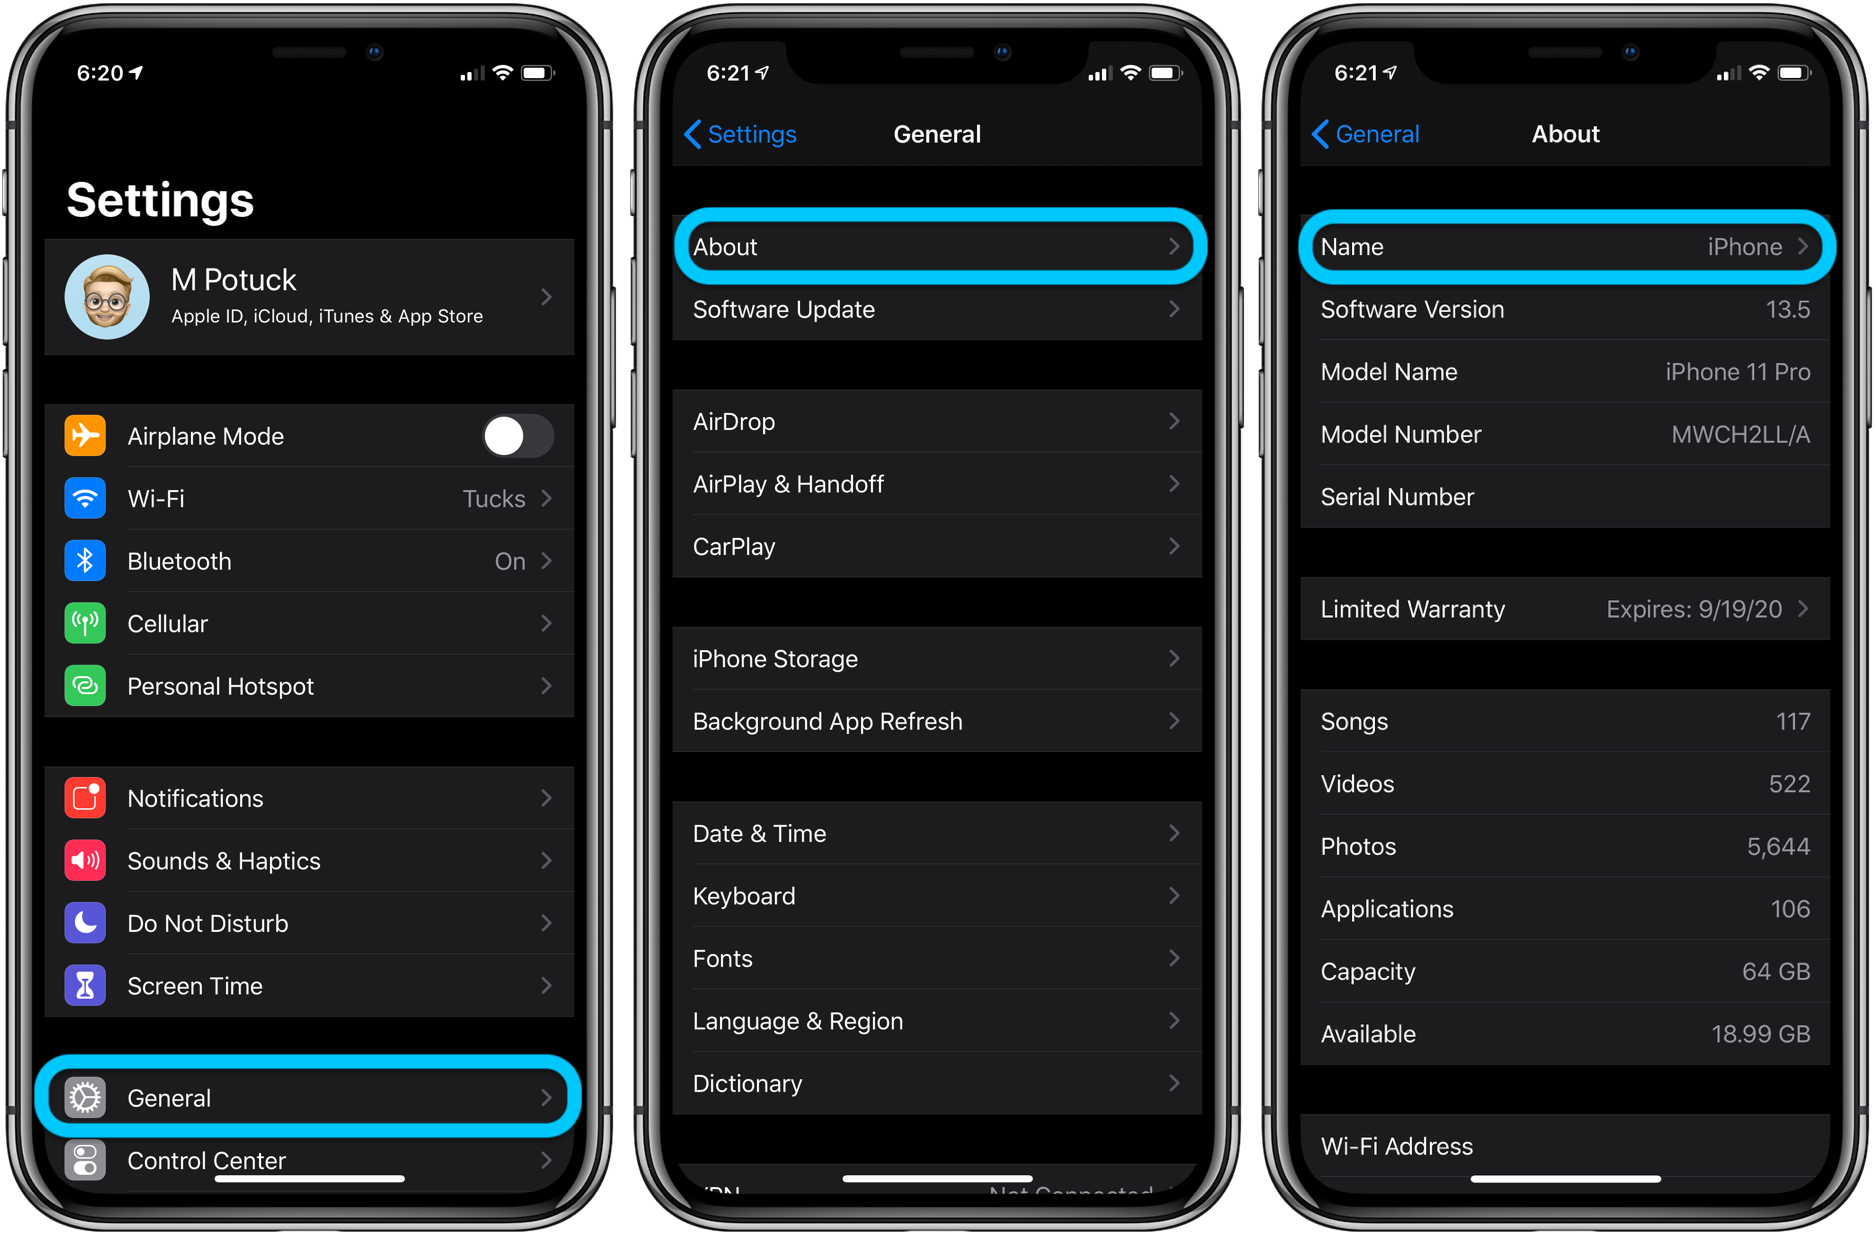
Step 1: Launch the Settings app on your device and navigate to General > About.
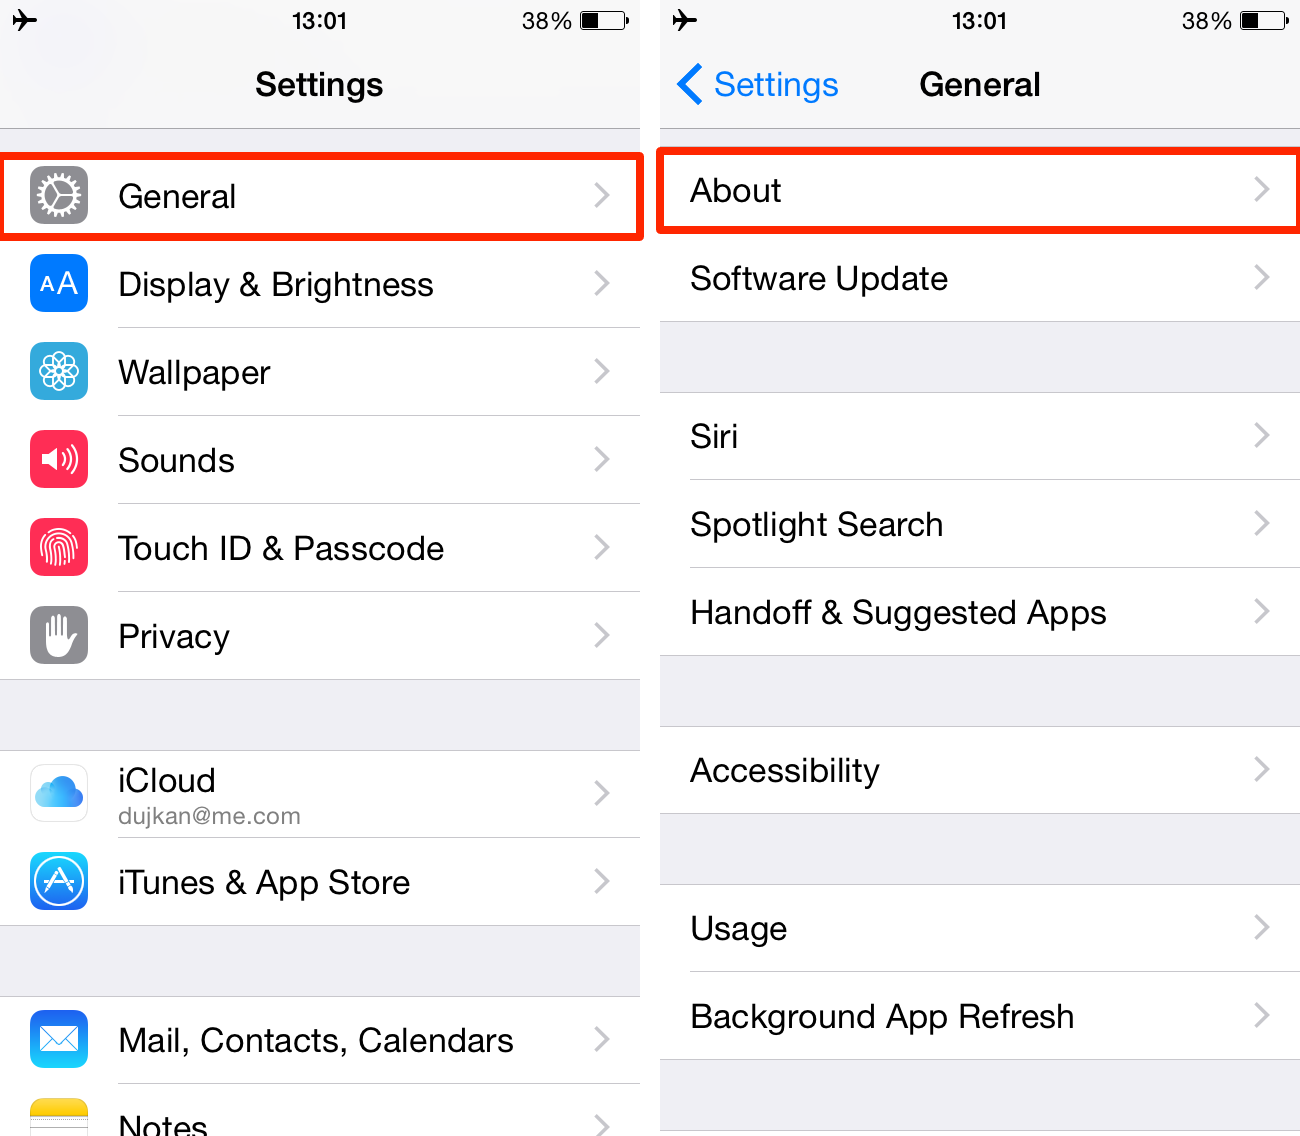
Step 2: As pictured below, the Name section at the very top should display the current name of your iPhone, iPad or iPod touch. Tap it to set a custom name for your device.
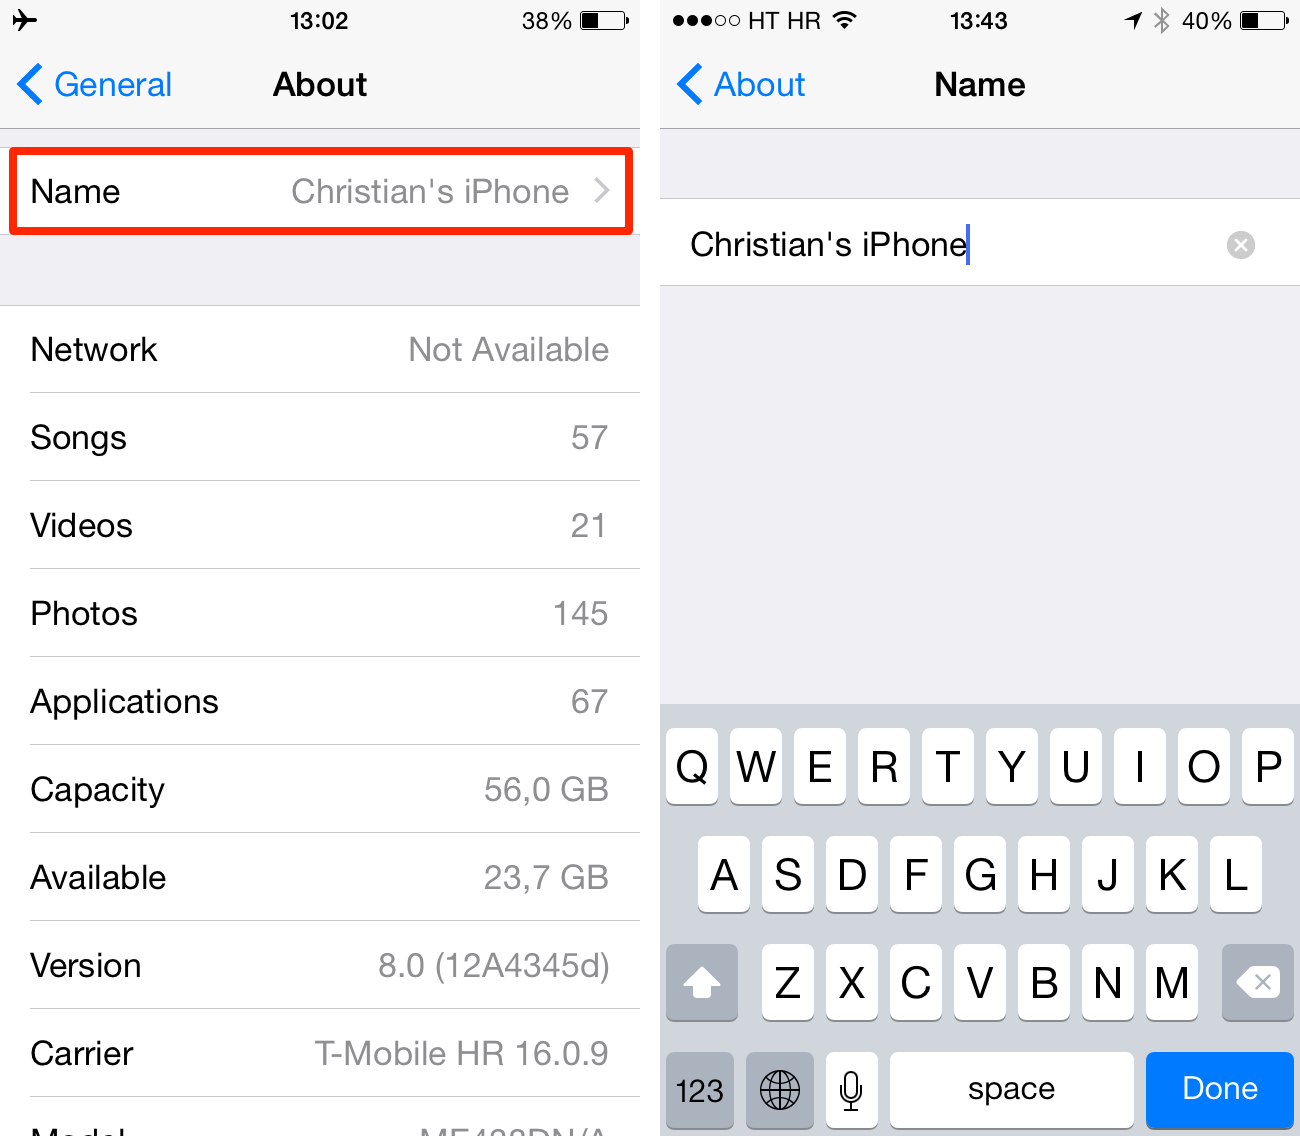
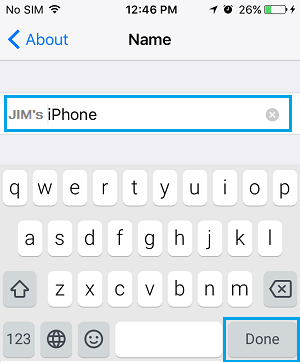
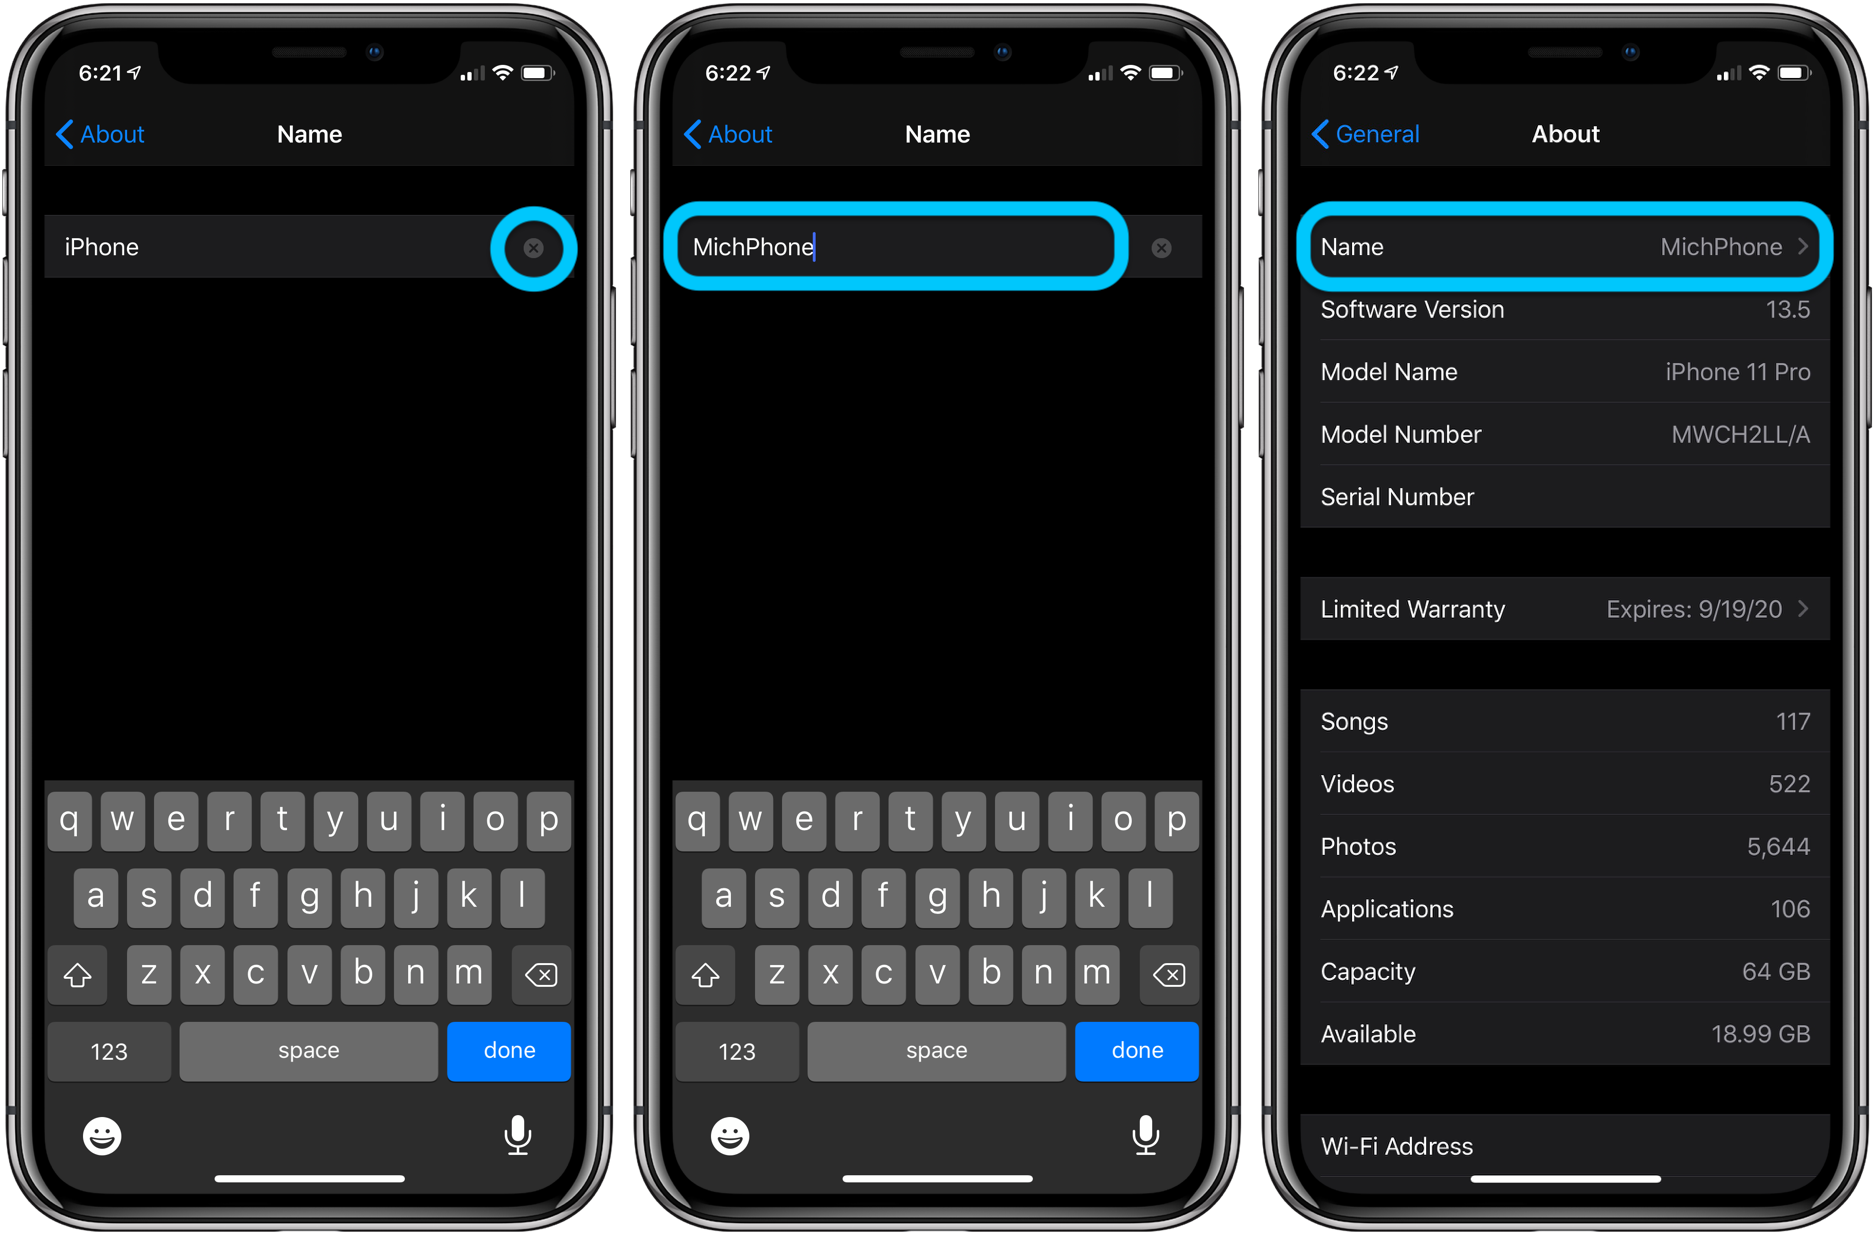
Step 3: Use the on-screen keyboard to give the device a new name. Hit Done when finished. In the example below, I renamed my iPhone 5s from the default “Christan’s iPhone” name to the more descriptive “Chris – iPhone 5s”.
That’s all there is to it!
The new custom name for your device should be listed under the Name line in Settings > General > About.
How to change your device name using Finder
Step 1: Launch Finder on your Mac and connect your device to the computer using a USB cable. If you’re using the Wi-Fi Sync feature, make sure that both your computer and an iOS device are connected to the same Wi-Fi network.
You may be asked to Trust both of your devices and unlock your iPhone if necessary.
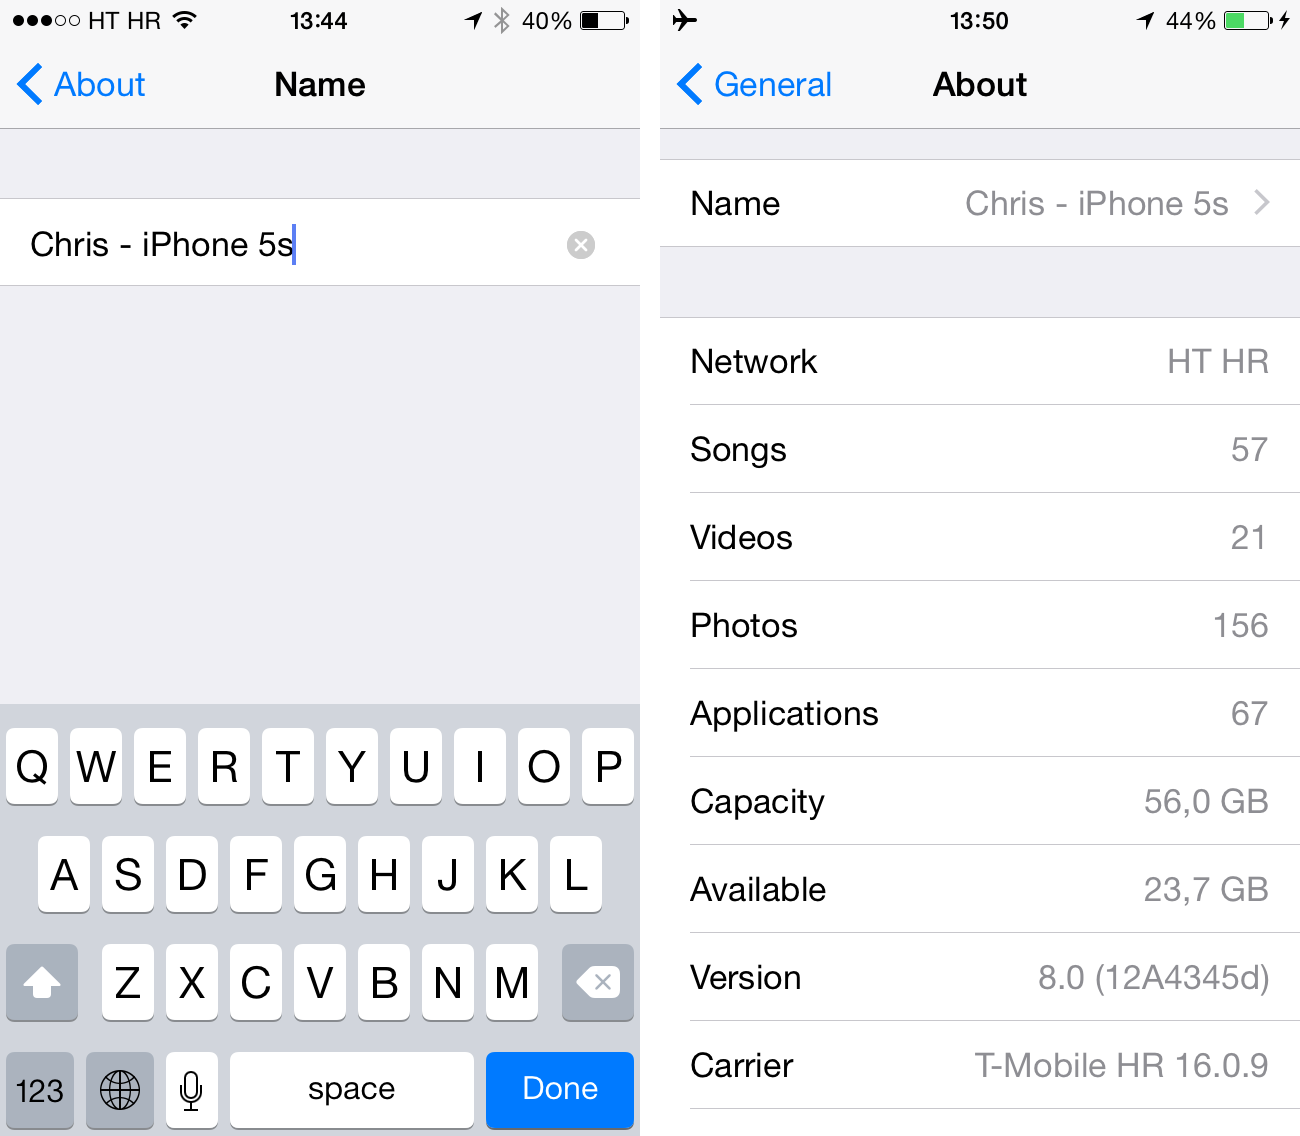
Step 2: Click your device under Locations in the Finder sidebar. If you have several devices connected, choose an iPhone, iPad or iPod touch you want to rename.
Step 3: Click the current name of your iOS device, type the new name for it, and press Return on the keyboard.
That’s it — no need to sync manually as Finder will rename your device on-the-fly.
Again, device name is used to denote your hardware in Finder, as well as help distinguish it inside the Find My iOS app and in the service’s web interface on iCloud.
Unfortunately, AirDrop in iOS/macOS uses your Apple ID’s first name rather than device name, which would have been more logical and a lot clearer if you ask me.
Источник
How to Change the Name of Your iPhone
By: Waseem Patwegar
Your iPhone has a Name and by default it is called an “iPhone”. However, you can Change the Name of your iPhone and give it an identity, which can help it distinguish it from other iPhones.

Change iPhone Name
As you will agree, the default name “iPhone” is not at all unique and things can get confusing when you own two iPhones or have multiple devices in a family all named as “iPhone”.
For example, when you get a New iPhone you will see two iPhone icons in iTunes with the same name, which makes it difficult to tell them apart.
Other Apple services like Find My iPhone and iCloud are other places where you will come across both your old and New iPhones being listed with the same Name (iPhone).
Another reason for changing the Name of iPhone would be make Messages sent from your device appearing as Sent from Jim’s iPhone, instead of being marked as sent from iPhone.
1. Change iPhone Name Using Settings
Changing the name of your iPhone, iPad or iPod is really easy and you can do it right on your device.
1. Go to Settings > General > About > Name
2. On the next screen, type the New Name for your iPhone and tap on Done .
Now, whenever you connect iPhone to Mac or Computer it will appear as Jim’s iPhone, instead of being listed as iPhone.
2. Change iPhone Name Using Mac
An easy way to change the Name of your iPhone is by using the Finder Utility on your Mac.
1. Connect iPhone to Mac using its supplied cable.
2. Click on iPhone in the left-pane. In the right pane, click on the current Name of your iPhone, type a New Name and click on the Sync button.
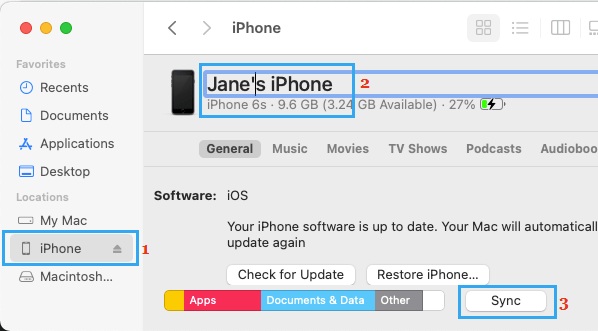
3. Once the Syncing process is completed, you will see your iPhone appearing with its New Name in Finder.
3. Change iPhone Name Using iTunes
If your iPhone is connected to a Windows computer, you can easily change its Name within iTunes.
1. Connect iPhone to Computer using its supplied USB cable.
2. Open iTunes on your Computer and click on the Phone icon as it appears in iTunes.
3. Once you click on the Phone icon, you will see the picture of your device and Device Name appearing in the upper-left corner of your screen.
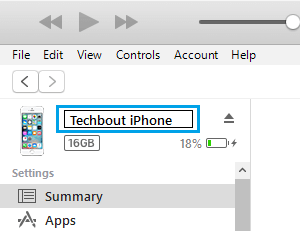
4. Click on the Device Name and type a New Name for your iPhone.
iTunes will automatically sync the New Name to your device and you should be able to see the New Name on your iPhone by going to Settings > General > About .
Источник
How to change the name of your iPhone
— Jun. 4th 2020 12:01 am PT
Does your iPhone name show up as just iPhone? Or maybe it has a custom name but you’re ready to shake things up? Follow along for how to change your iPhone’s name.
Your iPhone’s name will show up in a number of places like when sharing to it via AirDrop, viewing iCloud backups, using the Find My app, managing it when connected to your Mac, and more.
To make it easy to identify your device and also to spice things up a little bit, it’s fun to give your iPhone a unique name.
How to change your iPhone name
- On your iPhone, head to Settings
- Tap General>About>Name
- Tap your current name, delete it, and enter a new one
- Tap Done
Here’s how the process looks:
Here are a few other places you can change your name on your iPhone:
Apple ID
To change your name that’s associated with your Apple ID:
- Head to Settings
- Tap your name
- Choose Name, Phone Numbers, Email
- Now tap your name at the top to change it
Contacts
To change your name or other details on your contact card, head to the Contacts app, and tap yourself at the top of the app, lastly choose Edit in the top right corner and you can make your changes. Tap Done in the top right corner when finished.
Teach Siri how to pronounce names
Another nice option is the ability to teach Siri how to say names correctly. Check out our full tutorial here for how to train Siri on name pronunciation.
Read more tutorials from 9to5Mac:
FTC: We use income earning auto affiliate links. More.
Источник
How To Change the Name of Your iPhone
The name assigned to your iPhone is how you’ll recognize it when you sign into iCloud or view it from other devices.
* This post is part of iPhone Life‘s Tip of the Day newsletter. Sign Up. *
It can help to personalize the name of your phone to make it easier to recognize, especially if you have a lot of devices on your account. We’ll show you how to change the name of your iPhone to something more personal and easy to recognize.
With just a few taps, you can change the name of your iPhone to make it easier to find in your list of iCloud devices. Here’s how:
- Open the Settings app.

Tap on General.

Tap on About.

Tap on the line that says Name.


Now you know how to change the name of your iPhone! The label you entered will appear when connecting to your computer or looking for your iPhone in the list on iCloud or the Find My app. This means you won’t be confused when trying to determine which device is yours, which one belongs to other family members, and which old unused devices to remove from your account. It’s also handy to know that you can change your iPhone name any time you want; use these same steps to name and rename your device at will.
Источник
Add or remove your phone number in Messages or FaceTime
You can use the phone number of your iPhone with Messages and FaceTime on your Mac, iPad, or iPod touch.
Set up or remove your phone number
Turn your number on or off for Mac
Turn your number on or off for iPad or iPod touch
Set up your phone number
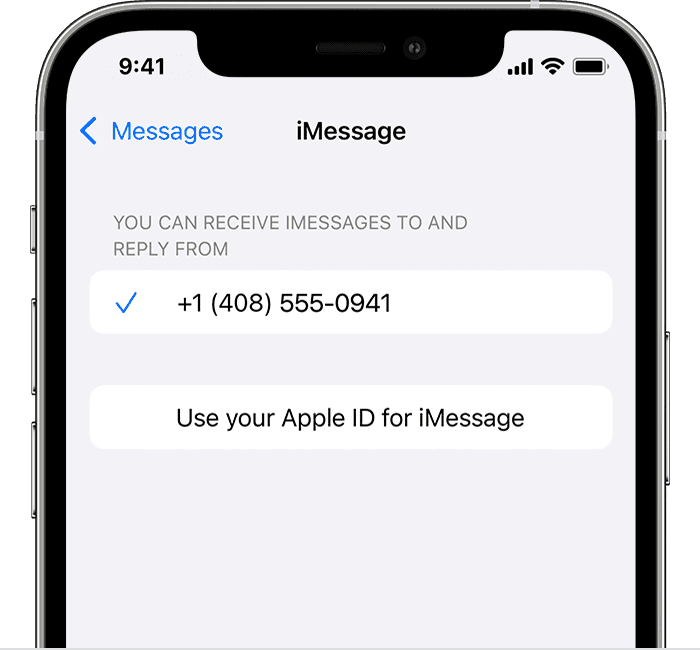
- Go to Settings > Messages and make sure that iMessage is on. You might need to wait a moment for it to activate.
- Tap Send & Receive. If you see “Use your Apple ID for iMessage,” tap it and sign in with the same Apple ID that you use on your Mac, iPad, and iPod touch.

- In the «You can receive iMessages to and Reply From» section, make sure that your phone number and Apple ID are selected.
- Go to Settings > FaceTime and make sure that your phone number and Apple ID are selected in the «You can be reached by FaceTime at» section.
On your other devices, you can now turn on the phone number that you just set up:
If you use this feature and share your Apple ID with someone, you can’t prevent them from seeing your conversations. Instead of using the same Apple ID as someone else, set up Family Sharing.
Remove your phone number
If you don’t want calls or messages for your iPhone on your iPad, iPod touch, or Mac, you can remove your phone number. There are two ways to do this:
- On your iPhone, go to Settings > Messages > Send & Receive. Select your Apple ID at the bottom of the screen and tap Sign Out. Then go to Settings > FaceTime, select your Apple ID and tap Sign Out.
- If the phone number that you want to remove belongs to an iPhone that you can’t access, change your Apple ID password. This removes all phone numbers from your iPad, iPod touch, and Mac. Calls or messages for the removed numbers won’t appear on those devices anymore.

Turn your phone number on or off for your Mac
After you set up your phone number, you can turn it on or off for Messages and FaceTime on your Mac.
- Open Messages or FaceTime. If asked, sign in with the Apple ID that you’re using with Messages and FaceTime on your iPhone.
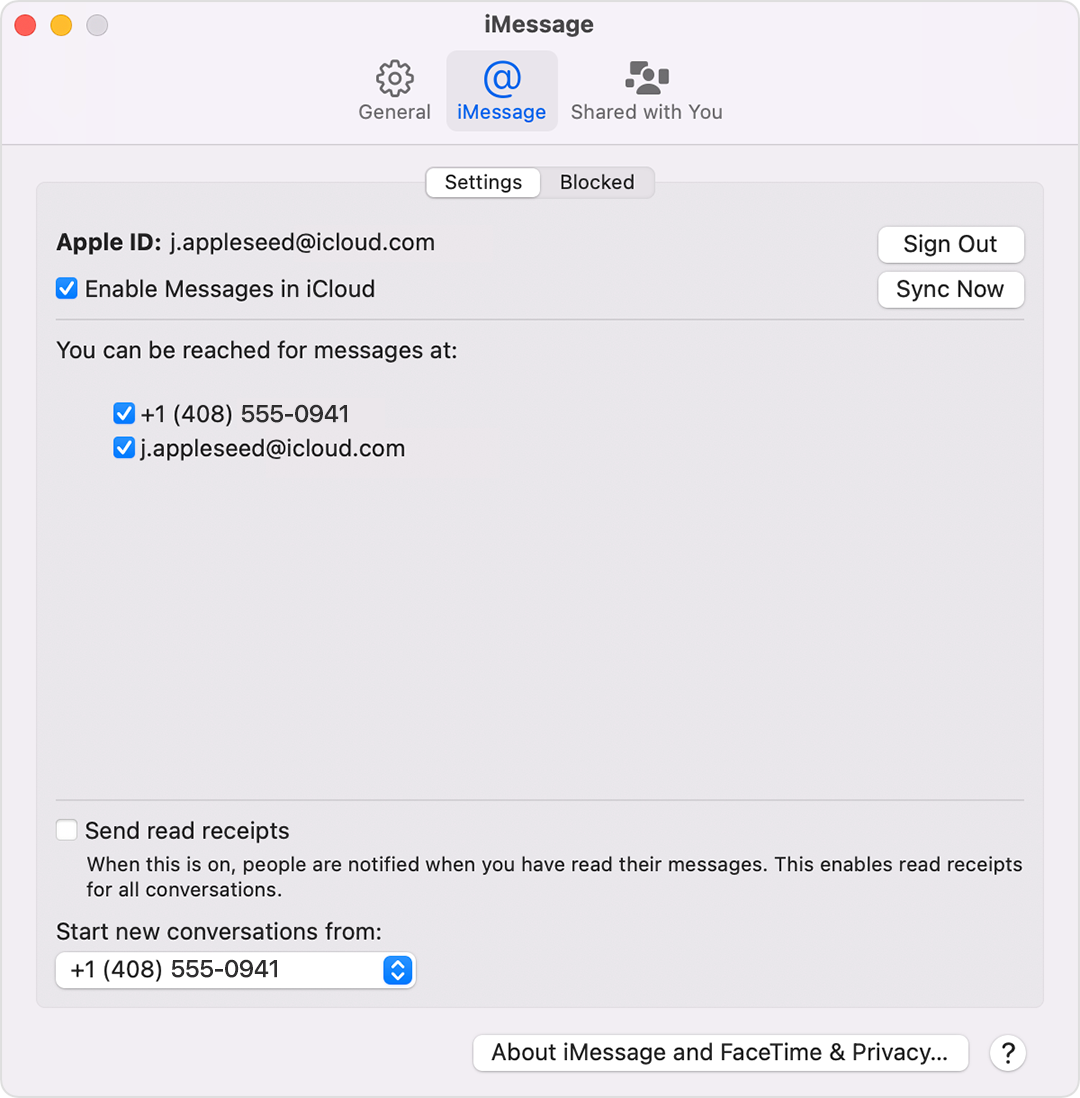
- For Messages, choose Messages > Preferences, then click iMessage. For FaceTime, choose FaceTime > Preferences, then click Settings.
- Turn your phone number on or off:
- To turn on your phone number, select it and your Apple ID in the list. If you don’t see your phone number, get help with your settings or contact Apple Support. If you see a number that isn’t yours, change your Apple ID password.
- To turn off your phone number, deselect it in the list.
- If you want recipients to see your phone number and not your Apple ID, select your phone number from the “Start new conversations from” or ”Start new calls from” pop-up menu.
Turn your phone number on or off for your iPad or iPod touch
After you set up your phone number, you can turn it on or off for Messages and FaceTime on your iPad or iPod touch.
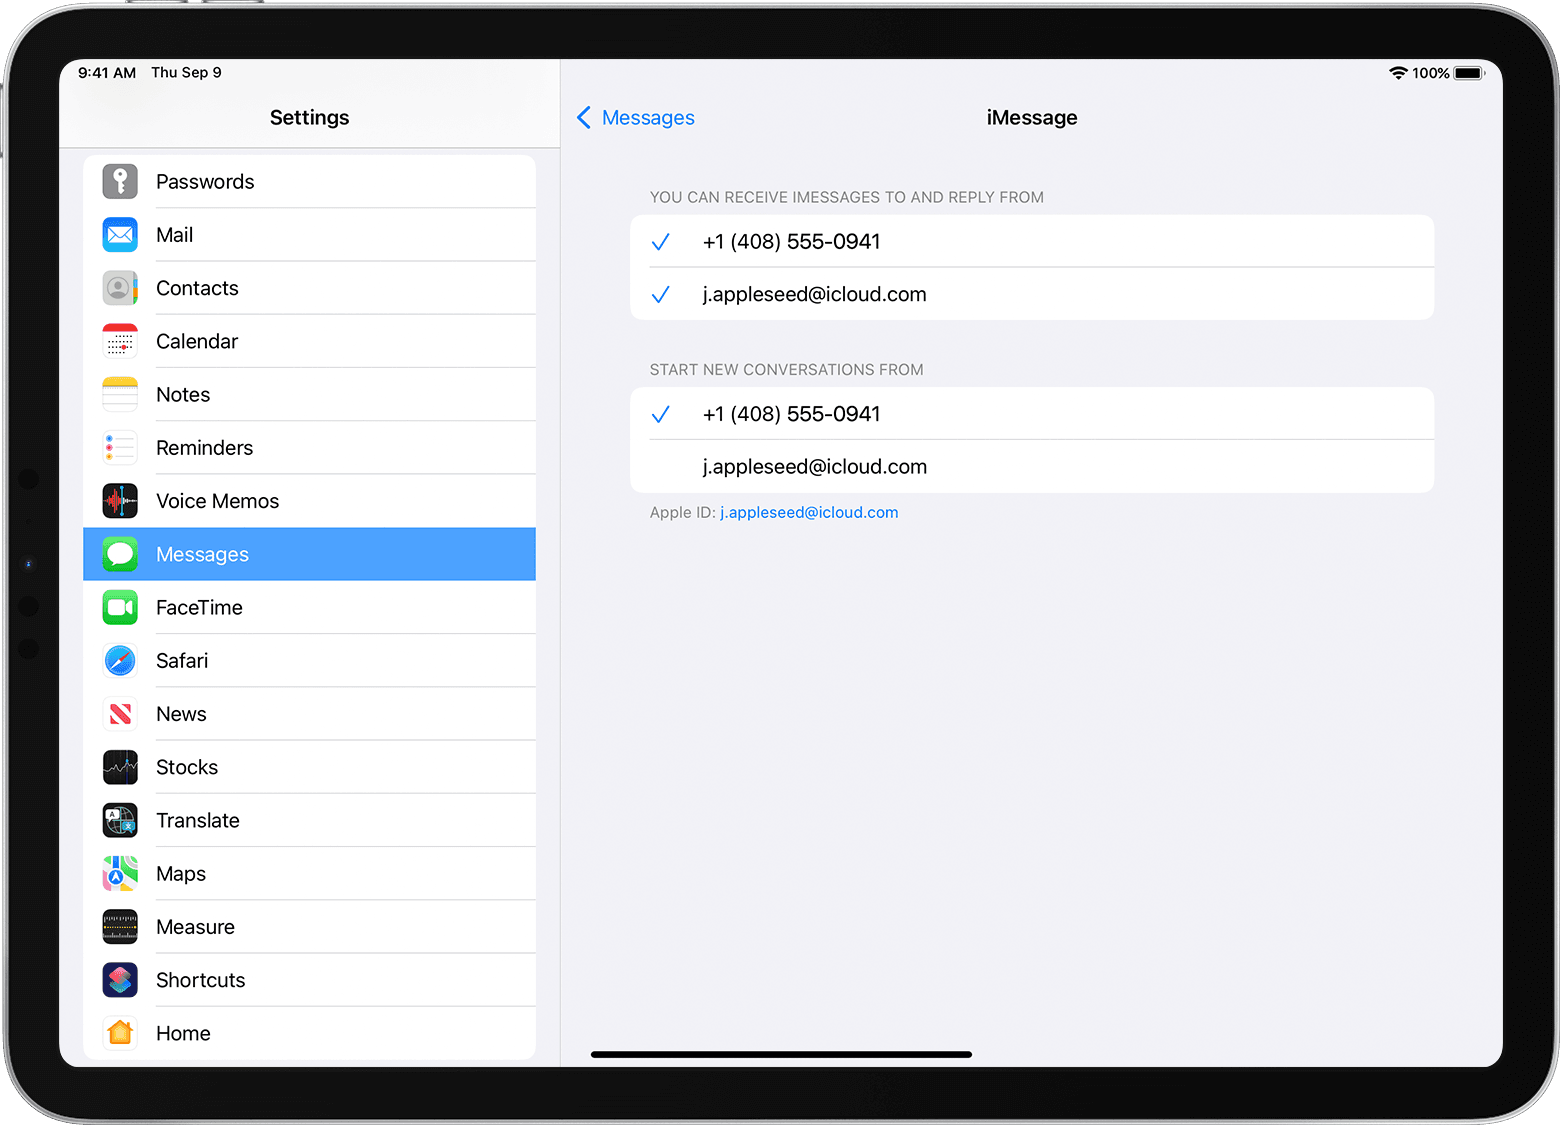
- For Messages, go to Settings > Messages and make sure that iMessage is on. If asked, sign in with the Apple ID you’re using with Messages and FaceTime on your iPhone. Then tap Send & Receive.
- For FaceTime, go to Settings > FaceTime. If asked, sign in with the Apple ID that you’re using with Messages and FaceTime on your iPhone.
- Turn your phone number on or off:
- To turn on your phone number, select it and your Apple ID in the “You can be reached” section. If you don’t see your phone number, get help with your settings or contact Apple Support. If you see a number that isn’t yours, change your Apple ID password.
- To turn off your phone number, uncheck it.
If you can’t see or select your number in Messages or FaceTime
- Make sure that you’re using the latest software for your Mac or iOS device.
- Make sure that you correctly followed the iPhone steps to set up your phone number. You should be using the same Apple ID on all of your devices.
- In the “You can be reached” section of Messages and FaceTime settings, make sure that there are checkmarks beside your phone number and Apple ID:
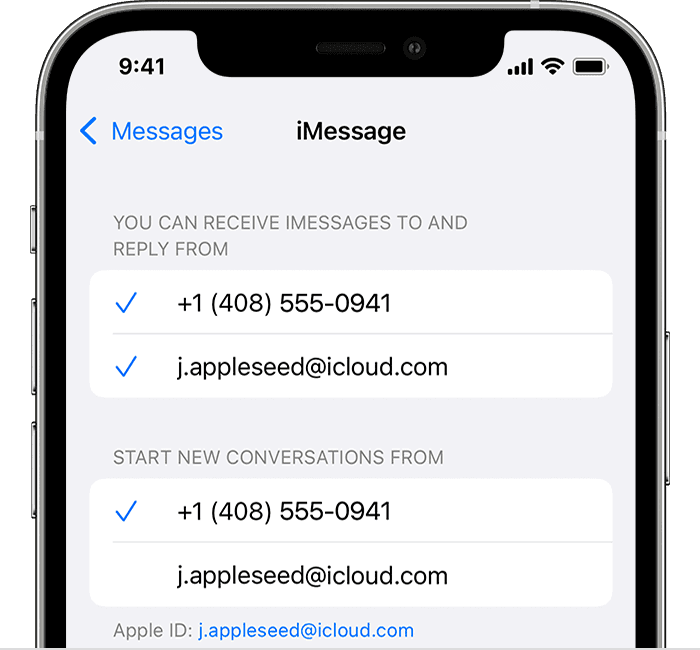
If your phone number is unchecked and you can’t select it, or you have some other issue, follow these steps:
- On your Mac:
- In Messages, choose Messages > Preferences, then click iMessage. Click Sign Out.
- In FaceTime, choose FaceTime > Preferences, then click Sign Out.
- On your iPhone, iPad, and iPod touch:
- Go to Settings > Messages > Send & Receive. Tap your Apple ID, then tap Sign Out.
- Go to Settings > FaceTime. Tap your Apple ID, then tap Sign Out.
- On your iPhone:
- Go back to Settings > Messages and make sure that iMessage is turned on.
- Tap Send & Receive, then choose “Use your Apple ID for iMessage” and sign in with your Apple ID.
- Using the same Apple ID, sign back in to Messages and FaceTime on your other devices.
If you still need help, change your Apple ID password and repeat the setup steps. If that doesn’t work, contact Apple Support.
Источник


