- Find the serial number or IMEI on your iPhone, iPad, or iPod touch
- Before you begin
- Find your serial number, IMEI/MEID, or ICCID
- iPhone
- iPad and iPod touch
- Finder and iTunes
- If you don’t have your device
- Remove Virus from iPhone with iOS Eraser
- 8 Ways to Check iPhone for Virus or Malware
- Part 1: Top 8 Ways to Check iPhone for Virus or Malware
- 1. Check Battery Performance
- 2. Check whether Your iPhone is JailBroken
- 3. Check Crashing Apps
- 4. Check Unknown Apps
- 5. Check Pop-up Ads in Safari
- 6. Check Unexplained Extra Charges
- 7. Your iPhone is overheating
- 8. The battery is draining faster
- Part 2: 4 Ways to Get Rid of Virus on Your iPhone
- 1. Turn off & Restart your Device
- 2. Clear History & Website Data
- 3. Reset Your iPhone as a New One
- 4. Restore your iPhone from Backup
- Part 3: Remove Virus from Your iPhone Completely
- Conclusion
Find the serial number or IMEI on your iPhone, iPad, or iPod touch
Learn how to find the serial number, IMEI/MEID, CDN, and ICCID on your iPhone, iPad, or iPod touch.
Before you begin
- You can find these numbers in several places, including Settings, on the physical device, in Finder or iTunes, and on the original packaging.
- When you contact Apple for support, you can use the serial number or the IMEI/MEID number to identify your device.

Find your serial number, IMEI/MEID, or ICCID
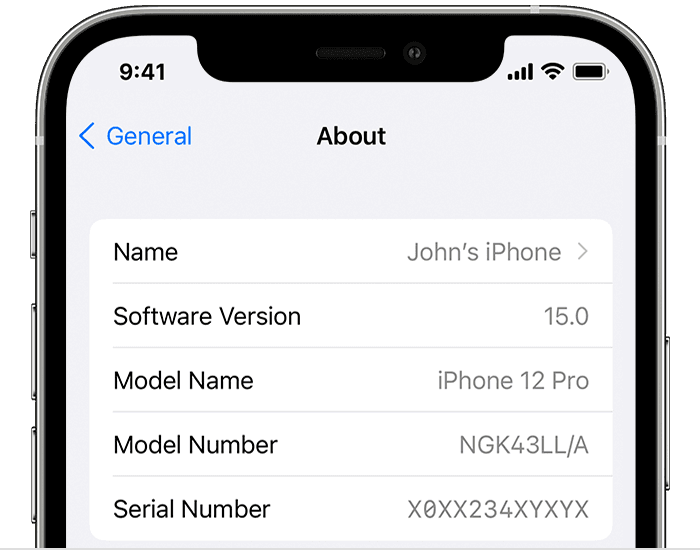
- Go to Settings > General and tap About.
- Look for the serial number. You might need to scroll down to find the IMEI/MEID, and ICCID.

- To paste this information into Apple registration or support forms, touch and hold the number to copy.
Still haven’t found the number that you need? See the following sections.
In Finder or iTunes
Don’t have your device?
iPhone
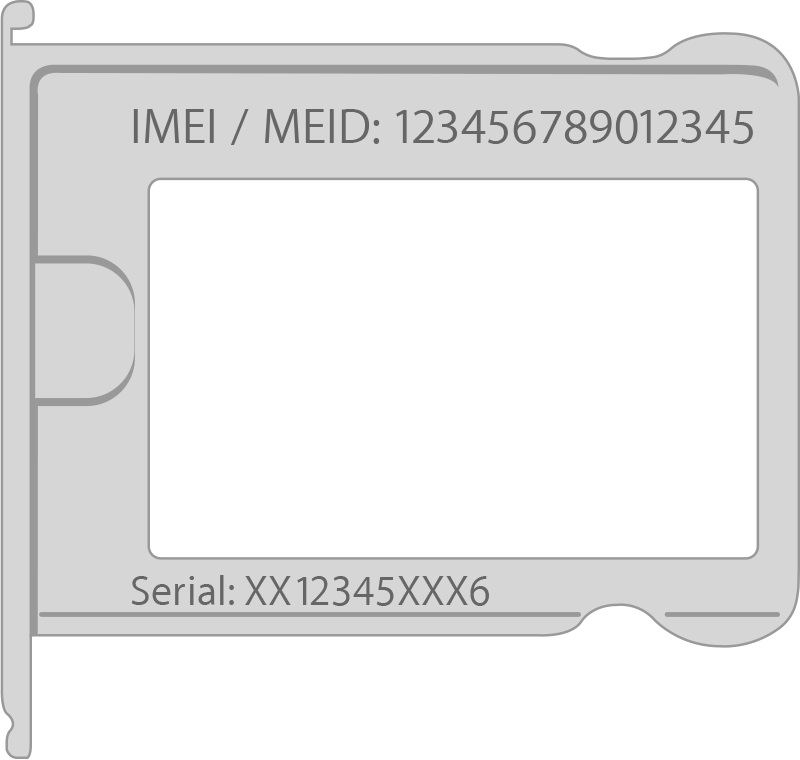
On these devices, find the serial number in Settings and the IMEI/MEID on the SIM tray. If you need support but you can’t view the Settings menu, you can use the IMEI/MEID instead of the serial number:
- iPhone 13
- iPhone 13 mini
- iPhone 13 Pro
- iPhone 13 Pro Max
- iPhone 12
- iPhone 12 mini
- iPhone 12 Pro
- iPhone 12 Pro Max
- iPhone SE (2nd generation)
- iPhone 11
- iPhone 11 Pro
- iPhone 11 Pro Max
- iPhone XS
- iPhone XS Max
- iPhone XR
- iPhone X
- iPhone 8
- iPhone 8 Plus
- iPhone 7
- iPhone 7 Plus
- iPhone 6s
- iPhone 6s Plus
![]()

On these devices, find the serial number in Settings and the IMEI/MEID (the MEID is the first 14 digits of the IMEI) on the back. If you need support but you can’t view the Settings menu, you can use the IMEI/MEID instead of the serial number:
- iPhone 6
- iPhone 6 Plus
- iPhone SE (1st generation)
- iPhone 5s
- iPhone 5c
- iPhone 5

- iPhone 3G
- iPhone 3GS
- iPhone 4 (GSM model)
- iPhone 4s
If you have an original iPhone, find the serial number and IMEI engraved on the back.
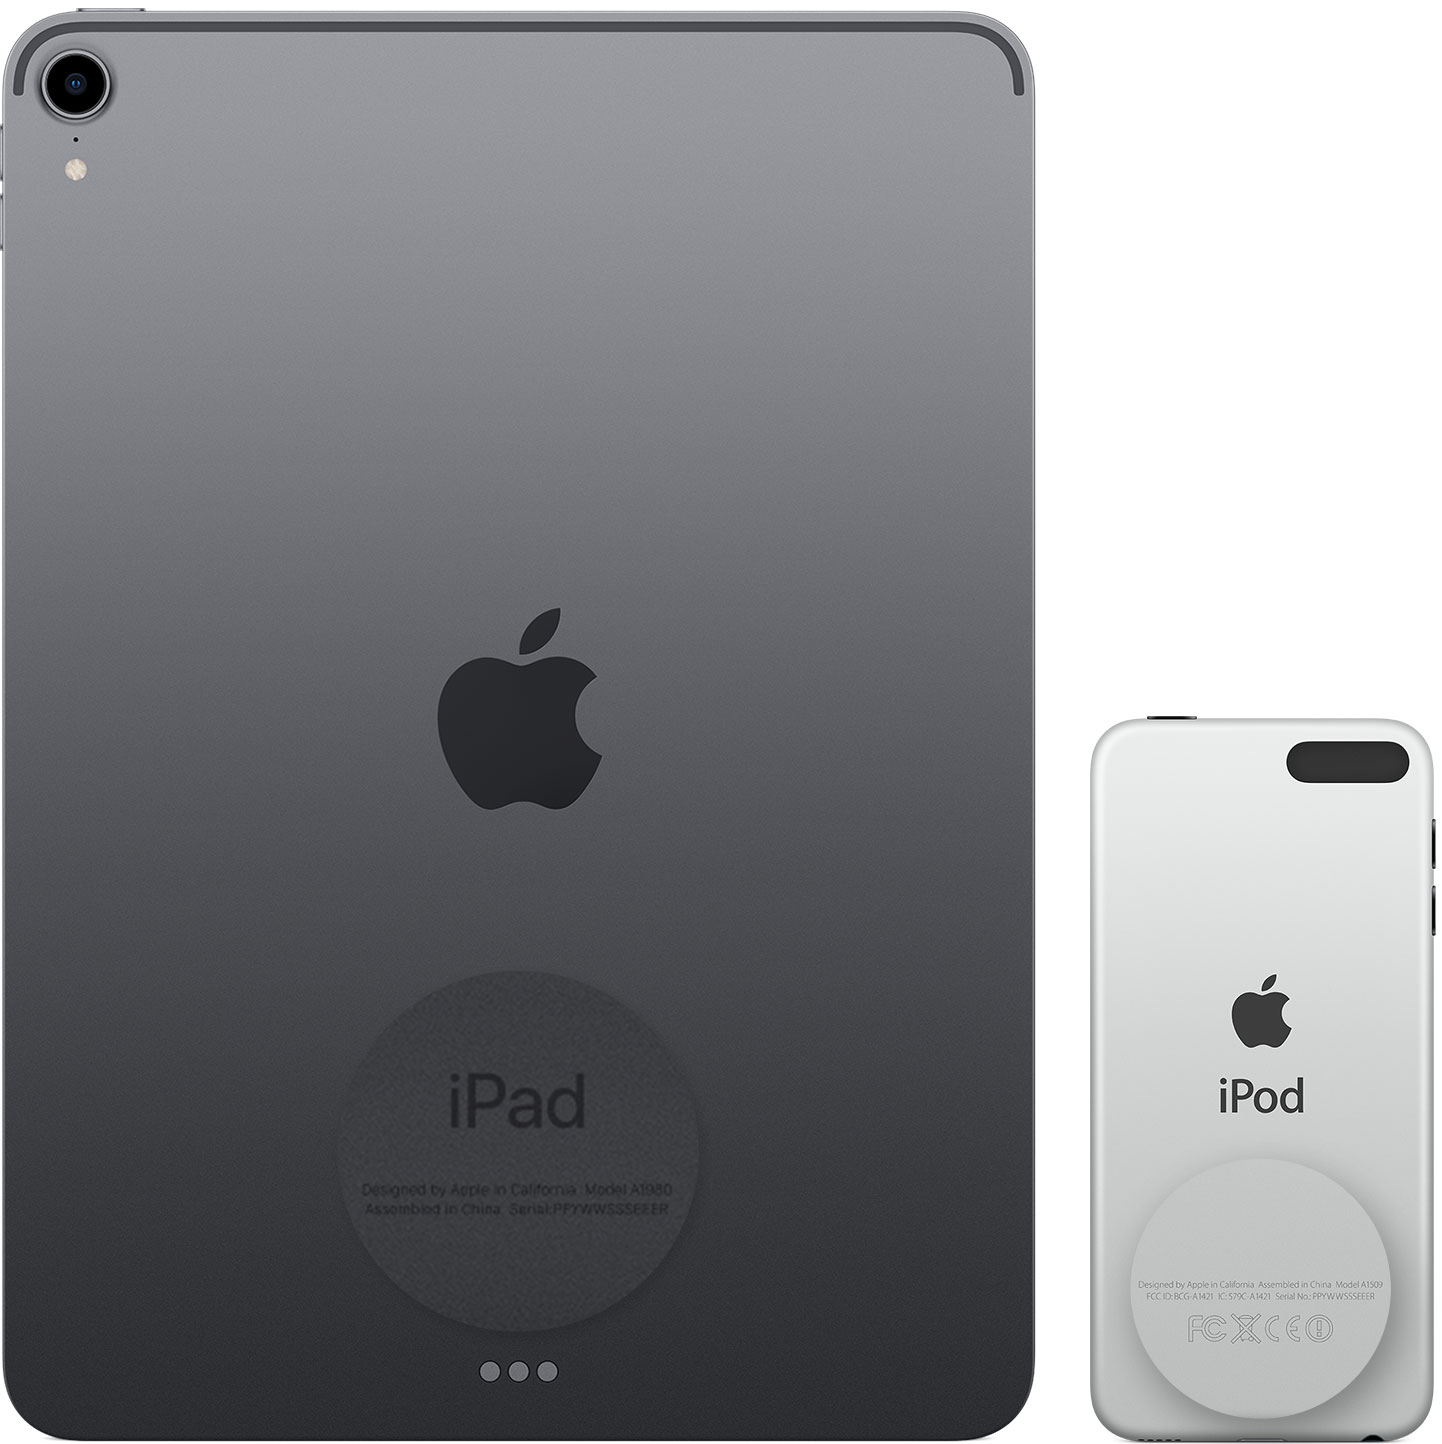
iPad and iPod touch
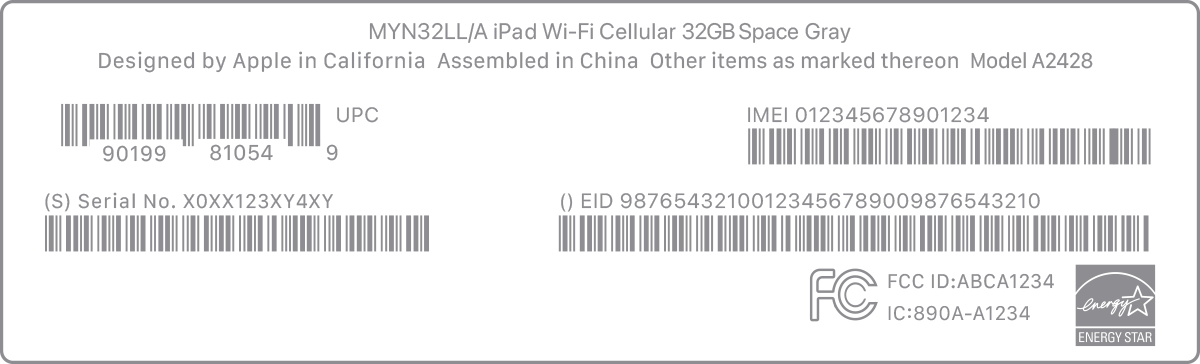
Find the serial number for your iPad Pro, iPad, or iPod touch on the back of the device. On an iPad (Wi-Fi + cellular model), you’ll also find the IMEI.
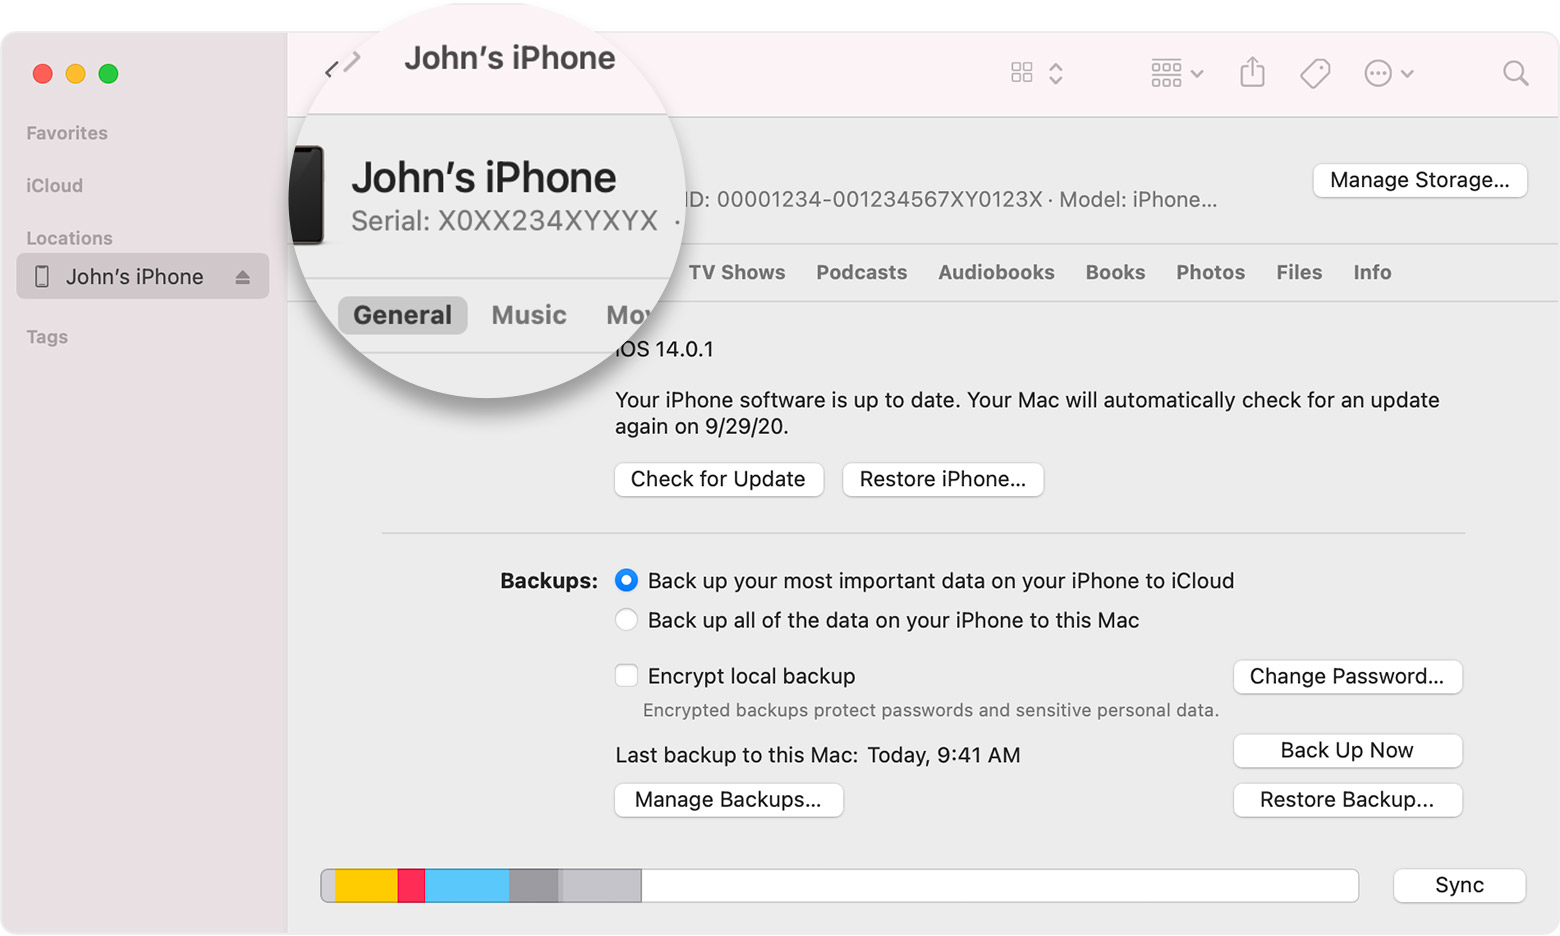
Finder and iTunes
You can also find the serial number for your device in Finder or iTunes:
- Connect your device to your computer.
- On a Mac with macOS Catalina 10.15 or later, open the Finder. On a Mac with macOS Mojave or earlier, or on a PC, open iTunes.
- Locate your device. In Finder, make sure you’re under the General tab. In iTunes click the Summary tab to see its information.
- For an iPhone, click Phone Number under your device name or the device model to find the IMEI/MEID and ICCID. For an iPad (cellular model), click Serial Number to find the CDN, IMEI/MEID, and ICCID.
If you’d like to paste this information into Apple registration or support forms, choose Edit > Copy Serial Number.
If you don’t have your device
There are several places to check that might show the serial or IMEI/MEID number.
- Go to appleid.apple.com in a web browser on your computer.
- Sign in with the Apple ID that you use on your device.
- Scroll down to the Devices section. To see the serial and IMEI/MEID number, select the device.
If you still need help, here’s what to try next:
- Do you have a different device with iOS 10.3 or later that’s signed in to your Apple ID? On that device, go to Settings > [Your name]. Scroll down to see any devices signed in with your Apple ID. To view the serial and IMEI/MEID number, tap the device name.
- Do you still have your device’s original package? Find the serial number and IMEI/MEID on the barcode:
- Still can’t find the number that you need? Contact Apple Support by selecting your device from this list:
- iPhone
- iPad
- iPod touch
Information about products not manufactured by Apple, or independent websites not controlled or tested by Apple, is provided without recommendation or endorsement. Apple assumes no responsibility with regard to the selection, performance, or use of third-party websites or products. Apple makes no representations regarding third-party website accuracy or reliability. Contact the vendor for additional information.
Источник
Remove Virus from iPhone with iOS Eraser
 > How to > iPhone > How to Check iPhone for Virus or Malware
8 Ways to Check iPhone for Virus or Malware
Do iPhones get viruses? Yes they do — but it’s very rare. Rather than an a virus, it’s more likely that you’re seeing a misbehaving advert in an app you use regularly, triggering behaviour that is intended to convince you that iOS is infected and you need to download an app to fix it, or redirecting you to a dodgy web page or a dodgy app on the App Store. Basically, there is a lot of personal information stored in a device and if your iPhone is infected, your personal details might get compromised.
Part 1: Top 8 Ways to Check iPhone for Virus or Malware
Malware does exist in iPhone and if you are sure that your device is misbehaving, you should definitely check your iPhone for viruses or malware. If you are thinking how to check iPhone for virus or malware, you can follow the methods given below.
1. Check Battery Performance
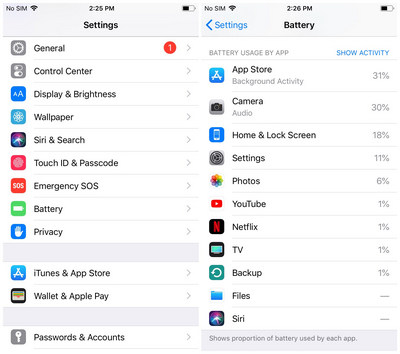
It’s a good idea to have at least a general idea of your typical battery usage month over month. This is because an increase in your battery usage can indicate a problem in the same way a dip in your gas mileage can. If your iPhone’s battery usage is suddenly spiking it may be an indicator of malware burning through data in the background of your device.
Step 1 : Go to Settings and tap on Battery.
Step 2 : All the apps with the respective battery usage will be listed.
Step 3 : When you tap on Show Detailed Usage, you will get the breakdown of foreground and background usage. If you find an app that you don’t recognize, remove it immediately.
2. Check whether Your iPhone is JailBroken
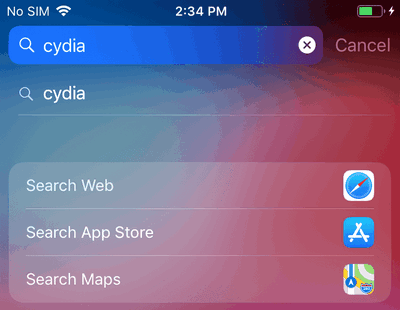
Jailbreaking removes many of the iPhone’s built-in restrictions, leaving it vulnerable to unapproved app installations. If you purchased the iPhone from someone else, they may have jailbroken it to install malicious software. Here’s how to check if it’s jailbroken:
Step 1 : Open the Search bar in your device.
Step 2 : Type cydia in the search bar and tap Search. If an app called “Cydia” appears in the search results, your iPhone is jailbroken.
3. Check Crashing Apps
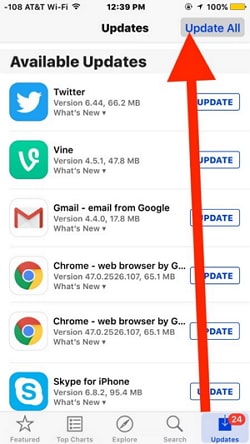
Sometimes apps crash, but that should be a rare occurrence. If one or more of your apps are repeatedly crashing, make sure you’ve updated them all. If a particular app keeps crashing, try deleting and downloading it again. If one or more apps still keep crashing, maybe malware is at play after all.
Step 1 : Open App Store on your device.
Step 2 : If asked, enter the Apple ID and password.
Step 3 : If there are any updates available, tap Update All.
4. Check Unknown Apps
The malicious apps look similar to the original apps so you need to be extra careful while checking for unknown apps.
Step 1 : Swipe through the screen and look for the apps that you don’t remember installing.
Step 2 : If you see an app that looks familiar but you don’t recall installing it, it could be malicious. It’s best to delete it if you don’t know what it is.
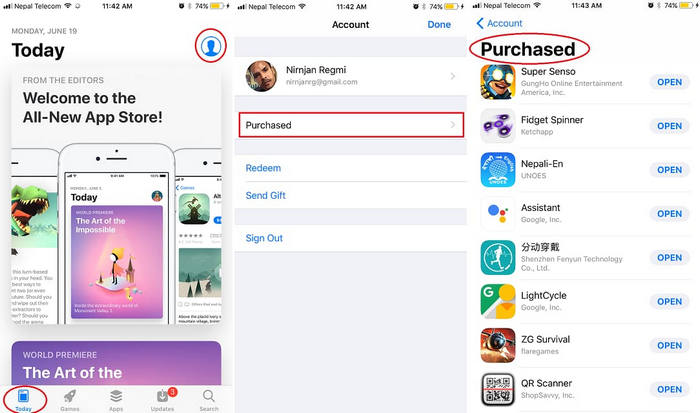
Step 3 : To see a list of every app you’ve installed from the App Store, tap the Apps icon at the bottom of the store, tap your profile photo, then tap Purchased. If there’s an app on your phone that isn’t in this list (and doesn’t come from Apple), it’s likely malicious.
5. Check Pop-up Ads in Safari
If you’re experiencing lots of pop-ups when browsing Safari on your iPhone, that’s not necessarily a symptom of malware. Make sure you’ve blocked pop-ups in your Settings, then see if the problem diminishes. If pop-ups keep, well, popping up with the same frequency, you may have an issue.
6. Check Unexplained Extra Charges
Viruses run in the background, using your data to communicate with the internet. Check your billing statement to make sure you haven’t had a spike in data usage, or are suddenly paying for sending SMS messages to premium numbers.
7. Your iPhone is overheating
Again, lots of things could cause your iPhone to overheat (a faulty battery is usually the culprit) But, in rare cases, it could indeed be a sign of a virus.
8. The battery is draining faster
This could be down to any number of issues, from legitimate apps eating up your battery to the fact your battery may just be declining due to age. That said, there is a chance, however slim, that a piece of malware is working in the background without your knowledge.
Part 2: 4 Ways to Get Rid of Virus on Your iPhone
After checking all the steps above, if you find something suspicious or unknown apps, you need to take actions on this situation.
1. Turn off & Restart your Device
Step 1 : Hold down the power button of your device until you see a slider.
Step 2 : Slide and turn the iPhone off.
Step 3 : To restart, hold down the power button until you see the Apple logo.
2. Clear History & Website Data
Step 1 : Open Settings on your device and tap Safari.
Step 2 : Again tap Clear History and Website Data.
Step 3 : Confirm by tapping Clear History and Data.
![]()
3. Reset Your iPhone as a New One
If you’re even marginally convinced that your iPhone has picked up malware, it’s time to do an iCloud or an iTunes reset. This step will allow your iPhone to start over with factory settings and, hopefully, no malware.
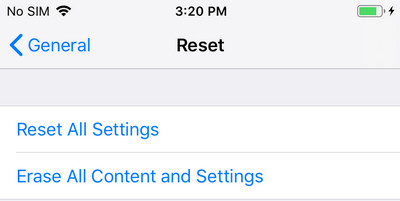
Step 1 : Go to Settings -> General -> Reset -> Erase All Contents and Settings.
Step 2 : Enter your passcode to confirm the reset.
Step 3 : The process will take some time to complete. Then set up your device as a new one.
4. Restore your iPhone from Backup
You can also restore the backup to your device to remove the viruses. You can restore either the iTunes backup or iCloud backup to your iPhone. If the most recent backup is corrupted and if for any reason you are not able to restore, it might contain malware. So, restore one of other backups to your device.
Part 3: Remove Virus from Your iPhone Completely
Syncios iOS Data Eraser is a thoughtful and efficient tool created for iOS devices. It is designed for data management of all kinds of data on iPhones and iOS devices. Its power comes from being able to remove and erase files permanently with zero chance of being recoverability by any recovery tool anywhere in the world. This is essential for protecting your private information and files, and for keeping the spyware from popping back up in the future.
Step 1 : Download and install Syncios iOS Data Eraser on your computer.
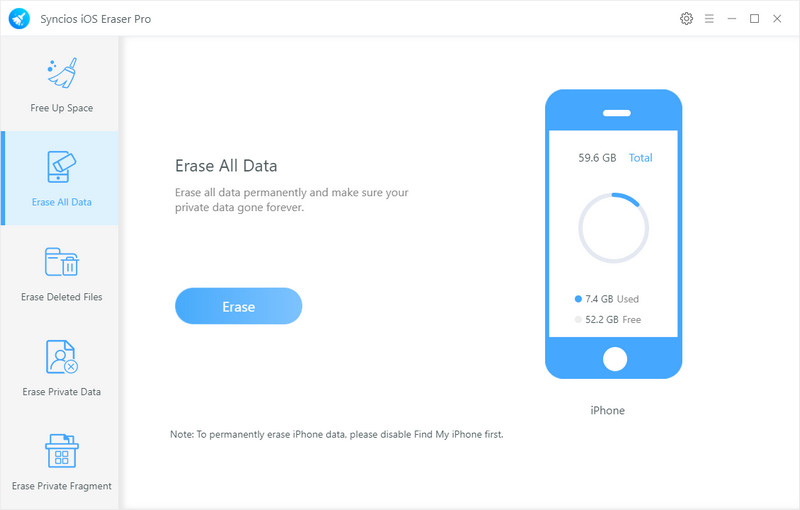
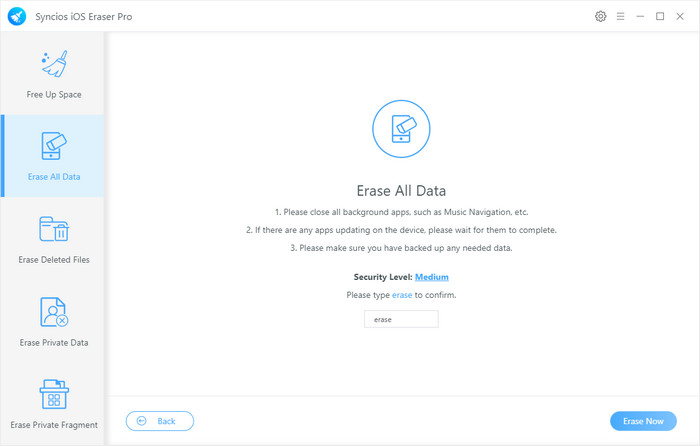
Step 2 : Select «Erase All Data» on the program screen, and then click «Erase» to bring up the confirmation box.
Step 3 : Select the desired security level. For spyware, you will want to select «High Level,» which performs the full erasure process twice using the DoD 5220.22-M standard.
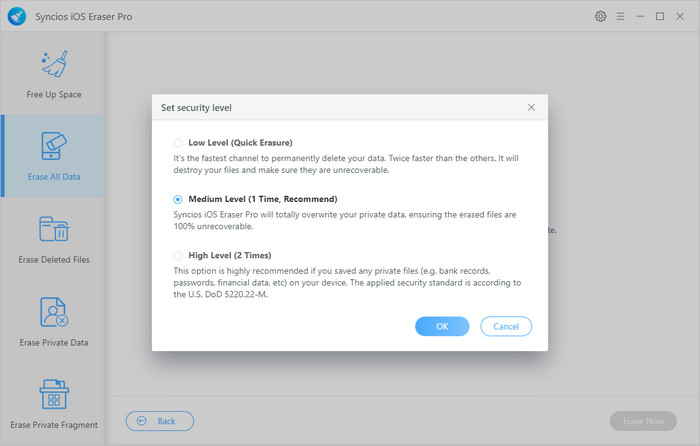
Step 4 : Finish confirming your Erase All Data choices and begin the erasing process. When the process is complete, the software program screen will let you know.
And that’s it! Now you have erase all spyware and virus from your iPhone completely.
Conclusion
To protect your iPhone from virus or malware, we suggest you update iOS regularly. It can be tempting to wait on updating your operating system; it seems like you just got comfortable with the last version! There’s a very good reason to make the switch as soon as possible, though. Operating system updates are a way for Apple to introduce new features and fix bugs, but also to keep security at the highest possible level. When a security breach or even the possibility of one is detected, Apple programmers get to work tightening up the chinks in your iPhone’s armor. Waiting to switch to the latest version of iOS leaves your iPhone vulnerable to malware, so update as soon as you can, every time.
If you are thinking how to check iPhone for virus or malware then you have to view all the above methods carefully. You can choose any one method depending on your situation and then check the iPhone for the virus. You can ask anything regarding this topic or this ios data eraser tool by leaving your comments below.
Источник


