- How to close app android studio
- How to Reopen, Close and Save project in Android Studio
- How to Close project in Android Studio:
- How to Save project in Android Studio:
- How to Close Apps on Android
- Shut off running apps to free up memory and declutter
- Closing Apps Isn’t Usually Necessary
- How to Close Apps on Android From the Home Screen
- How to Close Apps Using the Apps Manager
- How to Shut Down Running Services on Android
- How to detect Android application open and close: Background and Foreground events.
- Detecting App Lifecycle Evnts
- Backgrounding
- Foregrounding
- Implementing a Foreground and Background Handler
- AppLifecycleHandler
- Update: Using Android Architecture Components
- Build Your First Android App in Java
- 1. Welcome!
- What you must know already
- What you’ll learn
- Use Android Studio and Java to write Android apps
- Note: This version of the codelab requires Android Studio 3.6 or higher.
- 2. Install Android Studio
- Note: This version of the codelab requires Android Studio 3.6 or higher.
- 3. Task: Create your first project
- What you’ll learn
- Step 1: Create a new project
- Step 2: Get your screen set up
- Step 3: Explore the project structure and layout
- Step 4: Create a virtual device (emulator)
- Step 5: Run your app on your new emulator
How to close app android studio
When the project is already opened in android studio and the same time Another project is opened in android studio then use the Reopen project. When the project work is done in android studio then use the Close project and When all project is complete in android studio then use the Save All.
How to Reopen, Close and Save project in Android Studio
How to Reopen the project in Android Studio perform the following steps:
Step 1: Firstly, Click on File then Click on Reopen Project and choose the file which file you want to be opened. We choose “My Application” file.

Step 2: After that a message box will be shown on your computer screen. This will show project will be opened in “This Window” or “New Window”. We open the project in “New Window” and After that your project will be opened.
How to Close project in Android Studio:
Step 1: Click on File then Click on Close Project and your project will be closed.
How to Save project in Android Studio:
Step 1: Click on File then Click on Save All and your project will be saved. You can also use ctrl+S shortcut.
Источник
How to Close Apps on Android
Shut off running apps to free up memory and declutter
:max_bytes(150000):strip_icc()/tim-fisher-5820c8345f9b581c0b5a63cf.jpg)
To close apps on Android means to shut the apps down. You might shut down an app if it isn’t responding normally, if your phone or tablet is low on memory, or to clear up the screen.
Closing Apps Isn’t Usually Necessary
It’s not usually required that you shut down apps on Android because your device should handle the apps appropriately, shuffling memory back and forth between apps you’re actively using and the ones running in the background. Constantly shutting down apps might make your device run slower. However, if there’s a reason you want to clear the apps, you can do so easily.
Shutting off, killing, or clearing away Android apps isn’t the same as deleting them. You need to uninstall an Android app to remove it completely.
These directions should work no matter who made your tablet or phone—Google, Samsung, Xiaomi, etc.
How to Close Apps on Android From the Home Screen
There are a couple of ways to shut off apps. You can close running apps from the Home screen or from the device settings.
The quickest way is from the Home screen at any time:
Start by viewing all running apps. How you do this depends on your phone and the Android version. If you’re not sure how your device shows running apps, try the different methods that are available:
- Swipe up from the bottom of the screen (but don’t swipe too far up or the app drawer opens).
- Tap the small square icon on the bottom of the screen.
- Press the physical button on the bottom of your phone or tablet that looks like two overlapping rectangles. You might not see it light up until you press in that area next to the Home button.
- On Samsung Galaxy devices, press the Recent Apps button to the left of the Home button.
Swipe up and down or left and right (depending on your phone) to find the app you want to close down.
Swipe up on the app you want to kill, as if you were throwing it off the screen. This works if your apps are listed horizontally.
:max_bytes(150000):strip_icc()/001-close-apps-on-android-4164116-73590309b5e14ae0ae3cee02b4323de0.jpg)
Or, for vertically listed apps, swipe the app left or right to close it immediately.
:max_bytes(150000):strip_icc()/002-close-apps-on-android-4164116-dc89f3221859413e94385b904ec65efc.jpg)
On some devices, there’s an exit button in the upper-right corner of each app when in this view, and you can tap it to close the app. If you see a three-lined button at the bottom with a small x on it, tap it to close all the recently opened apps.
Some devices have a Clear all option if you swipe all the way to the left. Tapping that kills all the apps at once.
Repeat steps 2 and 3 to close the other running apps. When you’re finished, select an empty space next to the edge of the screen or press the Home button.
How to Close Apps Using the Apps Manager
Your phone or tablet has a built-in manager for apps that you should use if you need to close background apps (apps that are running but don’t show up when you follow the method above).
When you use the settings to close running apps, there are more options than what you find in the swiping method. This option isn’t as friendly and is geared more toward killing unresponsive apps rather than exiting gracefully.
Open the settings and tap Apps & notifications. If you don’t see that, look for Apps, App Management, Application manager, or General > Apps.
Tap See all apps and then locate the problem app that you want to shut down. If you don’t see that option, you may be viewing a list of the apps on your device, in which case you can scroll to find the one you want to close.
:max_bytes(150000):strip_icc()/003-close-apps-on-android-4164116-05ca101191b54b64ac4bf2420256c0d4.jpg)
Select the app and choose Force stop.
Depending on your device, this screen is also where you can uninstall the app if you’re not sure why you have it in the first place.
Tap OK or Force stop to confirm that you want to kill the running app.
Once the app has stopped, you can open it again normally. However, the destructive nature of forcing an app to close down may cause some corruption or unintended behavior.
:max_bytes(150000):strip_icc()/004-close-apps-on-android-4164116-2a8f68613ace47d1868b7b067c63aab6.jpg)
How to Shut Down Running Services on Android
Services are usually not something the average person needs to deal with, especially considering that the ability to do so isn’t available by default. However, if you know what you’re doing, and you need to terminate a service that a particular app is running, it’s a straightforward process.
Enable developer mode. This is a special mode that lets you view and edit settings that a normal user can’t see.
Go to Settings > System > Advanced, then tap Developer options. Some older Android devices store these options in Settings > System.
:max_bytes(150000):strip_icc()/005-close-apps-on-android-4164116-a0d93c864c674f208bb2c6af4e9b080f.jpg)
Select Running services, and scroll through the list to find and select the app that’s running the service you want to kill.
Choose Stop next to the service you want to end. Depending on your device, you might need to press OK to confirm.
Источник
How to detect Android application open and close: Background and Foreground events.

Dec 17, 2017 · 4 min read
This question seems to come up a lot. Especially if you are just starting out with Android developme n t. It’s simply because there is nothing obvious built into the Android SDK enabling developers to hook into application lifecycle events. Activities and Fragments have all the callbacks under the sun to detect lifecycle change, but there is nothing for the whole application. So how do you detect when a user backgrounds and foregrounds your app. This is an example of how your could detect Application lifecycle events. Feel free to adjust and enhance it to suit your needs, but this idea should be enough to work for most applications with one caveat, it will only work for Android API level 14+(IceCreamSandwich 🍦🥪).
Detecting App Lifecycle Evnts
Backgrounding
ComponentCallbacks2 — Looking at the documentation is not 100% clear on how you would use this. However, take a closer look and you will noticed the onTrimMemory method passes in a flag. These flags are typically to do with the memory availability but the one we care about is TRIM_MEMORY_UI_HIDDEN. By checking if the UI is hidden we can potentially make an assumption that the app is now in the background. Not exactly obvious but it should work.
Foregrounding
ActivityLifecycleCallbacks — We can use this to detect foreground by overriding onActivityResumed and keeping track of the current application state (Foreground/Background).
Implementing a Foreground and Background Handler
First, lets create our interface that will be implemented by a custom Application class. Something as simple as this:
Next, we need a class that is going to implement the ActivityLifecycleCallbacks and ComponentCallbacks2 we discussed earlier. So lets create an AppLifecycleHandler and implement those interfaces and override the methods required. And lets take an instance of the LifecycleDelegate as a constructor parameter so we can call the functions we defined on the interface when we detect a foreground or background event.
We outlined earlier that we could use onTrimMemory and the TRIM_MEMORY_UI_HIDDEN flag to detect background events. So lets do that now.
Add this into the onTrimMemory method callback body
So now we have the background event covered lets handle the foreground event. To do this we are going to use the onActivityResumed. This method gets called every time any Activity in your app is resumed, so this could be called multiple times if you have multiple Activities. What we will do is use a flag to mark it as resumed so subsequent calls are ignored, and then reset the flag when the the app is backgrounded. Lets do that now.
So here we create a Boolean to flag the application is in the foreground. Now, when the application onActivityResumed method is called we check if it is currently in the foreground. If not, we set the appInForeground to true and call back to our lifecycle delegate ( onAppForegrounded()). We just need to make one simple tweak to our onTrimMemory method to make sure that sets appInForeground to false.
Now we are ready to use our AppLifecycleHandler class.
AppLifecycleHandler
Now all we need to do is have our custom Application class implement our LifecycleDelegate interface and register.
And there you go. You now have a way of listening to your app going into the background and foreground.
This is only supposed to be used as an idea to adapt from. The core concept using onTrimMemory and onActivityResumed with some app state should be enough for most applications, but take the concept, expand it and break things out it to fit your requirements. For the sake of brevity I won’t go into how we might do multiple listeners in this post, but with a few tweaks you should easily be able to add a list of handlers or use some kind of observer pattern to dispatch lifecycle events to any number of observers. If anyone would like me to expand on this and provide a multi listener solution let me know in the comments and I can set something up in the example project on GitHub.
Update: Using Android Architecture Components
Thanks to Yurii Hladyshev for the comment.
If you are using the Android Architecture Components library you can use the ProcessLifecycleOwner to set up a listener to the whole application process for onStart and onStop events. To do this, make your application class implement the LifecycleObserver interface and add some annotations for onStop and onStart to your foreground and background methods. Like so:
Источник
Build Your First Android App in Java
1. Welcome!
In this codelab, you’ll learn how to build and run your first Android app in the Java programming language. (If you’re looking for the Kotlin version of this codelab, you can go here.)
What you must know already
This codelab is written for programmers and assumes that you know either the Java or Kotlin programming language. If you are an experienced programmer and adept at reading code, you will likely be able to follow this codelab, even if you don’t have much experience with Java.
What you’ll learn
- How to use Android Studio to build your app.
- How to run your app on a device or in the emulator.
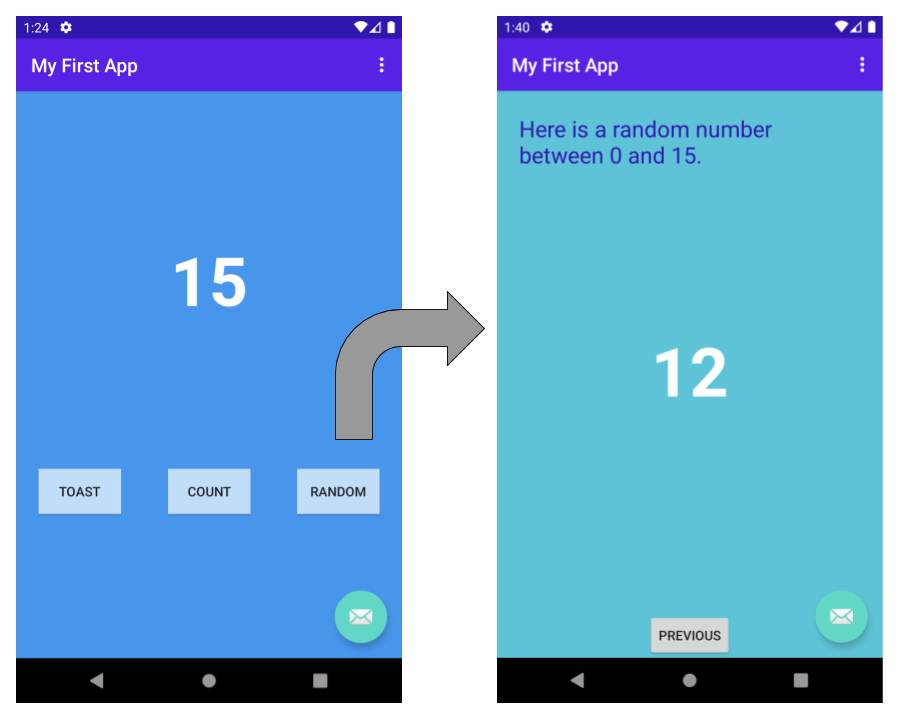
- How to add interactive buttons.
- How to display a second screen when a button is pressed.
Use Android Studio and Java to write Android apps
You write Android apps in the Java programming language using an IDE called Android Studio. Based on JetBrains’ IntelliJ IDEA software, Android Studio is an IDE designed specifically for Android development.
Note: This version of the codelab requires Android Studio 3.6 or higher.
To work through this codelab, you will need a computer that can run Android Studio 3.6 or higher (or already has Android Studio 3.6 or higher installed).
2. Install Android Studio
Note: This version of the codelab requires Android Studio 3.6 or higher.
You can download Android Studio 3.6 from the Android Studio page.
Android Studio provides a complete IDE, including an advanced code editor and app templates. It also contains tools for development, debugging, testing, and performance that make it faster and easier to develop apps. You can use Android Studio to test your apps with a large range of preconfigured emulators, or on your own mobile device. You can also build production apps and publish apps on the Google Play store.
Note: Android Studio is continually being improved. For the latest information on system requirements and installation instructions, see the Android Studio download page.
Android Studio is available for computers running Windows or Linux, and for Macs running macOS. The OpenJDK (Java Development Kit) is bundled with Android Studio.
The installation is similar for all platforms. Any differences are noted below.
- Navigate to the Android Studio download page and follow the instructions to download and install Android Studio.
- Accept the default configurations for all steps, and ensure that all components are selected for installation.
- After the install is complete, the setup wizard downloads and installs additional components, including the Android SDK. Be patient, because this process might take some time, depending on your internet speed.
- When the installation completes, Android Studio starts, and you are ready to create your first project.
Troubleshooting: If you run into problems with your installation, see the Android Studio release notes or Troubleshoot Android Studio.
3. Task: Create your first project
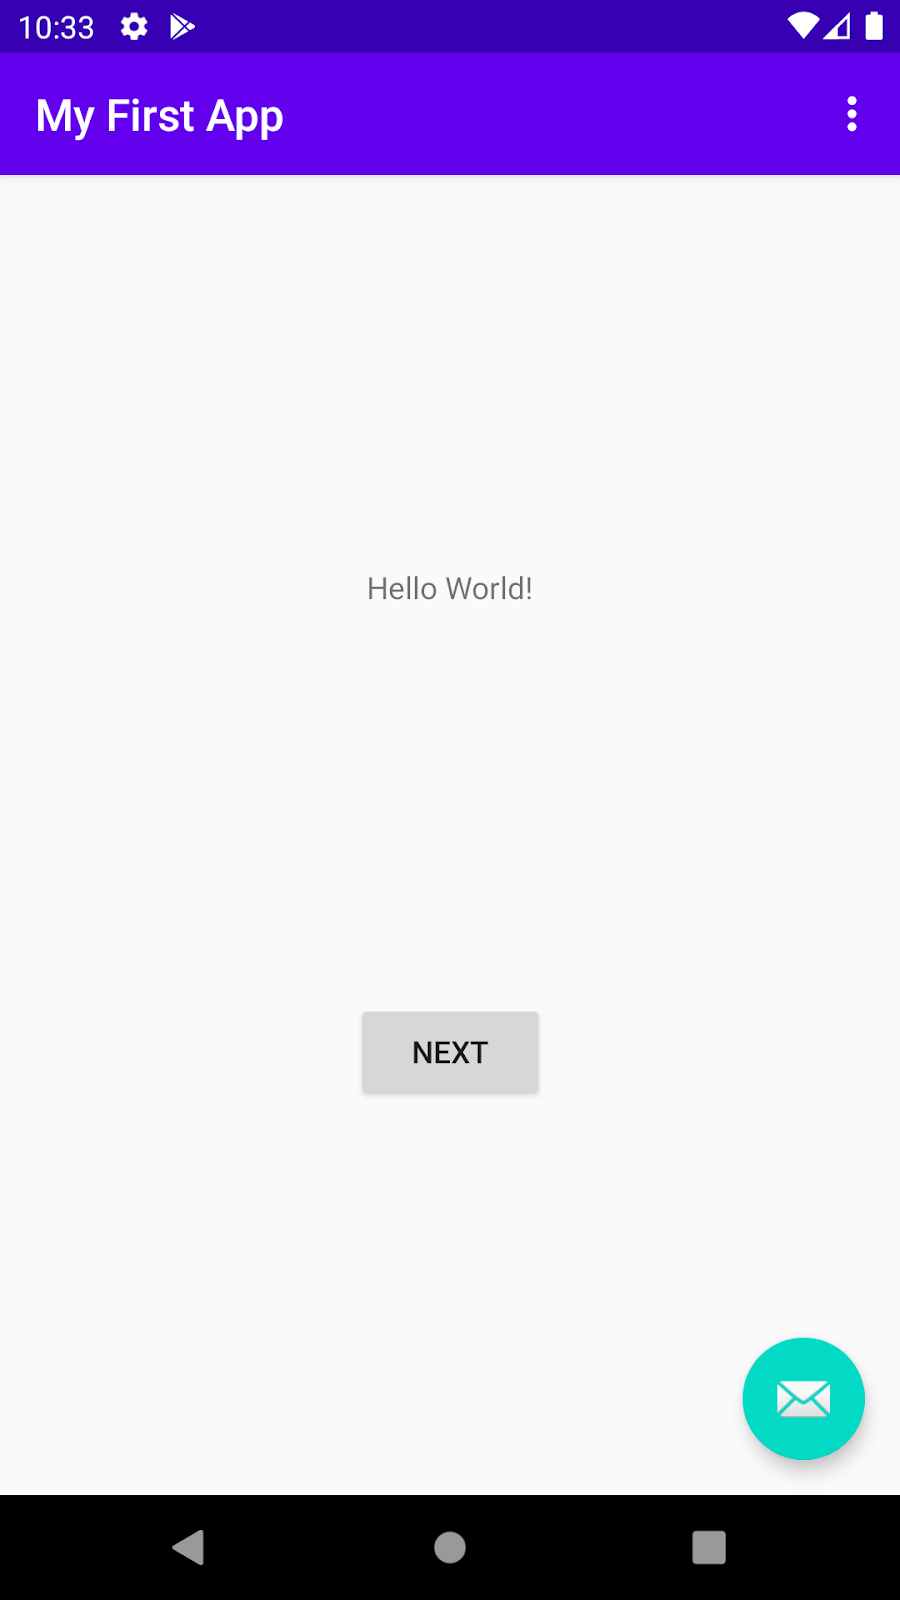
In this step, you will create a new Android project for your first app. This simple app displays the string «Hello World» on the screen of an Android virtual or physical device.
Here’s what the finished app will look like:
What you’ll learn
- How to create a project in Android Studio.
- How to create an emulated Android device.
- How to run your app on the emulator.
- How to run your app on your own physical device, if you have one.
Step 1: Create a new project
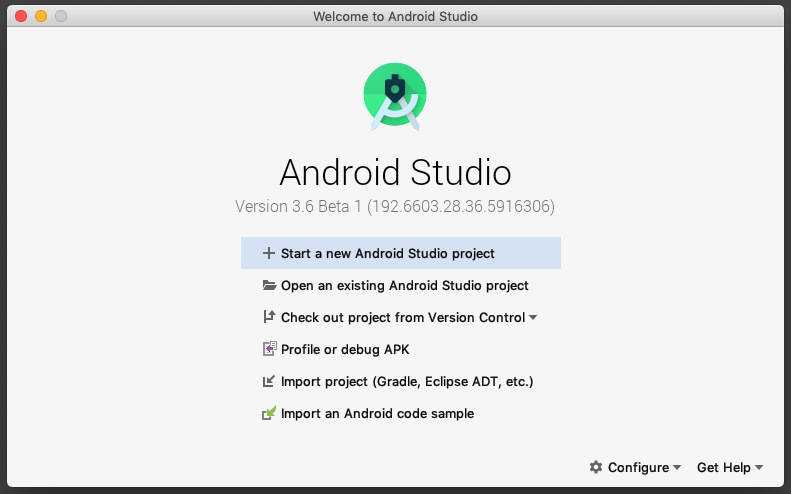
- Open Android Studio.
- In the Welcome to Android Studio dialog, click Start a new Android Studio project.

- Select Basic Activity (not the default). Click Next.
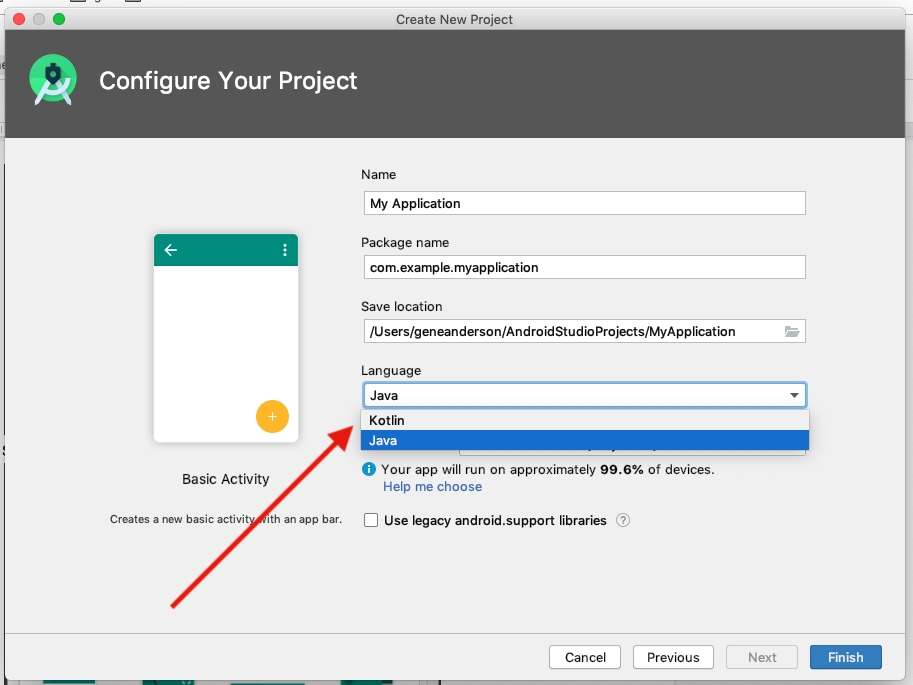
- Give your application a name such as My First App.
- Make sure the Language is set to Java.
- Leave the defaults for the other fields.
- Click Finish.

After these steps, Android Studio:
- Creates a folder for your Android Studio project called MyFirstApp. This is usually in a folder called AndroidStudioProjects below your home directory.
- Builds your project (this may take a few moments). Android Studio uses Gradle as its build system. You can follow the build progress at the bottom of the Android Studio window.
- Opens the code editor showing your project.
Step 2: Get your screen set up
When your project first opens in Android Studio, there may be a lot of windows and panes open. To make it easier to get to know Android Studio, here are some suggestions on how to customize the layout.
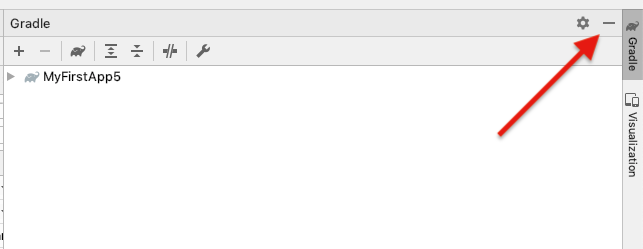
- If there’s a Gradle window open on the right side, click on the minimize button (—) in the upper right corner to hide it.
- Depending on the size of your screen, consider resizing the pane on the left showing the project folders to take up less space.
At this point, your screen should look a bit less cluttered, similar to the screenshot shown below.

Step 3: Explore the project structure and layout
The upper left of the Android Studio window should look similar to the following diagram: 
Based on you selecting the Basic Activity template for your project, Android Studio has set up a number of files for you. You can look at the hierarchy of the files for your app in multiple ways, one is in Project view. Project view shows your files and folders structured in a way that is convenient for working with an Android project. (This does not always match the file hierarchy! To see the file hierarchy, choose the Project files view by clicking (3).)
- Double-click the app (1) folder to expand the hierarchy of app files. (See (1) in the screenshot.)
- If you click Project (2), you can hide or show the Project view. You might need to select View > Tool Windows to see this option.
- The current Project view selection (3) is Project > Android.
In the Project > Android view you see three or four top-level folders below your app folder: manifests, java, java (generated) and res. You may not see java (generated) right away.
- Expand the manifests folder.
This folder contains AndroidManifest.xml . This file describes all the components of your Android app and is read by the Android runtime system when your app is executed. 2. Expand the java folder. All your Java language files are organized here. The java folder contains three subfolders:
com.example.myfirstapp: This folder contains the Java source code files for your app.
com.example.myfirstapp (androidTest): This folder is where you would put your instrumented tests, which are tests that run on an Android device. It starts out with a skeleton test file.
com.example.myfirstapp (test): This folder is where you would put your unit tests. Unit tests don’t need an Android device to run. It starts out with a skeleton unit test file. 3. Expand the res folder. This folder contains all the resources for your app, including images, layout files, strings, icons, and styling. It includes these subfolders:
drawable: All your app’s images will be stored in this folder.
layout: This folder contains the UI layout files for your activities. Currently, your app has one activity that has a layout file called activity_main.xml . It also contains content_main.xml , fragment_first.xml , and fragment_second.xml .
menu: This folder contains XML files describing any menus in your app.
mipmap: This folder contains the launcher icons for your app.
navigation: This folder contains the navigation graph, which tells Android Studio how to navigate between different parts of your application.
values: This folder contains resources, such as strings and colors, used in your app.
Step 4: Create a virtual device (emulator)
In this task, you will use the Android Virtual Device (AVD) manager to create a virtual device (or emulator) that simulates the configuration for a particular type of Android device.
The first step is to create a configuration that describes the virtual device.
- In Android Studio, select Tools >AVD Manager, or click the AVD Manager icon in the toolbar.
- Click +Create Virtual Device. (If you have created a virtual device before, the window shows all of your existing devices and the +Create Virtual Device button is at the bottom.) The Select Hardware window shows a list of pre-configured hardware device definitions.
- Choose a device definition, such as Pixel 2, and click Next. (For this codelab, it really doesn’t matter which device definition you pick).
- In the System Image dialog, from the Recommended tab, choose the latest release. (This does matter.)
- If a Download link is visible next to a latest release, it is not installed yet, and you need to download it first. If necessary, click the link to start the download, and click Next when it’s done. This may take a while depending on your connection speed.

Note: System images can take up a large amount of disk space, so just download what you need.
- In the next dialog box, accept the defaults, and click Finish.
The AVD Manager now shows the virtual device you added.
- If the Your Virtual Devices AVD Manager window is still open, go ahead and close it.
Step 5: Run your app on your new emulator
- In Android Studio, select Run > Run ‘app’ or click the Run icon in the toolbar. The icon will change when your app is already running.
 The icon will change when your app is already running.
If you get a dialog box stating «Instant Run requires that the platform corresponding to your target device (Android N. ) is installed» go ahead and click Install and continue.
- In Run > Select Device, under Available devices, select the virtual device that you just configured. This menu also appears in the toolbar.
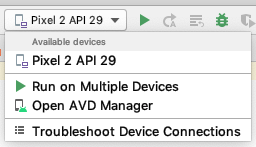
The emulator starts and boots just like a physical device. Depending on the speed of your computer, this may take a while. You can look in the small horizontal status bar at the very bottom of Android Studio for messages to see the progress.
Messages that might appear briefly in the status bar
Gradle build running

Waiting for target device to come on line
Источник


