- Question: Q: How to change default keynote colors
- Helpful answers
- Fill text with gradients or images in Pages, Numbers, and Keynote
- Fill text with a gradient
- Fill text with a two-color gradient
- Create a gradient fill with more than two colors
- Apply a gradient to an entire page or object
- Fill text with an image
- Add an outline to text
- Adjust the brightness and color temperature on your iPhone, iPad, or iPod touch
- Adjust brightness in Control Center
- Adjust brightness and color temperature in Settings
- About brightness levels
- Learn more
- How to colour an apple
- Color Management
- System Colors
- Dynamic System Colors
Question: Q: How to change default keynote colors
In all the Apple «Office» apps — Keynote, Numbers, Pages — there are a number of standard colors that can be picked from the popup. These are different for every theme. This looks as follows. How can these colors be changed?
OS X Mavericks (10.9)
Posted on Dec 20, 2015 2:43 AM
In the style fill Inspector, click on the multicoloured circle to open the colour palette, select the colour you want to add to the colour fills.
Click on the current fill patch, then drag down on to an existing patch to replace.
The new colour fills will be saved with the presentation and you can create a custom theme to use for other presentations. (File > Save Theme)
Posted on Dec 20, 2015 7:38 AM
Helpful answers
This is a fantastic answer. It took me a bit to figure out that this can only be done if you click on the color box that DOES NOT have the colour wheel next to it. You need to use both the plain fill box, and the color wheel fill box. This really could have been done much, much easier by just letting you drag and drop from the colors picker to any color fill box.
For anyone wondering, you can do the same for the gradient fills and the image fills, by choosing one first, then dragging to the fill box as above. Oddly, none of the various shades are pre-calculated so you could have a palette of 29 colors (why not 30??)
Apple developers — this really needs some work.
Источник
Fill text with gradients or images in Pages, Numbers, and Keynote
You can also add outlines to make your text stand out.
Fill text with a gradient
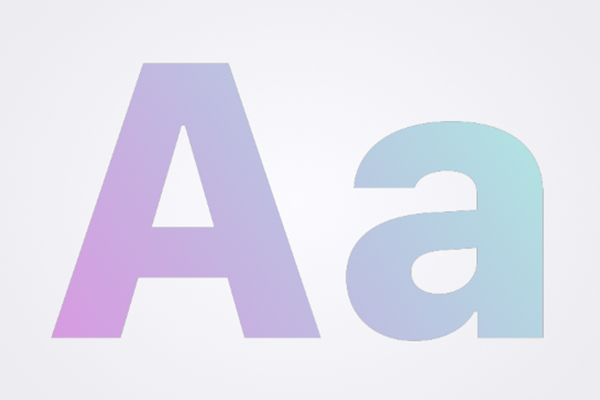
A color gradient creates a gradual transition between two or more colors. On iPhone, iPad, iPod touch, or Mac you can fill text with a two-color gradient.
Fill text with a two-color gradient
You can fill text with a two-color gradient fill and adjust the direction and angle of the gradient.
- Select the text you want to fill with a gradient. To fill all the text in a text box, select the text box.
- Tap or click the Format button .
- Tap or click Text Color.
- On iPhone or iPad, tap Gradient. On Mac, click Gradient fill.
- To change the colors of the gradient, use the color pickers to choose swatches. Or use the color wheels to select the exact colors you want. For example, choose purple to start the gradient, and blue to end the gradient.
Use the other controls to change the angle and direction of the gradient.
Create a gradient fill with more than two colors
On Mac, you can add more than two colors to a gradient fill. Select the text, then choose Advanced Gradient Fill from the Text Color pop-up menu. Using the slider, add color stops to add more colors to the gradient. Click a color stop to change the color of that stop. Drag the color stops and use the other controls to change the blend, angle, and direction of the gradient.
Apply a gradient to an entire page or object
You can apply a gradient to an entire page or object, so the gradient is spread out over the whole page or object—even areas of it that don’t contain any text:
- In a Pages word processing document, select the text, then select «Apply gradient to entire page.»
- In a Pages page layout document, a Numbers spreadsheet, or a Keynote presentation, select the object, then select «Apply gradient to entire object.»
When you select this option, you might see more colors as you add more text and fewer colors as you delete text.
Fill text with an image

- Select the text you want to fill with an image. To fill all the text in a text box, select the text box.
- Tap or click the Format button .
- Tap or click Text Color.
- On iPhone or iPad, tap Image. On Mac, click Image Fill.
- To choose an image, tap Change Image on iPhone or iPad, or click Choose on Mac. Then, navigate to the image you want.
You can scale or stretch to fit the image in the text, tile the image, and more.
You can also add a color overlay. On iPhone or iPad, turn on Color Overlay, then make your adjustments. To add a color overlay on Mac, choose Advanced Image Fill from the Text Color menu, then click the color wheel and make your adjustments.
Add an outline to text
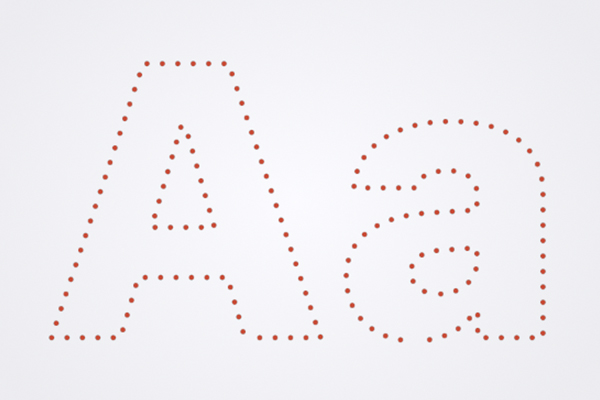
- Select the text you want to outline. To outline all the text in a text box, select the text box.
- Tap or click the Format button .
- On iPhone or iPad, tap the More button . On Mac, click the advanced options button under Font.
- Select Outline.
- Select the line type, the color, and the width of the outline.
- You can remove the color of the text to emphasize the outline:
- On iPhone or iPad, tap the Format button , tap Text, then tap Text Color. Tap Preset, swipe to the black and white options, and then tap No Fill.
- On Mac, click the Font Color pop-up menu below Character Styles, then choose No Fill.
Источник
Adjust the brightness and color temperature on your iPhone, iPad, or iPod touch
Learn how to adjust display brightness and color temperature on your iPhone, iPad, or iPod touch.
Adjust brightness in Control Center
You can quickly adjust brightness in Control Center on your iPhone or iPad:
- On an iPhone X or later, or an iPad with iOS 12 or iPadOS, swipe down from the top-right corner of your display. On an iPhone 8 or earlier, or on an iPod touch, swipe up from the bottom edge of your display.
- Drag the brightness bar up or down to adjust the brightness.

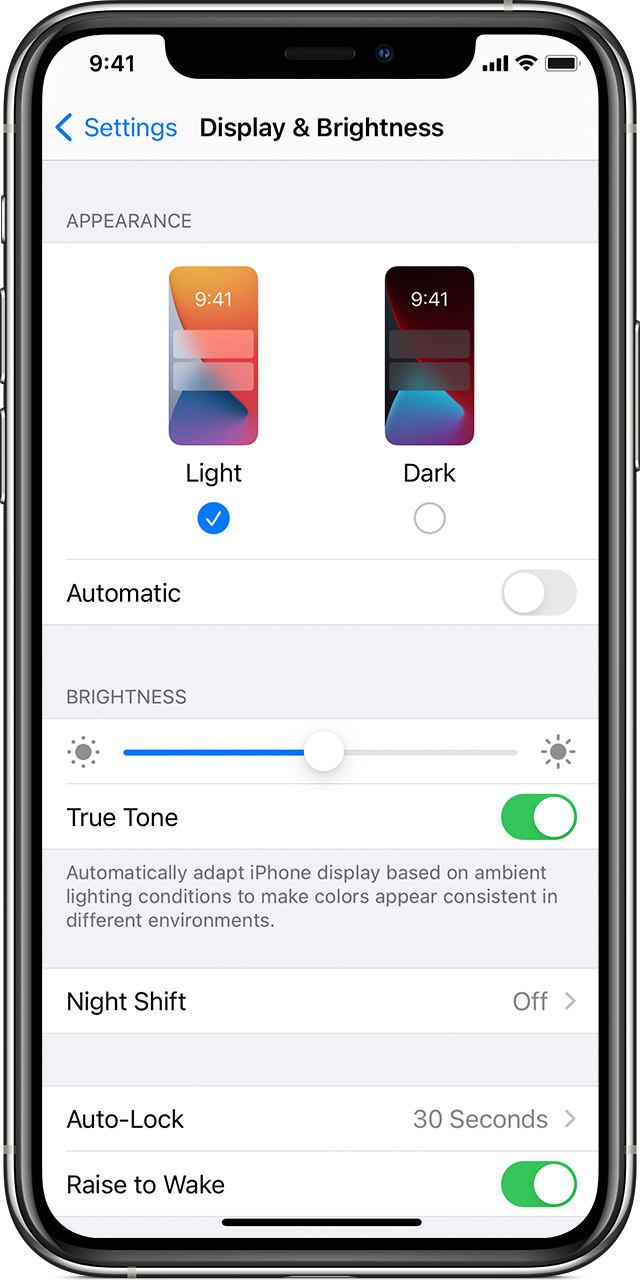
Adjust brightness and color temperature in Settings
- Go to Settings > Display & Brightness.
- Drag the slider to the right or left to adjust the brightness.
From here, you can turn on Dark Mode, which is designed to make the screen easier on your eyes. Dark Mode uses a dark color scheme that works system wide, including with the apps that come with your device and with many third-party apps.
True Tone,* which is on by default, uses advanced sensors to adjust the color and intensity of your display to match the ambient light, so that images appear more natural.
If you turn off True Tone, the display keeps color and intensity constant, regardless of changes in the ambient light.
You can also turn on Night Shift, which adjusts the colors of your display to the warmer end of the spectrum—making the display easier on your eyes. To adjust the color temperature to be warmer or colder, go to Settings > Display & Brightness > Night Shift and use the color-temperature slider.
Some display accessibility settings, including Invert Colors, Grayscale, and Increase Contrast, might turn off True Tone.
About brightness levels
iOS devices use an ambient light sensor to adjust brightness levels based on the light conditions around you. The sensor lowers brightness in dark locations and raises brightness in light locations. The auto-brightness feature is on by default.
When auto-brightness is on, you’ll notice that the brightness slider on your device moves according to changing light conditions.
You can turn auto-brightness on or off in Settings > Accessibility > Display & Text Size. To reset the auto-brightness settings, turn off auto-brightness and then turn it back on.
iPod touch doesn’t support the auto-brightness feature.
Learn more
- Brightness can affect battery life. To maximize battery life, let auto-brightness adjust your display or dim your screen.
- Use Night Shift to adjust the colors of your display.
- Learn what to do if your display won’t turn on or if you have other screen issues.
* You can use True Tone with these devices: iPhone 8 and later, iPad Pro 12.9-inch (3rd generation), iPad Pro 11-inch, iPad Pro 12.9-inch (2nd generation), iPad Pro 10.5-inch, iPad Pro (9.7-inch), iPad Air (3rd generation), and iPad mini (5th generation).
Источник
How to colour an apple
Color is a great way to provide status information, give feedback in response to user actions, and help people visualize data.
Use color judiciously for communication. In general, color should be used sparingly, like when you need to call attention to important information. For example, a red triangle that warns people of a critical problem becomes less effective when you use red elsewhere in an app for noncritical reasons.
Consider how your use of color might be perceived in other countries and cultures. In some cultures, for example, red communicates danger, whereas in others it has positive connotations. Make sure the colors in your app send the message you intend.
Avoid using colors that make it hard for people to perceive content in your app. For example, colorblind people might not be able to distinguish some color combinations, and insufficient contrast can cause icons and text to blend with the background and make content hard to read. For guidance, see Color and Contrast.
Consider how nearby artwork and translucency affect colors. Color can lose its impact when composited over a non-neutral or translucent background, or when used adjacent to a very bright, colorful image.
Test your app’s color scheme under a variety of lighting conditions. Lighting varies significantly based on room ambiance, time of day, and more. Colors you see on your computer at design time won’t always look the same when using your app in an environment with bright ambient light conditions. Always preview your app under multiple lighting conditions, including outdoors with a laptop on a sunny day, to see how colors appear. Adjust colors to provide the best possible viewing experience in the majority of use cases.
Use the standard color panel for user color changes. If your app lets people change colors, use the standard color panel (shown below) to obtain the user’s color selection rather than designing a custom color-picker. The standard color panel provides a number of color selection modes, can be expanded with custom color selection modes, and allows the user to save swatches of frequently used colors. For developer guidance, see NSColorPanel. On a Mac equipped with a Touch Bar, you can also let people change colors using the standard color picker.

Color Management
Apply color profiles to your images. Color profiles help ensure that your app’s colors appear as expected on different displays. The Standard RGB (sRGB) color space produces accurate colors on most displays.
Use wide color to enhance the visual experience on compatible displays. Wide color displays support a P3 color space, which can produce richer, more saturated colors than sRGB. As a result, photos and videos that use wide color are more lifelike, and visual data and status indicators that use wide color are more meaningful. When appropriate, use the Display P3 color profile at 16 bits per pixel (per channel) and export images in PNG format. Note that a wide color display is needed to design wide color images and select P3 colors.
Provide color space-specific image and color variations when the experience calls for it. In general, P3 colors and images tend to appear normally on sRGB displays. Occasionally, however, it may be hard to differentiate between two very similar P3 colors when viewed on an sRGB display. Gradients that use colors in the P3 spectrum can also sometimes appear clipped on sRGB displays. To avoid these issues, you can provide distinct images and colors in the asset catalog of your Xcode project to ensure visual fidelity on both wide color and sRGB displays.

Preview your app’s colors on actual sRGB and wide color displays. Make adjustments as needed to ensure an equally great visual experience on both types of displays.
TIP On a Mac with a wide color display, you can use the standard color panel to select and preview P3 colors and compare them with sRGB colors.
System Colors
macOS offers a range of standard system colors that automatically adapt to vibrancy (see Translucency and Vibrancy) and changes in accessibility settings like Increase contrast and Reduce transparency. Use these colors when choosing app tint colors that look great individually and in combination, on both light and dark backgrounds.
Don’t hard code system color values in your app. The color values provided below are intended for reference during your app design process. The actual color values will fluctuate from release to release, based on a variety of environmental variables. Always use the API to apply system colors.
For developer guidance, see NSColor (AppKit) and Color (SwiftUI).
| Aqua | Dark | Name | SwiftUI API |
|---|---|---|---|
| Gray | systemGrayColor |
| Aqua | Dark | Name | SwiftUI API |
|---|---|---|---|
| Gray | systemGrayColor |
| Aqua | Dark | Name | SwiftUI API |
|---|---|---|---|
| Gray | systemGrayColor |
| Aqua | Dark | Name | SwiftUI API |
|---|---|---|---|
Dynamic System ColorsmacOS defines a range of system colors that dynamically match the color scheme of standard interface controls like buttons and labels. These dynamic system colors are listed in the Developer palette of the standard color panel.
Standard color panel (light)
Standard color panel (dark) Don’t redefine the semantic meanings of dynamic system colors. To ensure a consistent experience and ensure your interface looks great when the appearance of macOS changes in the future, use dynamic system colors as intended. Don’t try to replicate dynamic system colors. Dynamic system colors — some of which may be patterns — fluctuate from release to release, based on a variety of environmental variables. Instead of trying to create custom colors that match the dynamic system colors, use the dynamic system colors. Источник  Введение Технологии развиваются с невероятной скоростью  Введение: Apple является одной из самых известных и  Кастомизация гаджетов Apple – это процесс изменения |


