- Transfer photos and videos from your iPhone, iPad, or iPod touch
- Use iCloud Photos
- Import to your Mac
- Import to your Windows PC
- How to transfer photos from iPhone to PC – 8 ways
- How to get photos off iPhone
- Windows Explorer
- How to transfer photos from iPhone to computer
- CopyTrans Photo
- Download iCloud photos to PC
- CopyTrans Cloudly
- Transfer photos from iPhone to PC
- icloud.com
- How to Import Photos from iPhone to PC Windows 7
- Method 1. Transfer Photos from iPhone to PC with EaseUS MobiMover
- Method 2. Copy Photos from iPhone to PC Windows 7 with AutoPlay
- Method 3. Import Photos from iPhone to PC Running Windows 7 via File Explorer
- Method 4. Transfer Photos from iPhone to Computer with iCloud
- Method 5. Export Photos from iPhone to Computer viaВ Email
- The Bottom Line
Transfer photos and videos from your iPhone, iPad, or iPod touch
Learn how to transfer photos and videos from your iPhone, iPad, or iPod touch to your Mac or PC. You can also make your photos available on all your devices with iCloud Photos.
Use iCloud Photos
iCloud Photos keeps your photos and videos safe, up to date, and available automatically on all of your Apple devices, on iCloud.com, and even your PC. When you use iCloud Photos, you don’t need to import photos from one iCloud device to another. iCloud Photos always uploads and stores your original, full-resolution photos. You can keep full-resolution originals on each of your devices, or save space with device-optimized versions instead. Either way, you can download your originals whenever you need them. Any organizational changes or edits you make are always kept up to date across all your Apple devices. Learn how to set up and use iCloud Photos.
The photos and videos that you keep in iCloud Photos use your iCloud storage. Before you turn on iCloud Photos, make sure that you have enough space in iCloud to store your entire collection. You can see how much space you need and then upgrade your storage plan if necessary.
Import to your Mac
You can use the Photos app to import photos from your iPhone, iPad, or iPod touch to your Mac.
- Connect your iPhone, iPad, or iPod touch to your Mac with a USB cable.
- Open the Photos app on your computer.
- The Photos app shows an Import screen with all the photos and videos that are on your connected device. If the Import screen doesn’t automatically appear, click the device’s name in the Photos sidebar.
- If asked, unlock your iOS or iPadOS device using your passcode. If you see a prompt on your iOS or iPadOS device asking you to Trust This Computer, tap Trust to continue.
- Choose where you want to import your photos. Next to «Import to,» you can choose an existing album or create a new one.
- Select the photos you want to import and click Import Selected, or click Import All New Photos.

- Wait for the process to finish, then disconnect your device from your Mac.
Import to your Windows PC
You can import photos to your PC by connecting your device to your computer and using the Windows Photos app:
- Make sure that you have the latest version of iTunes on your PC. Importing photos to your PC requires iTunes 12.5.1 or later.
- Connect your iPhone, iPad, or iPod touch to your PC with a USB cable.
- If asked, unlock your iOS or iPadOS device using your passcode.
- If you see a prompt on your iOS or iPadOS device asking you to Trust This Computer, tap Trust or Allow to continue.
If you have iCloud Photos turned on, you need to download the original, full resolution versions of your photos to your iPhone before you import to your PC. Find out how.
When you import videos from your iOS or iPadOS device to your PC, some might be rotated incorrectly in the Windows Photos app. You can add these videos to iTunes to play them in the correct orientation.
If you’re having trouble importing photos from your iOS or iPadOS device to Windows 10, try these steps:
- On your iOS or iPadOS device, open the Settings app. Tap Camera, then tap Formats.
- Tap Most Compatible. From now on, your camera will create photos and videos in JPEG and H.264 formats.
Источник
How to transfer photos from iPhone to PC – 8 ways
“Our smartphones are the sources of our utmost pleasure: they accompany us most of the time and capture everyday moments with their powerful cameras. High-resolution pictures populate Camera Roll rapidly. Next thing you know, you are searching for a way to transfer photos from iPhone to PC as your storage is full.
If you wonder how to download photos from iPhone to computer, iTunes can’t be of much help. In this post, you’ll find 8 most popular ways to transfer iPhone photos to PC without iTunes, and thus clean up space on your device:

How to get photos off iPhone
Windows Explorer
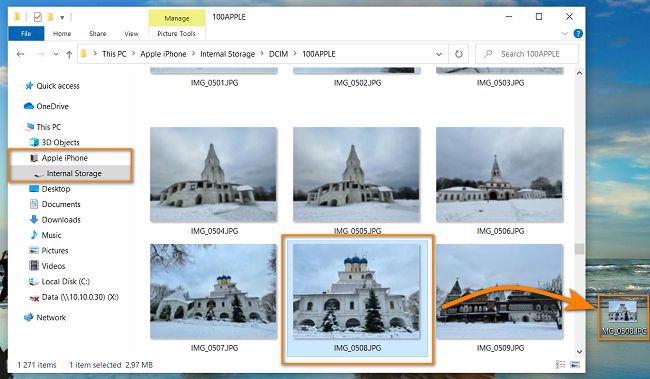
Windows Explorer allows you to transfer pictures from iPhone to PC: just connect your iPhone to computer and run Windows Explorer. Then, find your iPhone name under “Portable devices”. Open the “DCIM” folder, then drag and drop photos to your PC.
The only benefit, really, is that the photos will be present on your PC. However, the following caveats may spoil the fun when transferring photos from iPhone to PC:
❌ the album structure is not preserved and there isn’t any coherent timeline;
❌ you cannot choose the photo format (for example .HEIC is not supported by Windows);
❌ photo orientation is not respected;
❌ iPhone might not be detected by PC at all;

If you’d like to transfer photos from iPhone to PC in the right order and appearance, with album structure preserved and an opportunity to convert upon transfer – try CopyTrans Photo. We also have drivers for iOS devices, so your iPhone won’t stay unnoticed!

How to transfer photos from iPhone to computer
CopyTrans Photo
If you are interested in how to download photos from iPhone to computer in a quick way, try CopyTrans Photo – a simple solution for transferring pics from iPhone to PC.
✔️ backup iPhone photos to PC;
✔️ preserve the original quality and EXIF data;
✔️ convert HEIC to JPEG;
✔️ work offline;
✔️ compatible with new Apple format, ProRAW;
✔️ copy albums, preserv its structure;

To upload photos from iPhone to computer connect your iPhone to your PC and start CopyTrans Photo. All your iPhone photos will start loading immediately. The photos from your iPhone will be shown in the left-hand pane of the program, while all the pictures and folders on your computer will be displayed on the right side.
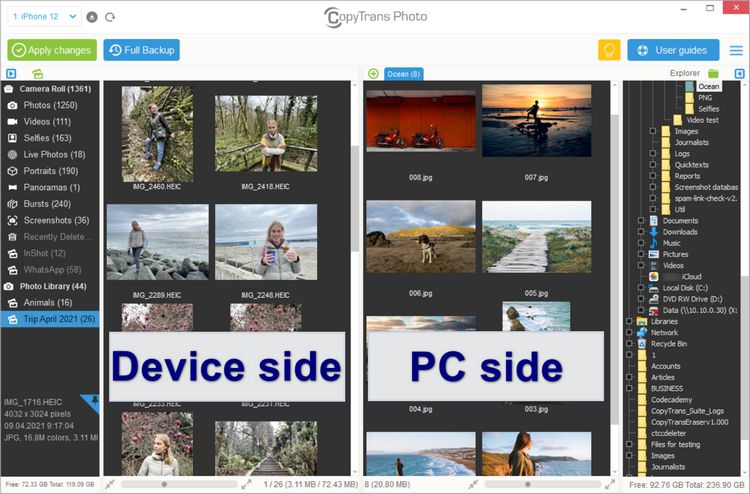
Now you can select some of your images or all of them at once (by pressing the ctrl and “A” keys simultaneously) as well as all your photo albums, and copy photos from iPhone to PC with a simple drag-and-drop.
Finally, click the green “Apply” button and you’re all set!
This way you can import iPhone photos to PC and organize them in albums so that they look exactly like they do on your Apple device. You can also back up all photos in one click using the Full Backup option in CopyTrans Photo.

Download iCloud photos to PC
CopyTrans Cloudly
Now you need to know how to copy photos from iPhone to PC using an iCloud alternative. If you have iCloud Photos enabled on your iPhone, you can use CopyTrans Cloudly to transfer iPhone photos to PC:
✔️ downloads all the photos and videos;
✔️ uploads JPG, HEIC or PNG images to iCloud from PC;
✔️ preserves the album structure;
✔️ without duplicates;
✔️ recovers permanently deleted photos from iCloud;
✔️ allows to save photos on a hard drive directly;
Open CopyTrans Cloudly from the CopyTrans Control Center, enter your iCloud password and login and choose the Download option.
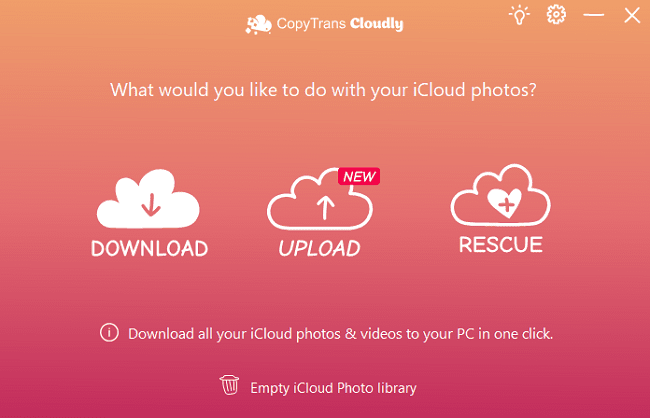
Then select the folder where you would like to store all your photos on your computer and start downloading. After it’s finished, open this folder and you will find all your images there.
After you downloaded all your iPhone pics, you can switch off iCloud Photos on your iPhone and remove all your images and videos from icloud.com with CopyTrans Cloudly. This will free up a lot of storage in your iCloud account and you can even downgrade your iCloud storage plan and pay less.
By the way, we have a comprehensive guide on how to download all photos from iCloud. We compared the strengths and weaknesses of all three methods described in this article and created a table for you to decide which one suits you best. Check it out!
| CopyTrans Cloudly | iCloud.com | iCloud for Windows | |
| Downloading all photos | Downloads everything at once | Downloads only 1000 items at a time | Downloads everything at once |
| Preserving album structure | Yes | No | No (downloads by year) |
| Downloading originals | Yes | Yes | Not always |
| Incremental download of new photos (without creating duplicates) | Yes | No | No |
| Deleting all photos | Deletes everything at once | Deletes only 1000 items at a time | No |
| Retrieving permanently deleted photos | Yes | No | No |
| Speed (depends on the Internet connection speed) | 15-30 minutes for every 5 GB | Eternity | 1,5-3 hours for every 5 GB |
| Viewing and selecting photos before downloading | No | Yes | No |
| Using on a Mac | No | Yes | No |
| Uploading photos to iCloud | Yes | Yes | Yes |
Transfer photos from iPhone to PC
icloud.com
How to move pictures from iPhone to computer without connecting iPhone to PC? You can use iCloud for it.
❌ does not let you download all the photos with one click;
❌ only 1000 can be downloaded at a time;
❌ photos not stored in the correct order;
Enable iCloud Photos on your iPhone (Settings> Apple ID> iCloud> Photos). After this, your photos and videos will start uploading to your iCloud.
You can check the box next to Download and Keep Originals, if you want to keep the high-resolution original photos and videos on your iPhone, or Optimize iPhone Storage, if you want to store the original photos and videos in iCloud and have space-saving versions on your device (i.e. only thumbnails).
After this, log into your iCloud account from your PC, select the iPhone photos you want to download one by one, and click the Download symbol in the top-right corner.

NOTE: Unfortunately, Apple scrapped the option to select and download multiple iCloud photos to your PC at once. Now you can download 1000 photos at a time. You can also download them in small batches by sharing entire moments. To select the moment, click on the small plus sign at the right top corner of one of the moments. You can download them to your PC after that.
Источник
How to Import Photos from iPhone to PC Windows 7
By transferring photos from your iPhone to your computer, you can make a copy of important images, share precious pictures with your friends, or print beautiful photos. Whatever your purposes of exporting iPhone photos to PC, here areВ five methods to do it.В
Method 1. Transfer Photos from iPhone to PC with EaseUS MobiMover
By far, the easiest way to transfer pictures from iPhone to a PC running Windows 7/8/10 is to use anВ iPhone data transfer toolВ such as EaseUS MobiMover. With which you can transferВ entire iPhone photos to your PC, or you can export just a selection of pictures from your iPhone. The whole process doesn’t require an internet connection, so you don’t have to worry that your internet is unstableВ or there is no internet available.
To transfer photos from iPhone to PC running Windows 7/9/10:
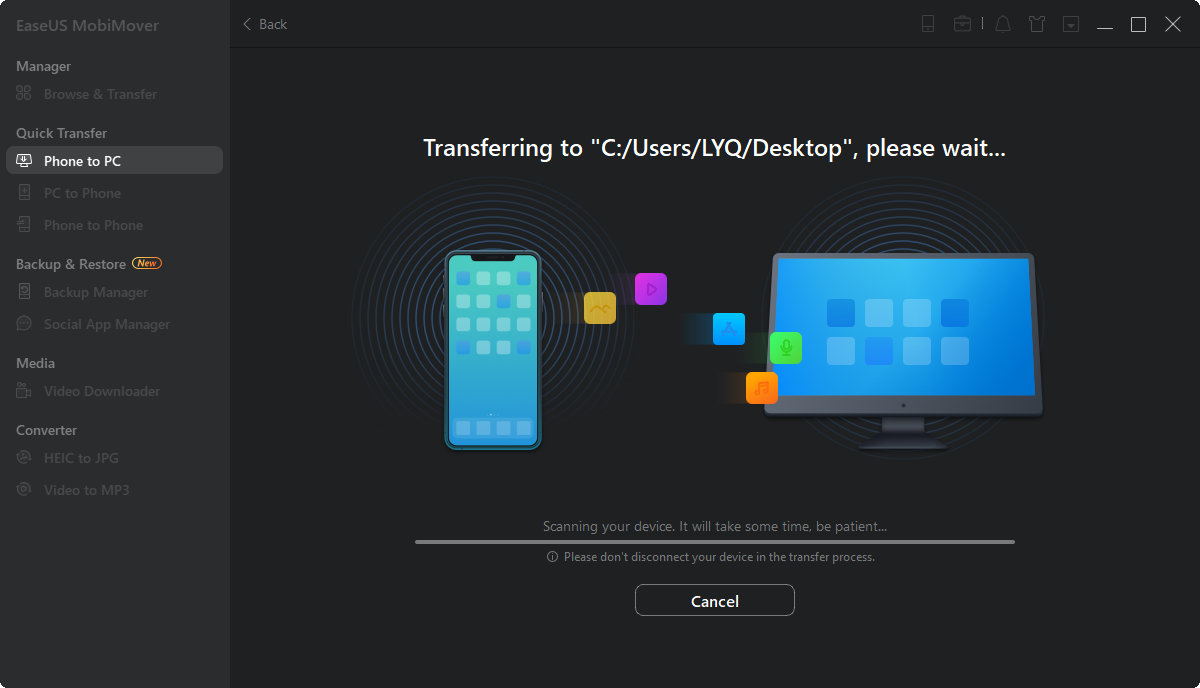
Step 1. Connect your iPhone to PC running Windows 7 or later. Run EaseUS MobiMover, choose «Phone to PC» and click the «Next» button on the screen. This mode allows you to transfer data from iPhone to PC in one click.В

Step 2. MobiMover supports transferring audio, videos, pictures, books, contacts, messages, etc. from iPhone to PC. Here, choose «Pictures» only. MobiMover will save the files on your desktop by default. You can customize the path as you need.В
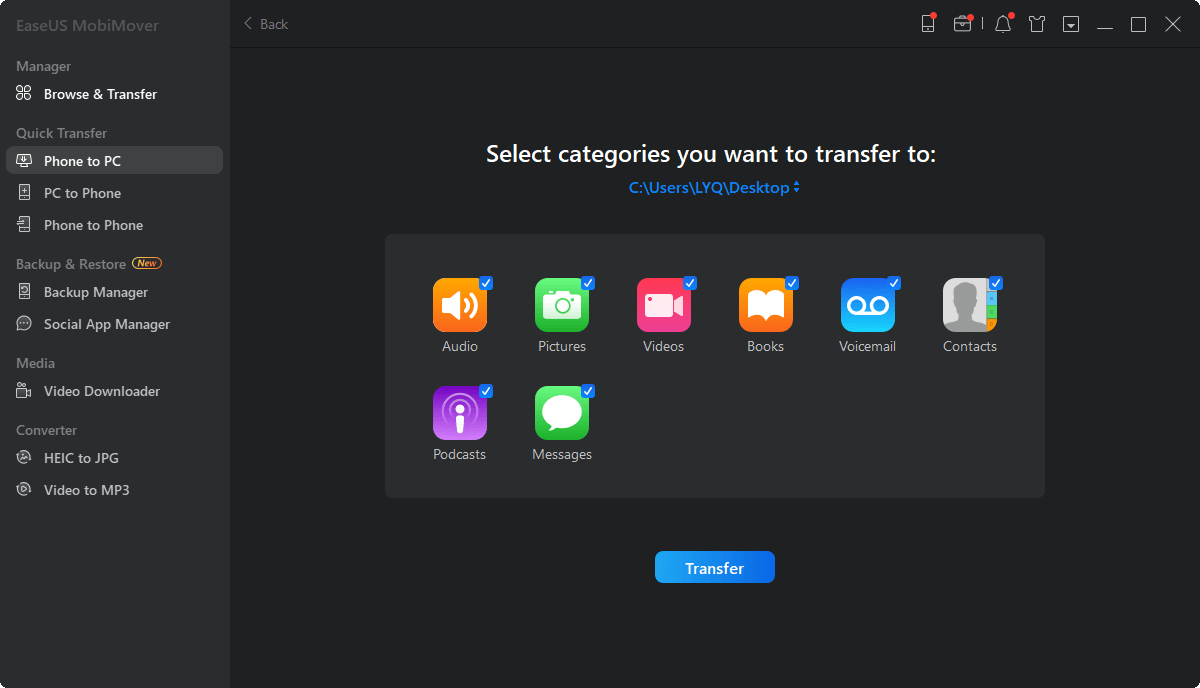
Step 3.В Now, click the «Transfer» button to start transferring photos from your iPhone to PC.В The transfer time depends on the file size. Wait patiently
Method 2. Copy Photos from iPhone to PC Windows 7 with AutoPlay
If you don’t like using a third-party transfer tool, you can use Windows’s built-in feature — AutoPlay to transfer photos from your iPhone to your computer. To use this method, there are some additional things you should do.
- Download and install iTunes on your computer so that AutoPlay can read your iPhone data.В
- Prepare a USB cable.
- Unlock your iPhone using your password.
If everything goes smoothly, you can follow the steps below to finish the rest of the steps.
Step 1. Plug your iPhone into your PC using a USB cable.
Step 2. You may need to unlock your iPhone using your password.
Step 3.В A prompt will appear on your iPhone asking you to «Trust This Computer,» tap «Trust.»
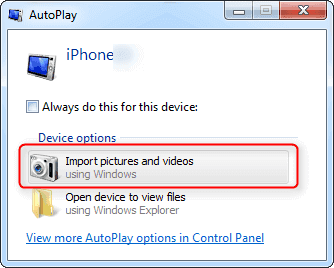
Step 4. When your iPhone is detected by this PC, theВ AutoPlay window will appear. Click «Import pictures and videos.» Then the import process will begin.В
Step 5. Then, all of your pictures will be imported to your computer. You can findВ them in a folder called «My Pictures.» If you want to change the default location to store the transferred pictures, you can click «Import Setting» in the left corner bottom and then follow its on-screen instructions to do it.
Note: The steps vary will vary depending on the different systems of your computer. You can follow its instructions to do it with ease. Plus, AutoPlay doesn’t allow you to export certain pictures. If you want to export some specific photos, just follow the next method to do it.В
Method 3. Import Photos from iPhone to PC Running Windows 7 via File Explorer
File Explorer is another free option to download pictures from your iPhone to your PC. As with the AutoPlay method shown above, you’ll need to download and install iTunes (the latest version) so that your Windows 7 computer can read your iPhone’s content. Then, follow these steps.
Step 1. Open Files Explorer by going to «This PC» > «Apple iPhone» > «Internal Storage» > DICM.
Step 2. Open the «DICM» folder, and then you’ll see all of your pictures and videos.
Step 3. Choose the pictures you want and copy them to another folder on your computer.В
![]()
Method 4. Transfer Photos from iPhone to Computer with iCloud
iCloud is a wireless option to export iPhone photos to a PC running Windows 7. Here are a few things you should know about using this method.В
- This method requires you to enable iCloud Photos on your iPhone. If you don’t, go to Settings > [your name] > iCloud > Photos > iCloud Photos. From here, you can enable and disable iCloud Photos.В
- Once you’ve enabled iCloud Photos on your iPhone, every new picture you take will be automatically synced to your iCloud photos when your iPhone connects to a WiFi network.В
- Every iCloud account comes with 5GB of storage, which can exceed easily if you transfer photos and videos that are in large size. If you have many photos to transfer, don’t forget to upgrade your iCloud storage plan. (Prices start at $0.99 a month for 50GB)
iCloud is a great feature to use if you want to access your iPhone photos on other devices. If you prefer to use it, here are the steps.
Step 2. Sign in to your iCloud account.
Step 3. Make sure the «Photos» option is enabled, then click «Option.»
Step 4. Check the box next to «iCloud Photo Library» and «Download new photos and videos from my PC.»
Step 5. Click «Done.»
![]()
Method 5. Export Photos from iPhone to Computer viaВ Email
Apart from the methods listed above, you can also transfer photos from an iPhone to a computer in an old-fashioned way by using email. But this method only works when you have several photos to transfer since your email has a size limit for attachment.В
Step 1. Open the Photos app on your iPhone.В
Step 2. Go to your Camera Roll.
Step 3. Select the photos (not more than five) you wish you transfer.
Step 4. Click the export icon in the bottom left corner.
Step 5. From the suggestedВ options, choose «Mail.»
Step 6. Enter the detailed information by following its on-screen instructions.В
Step 7. Then, you can sign in to your email account on the computer and download pictures to your PC.
![]()
The Bottom Line
In addition to the methods we mentioned in this guide, there are many other different ways out there that can help you export photos from iPhone to PC. For example, you can also do the same thing via social apps, such as WhatsApp, Instagram, Skype, and Facebook. To use them, all you need is to add your photos to any of these apps and open them on your computer. Then, you can download them all to your computer.В
о™љо™љо™љо™љо™љ
4.5 out of 5 stars, based on 10 votes
EaseUS MobiMover allows you to easily transfer all data from your iPhone to your PC. The app is available for both Windows and Macs so irrespective of which platform you use, you are covered.

EaseUs MobiMover solves this problem as it allows you to transfer data from an iPhone to a Mac, Mac to an iPhone, or from one iPhone to another iPhone fast.

EaseUS MobiMover is a program that allows you to share files between your iOS device and your PC in an easy manner. This is very useful, since both operative systems are not compatible.

EaseUS MobiMover for Mac and PC is a powerful tool for transferring data from your Apple mobile device to your computer, managing the variety of files that you create, and moving those huge videos quickly.

Related Articles — ALSO ON EaseUS SOFTWARE
Источник


