- Assets Folder in Android Studio
- How the asset folder is different from the Resource Raw folder?
- But when to use which folder?
- How to Create Assets Folder in Android Studio?
- How to Create Android Assets Folder in Android Studio
- How to Add Vector Assets in Android Studio?
- How Vector Asset is different from Image Asset?
- Problem using PNG’s
- Bitmap vs Vector
- Benefits of Vector Assets
- How do vector assets render?
- Vector Formats
- Step by Step Implementation
- How to Add Image to Drawable Folder in Android Studio?
- Method 1
- Method 2
Assets Folder in Android Studio
It can be noticed that unlike Eclipse ADT (App Development Tools), Android Studio doesn’t contain an Assets folder in which we usually use to keep the web files like HTML. Assets provide a way to add arbitrary files like text, XML, HTML, fonts, music, and video in the application. If one tries to add these files as “resources“, Android will treat them into its resource system and you will be unable to get the raw data. If one wants to access data untouched, Assets are one way to do it. But the question arises is why in the asset folder? We can do the same things by creating a Resource Raw Folder. So let discuss how the assets folder is different from the Resource Raw folder?
How the asset folder is different from the Resource Raw folder?
In Android one can store the raw asset file like JSON, Text, mp3, HTML, pdf, etc in two possible locations:
- assets
- res/raw folder

Both of them appears to be the same, as they can read the file and generate InputStream as below
But when to use which folder?
Below is some guidance that might be helpful to choose
1. Flexible File Name: (assets is better)
- assets: The developer can name the file name in any way, like having capital letters (fileName) or having space (file name).
- res/raw: In this case, the name of the file is restricted. File-based resource names must contain only lowercase a-z, 0-9, or underscore.
2. Store in subdirectory: (possible in assets)
- assets: If the developer wants to categories the files into subfolders, then he/she can do it in assets like below.

3. Compile-time checking: (possible in res/raw)
- assets: Here, the way to read it into InputStream is given below. If the filename doesn’t exist, then we need to catch it.
- res/raw folder: Here, the way to read it into InputStream is:
So putting a file in the res/raw folder will provide ensure the correct file-name during compile time check.
4. List filenames at runtime: (possible in assets)
- assets: If the developer wants to list all the files in the assets folder, he/she has used the list() function and provide the folder name or ” “ on the root folder as given below.
- res/raw: This is not possible in this folder. The developer has to know the filename during development, and not runtime.
So, in assets, one can read the filename during runtime, list them, and use them dynamically. In res/raw, one needs to code them ready, perhaps in the string resources file.
5. Filename accessible from XML: (possible in res/raw)
So if you need to access your file in any XML, put it in the res/raw folder. Let’s make a table to remember the whole scenario easily.
| Res/Raw Folder |
|---|
| Flexible File Name NO |
| Store in subdirectory NO |
| Compile-time checking YES |
| List filenames at runtime NO |
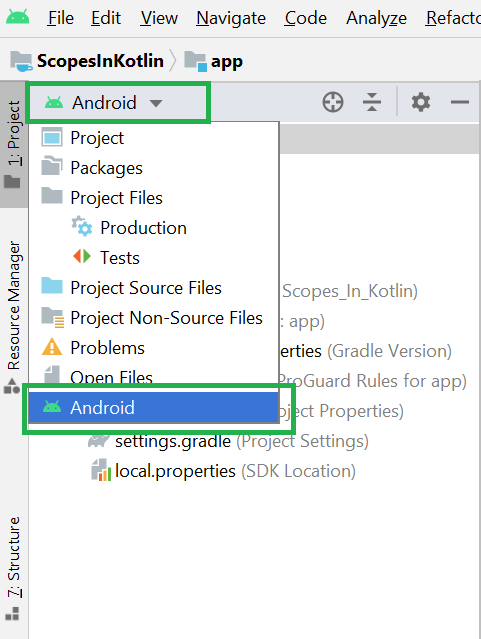
Filename accessible from XML How to Create Assets Folder in Android Studio?Now let’s discuss how to create an assets folder in the android studio. Below is the step-by-step process to create an assets folder in Android studio. Step 1: To create an asset folder in Android studio open your project in Android mode first as shown in the below image.
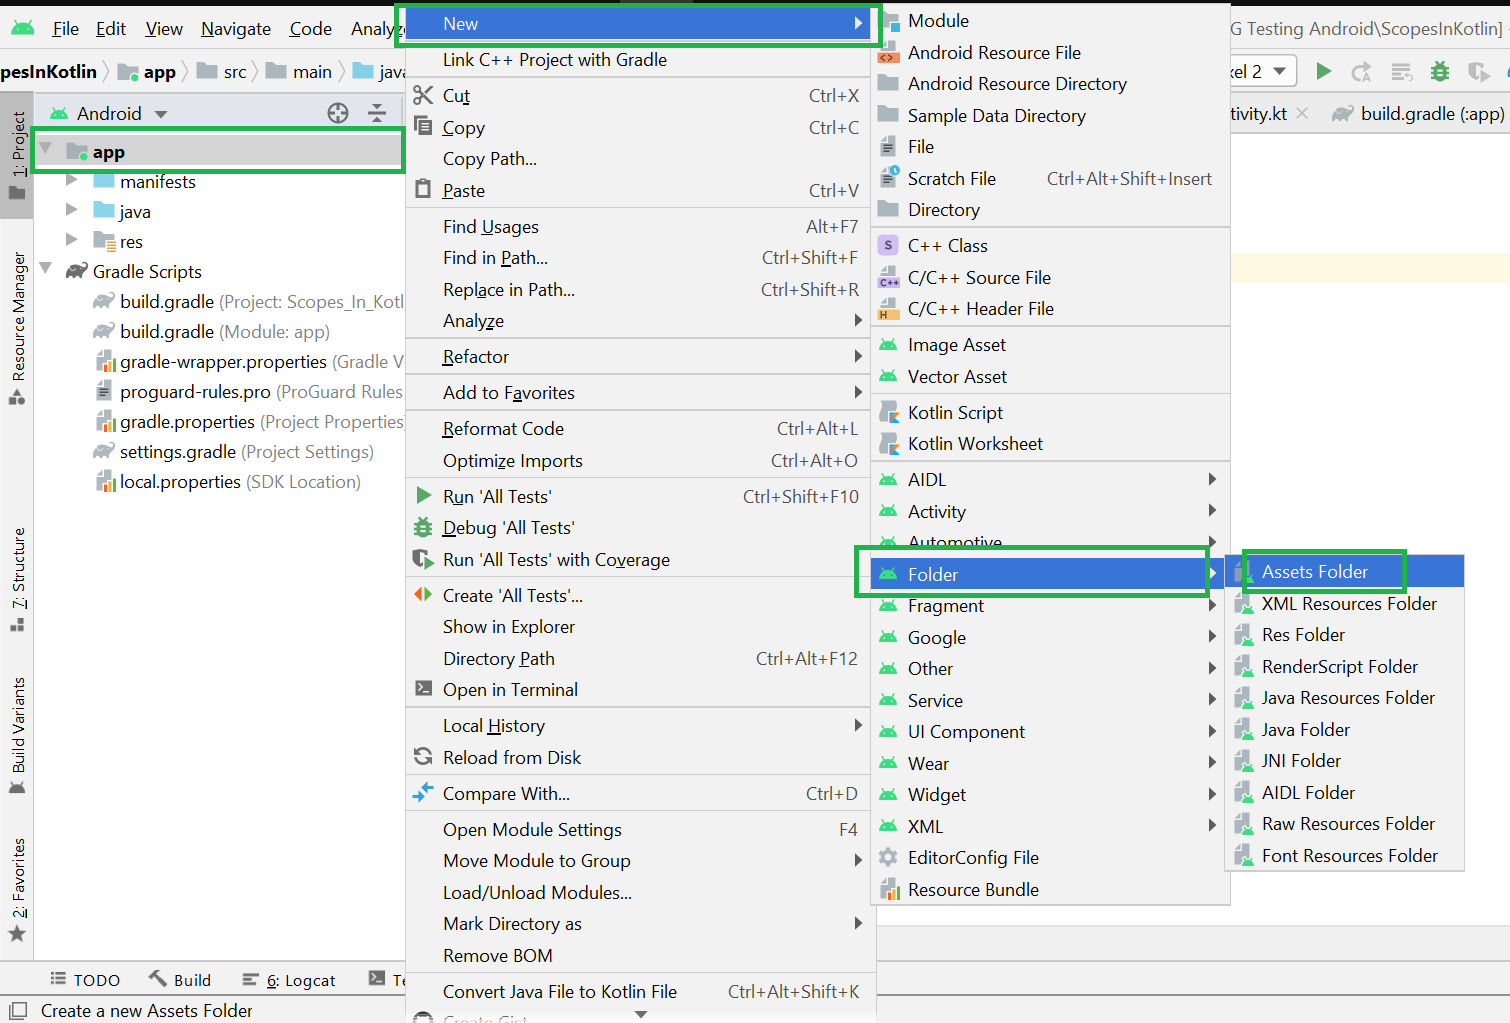
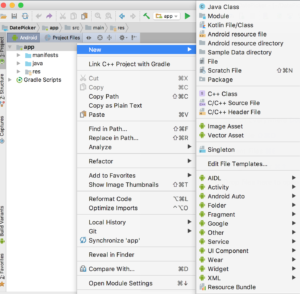
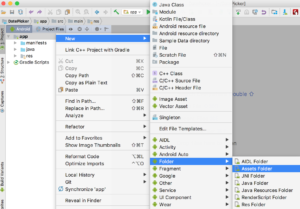
Step 2: Go to the app > right-click > New > Folder > Asset Folder and create the asset folder.
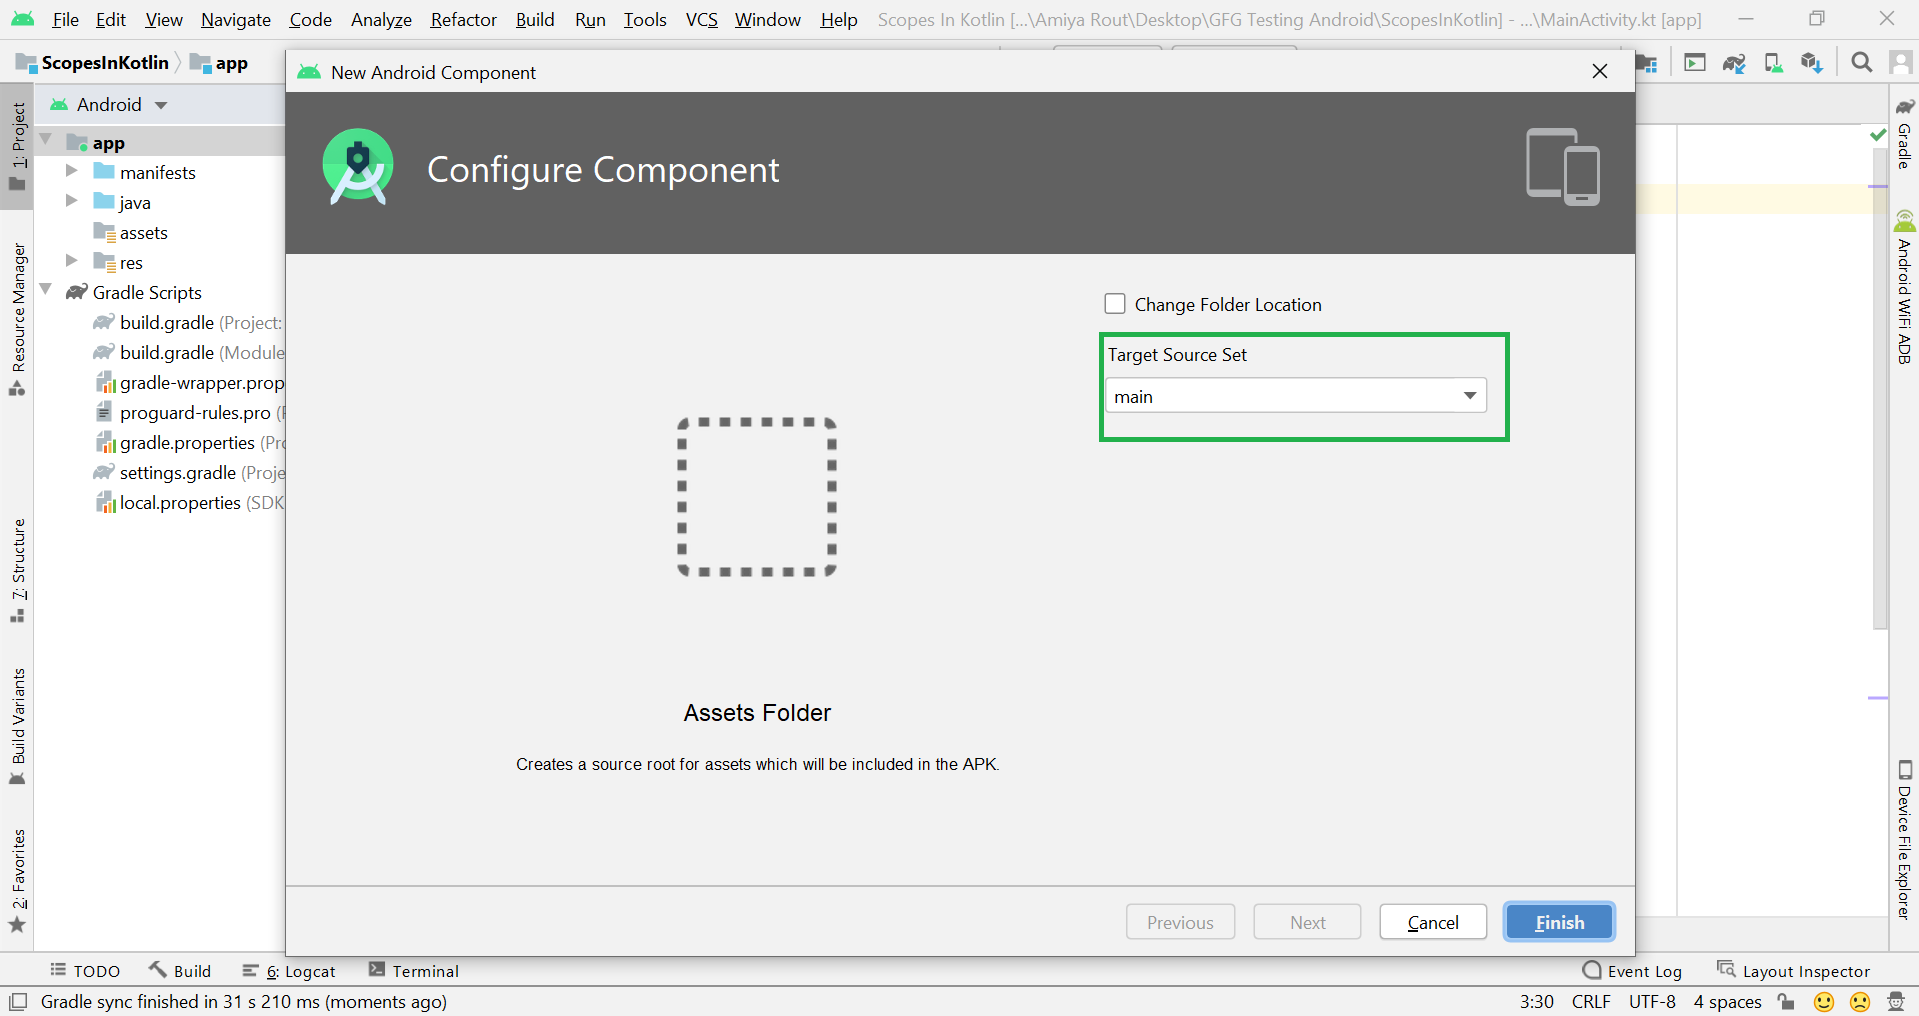
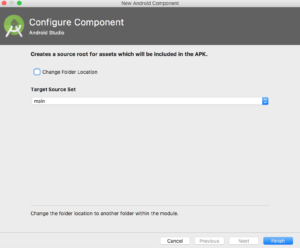
Step 3: Android Studio will open a dialog box. Keep all the settings default. Under the target source set, option main should be selected. and click on the finish button.
Step 4: Now open the app folder and you will find the assets folder by the name of “assets” as shown in the below image. Источник How to Create Android Assets Folder in Android StudioHi and welcome to another tutorial from Codingdemos, today you will learn how to create Android assets folder inside Android Studio. You can use assets folder to add fonts that you can use it in your app.
By the end of this tutorial, you will have Android assets folder. (Large preview)
1- Open up Android Studio and open any project that you have in your computer.
Create new Android Studio project or open existing project. (Large preview) 2- Select app folder, right-click on it and choose New.
3- Now hover your mouse over Folder menu item and choose Assets Folder.
4- You will see a dialog box named New Android Component appears in Android Studio.
Android Studio Android component dialog box. (Large preview) 5- You click on Finish and Android Studio will create an assets folder in your project.
Create asset folder in Android Studio. (Large preview) 6- I hope you find this tutorial helpful and if you have any question please post them in the comment below. Источник How to Add Vector Assets in Android Studio?Vector Assets in Android Studio helps to add material icons and import Scalable Vector Graphics and Adobe Photoshop Document files into your project as vector drawable resources. How Vector Asset is different from Image Asset?Image Asset Studio helps us create different types of icons with different densities and shows us exactly where they’ll be placed in our project. It includes tools for adjusting our icons and adding backdrops, all while displaying the result in a preview pane, so they appear exactly as we intended. Vector Asset Studio helps to add a vector graphic to our project as an XML file that describes the image. Problem using PNG’sThe PNG format can surely handle high-resolution photos. PNG format is a lossless web format. Hence, file sizes tend to get very large. If we want to work with photos on the web, we should always try to continue with JPEG. And the main issue for printing a .png file is its inherent color profile. The colors of the images may be a little dull since the printer has to interpret a different color language. Each PNG asset which we use is a certain density specific. Therefore, we have to deal with different versions of the same image for different screen sizes. To get rid of such problems we use vector assets. Bitmap vs VectorThere are the following differences between Bitmap and Vector: Benefits of Vector AssetsImage scalability is the major advantage of using the vector drawable. The same file can be resized for different screen sizes without loss of image quality which results in smaller APK files and less developer maintenance. We can also use vector images for animation. How do vector assets render?The vector assets are first compiled to binary format at compile time and then at runtime. Next, the application is needed to load this up, generates a model object from binary code, and perform some canvas operations to draw the individual paths to the screen. Vector FormatsThere are the following vector file formats:
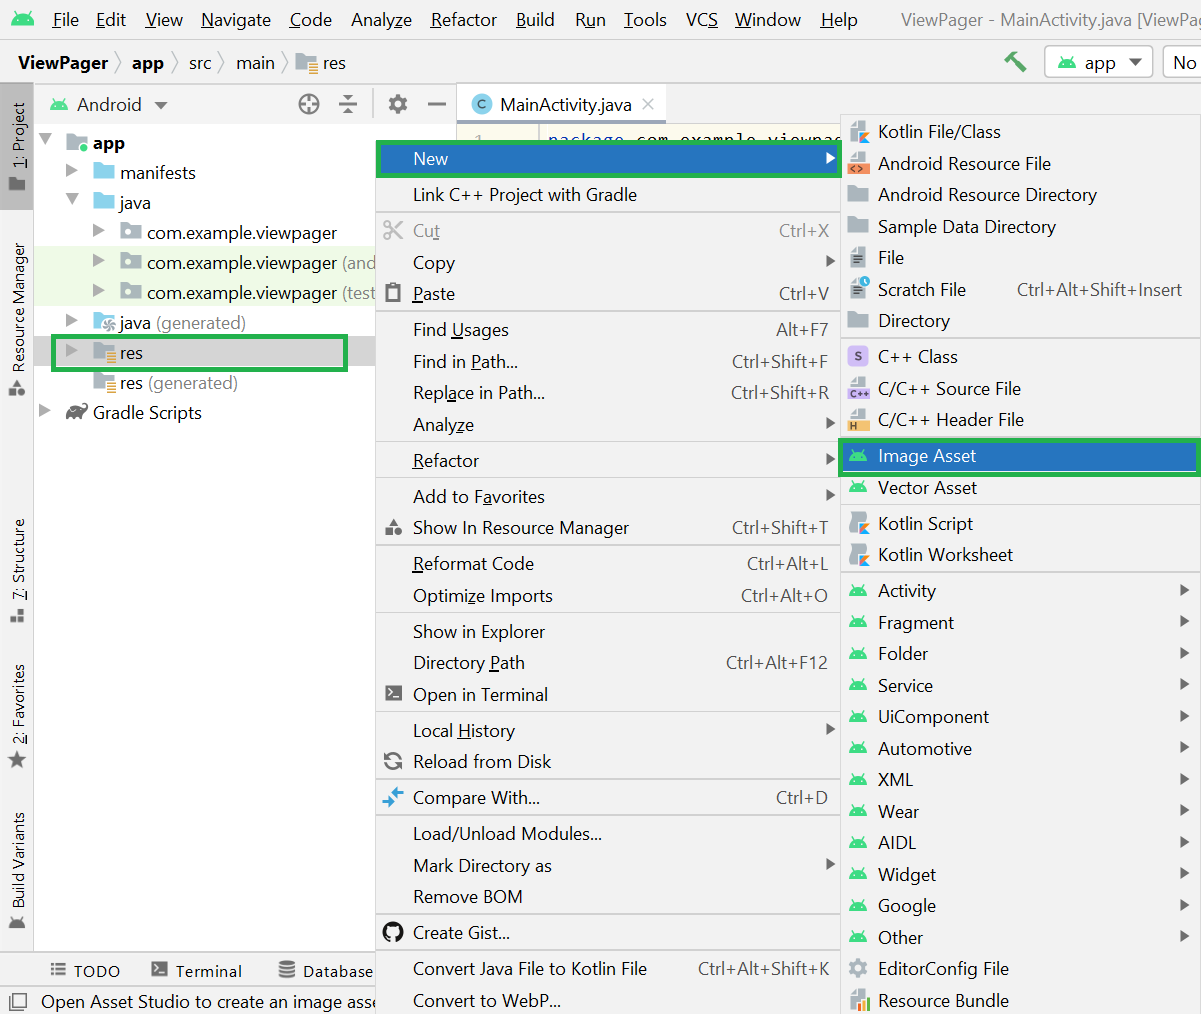
Step by Step ImplementationStep 1: Right-click on drawable > New > Vector Asset After clicking on Vector Asset a new dialog box is opened that is shown below. Step 2: Click on Clip Art and Search for the Icons and click ok button Step 3: Change the color of the icon Icon color can be changed either by directly adding color code or by adjusting the color using brightness and then click on choose button. Step 4: Click Next Step 5: Now Click on Finish Button Step 6: Icon is created in the drawable folder as shown in the image Источник How to Add Image to Drawable Folder in Android Studio?The resource folder is the most important folder because it contains all the non-code sources like images, XML layouts, UI strings for the android application. In Android Studio inside the res folder, one can find the drawable folder, layout folder, mipmap folder, values folder, etc. Among them, the drawable folder contains the different types of images used for the development of the application. We need to add all the images to the drawable folder for the application development. Images are used in android applications to provide more user-friendly behavior & functionality. So in this article, we are going to discuss how to add an image to the drawable folder with multiple methods being explained step by step. Method 1In method 1 we will do it through the way Android Studio provided to you. Step 1: Open Android Studio and go to the app > res > right-click > New > Image Asset as shown in the below figure.
Step 2: A pop-up screen will arise like below. Here choose Action Bar and Tab Icons in Icon Type.
Step 3: Then choose Asset Type as Image and enter the Path of your image. Enter the name of your image and click on Next.
Step 4: Now you can see the android studio automatically created the different-sized images. You can directly create the folder and drag image inside but you won’t have the different-sized icons if you do that and this the main advantage of following this method. And finally, click on the Finish button.
Now go to the app > res > drawable and you can find a folder named as image and the different sized images inside this folder as shown in the below image.
Method 2Method 2 is very easy but as we discussed above we can directly create the folder and drag image inside but you won’t have the different-sized icons if you do that and this the main advantage of method 1. So the developer must follow method 1. Below is the step by step implementation of method 2: Step 1: In this method first of all in your system find your required images and copy the image as we do normally. Step 2: Then open the Android Studio go to the app > res > drawable > right-click > Paste as shown in the below figure.
Step 3: Then a pop-up screen will arise like below. Here choose your directory where you want to store your image file. And click on OK.
Step 4: In this screen, you can rename your image file name and also choose your directory. And click on the Refactor button. And you are done.
Now go to the app > res > drawable and you can find a file named as method_2.jpg as shown in the below image. Источник  Когда к мобильному устройству присоединены наушники  ОС Google Android развивается, и по всему видимому |