- How to downgrade from the Android 11 Beta 3 to Android 10 on Google Pixel [Video]
- How to downgrade from the Android 11 Developer Preview on Google Pixel
- 1. Download and install Android SDK Platform-Tools package
- 2. Enable USB debugging and OEM unlocking
- 3. Download the Factory Image for your device
- 4. Boot into device bootloader
- 5. Unlock the bootloader
- 6. Enter the flash command
- 7. Relock the bootloader (optional)
- 8. Reboot your phone
- More Android Basics:
- How to Downgrade Your Phone from Android 10 to Android 9
- Installing the Android SDK Platform-Tools package
- Apple AirPods 3
- Make sure your phone is fully updated
- Download the older operating system image
- Enable USB Debugging
- Plug your phone into your computer
- Reboot your Android and start downgrading (attempt one)
- How to downgrade your device (the successful attempt)
- A summary of how to (really) downgrade your device
How to downgrade from the Android 11 Beta 3 to Android 10 on Google Pixel [Video]
— Aug. 7th 2020 12:51 am PT
If you are not content with the most recent Android 11 Beta build on your Google Pixel, it’s probably music to your ears knowing that you can downgrade your OS to a stable version of Android 10 if you encounter any major problems.
We’ve shown you how to install the Android 11 Beta or Developer Preview phase, so it’s only fair that we show you how to downgrade from this experimental Android build.
You’re going to need to do a few things before you can revert to a stable Android 10 build, though. Firstly, be sure to back up all of your data before even attempting this. You will lose your device data, as this method requires a device wipe, and your device will be wiped several times during this process.
IMPORTANT NOTE: If you are a Pixel 4 owner and choose to downgrade back to Android 10, Face Unlock will no longer be able to be set up. For this reason, unless you are happy to only utilize PIN security, flashing back may only be worthwhile if you are happy to have Face Unlock and associated features disabled for the foreseeable future — at least until the full Android 11 upgrade is available.
This guide is also tailored for Windows users, so the process may vary for those using MacOS or Linux.
How to downgrade from the Android 11 Developer Preview on Google Pixel
Easy method: Simply opt-out from the Beta on the dedicated Android 11 Beta website and your device will be returned to Android 10.
- Download and install Android SDK Platform-tools
- Enable USB debugging and OEM unlocking
- Download the most recent compatible Factory Image
- Boot into device bootloader
- Unlock bootloader
- Enter the flash command
- Relock bootloader (optional)
- Reboot your phone
1. Download and install Android SDK Platform-Tools package
You’ll need to use ADB or Android Debug Bridge to downgrade your current Android build to an older version. We recommend installing the unzipped platform-tools package on your desktop for quick access when running commands. You can download the latest platform-tools zip file from here.
2. Enable USB debugging and OEM unlocking
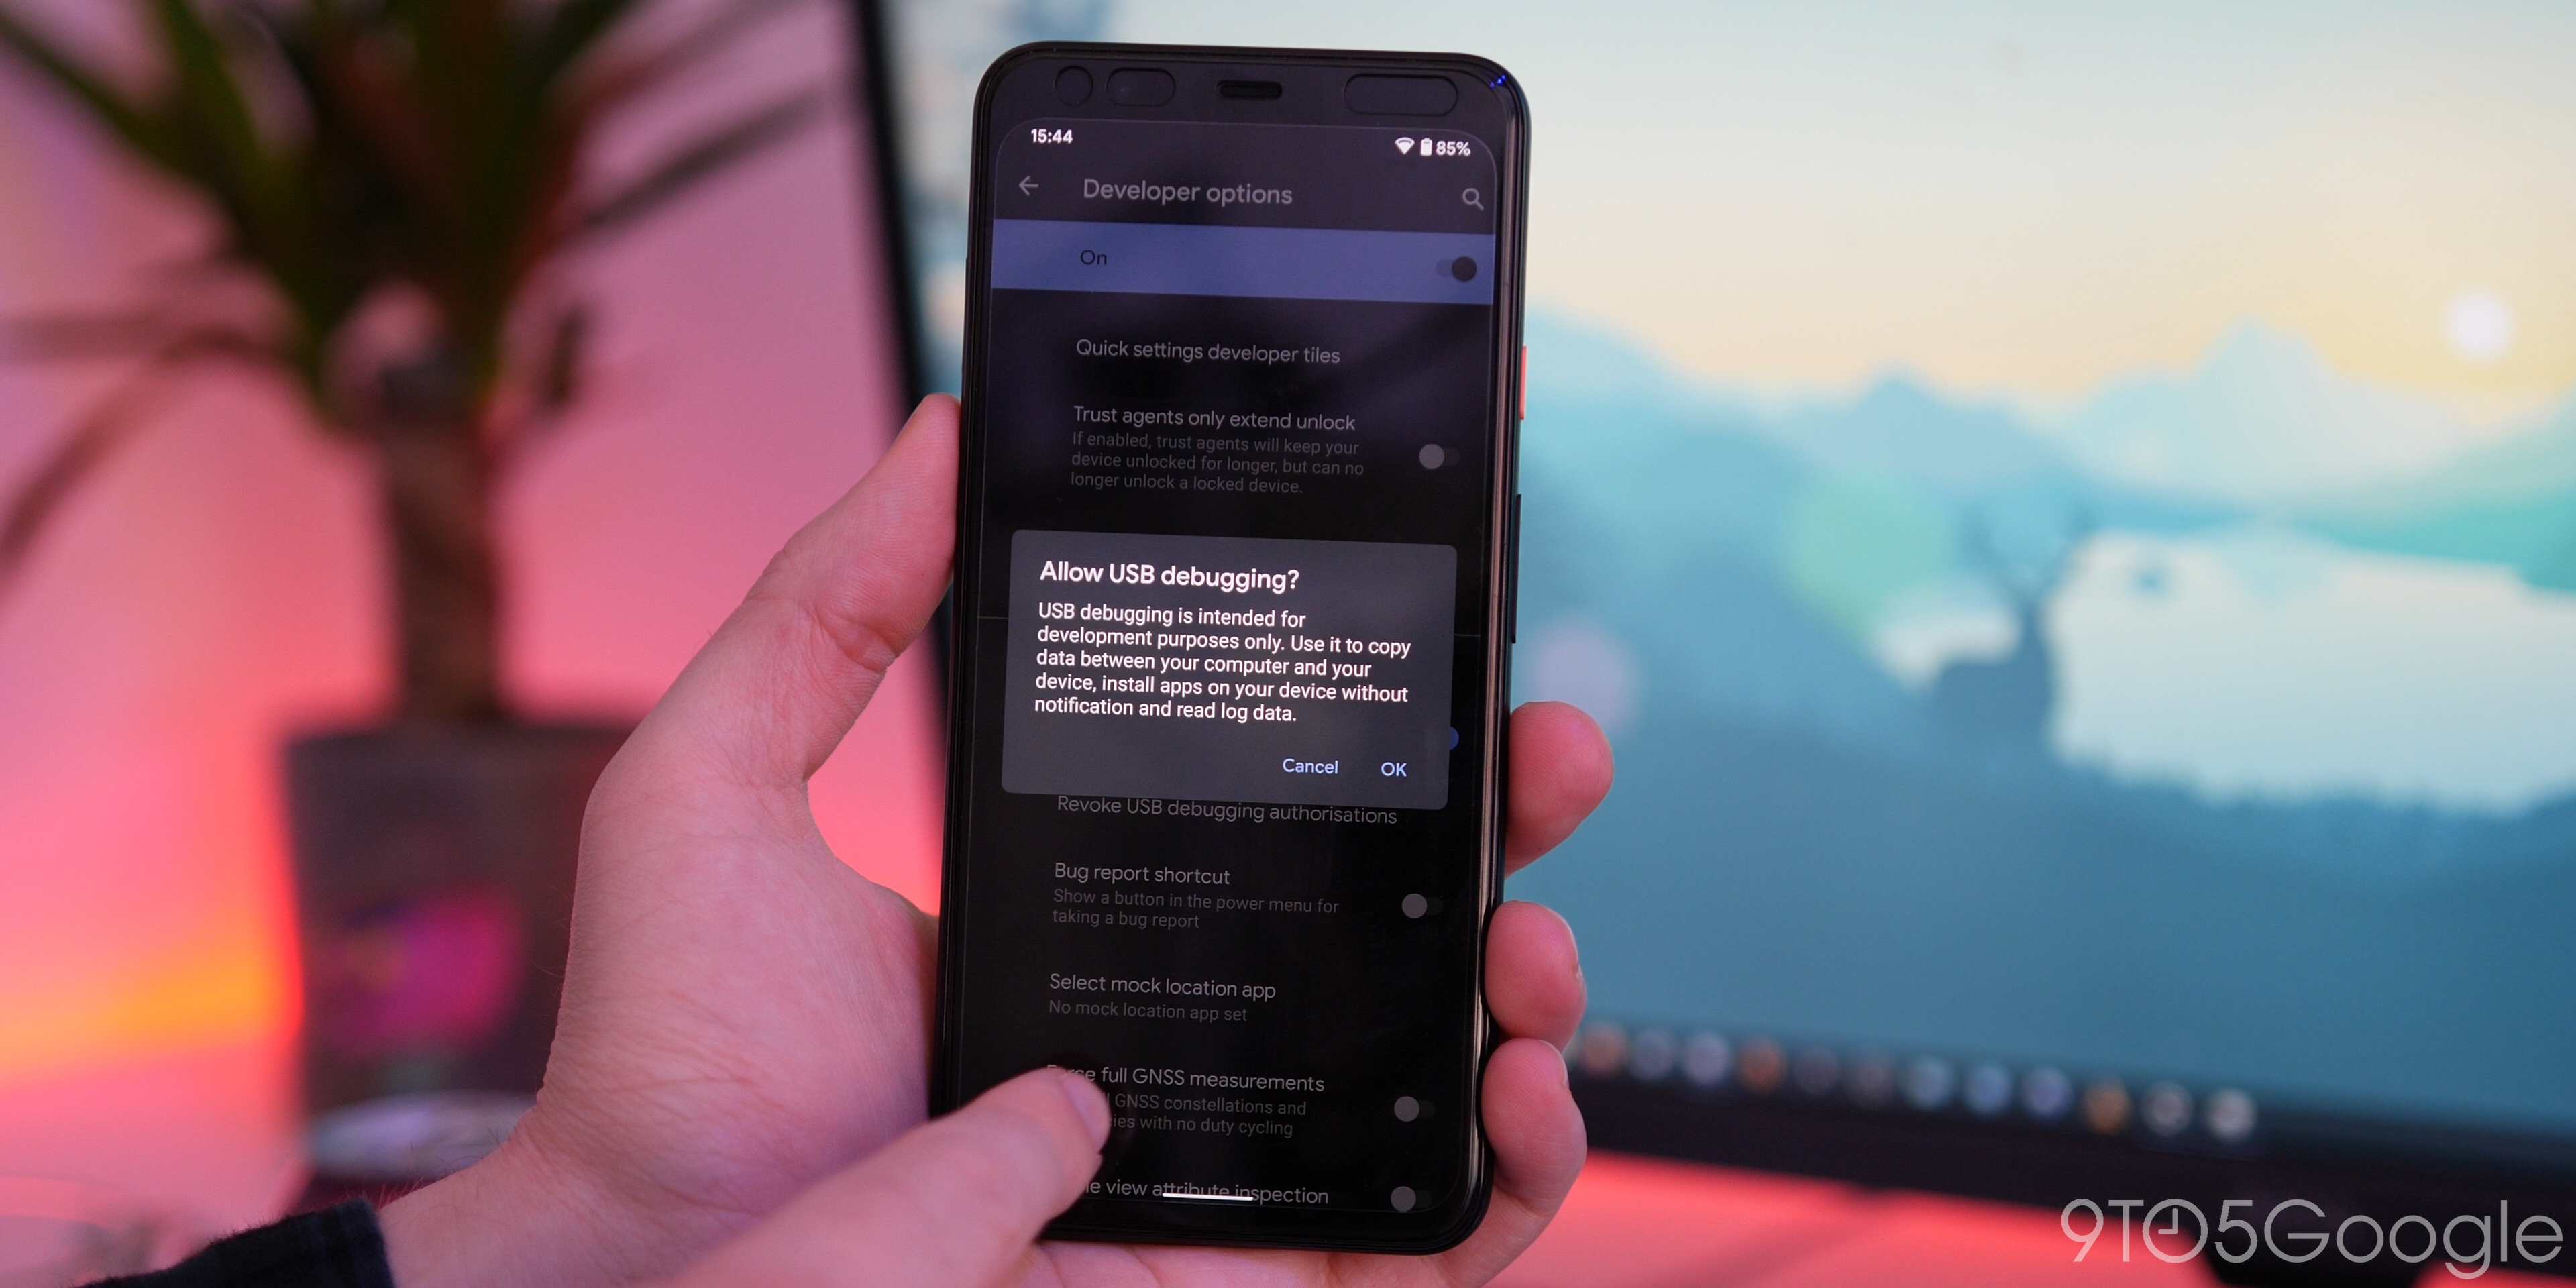
Firstly, ensure that you have Developer Options enabled on your Pixel, you can do that by heading to your device Settings > About phone, now tap “Build number” until a message confirms that you have Developer options enabled.
Now you need to head to Settings > System > Advanced > Developer options (you may need to expand a hidden menu for this). Before we are ready to continue, you will need to scroll down and enable “OEM unlocking” as this is integral for further steps. Now scroll slightly further down to the “Debugging” section and tap the “Allow USB debugging” option.
3. Download the Factory Image for your device
This is necessary for the Android 11 downgrade process. You’ll need to download the correct Factory Image for your device. This is essentially just a blank slate for your smartphone or snapshot of that particular Android build at that time. You can grab it from Google’s Factory Image OTA hosting site, which contains all Factory Images for Pixel and Nexus devices.
You will need to add this file and unzip its contents to the platform-tools folder for access later on.
Note: Do not extract into an internal sub-folder, just extract all files into the main platform-tool folder.
4. Boot into device bootloader
This can be done a couple of ways. The simplest way is to connect your device to your Windows PC and open platform-tools folder and typing “cmd” into your file manager address bar. This will open a Command Prompt window in the right place, now enter the following command to start the adb daemon:
Your Pixel device will now load into the bootloader, which is where we’ll need to be to send some commands.
Alternatively, you can press and hold the Power button and volume down key until you see the Android figure lying down. Now you will need to press and hold the power button and volume up button briefly before releasing the volume up key. Using the up and down volume buttons, you can scroll to select “enter fastboot.”
5. Unlock the bootloader
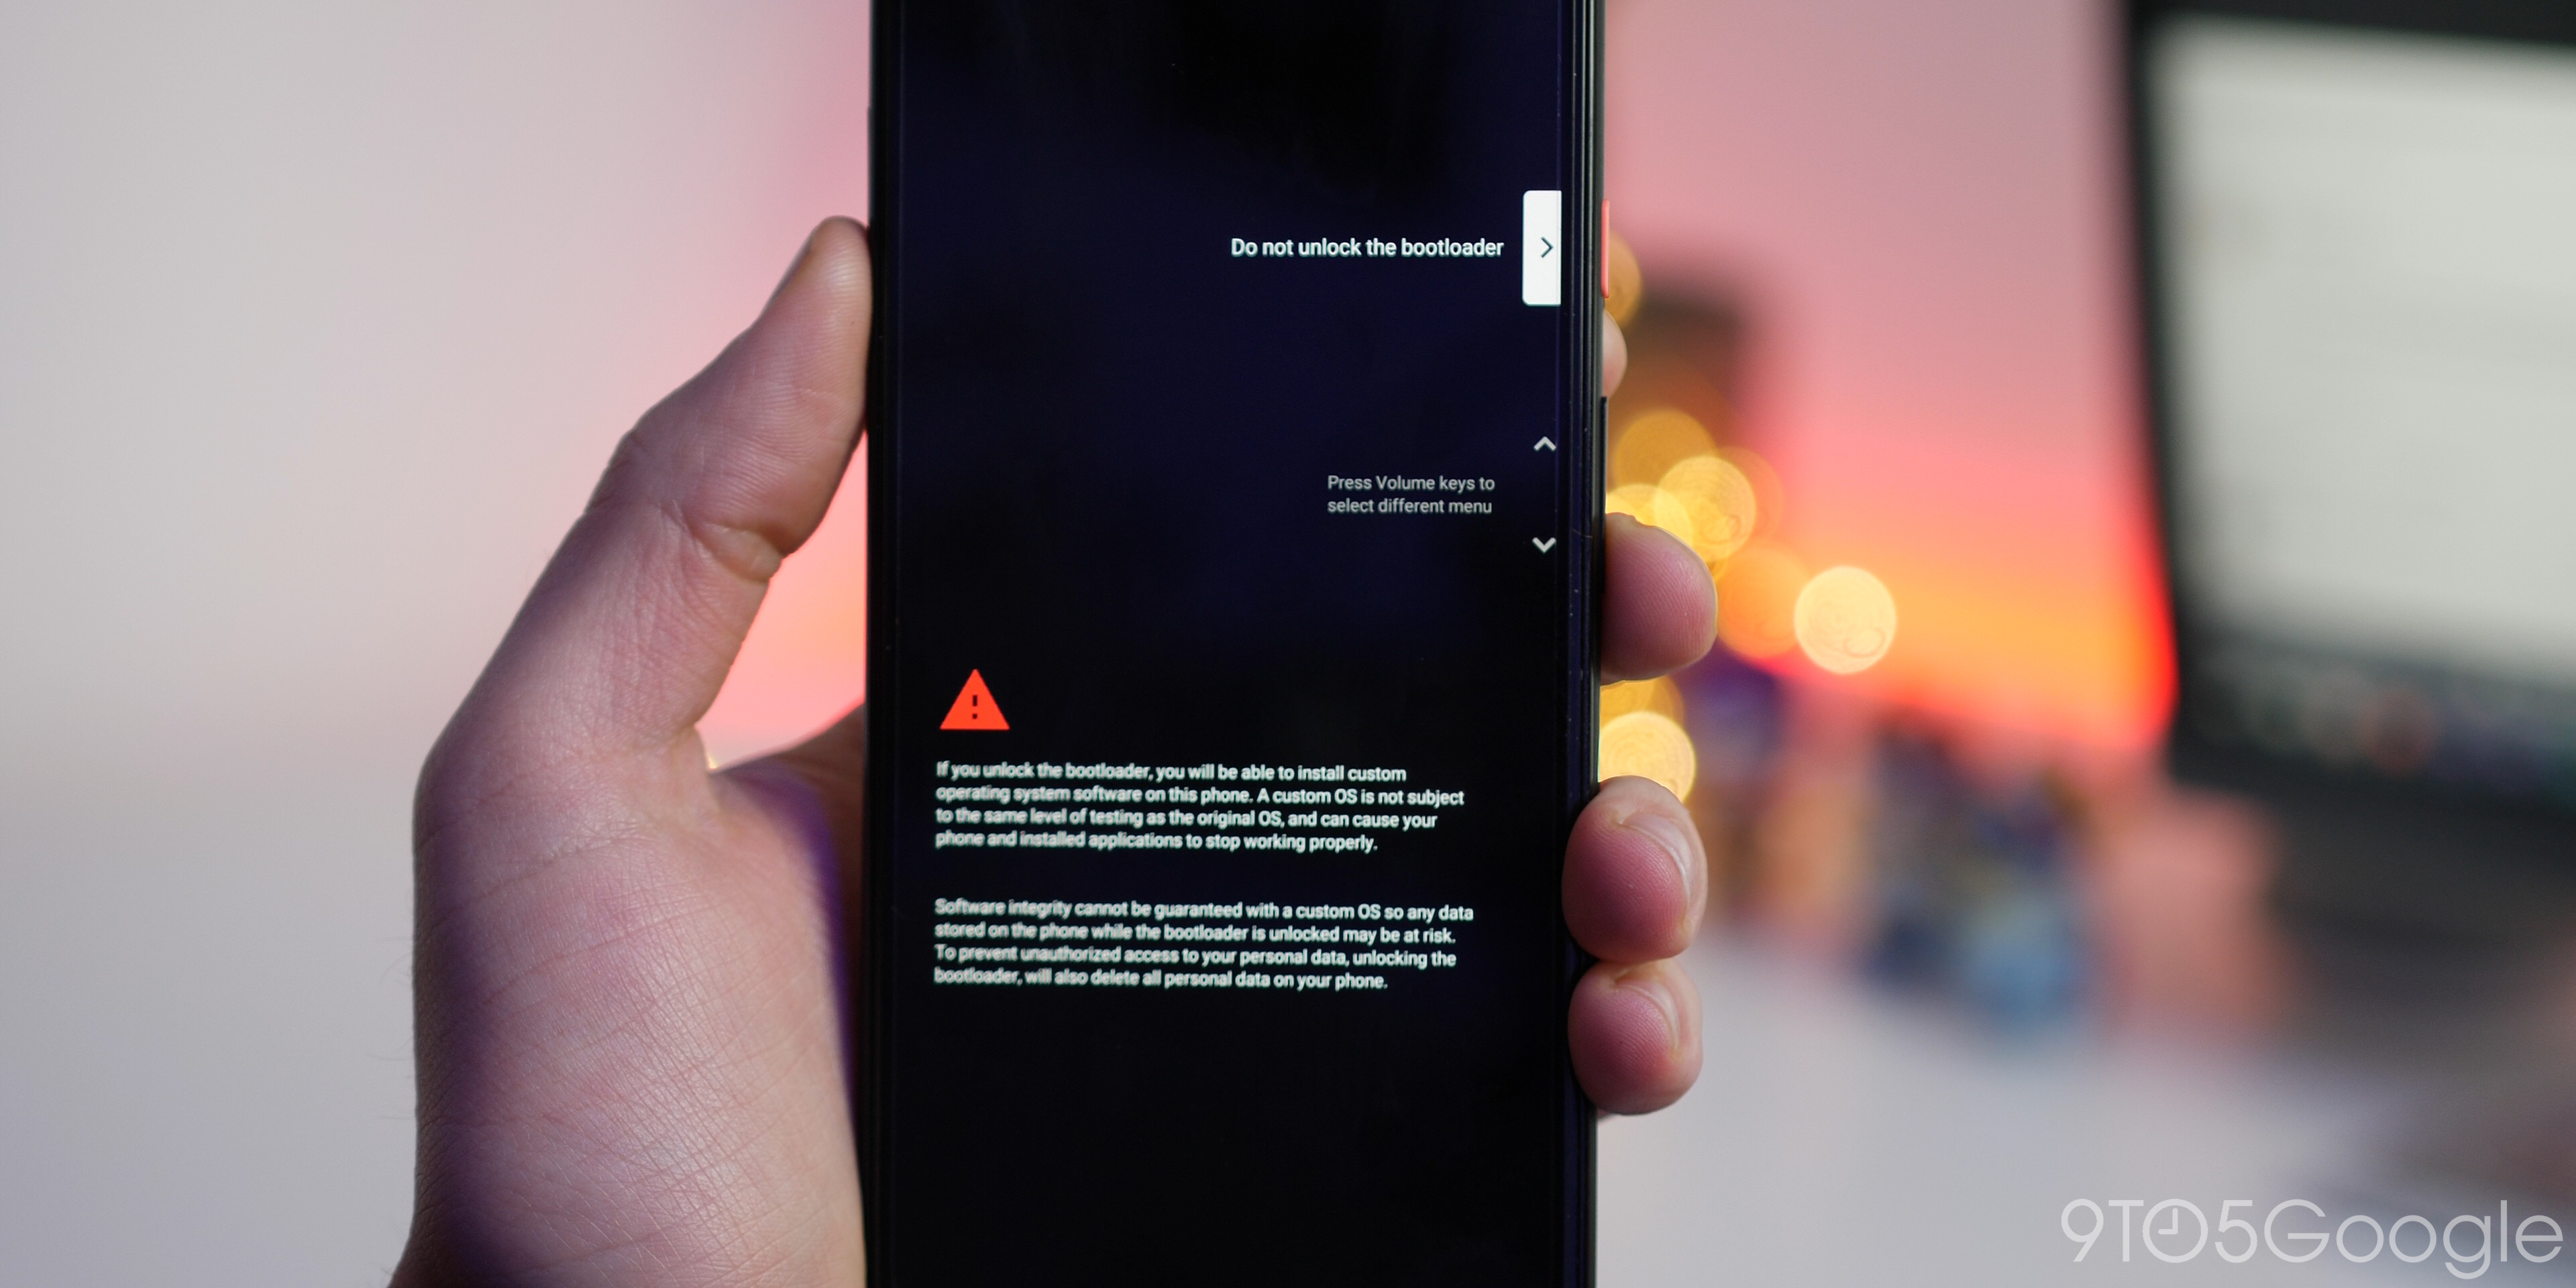
Unlocking the bootloader is necessary for the flashing process, as unfortunately you can’t flash a Factory Image and downgrade your Android version using the slightly simpler ADB sideloading method. This is a pretty simple process though. When using your command-line interface, enter the following command:
You will get a slightly daunting message on your display warning you that unlocking the bootloader may cause device instability. Using the physical volume keys, choose the “Unlock the bootloader” option and confirm your selection by pressing the power button. Restart your Pixel, as this process will wipe your smartphone.
We will also need to skip the device startup process to re-enable USB Debugging in preparation for the next step. Once you have done so, ensure your Pixel is connected to your PC, and you’ll need to enter the bootloader on your device with the following command again:
6. Enter the flash command
With all of your Factory Image files extracted into the platform-tools folder and accessible. You can now run the following command (with your open Command Prompt/PowerShell window):
Your Pixel will now begin the process of downgrading Android, which will take a few minutes. Leave the Command Prompt window open, and when the process has finished, you will see a completion message.
7. Relock the bootloader (optional)
This is an optional step, but is needed if you want to get future OTA updates. Otherwise, you’ll see a pop-up splash screen with a warning each time you reboot your device.
You will need to go through the device setup process again which you can skip wholesale. From here, go back and re-enable USB debugging from step No 2 — your bootloader is unlocked so OEM unlocking should be grayed out.
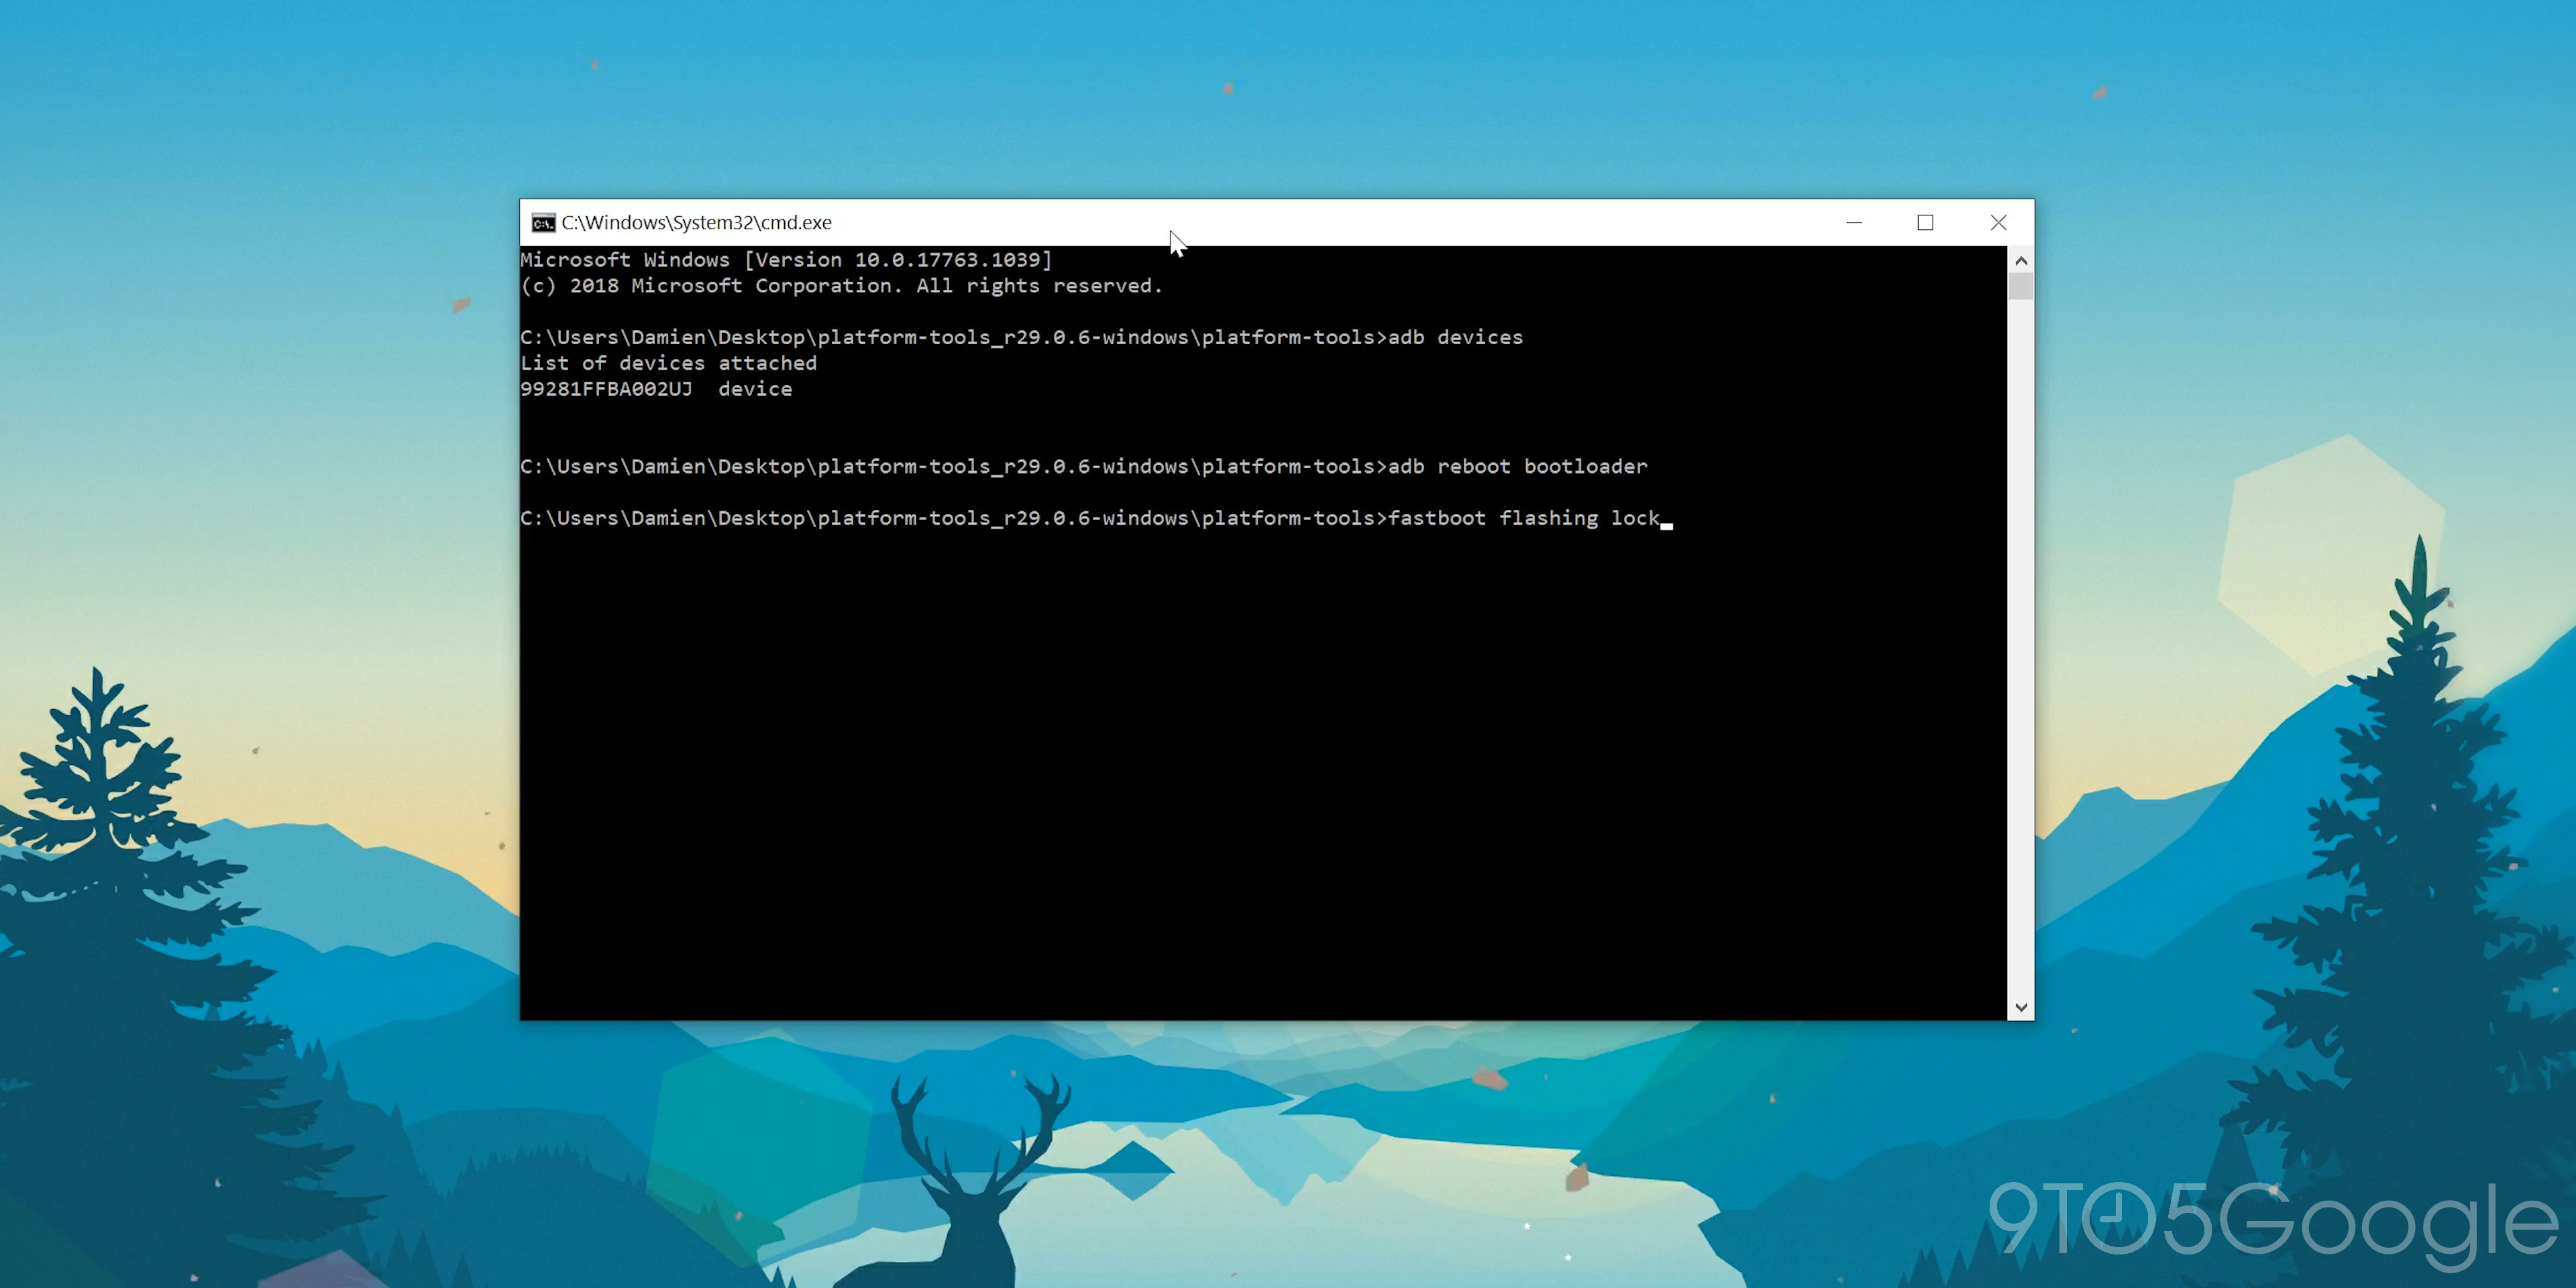
Plug your device back into your Windows PC and open your platform-tools folder and reopen a Command Prompt window using the “cmd.” Enter the following command to quickly load into your device bootloader:
Now we can re-lock the bootloader by entering the following:
On your Pixel, using the volume keys, scroll to the “lock the bootloader” option and tap the power button to accept. When confirmed “locked” will appear on screen within the bootloader menu. Note: This process will wipe your device a further time once you reboot your Pixel.
8. Reboot your phone

You can now disconnect your device and reboot as you have successfully downgraded from the Android 11 developer preview to Android 10. It should now load into the device setup process, allowing you to sign up and enjoy your stable Android build.
It’s also worth noting that this method will work if you do wish to downgrade from Android 10 to Android Pie on devices such as the Pixel 2 and Pixel 3. However, we do not recommend doing so, as this brings about various device security risks and further potential issues. That said, if you do choose to downgrade from one Android version to another, then you do so at your own risk.
Another thing to note is that for those with a Pixel 4 series device, Face Unlock will no longer be able to be set up on a device that is running Android 10 if it has previously run an Android 11 Beta build. This means that flashing back may only be worthwhile if you are happy to have Face Unlock and associated features disabled for the foreseeable future.
More Android Basics:
FTC: We use income earning auto affiliate links. More.
Источник
How to Downgrade Your Phone from Android 10 to Android 9
Android 10 is here—for Pixel devices, at least. We typically recommend everyone update to the latest and greatest version of an operating system to enjoy its features, security patches, and bug fixes, but that doesn’t mean you’re guaranteed to have a perfect experience on your new OS.
If you encounter any critical issues in Android 10 (including slowdowns), or you just miss the familiarity of Android 9, you can downgrade your device. Though you’re probably better off holding out for any fixes, or backing up your information and factory-resetting your phone to see if that addresses any problems, the nuclear option is still there if you need it.
In this guide, we’ll walk you through the process of reverting from Android 10 to Android 9. We’re doing this on a Pixel because that’s what we have (and what has Android 10). This process will be different for other Android devices—if you can even downgrade at all—and we’ll address those in a separate guide once Android 10 is more widely available.
Installing the Android SDK Platform-Tools package
We’ll be using the command-line tool ADB, short for Android Debug Bridge, to downgrade our Google Pixel 3 XL, which means we have to install the Android SDK Platform-Tools package before we can get started doing anything. Click that link, grab the installer for Windows or Mac, and unzip its contents a folder—your pick.
Apple AirPods 3
A whole new look
Make sure your phone is fully updated
This one sounds like a strange step, given we’re trying to downgrade our Pixel device, but hear me out. The downgrade won’t work if there are pending Pixel updates. So, to prevent that, pull up Settings > System > Advanced > System update and check to see if anything is available. If so, download the update, install it, and restart your device.
Download the older operating system image
For Google’s Pixel phones, the company gives you a big list of operating system images to pick from. All I had to do was find my device (a Pixel 3 XL) and grab an image for Android 9.0. Easy as that. In my case, I used the most recent Android 9 image available: 9.0.0 (PQ3A.190801.002, Aug 2019)
Spoiler: This actually wasn’t the correct file to use at all, a fact I’ll address later in this piece. It’s around this point where my first attempt at downgrading my device started to go south, and I wanted to leave my initial thoughts here so you can get a full sense of what to do, and what not to do, if you’re following some downgrading directions you saw on Google’s site for the first time.
Enable USB Debugging
In order for my computer to talk to my phone over ADB, I also needed to first enable USB Debugging. To do that, pull up Settings > About phone, scroll to the bottom to find “Build number,” and tap that frantically until you enable Developer Options on your device. Head back to Settings > System > Advanced and tap Developer options. Scroll down to the “Debugging” section and enable “USB debugging.”
Spoiler: You’ll also want to enable “OEM unlocking” while you’re here, which I neglected to do until my second downgrading attempt. More on that in a bit.
Plug your phone into your computer
Easy, right? As you’re doing this, pull up an elevated Command Prompt (right-click and select Run as Administrator) or Terminal. Navigate over to where you unzipped the Android SDK Platform-Tools package.
Reboot your Android and start downgrading (attempt one)
Spoiler: I thought this was the right process at first. I was wrong. You can read through why this doesn’t work in this section, or skip to the next section if you’re getting antsy and just want to downgrade your device without the extra education.
To get started, enter the following command to reboot your device into its recovery mode. (You might have to accept a “USB debugging” request on your device first, and then send the command again.)
adb reboot recovery
When I did this, my device pulled up a scary-looking “No command” screen. To get to the main recovery menu, I simply had to hold down the power button, tap the “up volume” button, and release the power button.
From there, I selected the “Apply update from ADB” option on my device using the volume buttons and confirmed it using the power button. My Pixel then looked like this:
Back on my computer, I ran the following command to begin sideloading Android 9 back onto my device:
adb sideload crosshatch-ota-pq3a.190801.002-13edb921.zip
Yes, that file name is the name of the Android 9 image I downloaded from Google. And, yes, it has to be in the same folder as adb—don’t forget to move it there from your default downloads folder.
Not only could I see a little flurry of activity on my device:
But I also got a little progress indicator (a percent counter) on my Command Prompt:
And then everything failed:
How to downgrade your device (the successful attempt)
I suspect this method would allow you to upgrade your device without an issue, but there are actually a few more steps involved when you’re trying to downgrade your device.
First, I had to reboot the phone back to its regular state, revisit Developer options in the Settings app, and enable an option I forgot about: OEM unlocking.
I then rebooted back into ADB by typing adb reboot bootloader in the Command Prompt. Next, I had to install Google’s USB drivers by downloading them, unzipping them, pulling up Windows’ Device Manager, and manually updating the flagged Android device (by right-clicking, selecting “Update driver,” and pointing to the directory where I previously unzipped Google’s USB drivers).
I unplugged my phone and plugged it back in (for good luck, I suppose), and I was able to confirm my system could see it by typing fastboot devices in the command prompt.
I then downloaded Google’s factory image of Android 9 for my device—not the OTA image I previously pulled—and dropped it into the same folder as my ADB tool.
I felt pretty ready at this point. I unlocked my phone’s bootloader by typing fastboot flashing unlock into the command prompt. This prompted my device to issue a scary little warning, which I ignored; I used the volume buttons to select the new “Unlock the bootloader” option and confirmed using the power button.
While my phone’s bootloader unlocked, I unzipped the factory image I previously downloaded directly into my ADB folder, so its contents were swimming among all the other files. (Don’t unzip them to a new folder within your platform-tools folder.)
Finally, I typed flash-all into my Command Prompt and crossed my fingers. And. that failed, too, because it said the image wasn’t compatible with my device. Sigh.
To get around this issue, I decided to try flashing with a different factory image entirely—the very first “crosshatch” image available for my Pixel 3 XL, “9.0.0 (PD1A.180720.030, Sep 2018).“ I deleted the previous image’s contents from my platform-tools folder, unzipped this image’s contents into the folder like before, and ran flash-all again. And it seemed as if things were working, as I was getting a lot more data about the update processing than before:
After about two minutes, the update finished and my device automatically rebooted. With more fingers crossed—I think I was losing circulation by this point—I powered down my Pixel and manually rebooted it into fastboot mode by holding down the power and volume-down buttons. I then entered fastboot flashing lock into the Command Prompt to lock the bootloader back up (which, again, required me to pick the correct prompt on my phone).
Finally, I rebooted my device one final time by selecting the “Start” option on the fastboot screen (using the power button, of course). And—Great Scott!—we’ve traveled back to the past. Here’s that Pixel 3 XL now on Android 9 with the old September 2018 security update:
A summary of how to (really) downgrade your device
I realize that this long, meandering journey to downgrade my phone might be slightly confusing, but I wanted to walk you through the process to show you the trial-and-error steps you might have to take when you’re performing a downgrade on your device—be it a Pixel, a Samsung, or whatnot.
I’ve seen plenty of “downgrading Android” guides that tend to leave out a step or two that’s absolutely critical to the equation. Or, worse, they leave you hanging when you follow their steps and find that the process didn’t work for you. By watching how I did it, hopefully you’ve leveled up your troubleshooting techniques should you find yourself similarly stuck.
Here’s my final checklist of steps for downgrading my Pixel:
- Download and install the Android SDK Platform-Tools package
- Download and install Google’s USB drivers for your phone
- Make sure your phone is fully updated
- Enable Developer Options and turn on USB Debugging and OEM Unlocking
- Download a factory image for your device for whatever version of Android you want. (The most recent image might not be the optimal choice. Also, don’t use an OTA image.)
- Use a Command Prompt or Terminal to boot your device into its fastboot mode, and then unlock the bootloader
- Use the factory image’s “flash-all” command to begin the downgrade
- Lock your device’s bootloader when done
Источник


