- Методы лечения различных ошибок в Android Studio при разработке проекта
- How to Fix Android App Not Installed Error
- Android Issues & Fixes
- Why Android App Not Installed Error Occurs
- 1.В Insufficient Storage
- 2.В Corrupted/Contaminated App File
- 3.В Storage Location
- 4.В SD Card Not Mounted in the Device
- 5.В Corrupted Storage
- 6.В Application Permission
- FixВ App Not Installed on Samsung for System Problems
- How to Fix App Not InstalledВ on Android with Regular Ways
- Tip 1. Only Use Google Play Store
- Tip 2. Mount SD Card
- Tip 3. Choose App Location Wisely
- Tip 4. Format SD Card
- Tip 5. App Permissions
- Tip 6. Try toВ Clear Data
- Bonus Tip: How to Transfer Apps from Android to Android
- The Bottom Line
- More Related Articles
- Infographic: 11 Most Common Android Errors and How to Fix Them
- Android Errors List: 11 common errors and how to fix them
- 1. ActivityNotFoundException
- 2. ClassCastException
- 3. Error converting byte to dex
- 4. INSTALL_FAILED_INSUFFICIENT_STORAGE
- 5. NullPointerException
- 6. R.layout.main Cannot Be Found / Cannot resolve symbol R
- 7. OutofMemoryError
- 8. Only the original thread that created a view hierarchy can touch its views
- 9. Too many field references
- 10. NetworkOnMainThreadException
- 11. Activity has leaked window that was originally added here
- Wrapping up!
- Related tutorials you might be interested in:
- Author’s Bio:
Методы лечения различных ошибок в Android Studio при разработке проекта
Сегодня хотел бы поделиться своим анализом и способами лечением разных ошибок при разработке своего продукта в Android Studio. Лично я, не раз сталкивался с различными проблемами и ошибками при компиляции и/или тестировании мобильного приложения. Данный процесс, всегда однообразный и в 99% случаев и всегда нужно тратить n-колличество времени на его устранение. Даже, когда ты уже сталкивался с данной проблемой, ты все равно идешь в поисковик и вспоминаешь, как же решить ту или иную ситуацию.
Я для себя завел файлик, в котором отметил самые частые ошибки — потратив на это несколько часов и перечислил самые популярные ошибки (в дальнейшем планирую просто их запомнить), чтоб сократить свое время в дальнейшем.
Итак, начну по порядку с самой распространенной проблемы и дальше буду перечислять их по мере появления:
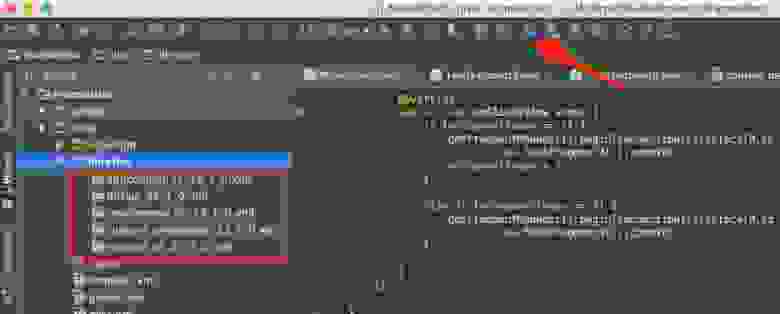
1) Если подчеркивает красным код, где используются ресурсы: R. — попробовать (но вероятно не поможет): Build -> Clean Project.
В принципе на Build -> Clean Project можно не терять времени, а лучше всего — слева переключиться на Project, открыть каталог .idea, затем каталог libraries и из него удалить все содержимое. Затем нажать кнопку Sync Project. А затем (если все еще красное, но скорее всего уже будет все ок ) Build -> Clean Project.
2) После внезапного выключения компьютера, после перезапуска может быть во всех проектах весь код красным. Перед этим может быть ошибка: Unable to create Debug Bridge: Unable to start adb server: Unable to obtain result of ‘adb version’. Есть три решения — первое помогло, второе нет (но может быть для другого случая), а третье — не пробовал:
а) File — Invalidate Caches/Restart — Invalidate and Restart
б) Закрыть студию. В корне папки проекта удалить файл(ы) .iml и папку .idea. Вновь запустить студию и импортировать проект.
в) Нажать Ctrl-Alt-O и запустить оптимизацию импорта.
Кстати, adb сервер можно проверить на версию (и работоспособность) и затем перезапустить:
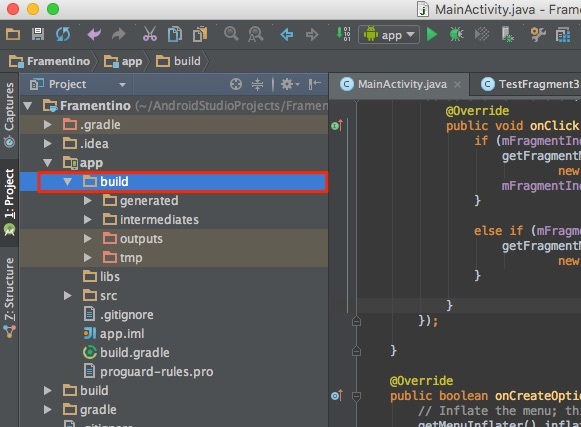
3) Если Android Studio выдает приблизительно такую ошибку: Error:Execution failed for task ‘:app:dexDebug’.
Надо слева переключиться на опцию Project, найти и удалить папку build которая лежит в папке app, т.е. по пути app/build. Затем перестроить весь проект заново: Build -> Rebuild Project.
Такое же решение если ошибка типа: «не могу удалить (создать) папку или файл» и указан путь, который в ведет в app/build. Тоже удаляем папку build и ребилдим проект.
4) В сообщении об ошибке упоминается heap — виртуальная память. А ошибка обычно вызвана ее нехваткой, т.е. невозможностью получить запрашиваемый объем. Поэтому этот запрашиваемый объем надо уменьшить, т.е. переписать дефолтное значение (обычно 2048 MB которое можно изменить в настройках), на меньшее 1024 MB.
В файле проекта gradle.properties пишем:

5) Android Studio пришет примерно такую ошибку: Plugin is too old, please update to a more recent version, or set ANDROID_DAILY_OVERRIDE environment variable to «83648b99316049d63656d7276cb19cc7e95d70a5»
Возможные причины (кроме необходимости регулярного обновления SDK):
а) Загруженный проект был скомпилирован с помощью уже несовместимого старого gradle плагина. В этом случае надо найти и подключить в своем build.gradle проекта этот более старый плагин. т.е. попробовать более старые версии, например: 1.1.3 (часто именно 1.1.x и подходит).
Найти все версии можно здесь.
б) Если в build.gradle проекта используется beta-версия плагина — это означает, что срок ее истек. Посмотреть последние релизы (продакшн и бета) можно также здесь:
6) Иногда при подключении сторонних библиотек могут дублироваться некоторые файлы (обычно связанные с лицензированием). В сообщении будет что-то содержащее слова: duplicate files. Решение — надо посмотреть в сообщении об ошибке или в документации подключенной сторонней библиотеки — какие именно файлы стали избыточными, и перечислить их в build.gradle модуля для исключения (exclude) из билда.
Это делается в директиве packagingOptions (которая, в свою очередь, находится в директиве android).
Источник
How to Fix Android App Not Installed Error
This post aims at telling you 6 tips to fix Android app not installed error. If you are stuck in Android app not installed error, those solutions are helpful.
Android Issues & Fixes
Android System Issues
Android Apps Issues
Samsung Phone Issues
I have a program working in the Android Emulator. Every now and again I have been creating a signed .apk and exporting it to my HTC Desire to test. It has all been fine. On my latest exported .apk I get the error message ‘App not installed’ when I try to install the .apk. What can I do with this issue?
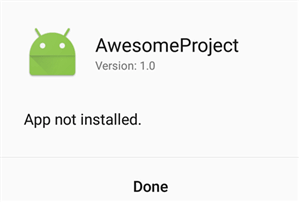
Many Android users would like to install an app with a .apk file extension to their Android phone from somewhere, or even from Google Play,В and they may get the error message of “Application not installed”. Also,В the “ App not installed” error may pop up as the above user described. В Then, what to do w hen trying to install an APK it says app not installed?
Android App Not Installed for This User
Knowing the reasons why apps not installed on Android occur is the first step to solve this problem. Here in this post, we will introduceВ w hat causes apps not installed on Android and how to fix Android 11 app not installed error, or other Android OS versions.
Why Android App Not Installed Error Occurs
1.В Insufficient Storage
If  you are storing too much data on your Android phone, the downloaded app certainly can’t be installed on Android. However, as Android devices now are having more and more storage, insufficient storage is rarely a reason for Android app not installed error.
2.В Corrupted/Contaminated App File
Besides, the a pp not installed may mean that you downloaded corrupted files. If you download apps from somewhere else than Google Play Store, app files are usually can’t be installed on your device smoothly. It is OK to download apps from other platforms, you just need to check its extension name and make an effort not to install contained files.
3.В Storage Location
Apps work best when they are stored on Android device’s internal memory and some apps can only be stored in the device’s internal storage. If you don’t save the app in an appropriate location, it is for sure that Android app not installed error would occur.
4.В SD Card Not Mounted in the Device
Even though some apps can be downloaded and installed to SD card, you will see Android app not installed notification because the SD card is not mounted on the device.
5.В Corrupted Storage
Corrupted storage, especially corrupted SD cards, is one of the most common reasons why Android app not installed error occurs. Unwanted data might contain elements that disturb the storage location, causing Android app can’t install error.
6.В Application Permission
Software operations running in the background are set not to allow the installation of third-party software, it is also one reason why app not installed error on Android happens.
FixВ App Not Installed on Samsung for System Problems
When you get theВ error message that says app not installed,В it mainly caused by the above glitches on the Android system. Then you can use DroidKit – Android System Repair to solve the problem. You can fix various Android system issues with DroidKit. For example,В apps keep crashing,В touch screen not working,В Downloading…Do Not Turn Off Target, Samsung black screen, etc.В The ROM downloaded and installed on your device when fixing the problem is definitely official from Samsung. It’s 100% secure and stable.
Here’s how to fix system issues with DroidKit:
Step 1. Download and install DroidKit on your computer. Launch the software and click Fix System Issues.
* 100% Clean & Safe
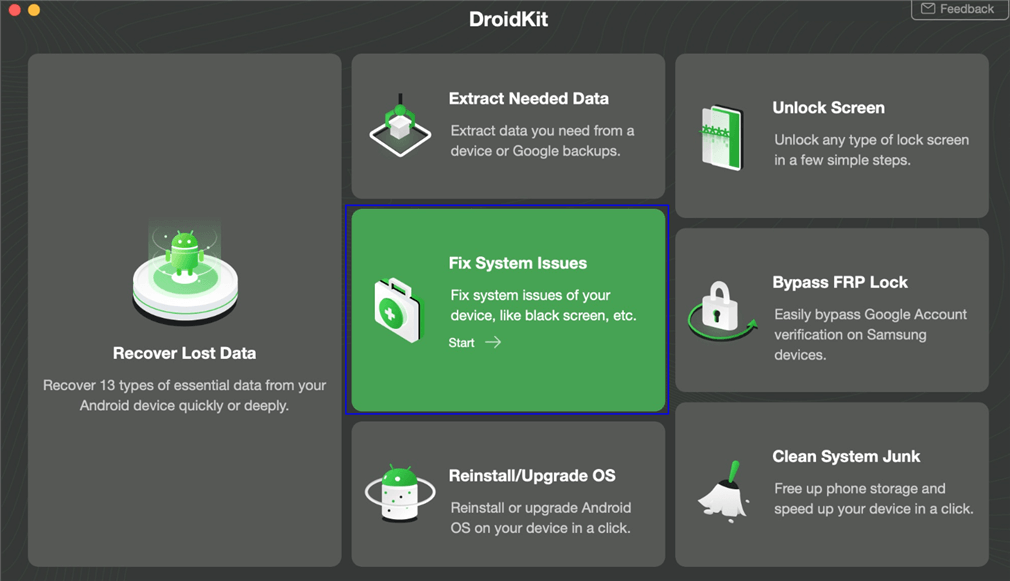
Click Fix System Issues
Step 2. Connect your device and click Start button.
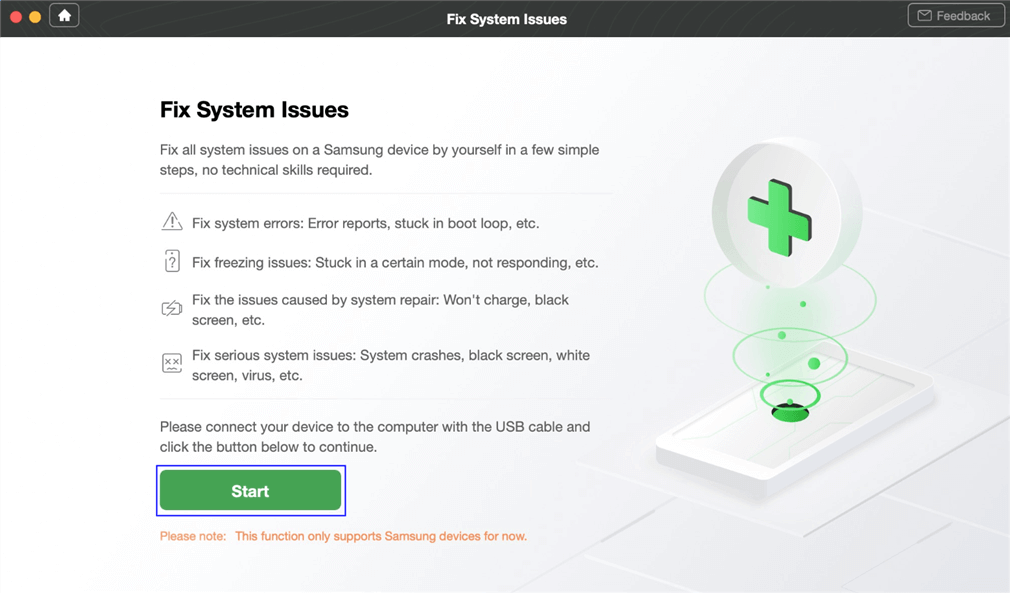
Click Start Button to Continue Fixing
Step 3. Click Download Now button to get the firmware package for your device.

Start to Download Firmware Package
Step 4. Once the firmware downloaded, tap one Fix Now.
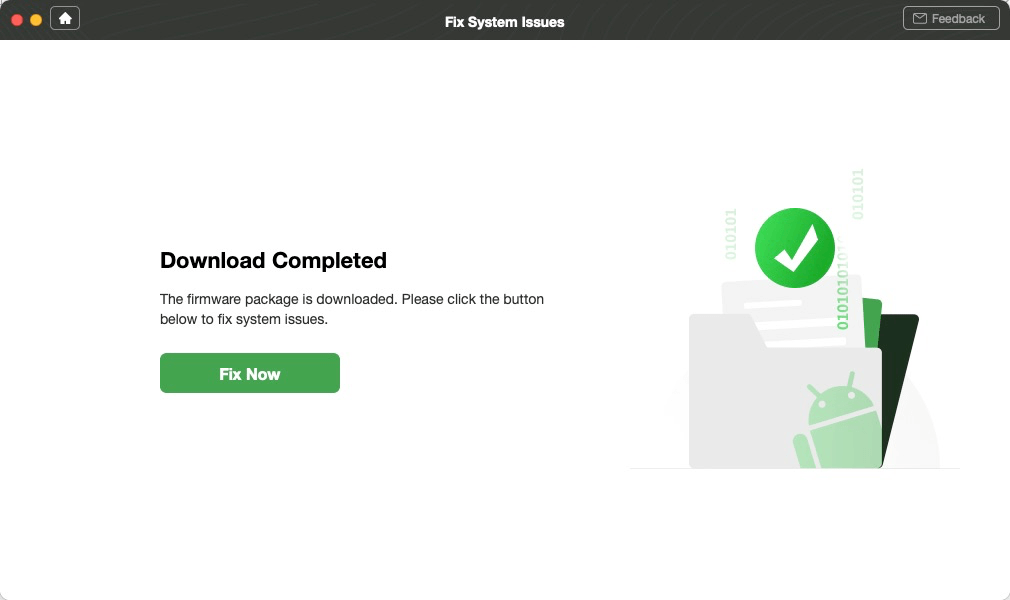
Fix Now after Firmware Downloaded
Step 5.В Follow the on-screen instructionsВ to put your device into download mode.
Step 6. After that, DroidKit will start repairing Samsung system. Wait for a while, you will getВ System Fixed Successfully page. All your system problems will be fixed by this way.
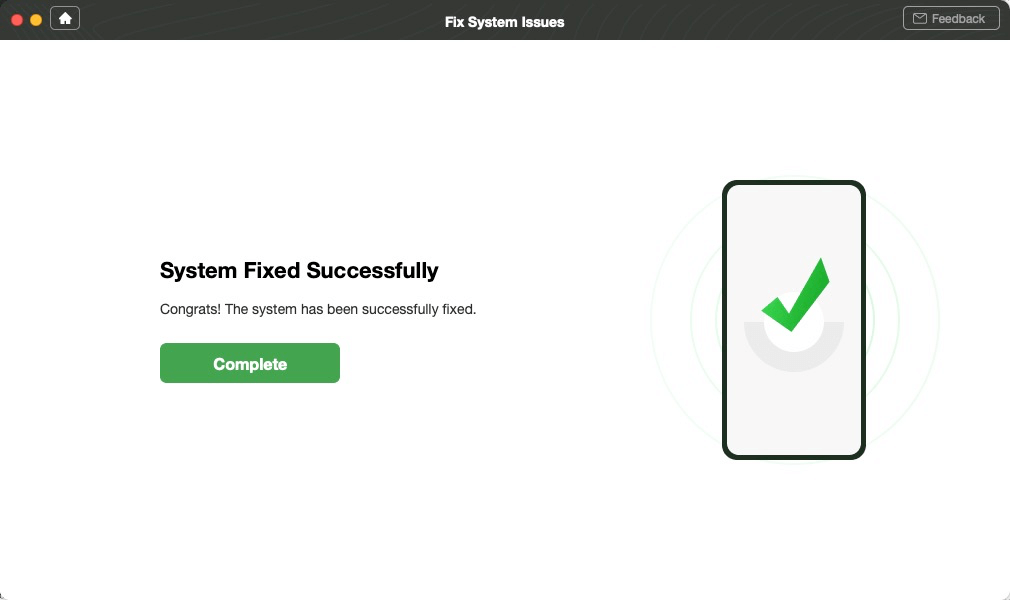
System Fixed Successfully
How to Fix App Not InstalledВ on Android with Regular Ways
Before trying those solutions below, please delete unwanted apps or files so that your Android phone can have enough storage to install a new app. After that, reboot your device.
Tip 1. Only Use Google Play Store
Play Store is a platform designed specifically for Android software and it contains only trusted apps. If you only use Google Play Store to download apps, Android app not installed error can seldom occur.
Tip 2. Mount SD Card
Even though your SD card is properly inserted on your Android phone, it sometimes still can be inaccessible. Mounting SD card can make the SD card accessible. Here is how to mount SD card.
Step 1. Go to Settings > Storage.
Step 2. Click on Mount SD card on the Storage Info screen.
Restart your device and try to install the app now, it should work.
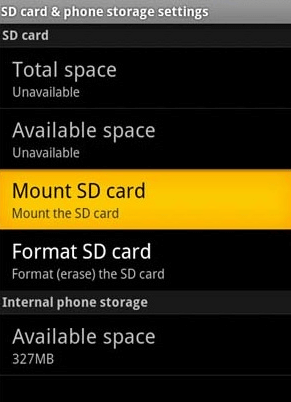
Android App Not Installed Fix – Mount SD Card
Tip 3. Choose App Location Wisely
It is suggested for users not to tamper with the app’s location and let the app decide where it needs to be placed. It is always best to place the apps in the phone’s internal storage.
Tip 4. Format SD Card
If the Android app not installed error occurs because SD card is corrupted, formatting the SD card is necessary. However, please do make a backup of the data on SD card so that you don’t have to suffer from any data loss.
Go to Settings > Storage > Format SD Card. Mount it with the steps in Tip 2.
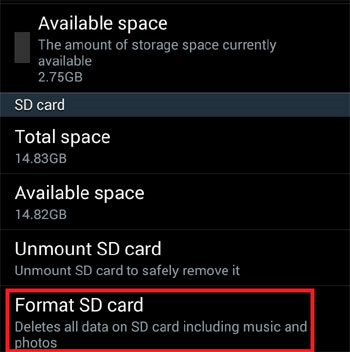
Android App Not Installed Fix – Format SD Card
Tip 5. App Permissions
The Android app not installed error can be combated after resetting app permissions.
Go to Settings > Apps > Reset App Preferences/Reset Application Permissions. After this, third-party software canВ be installed on your device.
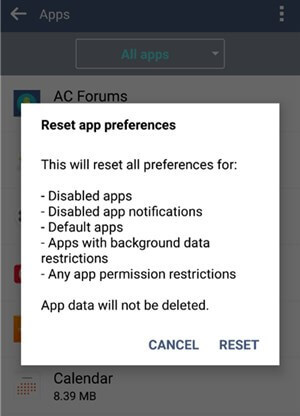
Reset App Permission
Tip 6. Try toВ Clear Data
If your phone and apps got wrong, generally you canВ also clear the cache and data of the Package installer. To do this:
Go to settings > Apps > Package Installer > Click Clear Cache and Data. After restarting your phone and then check if the problem is fixed.
If you got a message that “There was a problem parsing the package” while installing an app on Android, you can also find some solutions to this issue.
Bonus Tip: How to Transfer Apps from Android to Android
Switching to another phone is more than just getting a new phone. After making a purchase of a new phone, you have to transfer some important data like contacts, messages, photos from the old phone to the new phone and then download apps for the new Android phone.
It is no doubt that downloading apps on Android is troublesome and time-consuming. You have to search the app on the Google Play Store and then wait for the downloading and installation process. Thanks to the development of technology, an innovative tool – AnyDroid can help you transfer apps from Android to Android, saving you from those tedious processes. Here are more reasons why you should have AnyDroid to help you transfer apps from Android to Android.
- It can help you transfer apps from Android to Android directly within a few clicks. The whole process confuses nobody.
- It always transfers data at a blazing fast speed. According to statistics, AnyDriod can transfer almost 1.7 GB of data between Android phones within 1 minute.
- ItВ is 100% safe and secure. You have our guarantee that while using AnyDroid, it does no harm to your device and accidents like data loss or information leakage would never occur.
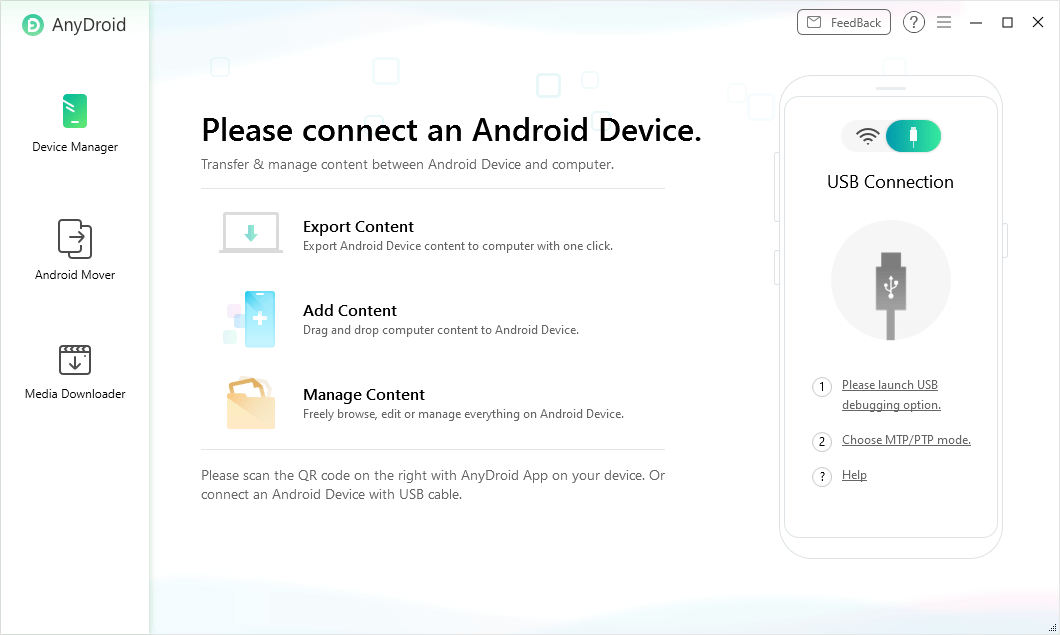
Manage & Transfer Android Data with AnyDroid
* 100% Clean & Safe
As you can see, AnyDroid is indeed a nice tool to transfer apps from Android to Android. Why not download it to your computer now and follow this guideВ to transfer apps from Android to Android?
The Bottom Line
That’s all for the topВ 7 tips to fix can’t install the app on Android. And DroidKit – Android System Repair can help you fix all Android OS problems. If you are bothered by software problems, download and try this tool with ease. If you find these tips helpful, please give this post a like or share it with others so that more people could benefit. Also, you can share your ideas in the comment column.
More Related Articles

Member of iMobie team as well as an Apple fan, love to help more users solve various types of iOS & Android related issues.
Источник
Infographic: 11 Most Common Android Errors and How to Fix Them

After days of toiling away at your latest Android project, you’ve finally reached the point where you’re ready to put all your hard work to the test. You attach your device or launch the Android Virtual Device (AVD) you created especially for this occasion, tell Android Studio to install your APK—and it doesn’t work.
Don’t panic! Simply work your way down this infographic to find out exactly what’s preventing your app from running, and how you can fix it.
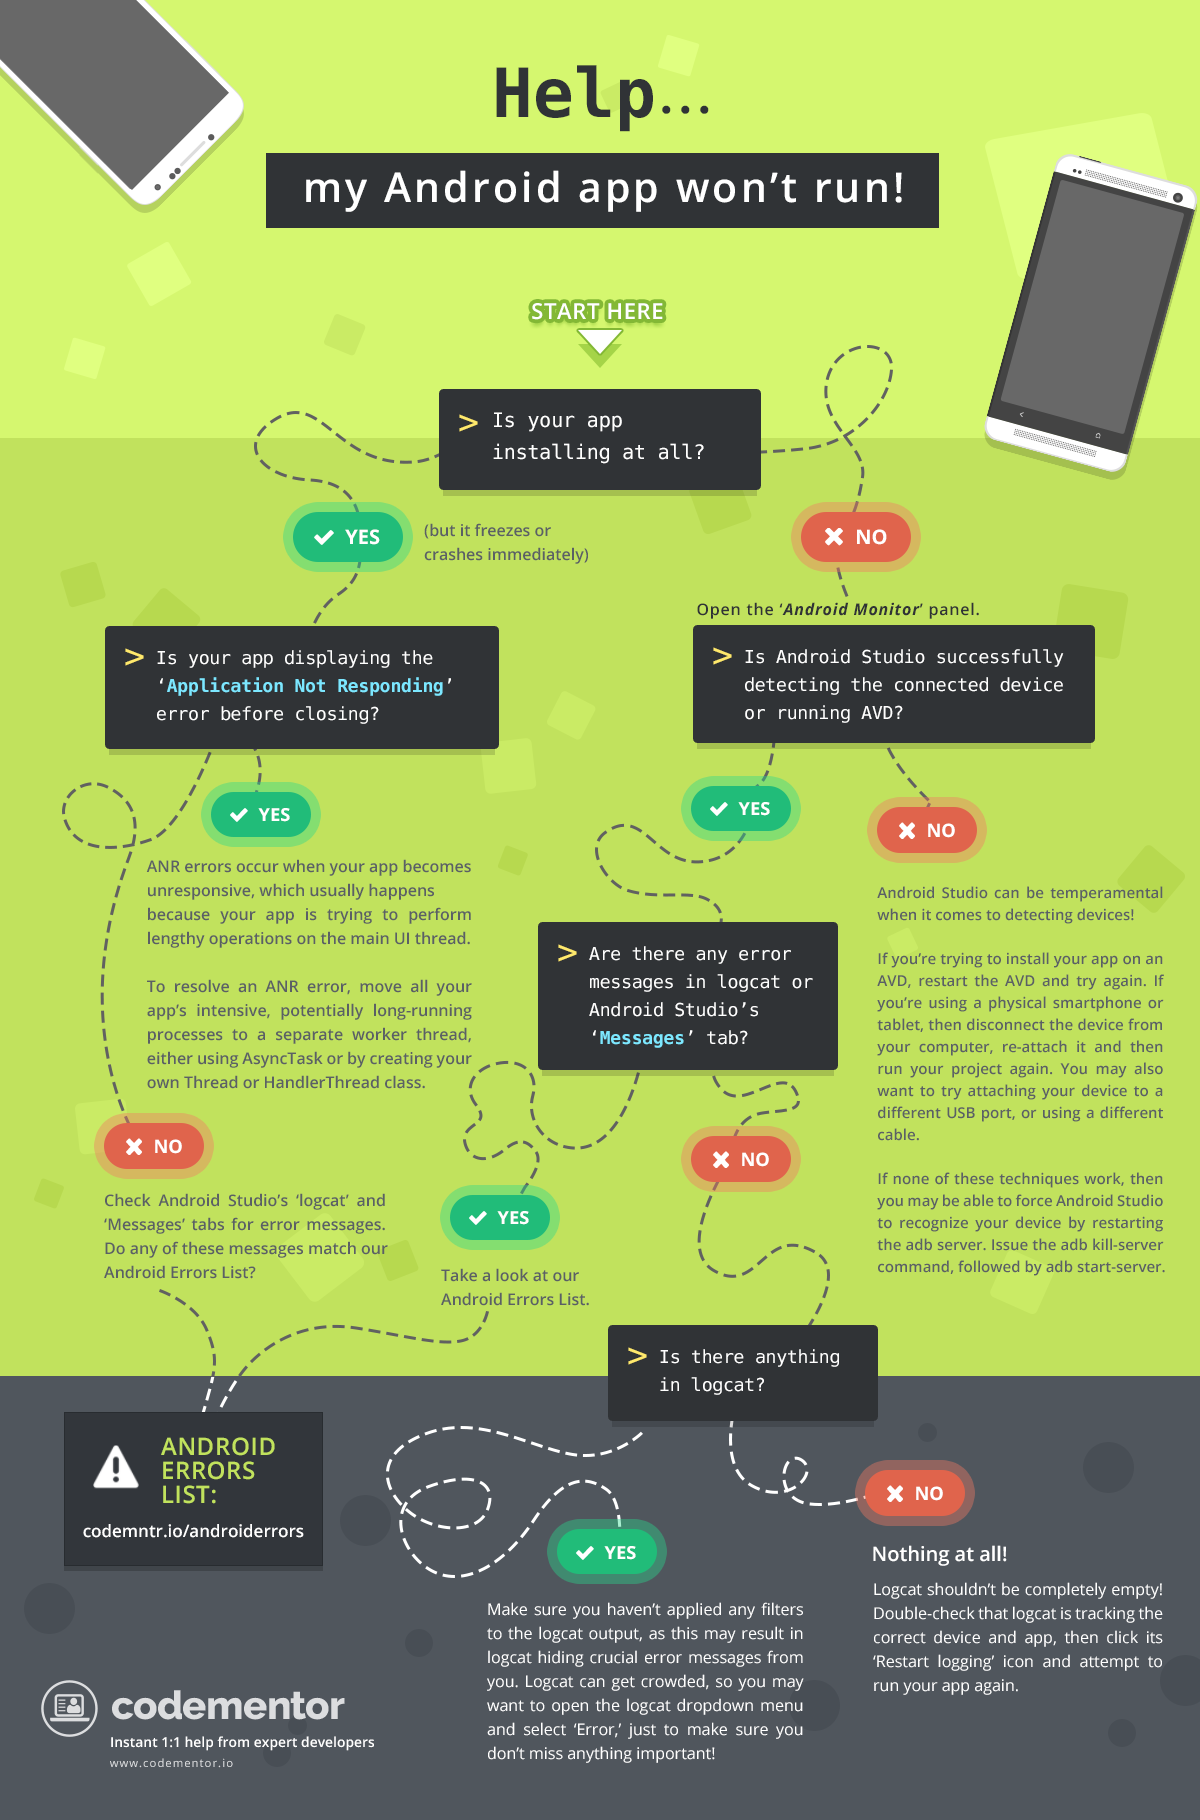 Click here to enlarge the infographic
Android Errors List: 11 common errors and how to fix them
1. ActivityNotFoundException
This exception is thrown when a call to startActivity fails because the Activity cannot be found. Usually, this means you forgot to declare the Activity in your Manifest.
2. ClassCastException
Java allows you to cast variables of one type to another, as long as this casting happens between compatible data types. A ClassCastException indicates that you’ve tried to cast an object to a subclass that it’s not an instance of, for example attempting to cast a String to an Integer. To resolve this error, navigate to the section of your code indicated in the error message, and then check what object(s) are being cast here.
3. Error converting byte to dex
If you’re encountering this error, then try cleaning (Clean > Build Project) and rebuilding your project (Build > Rebuild Project). If this doesn’t work, then check that the package names you’re using in your classes, match the package name in your project’s Manifest.
4. INSTALL_FAILED_INSUFFICIENT_STORAGE
This error may occur when you attempt to install your project on an Android Virtual Device (AVD) or physical Android device, and the device doesn’t have enough storage available.
If you’re using an AVD, close it and launch the ‘AVD Manager.’ Find the AVD you want to use, then click the ‘Edit’ icon. In the window that appears, select ‘Show Advanced Settings,’ scroll to the ‘Memory and Storage’ section and increase the amount of space available to your AVD. If you’re using a physical Android tablet or smartphone, then it’s time to spring clean your device to free up some space, for example, by uninstalling apps or clearing out some media files.
5. NullPointerException
A NullPointerException occurs when you use a reference that points to ‘no location’ in memory (null) as though you’re referencing an object. For example, maybe you’re trying to call the instance method of a null object, or modifying the slots of null as though it’s an array.
Your application will then attempt to use null where an object is required, resulting in a NullPointerException.
To fix a NullPointerException you’ll generally need to identify the values that are causing the exception, then locate where these values should be set, and set them.
6. R.layout.main Cannot Be Found / Cannot resolve symbol R
There are various issues that can lead to this error, but the solution is usually straightforward: simply clean (Build > Clean) and build your project (Build > Rebuild Project). You might need to repeat this process a few times before the error message stops appearing.
If this quick-fix doesn’t work, then check that you’re referencing all your layout files correctly throughout your project.
If you see this error after moving some Java files or directories around, then you may have confused Android Studio, as the IDE caches information about your project’s structure. To clear Android Studio’s cache and bring it out of its state of confusion, select ‘File > Invalidate Caches / Restart’ and then click the ‘Invalidate and Restart’ button. Clean and rebuild your project.
7. OutofMemoryError
This is thrown when your app is making memory requests that the system can’t meet.
There are many potential causes of an OutOfMemoryError, but some of the most common include holding onto references for too long, loading large bitmaps, and memory leaks. The fix will vary depending on the cause of your particular OutOfMemoryError, so you’ll need to track down the problem before you can work out the solution. For example, if the error turns out to be related to large, memory-hogging bitmaps, then a possible fix might be to load the bitmap at a reduced scale.
Android Studio comes with various tools that can help you analyze the way your app is using memory, including Memory Monitor, Allocation Tracker, HPROF Viewer, and the Android Device Monitor’s ‘Heap’ tab.
8. Only the original thread that created a view hierarchy can touch its views
This error occurs when you try to update a view from any thread other than the UI thread. To resolve this issue, make sure you perform any actions involving your app’s user interface on the UI thread only.
If you do need to access the UI thread from other threads, then you can use runOnUiThread.
9. Too many field references
This message will be displayed whenever your project includes more than 65536 references, as this is the maximum number of references that can be invoked by a single dex bytecode file.
When it comes to fixing this error, you have two choices: either reduce the number of references in your project or configure your app to use more than one dex file.
10. NetworkOnMainThreadException
This exception is thrown when your application attempts to perform networking operations on its main thread, as long-running operations have a tendency to block the main thread and can result in an Application Not Responding error.
If your project throws a NetworkOnMainThreadException, then you need to move your Internet-related code to a separate thread. Alternatively, you can use AsyncTask or IntentService to wrap your network operations in a worker thread.
11. Activity has leaked window that was originally added here
This error means that you’ve exited an Activity before the dialogue has been dismissed. To resolve this issue, make sure you call dismiss() to close any dialogues before exiting your Activity.
Wrapping up!
Haven’t spotted your specific error here? Often, the quickest way to understand and resolve an error is to copy/paste your error message into Google and spend some time exploring the search results.
Related tutorials you might be interested in:
Author’s Bio:

Jessica Thornsby is a technical writer based in Sheffield. She writes about Android, Eclipse, Java, and all things open source. She is the co-author of iWork: The Missing Manual, and the author of Android UI Design.
Источник


