- How to Flash Android Phone: Pictures Guide
- Part 1: Why Do You Need to Flash Android?
- Part 2: Recognizing the Risks Before Flash for Android
- Backup Your Phone Before Flash on Android
- Hard Reset to Keep Your Phone Safe Before Flash
- Part 3: How to Flash Android Phone (2 Methods with Pictures)
- Method 1: How to Flash Samsung Phone with ReiBoot for Android
- Method 2: How to Flash a Phone Manually with Custom ROMs
- Conclusion
- How to flash Android with PC
- Flash a different version of Android on your smartphone
- Install the right software to be able to flash your Android smartphone
- Benefits of Android Flash
- Use ODIN software to flash the correct version of Android:
How to Flash Android Phone: Pictures Guide
by Sophie Green Updated on 2020-12-17 / Update for Android Tips
Flashing a smartphone is a complicated – and risky – task and if any step goes wrong, you might end up damaging your phone permanently. Considering the pitfalls associated with flashing a phone, you will be able to flash your Android phone on your own without any risks. So, let’s find out how!
Part 1: Why Do You Need to Flash Android?
The reasons to flash an Android phone vary from user to user, but some general reasons that compel users to flash their Android phones include, but not limited to:
- When you need to install new custom ROM.
- If your phone is stuck, dead, or become unresponsive and doesn’t boot up.
- Changing Android to an entirely new version of operating system.
So, we have enough reasons to learn how to flash android phone from PC with USB cable.
Part 2: Recognizing the Risks Before Flash for Android
Flashing an Android phone is a risky busines that can have serious implications for your precious phone.
- Starting with data loss, flashing a phone will wipe out all the data from your phone.
- Secondly, if you’re installing a new custom ROM, you may not like it at all but have to settle for it.
- Also, if proper procedure is not followed, one may render irreparable loss to your mobile phone and make it completely useless.
Backup Your Phone Before Flash on Android
It’s recommended to do a backup for your device due to the data will be erased after flashing. So, check the basic method:
- Go to Settings > System > Advanced > Backup.
- If you can’t locate these options on your phone version, simply type Backup in the search bar.
Now, tap on Backup option and confirm the action by moving the toggler in front of it or hit on Continue, whichever is applicable on your smartphone.

Hard Reset to Keep Your Phone Safe Before Flash
Also, it is recommended to do a hard reset before flashing your phone as it eliminates the many risks automatically. So, you should perform hard reset on your Android phone.
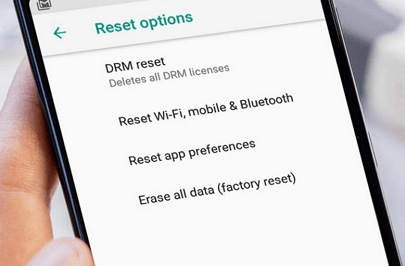
- Go to the Settings > System > Advanced > Reset options
- If you can’t find Reset options on your mobile, then search ‘Reset’ in the search bar.
- Now, once you find the option, click on Erase All Data/Factory Reset.
Then, click on Reset Phone option and confirm your action if pop-up window appears. Mostly, you have to enter screen passcode to confirm it. Within a few minutes, your mobile phone will complete the procedure.
Part 3: How to Flash Android Phone (2 Methods with Pictures)
Once you are done with hard reset of your phone, let us proceed to 2 simple methods explaining in detail how to flash your phone. Luckily these methods are comparatively less risky and have fixed the issues for many users.
Method 1: How to Flash Samsung Phone with ReiBoot for Android
Given the risks and virus threats linked with unreliable third-party tools, you have to use a safe and useful software to flash your Android phone – and none is better than Tenorshare ReiBoot for Android. This powerful software is intuitive, easy-to-use, and does no damage to your smartphone – however, it is only compatible with Samsung phones.
Its Repair Android System feature upgrades the firmware and flashes your Samsung smartphone in just a few minutes.


Right click to launch ReiBoot for Android on your computer. Connect your Samsung phone to it and click on Repair Android System feature.
Right click to launch ReiBoot for Android on your computer. Connect your Samsung phone to it and click on Repair Android System feature.
You will enter a new window. Hit on Fix Now to start the flashing process.
A window asking to enter the details of your Samsung mobile version will appear. Fill in the correct information using drop-down arrows.
Then, ReiBoot will start downloading the latest firmware package matching your mobile version. Don’t disconnect your mobile during the downloading process.
Once it downloads the package, click on Repair Now to continue.
Then, get your device into the download mode with following the on-screen guide.
ReiBoot will start flashing your mobile. After your Samsung mobile is flashed, click on Done and it will reboot and function properly.
Method 2: How to Flash a Phone Manually with Custom ROMs
Now, we will discuss another method on how to flash a phone without a computer. You can also flash an Android phone manually using custom ROMs. This method is risker and can cause irreparable damage to your phone. So, it should never be on the first priority of any user. Still, it works most of the time and helps users flash an Android phone.
- First, find a suitable ROM for your Android phone from the internet. Carefully go through the options and give due time to select the best available option. Once selected, make sure it’s compatible with your mobile version. Then download in the zip format and save on your mobile device.
Now, you have to unlock bootloader if it’s not already unlocked. Most mobiles come with unlocked bootloader but if that’s not the case for you, you have to contact the seller.
After that, you have to put your device into recovery mode. The best way is to find the relevant method corresponding to your handset on the internet. Generally, you can enter recover mode by press volume down and power keys together until Android logo appears. It means your device has entered recovery mode. You will see the type of recovery mode on the top of new Window.
Now, use volume down key to highlight “install zip from SD” card tap power key to select it.
Now, browse the file that you saved on your mobile earlier. As soon as you do that, your mobile will be flashed to this new ROM momentarily.
Now, again use the volume down and power keys to select Wipe cache partition option and bang! You have just flashed your phone.
Conclusion
This article has provided a simple yet detailed guideline on how to flash android phone with computer. Knowing that flashing a phone always accompanies severe risks, we have structured this article to help users offset any and all pitfalls.
Make sure you follow the proper procedure as discussed in this tutorial and use Tenorshare ReiBoot for Android to flash your Android phone with minimum risks.
Updated on 2020-12-17 / Update for Android Tips
Источник
How to flash Android with PC
You come from update your smartphone Android or the automatic update is activated and you end up with a unstable version of android, or simply it does not suit you by its use? Don’t panic, today it is possible to backtrack by flashing your Android smartphone for install any version of Android, from your computer.
Before starting, a little reminder on what this practice of » flasher »His Android smartphone. This technique therefore allows you to install the version of Android you want, or in other words the ROM you want. Some are directly related to android builder and are the official versions, and others, called » Custom ROM» , have been modified by passionate users who have customized certain versions of Android. You should know that this is possible because Android is available in open source, in other words the software code is accessible by anyone and therefore modifiable. This means that you can personalize your Android smartphone according to your wishes, by flashing a version which has been customized according to your desires and needs, all this simply using your computer.
If you just want to make a manual update from your smartphone without necessarily reverting to an older version, here is a link to the article that will help you do a manual update.
Warning before you start this procedure, you will have to save your personal data on your computer because they will deleted. Also, keep in mind that with the following procedure, you take risks about the manufacturer’s warranty of your smartphone and its proper functioning.
Important note : This procedure will serve you whether you want to go from version 9 to 8 of Android, or to version 7, or any other version (Pie, Nougat, Oreo, Marshmallow, Lollipop…) also a version Android custom, and should therefore work for any destination version chosen.
Here is a tutorial explaining how flasher any version or ROM of Android on your smartphone from your computer.
Flash a different version of Android on your smartphone
We will explain you step by step the different steps in order to flasher a different version of Android on your smartphone.
Install the right software to be able to flash your Android smartphone
Step 1 : Install the drivers for your smartphone on your computer.
First, you need to be able to connect your Android smartphone to your PC and install the version you want. To do this, therefore, install drivers from your phone to your computer, or an application allowing you to recognize your smartphone, which will allow you to intervene on it from your PC. Here are some links to download the most famous models of smartphone software on Android:
Once you have performed the installation, you need restart your PC, even if they don’t offer it to you.
Step 2 : Remember to activate the » USB debugging of your smartphone ”, By going to: Settings> Developer options> USB debugging. This option allows you to have more than freedom of access to your phone to install your desired version without constraint.
Step 3 : Rootez your smartphone.
What does it mean ? in English, root means » the root «. In other words, it means that you are accessing source files of your phone, and therefore sensitive files. And this is where we change the versions of android normally blocked. Phone brands block this kind of access by default because it exposes us to malfunctions if we are not attentive to what we are doing, by handling these important files. From the moment you make a » root » (commonly called » jailbreak «On iPhone) on your smartphone, it means you know what you’re doing, and bear the consequences in case of failure. But remember, thanks to this root, you can then flash any version of Android on your smartphone.
Benefits of Android Flash
Here is a summary of bespoke à flash your smartphone :
Installer any version of Android, and therefore personalization of the content.
Access to application only accessible with this mode there (also called » super user »Due to the extension of rights obtained).
You can customize your smartphone to a much greater degree, especially with start-up animations or system sounds.
You have more easily access to different applications of your smartphone and so you can close them and free up RAM to improve the performance of the device.
It is possible optimize battery usage by controlling the performance of the processor.
You have the possibility completely back up your personal data.
here are some software for rooter your Android smartphone with your computer:
- https://towelroot.fr.malavida.com/android/#gref
- https://kingroot.fr.uptodown.com/android
One of these applications may be works better than the other with your smartphone, search the internet which one is best for you.
If you have followed the steps explained on installing these applications, then your smartphone must be rooted.
If you have any doubts about the effectiveness of the procedure, there is a application very simple that will tell you if your Android smartphone is rooted or not.
If everything is good, let’s move on.
Once your smartphone is rooted, you’ll need to download version of Android you want to use (otherwise called ROM, Read Only Memory). This file is a image of a specific version software, in this case Android.
Attention however : As we explained to you above, there are original versions ROM and also customized versions and personalized by users due to access to open source Android. Search a little on the Internet the version that suits you best based on the specifics of each.
here is a lien to many phone models, with different ROM:
- https://theunlockr.com/roms/android-roms/
Once you have found the ROM for you, you will need download ODIN software, which will allow you to install the ROM on your smartphone:
You will therefore have to do some manipulation on your phone and your computer as well.
Use ODIN software to flash the correct version of Android:
restart your phone in mode recovery. For that, you need press a key combination simultaneously. To know precisely these keys, we recommend that you type in Google recovery mode + « phone model In order to know these keys. For example, on a model Samsung, the keys are as follows: High volume + Home + Power. You have to press these three keys until the phone turns back on, and at this precise moment you just have to release the power key, keeping the other two keys pressed. This will take you to the famous recovery mode. You can move in this mode with the up and down volume keys, and validate with power.
At this stage of the procedure, you must make a » wipe cache » and one » wipe data factory reset «. Select these choices by validating with the button . Remember that this procedure erase data from your Android!
Restart your smartphone by selecting the option » Reboot System Now «. Do not forget to validate your request by pressing the Power button.
Go back to your PC: Launch the ODIN software.
Load your ROM file in » .tar » or « . Tar.md5 «Using the PDA button that you see right in the center of your software window. If your archive contains 3 fichiers, named PDA / Code, Phone / Modem et CSC, select each file in the format «.tar » or «. Tar.md5 In the corresponding fields.
Warning : do not check the box Division in the options on the left, only » Auto Reboot «And» F. Reset Time «And do not add PIT file to the right. This parameter allows you to make a possible change in the partition table. Very unusual, this happens if an internal software update has to change the layout of your partition. It is to be selected only in very specific cases.
Connect your phone with your USB cable. Wait for the installation of the device drivers to complete. To find out if the procedure was carried out correctly, you will see the » ID: COM »Be highlighted in blue, in the center left of your ODIN software window.
Push the button Start to start flash version of android that you wish. If the procedure does not start, try disconnecting / reconnecting the USB cable, and retry the procedure.
You will know if the procedure is started by seeing a progress bar on the screen of your smartphone and also on your computer. Wait until your ODIN software displays » PASS «And you see the restarting your smartphone under the good version of android. The procedure should take a maximum of 15 minutes, a little patience and you are finally with the version of Android you want!
Источник


