- Форматирование SD-карты на Android-устройствах
- Описание
- Способы форматирования SD-карты на Android
- Полная очистка памяти через настройки Smartphone
- Форматирование SD card через компьютер
- Форматирование через меню Recovery
- Заключение
- How to Format Your SD Card on Android
- Take a Backup of Your Data
- Formatting an SD Card
- Can I Use a Damaged SD Card?
- Conclusion
- Never Miss Out
- How to Format SD Card on Android Phone?
- This is a detailed tutorial on how to format an SD card on Android. There are several situations when you may need to format a memory stick. We also show you how to troubleshoot common problems and recover lost data.
- What Are the Common Situations of Formatting an SD Card?
- Steps to Format SD Card on Android
- 1. Format SD Card on Android Phone
- 2. Format Android Memory Card on Computer
- 3. Format SD Card as Internal Storage
- Workable Solutions to SD Card Not Formatted Error
- 1. Damaged or Corrupt SD Card
- 2. Sudden Power Failure
- Tips You Should Know When Formatting an SD Card
- 1. How to Do an SD Card Data Backup
- 2. Recover Accidentally Formatted Android Files
- Closing Words
- Related Questions Searched for Frequently
Форматирование SD-карты на Android-устройствах
Описание
Современные мобильные смартфоны имеют широкий набор функций и возможностей, благодаря чему практически полностью заменили компьютер. Когда внутренней памяти недостаточно (особенно если говорить о бюджетных моделях), пользователи решают проблему с помощью установки SD-карты. Если возникает потребность в полной очистке флешки, нужно знать, как выполнить форматирование SD-карты “Андроид”. Именно об этом речь пойдет в данной статье.
Способы форматирования SD-карты на Android
Всего существует несколько способов полной очистки флешки, установленной на мобильном гаджете:
- Через настройки устройства.
- Посредством Recovery.
- С помощью ПК.
Отметим, что вариантов подключения флешки к компьютеру также несколько. О них речь пойдет ниже.
Кроме того, при форматировании SD card через ПК важно знать, в каком формате должна быть флешка, так как файловые системы Windows и Android могут отличаться. Мы расскажем, какую файловую систему необходимо выбирать. Если же форматирование выполняется через настройки телефона, такой вопрос не возникает, так как нет возможности выбрать формат файловой системы. Итак, разберем все варианты подробнее.
Полная очистка памяти через настройки Smartphone
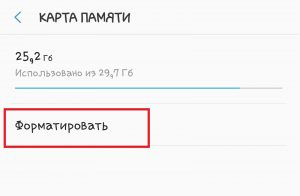
Каждый мобильный девайс с операционной системой Android имеет функцию форматирования. Причем выполнить ее можно двумя способами. Самый простой вариант на “Андроиде” – отформатировать карту памяти через настройки системы. Рзберемся на примере Samsung Galaxy A5 2017 года с версией Android 8.0:
- Переходим в параметры.
- Открываем раздел «Оптимизация».
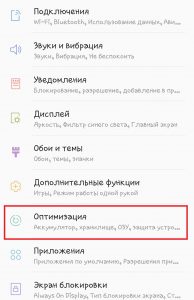
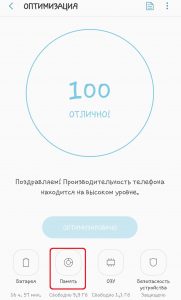
- Открываем дополнительные настройки памяти. Для этого нажимаем на кнопку в виде трех вертикальных точек в верхнем правом углу экрана (или нажимаем и удерживаем кнопку «Назад» несколько секунд) и выбираем пункт «Настройки памяти».
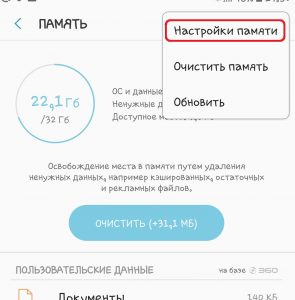
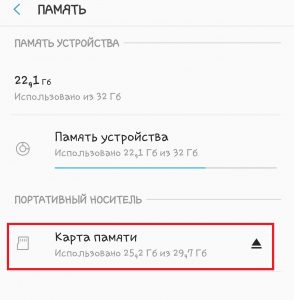
- Нажимаем кнопку «Форматировать» и подтверждаем действие.
Это самый простой способ, как правильно на телефоне отформатировать SD card. Существует и другой способ, но он предусматривает сброс параметров устройства до заводских. В этом случае будет очищено внутреннее хранилище смартфона от всех данных, параллельно вы сможете выбрать форматировку флешки. К этому способу следует прибегать только в крайнем случае.
Форматирование SD card через компьютер
Сразу же стоит уточнить, что при подключении телефона к компьютеру через USB-кабель вы не сможете отформатировать память подключенного устройства. Получится работать с флеш-накопителем, копировать, перемещать и даже удалять файлы, но форматирование будет недоступно. Потребуется извлечь флешку из смартфона и посредством кардридера подключить ее к компьютеру.
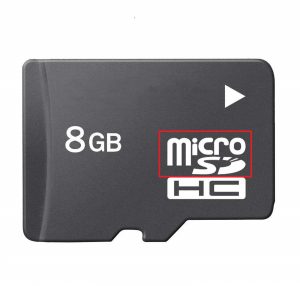
Сегодня можно найти разные типы флеш-карты для мобильных устройств, но наибольшей популярностью пользуются:
Накопители типа M2 встречаются довольно редко. В основном современныне смартфоны поддерживают карты micro SD. Уточнить тип вашей флешки легко – эта информация указана на карте памяти.
Итак, после подключения флешки к компьютеру через кардридер необходимо:
- Открыть файловый проводник.
- Найти свою флешку и кликнуть по ней правой кнопкой мышки.
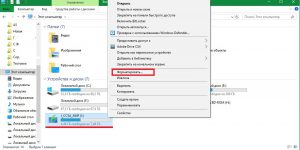
- Выбрать пункт «Форматировать».
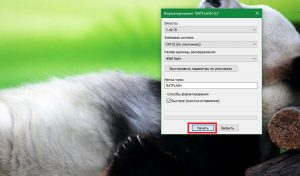
- В открывшемся окне указать параметры форматирования:
- Файловую систему – FAT32 (устройства с Android поддерживают только ее).
- Размер единицы распределения – по умолчанию выставлено среднее значение 4096 байт. Но по желанию вы можете установить другой размер кластера. Здесь действует одно правило: чем меньше размер кластера, тем плотнее будет заполняться пространство (по сути, больше информации поместиться на флешку). Но чем больше размер кластера, тем быстрее будет работать (чтение и запись) память. Поэтому важно выбрать среднее значение, которое является оптимальным между скоростью и плотностью заполнения. В любом случае ощутимой разницы вы не заметите, поэтому лучше отдавать предпочтение скорости.
- Метка тома – просто название флешки, которое будет отображаться при последующих подключениях к компьютеру.
- Кликните «Начать» и дождитесь окончания процедуры.
После завершения процедуры можно извлечь флешку и вставить ее в смарфтон.
Форматирование через меню Recovery
Еще один способ, как форматировать СД-карту на Аndroid, заключается в том, чтобы выполнить очистку через меню Recovery. Это нечто вроде BIOSa компьютера, только для мобильных гаджетов. К сожалению, стандартное Recovery не поддерживает форматирование флешек, поэтому многие энтузиасты устанавливают кастомные варианты плагина – CWM или TWRP. Эти прошивки имеют расширенный функционал и позволяют работать отдельно как с внутренней, так и с внешней (флешкой) памятью. Важно понимать, что при установке кастомного Recovery теряется гарантия. А в случае возникновения проблем ответственность ложится только на вас. Кроме того, для установки CWM или TWRP требуются root-права.
Гораздо проще воспользоваться соответствующим приложением для Android. Программа для форматирования микро СД имеется в свободном доступе на Google Play и называется SD card formatter. Существуют и другие аналоги, но все они работают по одному принципу:
- Запускаете программу.
- Нажимаете «Форматировать SD card» и подтверждаете действие.
Некоторые программы позволяют вносить определенные коррективы. Но по сути это ничего не меняет.
Стоит отметить, что при выполнении форматирования непосредственно в смартфоне (через настройки или с помощюю приложения) не нужно указывать, какая файловая система для micro SD будет установлена, так как смартфон поддерживает только FAT32 и устанавливает ее автоматически.
Заключение
Выше мы разобрали несколько способов форматирования флешки смартфона. Отметим, что на планшете данная процедура выполняется аналогично. Помните, что стандартные средства, которые предусмотрены разработчиками, всегда работают лучше и стабильнее, не вызывают ошибок и прочих трудностей, так как проходят тестирование на стабильность и совместимость. А вот сторонние приложения могут вызывать проблемы. Таким образом, лучше всего выполнять очистку памяти через параметры Android.
Источник
How to Format Your SD Card on Android

With daily and frequent use, the SD card on your Android phone can show malware infections, file storage errors and a tendency to overwrite itself. You can begin from a clean slate by formatting it properly. In fact, it is considered best practice to format your SD card now and then to boost performance and reduce clutter. Follow the simple procedure below to perform this activity for an Android phone.
Also read:  Free Tools to Check SD Card Speed and Capacity
Take a Backup of Your Data
Formatting the SD card will erase all its memory which means you will lose access to all your stored information. It is better to take a backup of this data first.
Google will back up your SD card and other phone data for free. If you have a lot of pictures and videos, you can enable automatic syncing with Google Photos on the cloud.
For the remaining data, go to your phone’s Settings where you can view an option for “Backup and Reset.” which is a common feature available with Samsung Galaxy, Oppo, OnePlus and Motorola handsets.

HTC phones have an “HTC Backup” app. Likewise, you need to check with your specific handset manufacturer website for instructions on making a backup of any other device.

If you don’t want to back up your information on Google’s servers, you can use third-party apps to back up your SD card.
Formatting an SD Card
Remove the phone’s back panel (or remove the SIM card tray). You can easily locate the SD card here. Before formatting, make sure just once that it’s been inserted properly.

Navigate to the phone’s “storage and USB” option. Click here to access your SD card details.

The only common link for all Android handsets is that you can locate the format SD card option from Settings. Depending on your handset model, it may be located under a different name.
For example, for Samsung Galaxy phones, the storage and USB options are separate, which you can access directly from the “format SD card” menu.

For most other Android phones, you should be able to navigate to the SD card details. It should clearly read the amount of storage data in use. You then have to click “portable storage” for more options.

In the next step you can view a three-dot icon from where you can access the SD card Settings.

If you’re using Android Marshmallow, Nougat or Oreo, you should see the option for “format as portable storage.” For older Android versions, you will see “format as internal.” Click the “Erase and Format” button and wait for a few minutes.

The process might take a while if you have a lot of stored data to be formatted. Be patient.

The inner app memory program will calculate the total space on your phone with a formatted SD card. Depending on your handset model, you might see a “success” status. As long as the total SD card memory is erased, you can safely assume that you now have a whole new SD card.
Also read:  How to Repair Your Micro SD Card and Recover Erased Data
If there is still some residual space, you can assume that some partitions of the SD card have been corrupted. In that case it is better to replace your SD card or occasionally repeat the entire procedure described here. Once a month is advisable.

Can I Use a Damaged SD Card?
Yes, you can. As long as your SD card is readable on a phone or computer, it can be used with regular precautions. However, it is better to take a backup of your damaged SD card data and replace it with another one.
Conclusion
Although SD cards aren’t that expensive, you don’t have to throw one away just because it is not performing to expectations. For example, even if you don’t want to use an SD card in a mobile phone, you can use it to power a Raspberry Pi computer.
What other methods/apps did you use to format your phone’s SD card? Please share in the comments.
Never Miss Out
Receive updates of our latest tutorials.
Sayak Boral is a technology writer with over eleven years of experience working in different industries including semiconductors, IoT, enterprise IT, telecommunications OSS/BSS, and network security. He has been writing for MakeTechEasier on a wide range of technical topics including Windows, Android, Internet, Hardware Guides, Browsers, Software Tools, and Product Reviews.
Источник
How to Format SD Card on Android Phone?
This is a detailed tutorial on how to format an SD card on Android. There are several situations when you may need to format a memory stick. We also show you how to troubleshoot common problems and recover lost data.

Eleanor Reed
Oct 30, 2021 • Filed to: SD Card Solutions • Proven solutions
Why would we want to format an SD card? Well, with daily use on your Android phone, there are several situations — malware, storage errors, and other issues that can only be cured by formatting. In this article, we show you how to format an SD card on Android and recover from any errors that you encounter in the process.
What Are the Common Situations of Formatting an SD Card?
Formatting in computing refers to the deletion of all data in a storage medium and setting up a file system. Before you begin, you may want to back up your SD card (memory stick) if it contains files you don’t want to lose.
Before we begin, let us examine some common situations where you need to format a memory stick on an Android phone.
1. SD card is damaged or simply isn’t working and you have some kind of error message on your phone e.g. «SD card is corrupted».
2. Compatibility issues. Some older Android phones don’t have support for the exFAT file system. In such a scenario, you would need to reformat to FAT32.
3. You may experience performance degradation. If that’s the case and the memory stick’s performance can improve, then formatting becomes an option.
4. Data security. If you don’t know where the memory stick has been and you’re not sure what kind of files could be there, or you suspect it could be infected by a virus, the easiest thing to do is to format it.
5. File size restrictions. For large files over 4GB, you can’t use the FAT32 file system which has a maximum file size of 4GB. In such a situation, you would have to format the SD card to exFAT.
Steps to Format SD Card on Android
There are several ways to format a memory stick. As already mentioned most devices with SD cards including phones, computers, and cameras have a formatting option.
1. Format SD Card on Android Phone
Different Android versions have slightly different steps on how you go about formatting. But the main idea is to navigate to the Storage area in your phone Settings, tap on the SD card, and look for the Format option. Below, we show you an example of how to format an SD card in Samsung on Android OS version 10.
On your phone, navigate to Settings > Device Care. Next, select Storage.
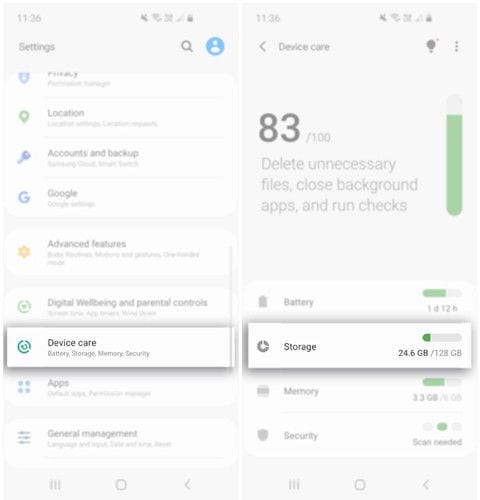
Tap on Advanced. Here, you will see Portable storage. Proceed and select SD Card.
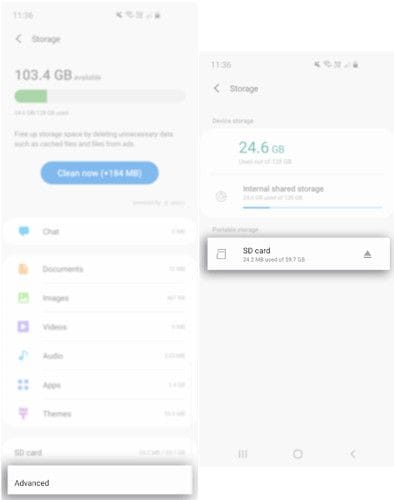
Next, tap Format. Finally, in the pop-up message, select Format SD Card.

Wait a few minutes for the process to terminate then begin using the card.
2. Format Android Memory Card on Computer
There are two options to format an SD memory card on a computer.
For the first option, connect the memory stick to the computer. Depending on the PC model, you can use a built-in reader or an adapter. Next, open Windows Explorer and locate the SD card on your drive list or wait for a few seconds for the drive to load.
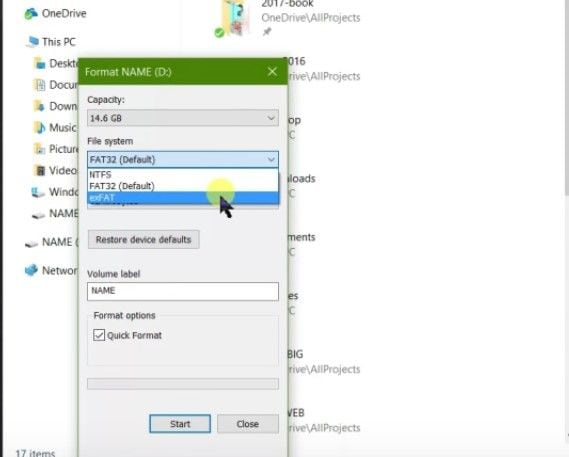
Right-click on the drive and select Format. You should then see a format window that defaults to FAT32. You may want to change this to exFAT if you anticipate having files larger than 4GB on the memory stick.

Next, enter the desired name in the Volume Label field. Check the Quick Format box or else the process can take a long time especially for large SD cards. To finish the process, click the Start button.
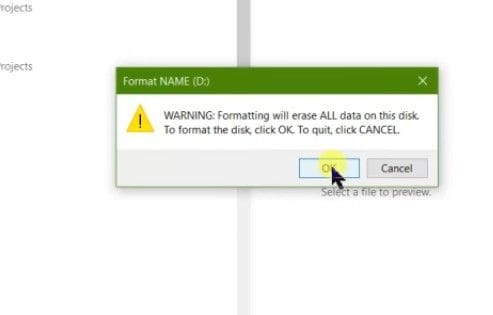
A warning message will appear. Click OK to proceed.
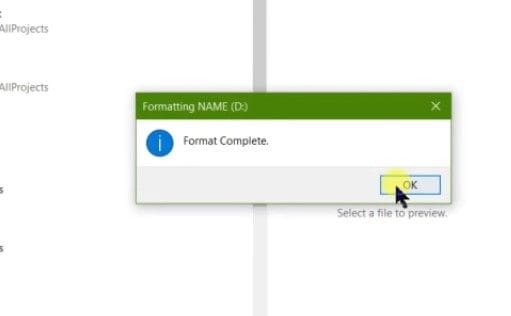
After a few seconds, the SD card is formatted.
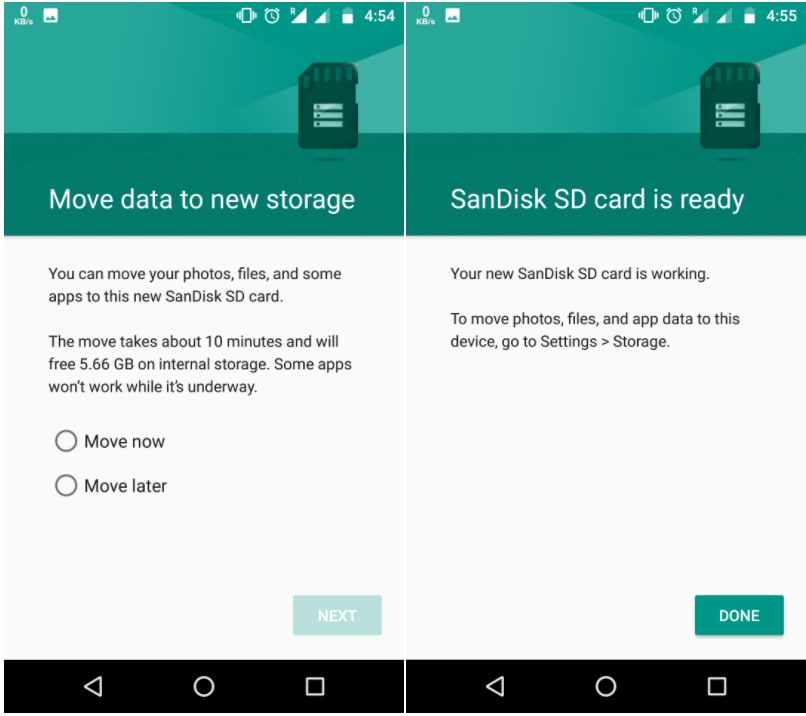
3. Format SD Card as Internal Storage
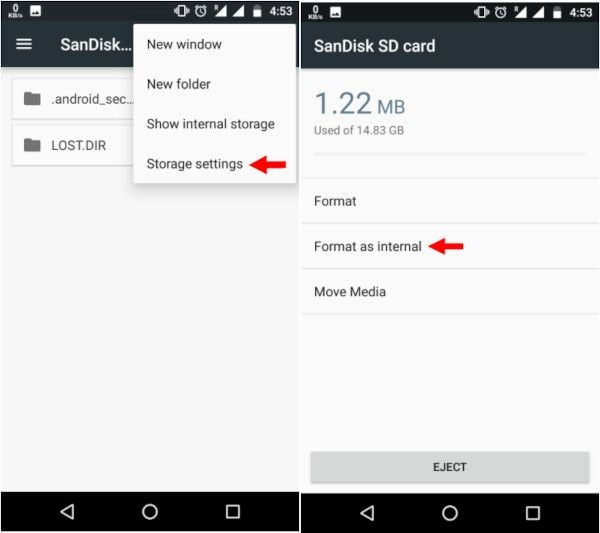
If your Android phone runs out of internal memory for your apps, the only solution is to use the SD card as internal storage. To do so, you need to format it as Internal Storage.
Begin by inserting it on your Android phone and wait a few seconds for it to be detected.
Next, go to Settings. Scroll down to Storage and Tap the SD card. Next, tap the three dots located in the top right corner of the screen. Tap Storage Settings. Next, select the Format as an Internal option.
Tap Erase & Format. If it is too slow, you will get a notification. Android may reject formatting a slow SD as Internal Storage.

Tap OK to continue then begin the data migration process by checking the Move Now radio button or Move Later to do it later.
Tap Done to complete the process.
Workable Solutions to SD Card Not Formatted Error
In the process of formatting an SD card using any of the methods described above, you may come across some errors. If you come across an error message stating, «Micro SD card not formatted», then the following are possible causes and solutions.
1. Damaged or Corrupt SD Card
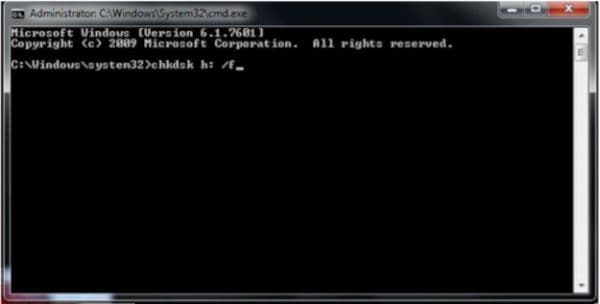
An SD card may be damaged or corrupted due to bad sectors or a virus in the files. To fix this error, connect the memory stick to your PC and navigate to File Explorer and take note of the drive letter.
Next, launch the command line utility by typing «CMD» in the Windows search and running the app as an administrator.

In the command line window, type «chkdsk h: /f«, where «h» represents your drive letter. This commands the PC to check and fix (f) any disk errors.
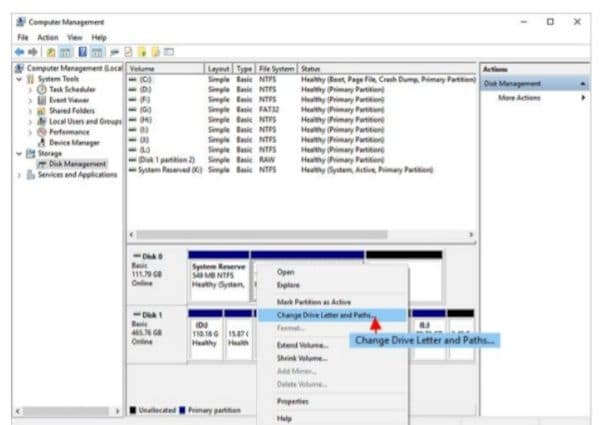
If this does not work, you can try and change the letter assigned to the drive.
To do this, go to This PC, right-click then click Manage. Click on Disk Management under the Storage menu and then right-click on the volume of the drive letter you wish to change. In the drop-down menu, select Change Drive Letter and Paths. Click Change and choose a different drive letter. Select OK, then Yes to the warning then wait a few seconds for the new drive letter to be assigned. You can view this change in Disk Management or File Explorer.
Retry the process.
The Memory Stick is Write-protected
You may have write-protected the memory stick without realizing it. The fix for this is quite easy. If it uses physical protection, identify the switch, and slide it to the appropriate position.

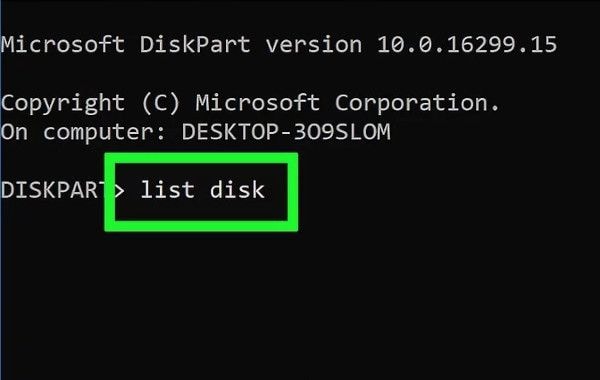
If it isn’t using a physical switch, connect it to your PC. Take note of the drive letter in File Explorer and then type «CMD» in the Windows search bar at the bottom left of your screen. This will launch the Command Line utility. Type «diskpart» and press Enter.
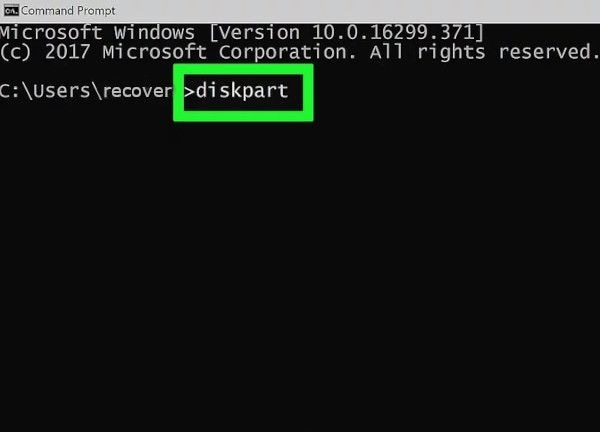
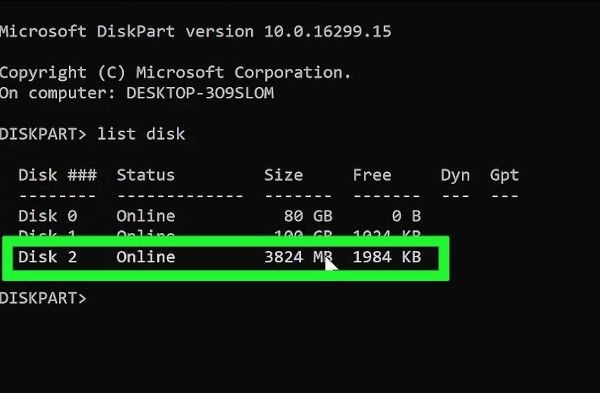
Next, type «list disk» to see a list of all the drives.
Identify it and note the disk number allocated to it.
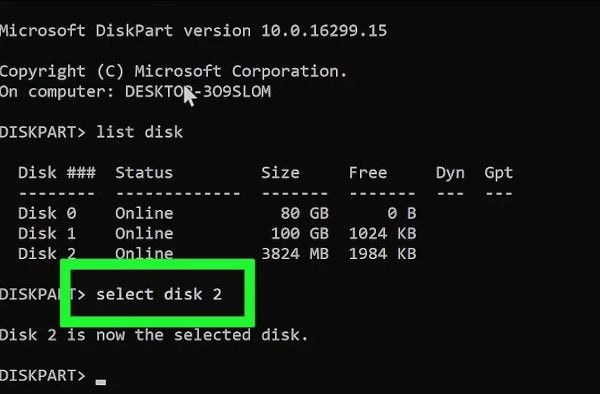
Next, type «Select Disk x» where «x» represents the actual disk number on your system e.g. «Select Disk 2».
Next, type «attributes disk clear readonly«. This will clear the read-only attribute.
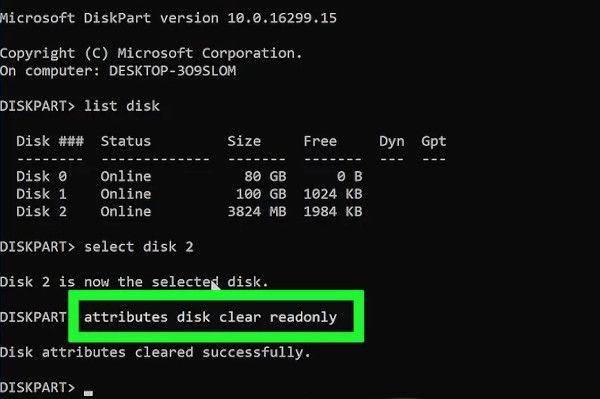
Close the Command Line utility and retry formatting the memory stick.
2. Sudden Power Failure
In the event of a sudden power loss, as the Phone or computer is formatting the memory stick, the process terminates prematurely. This is a simple fix, just retry the process once again and you should succeed.
All-Around Tips to Format SD Card Without Losing Data
One of the problems that can arise when formatting an SD card is data loss. Below are a few tips to format an SD card without losing data.
Tips You Should Know When Formatting an SD Card
Formatting refers to the complete erasure of data on the SD card and the creation of a file system.
1. How to Do an SD Card Data Backup
The best way to prevent data loss is to first perform a data backup. There are two ways to do this. Using your Android phone or backing up to a PC.
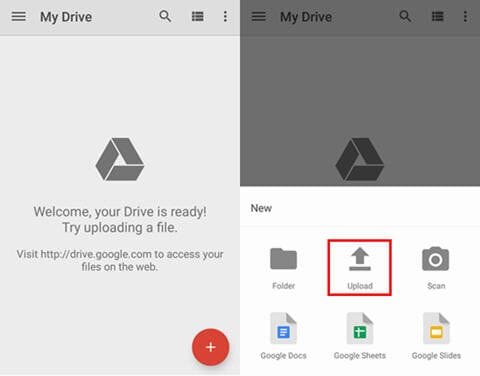
1. To back up using an Android phone, you will need a Google account and the Google Drive app. Install the Google Drive app from the Play Store and launch it.
2. Next, tap the + icon and select Upload.
3. Navigate to your SD card then select the files you want to upload or choose to upload everything.
4. Click Done and Google will begin uploading the files to Google Drive.
The second backup method involves using a PC. Connect the SD card to a PC and use File Explorer to navigate the drive. Right-click on the drive, click Copy and then paste in a different location on your computer. This action makes a copy of your SD card contents on your PC.
2. Recover Accidentally Formatted Android Files
In the unfortunate event that you fail to make a backup, do not worry. Wondershare Recoverit software can recover accidentally formatted Android files using Windows or Mac. This useful software can save you the trouble of having to hire a data recovery expert to get back your files. With Wondershare Recoverit Software, you can recover accidentally formatted Android files in three minutes.
To recover your files, follow these steps.
Step 1: Launch Wondershare Recoverit on Windows
Download Wondershare Recoverit and install it on your PC. Next, open the application. You can do so by typing «Recoverit» in the Windows search bar. Click it to launch it.
Step 2: Connect the SD Card
Next, connect the SD card to the computer and make sure it is recognized or detected.
Step 3: Select the SD Card
From within Wondershare Recoverit software, select the SD card from the list of locations.

Step 4: Scan the SD Card
Click Start and a scan will be launched on the SD card. You can pause or stop this process at any time.

Step 5: Preview and Recover the Files
At the end of the scan, preview the files from the list of results. To get your files back, simply click Recover, and save them in a location on your computer.

Wondershare Recoverit software is guaranteed to recover files accidentally deleted from an SD card. It can recover data in numerous types and formats, and even includes a video repair tool to repair corrupted videos.
Closing Words
We hope these tips have taught you how to format an SD card on Android without losing data. If you encounter a problem, go through the solutions again to solve the problem. And, most importantly, if you accidentally delete your data, you can always recover files from your Android SD card using Wondershare Recoverit Software.
Related Questions Searched for Frequently
1. How do I format my SD card on my Samsung?
Источник


