- How To Generate Certificate Fingerprint SHA-1 Using Android Studio
- What is SHA-1?
- How To Generate SHA-1 Fingerprint
- [Optional] Generate Fingerprints For Release
- Step 1. Create Keystore Properties
- Step 2. Load KeyStore Properties To Gradle
- Step 3. Execute Gradle Task
- Step 4. Find Generated Fingerprint
- How to Get SHA-1 key in Android Studio for Firebase.
- 3. Using gradlew
- How to obtain SHA1 Keys for debug and release — Android Studio [Mac]
- Debug Key
- Release
- Method 1
- Method 2
- How to Generate SHA1, MD5, and SHA-256 Keys in Android Studio?
- 1. SHA-1 Keys
- 2. MD-5 Keys
- 3. SHA-256 Keys
- Step by Step Guide to Generate SHA1, MD5, and SHA-256 Keys in Android Studio
How To Generate Certificate Fingerprint SHA-1 Using Android Studio
What is SHA-1?
Secure Hash Algorithm 1 or SHA-1 hash value is a unique representation of a certificate. Typically represented as a hexadecimal number with 40 digits long. This fingerprint value is requested by API providers like Google, Facebook along with package name of the app. They use SHA-1 fingerprint for registering the app to use their services securely.
Since it is a short representation of the developer certificate, it has become an important factor in establishing secure connection between app and service end points.
Today most of the apps depend on third party services and in future also this trend will continue. So i think this tutorial is relevant and will be helpful for Android developers in generating SHA1 fingerprint value.
Another reason is to write this tutorial is, many developers are using command-line tool like keytool for generating SHA1 fingerprint but if you are using Android Studio IDE, then you don’t have to use another tools because it is very simple in Android Studio to generate singing fingerprints.
Gradle is the build system used for Android development in Android studio IDE. Gradle is rich collection of tasks for various purposes. A gradle task named signingReport is responsible for generating fingerprint for the application.
Running the signingReport task against a particular build variant (debug, release) it will generate SHA-1 fingerprint value. SHA-1 fingerprint value will be different for each build variant. i.e, SHA-1 value of debug will be different from SHA-1 value of release build.
singingReport task will generate the following fingerprints,
Note: Best standard out of the above list is, SHA-256
How To Generate SHA-1 Fingerprint
Certificate fingerprints can be generated for any build variants like debug, release. Here i explain simple and secure way of generating fingerprint values which involves following 3 processes,
- Create keystore Properties
- Load keystore To Gradle
- Execute Gradle Task
[Optional] Generate Fingerprints For Release
If you only want SHA1 fingerprint value for debug build variant then you can skip this section to Step 1.
By default the gradle task will not generate fingerprints for release build variant. In most places you will only find how to generated certificate fingerprints for debug build variant but if you published your app in Google Play Store then the live version will be a release build. In this case you need to generate certificate fingerprints for release build variant too.
I will explain how to generate SHA-1 fingerprints for release build variant as well
If you need fingerprints for release build variant also then you have to do 2 additional things before you jump into build.gradle file,
- Create a keystore file (file with .jks extension)
- Add signingConfigs for release
If you already generated signed build for your app then you can skip keystore file creating part and jump to Step 1 and start creating keystore properties.
Keystore file is needed for generating signed apk also. So even if we don’t want to generate a signed apk, generating a signed build would be a good idea to get a keystore file.
Below is the tutorial on how to create a signed apk.
Step 1. Create Keystore Properties
Create a file named keystore.properties in the root directory of your project.
Open the keystore.properties file and past the following content to it.
Replace the above dummy values with your string values.
storeFile variable holds the path to where .jks file to be saved. Better create a folder for keystore file and give the full path of the keystore file.
Step 2. Load KeyStore Properties To Gradle
Once keystore properties file created with your secret credentials, next step is to load the keystore properties to the gradle build configuration. This will give access to the gradle tasks to the keystore properties.
Follow the below instructions to load keystore properties,
In your module’s build.gradle file, add 3 line of code to load your keystore.properties file before the android <> block to load the keystore to gradle.
Next add keystore properties for release build variant also. To do this, copy paste the release tag into signingConfigs
If we miss release singingconfigs then Gradle task will not able to generate certificate fingerprints for release build variants.
Step 3. Execute Gradle Task
signingReport is the name of task that performs the generation of SHA1 fingerprint. In the latest version of Android Studio,
FYI here i am using Android Studio 4.2 for the explanation.
You can find Gradle tab at the right hand-side of the Android Studio IDE. Clicking on the tab will open up the below window.

Click on the Gradle icon (Elephant icon) in the above window. It will open up a sub window,

Type gradle task run command: gradlew singingReport
Enter the command will start execution of gradle task and generate SHA1, MD5, SHA-256 fingerprints.
Step 4. Find Generated Fingerprint
After executing the signingReport you have to open Run tab, which is not selected by default.

Copy the long string shown against SHA1. SHA1 keys are generated and displayed under each build variant i.e, debug, release. Please go to corresponding variant section as shown in the above screenshot.
If you have added sinigingConfigs for release then you will get release variant also in the above result else, release variant will not be available.
Thank you. Please comment here if you have any doubt.
Источник
How to Get SHA-1 key in Android Studio for Firebase.
There are two methods of getting SHA-1 key, but First one is not working for Windows user. So, if you are a Windows user then go for 2nd Method.
Update:- On Android Studio Latest version(on 24 Sept 2021) 2020.3.1 for Windows 64-bit (912 MiB), Step 2 will not Work. So, go for Step 3 .
1. Using Keytool
Open a terminal and run the keytool the utility provided with Java to get the SHA-1 fingerprint of the certificate. You should get both the release and debug certificate fingerprints.
To get the release certificate fingerprint:
For Windows:-
For Mac/Linux:-
Note:- If you are not able to get your SHA-1 key using Keytool then Follow the below Method, in this method you will definitely get your SHA-1 key.
2. Using Gradle’s Signing Report
You can also get the SHA-1 of your signing certificate by Gradle signingReport . But for that, you have to follow some steps.
Step 1 : – First of all
=> open your project in Android Studio and open the project.
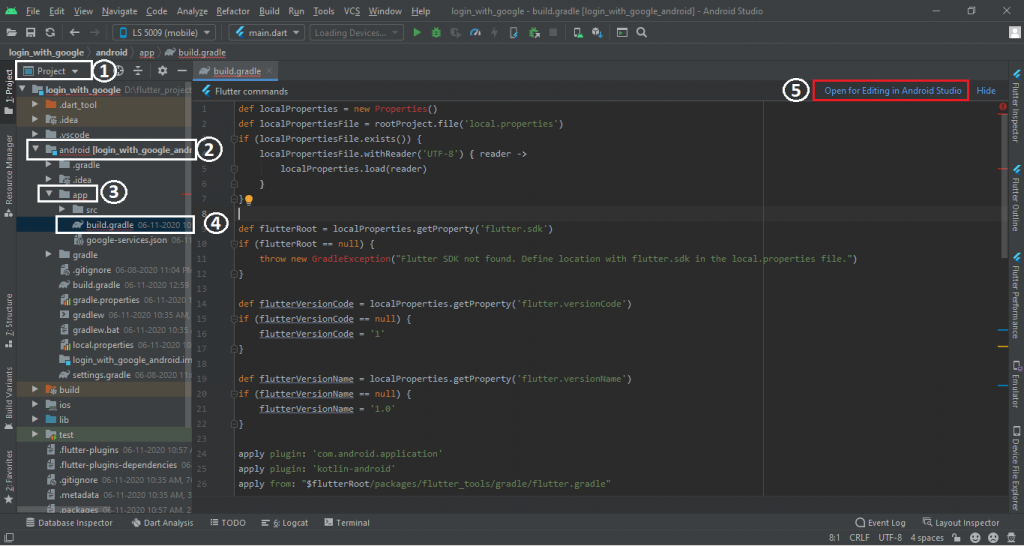
=>In the project, go to the android/app directory where you find build.gradle file. => Open it.
=> After opening, you’ll find an Open for Editing in Android Studio option, Click on it and open it in a new Tab. See the Below Image.
Step 2 :- After opening the file in the new tab, Wait for some time until Gradle Build Model Process Completes.
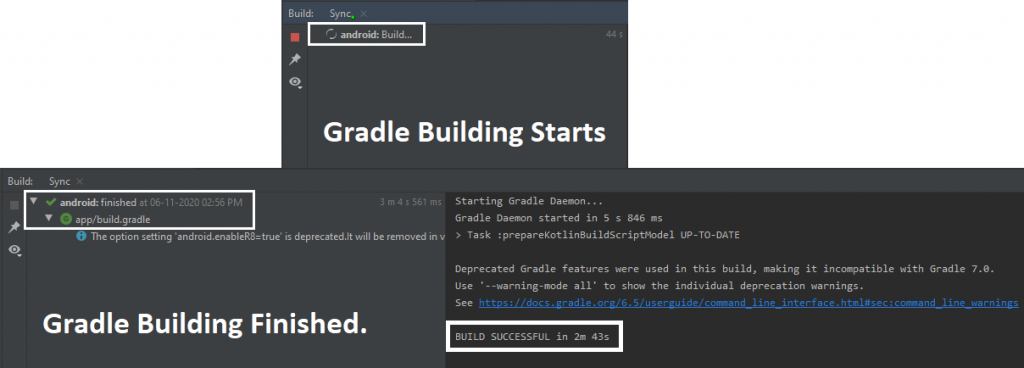
=> After Build Successful, go to the upper-right section where you find the Gradle option. Click On it.
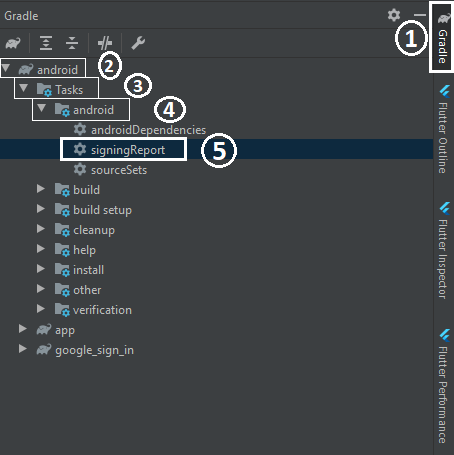
=> After that Open Android->Tasks->android and Double click on signingReport .
See the Below Image For Help.
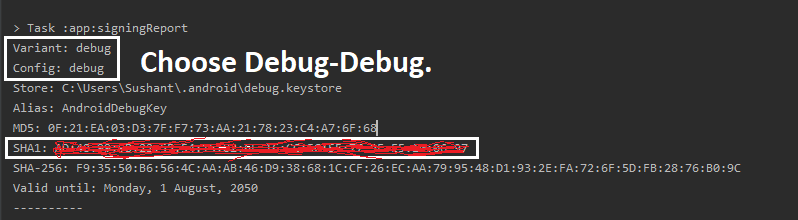
Step 3:- After Clicking on it, you’ll get a List of SHA-1 Keys but you have to choose Debug-Debug SHA-1 Key and copy and paste it on your Firebase. See the Below Image:-
3. Using gradlew
Step 1:- Right-click on ‘gradlew’ and go to ‘Open in Terminal’ This file is found under <
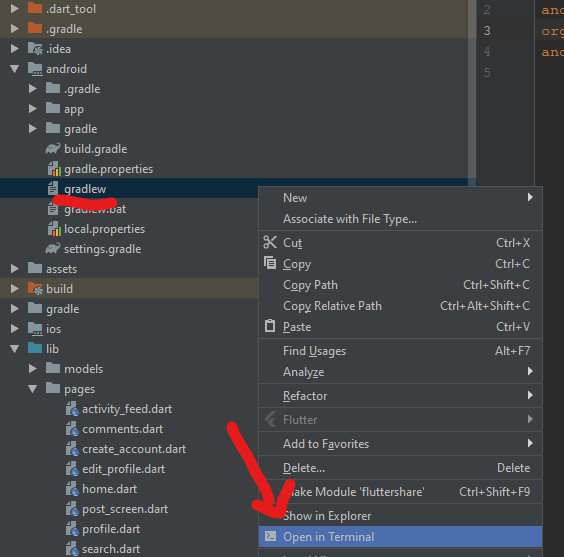
Step 2:- Type the following in command.
If did not work first try the second command:
Источник
How to obtain SHA1 Keys for debug and release — Android Studio [Mac]


Debug Key
Click on the Gradle tab on the right hand side of the Android Studio window.
Go to the Project root folder -> Tasks -> android -> signingReport

UPDATE: (Newer versions) In case you don’t find an android folder here, go to :app instead of root, navigate to Tasks>android and you’ll find signingReport.

Double click on signingReport, this will build and post the SHA1 in the bottom view.

Release
Method 1
In Android Studio, go to Build menu -> Generate Signed Bundle / APK
Select your keystore and key alias.
Copy the key store path and the key alias.
Here, the path is /Users/technofreek/Documents/testkeystore
and the alias is key0.

Open terminal and type the command
keytool -list -v -keystore -alias
For this example, here’s the command
keytool -list -v -keystore /Users/technofreek/Documents/testkeystore -alias key0
This will print your SHA1

Method 2
If you have enabled App Signing for your app in your Google Play Developer Console, by uploading your signing certificate, then just go to your developer console and select your app.
Select Release Management -> App Signing, and you’ll see you release SHA1.
Источник
How to Generate SHA1, MD5, and SHA-256 Keys in Android Studio?
SHA1, MD5, and SHA-256 are cryptographic functions that will convert your input to 160 bit (20 bytes) value. It is a secure key that is used to store very important data. In Android SHA1, MD5 and SA-256 keys are very important. If you want to add external APIs from Google such as Maps and other external features inside your app, then you have to add your key to Google’s console. The SHA keys are the unique identity of your application. These keys are very important and they are required when you have to add your application to the Google Play store. In this article, we will take a look at creating these keys in Android Studio.
1. SHA-1 Keys
SHA-1 also referred to as the Secure Hash Algorithm. It is a cryptographic hash function that will take input and it produces a 160-bit hash value. This generated hash value is known as a message digest. This generated hash value is then rendered in a hexadecimal format number which is 40 digits long. This key was designed by the United States National Security Agency which was used as an Information Processing Standard. SHA key was introduced in 1995.
Uses of SHA-1 key:
- It is used for Cryptography.
- By using this key the input data is converted into a 160-bit hash value which is difficult to decode.
- These keys are also used for Data Integrity.
2. MD-5 Keys
MD-5 keys are also referred to as Message Digest. These keys are faster than SHA-1 keys and they are simpler in usage than SHA-1 keys. MD-5 is having a length of 128 bits of the message digest. MD-5 is having poor security in comparison to SHA-1 keys. MD-5 key was introduced in 1992.
Uses of MD-5 key:
- MD-5 keys are used for Cryptography.
- They are used to store data in 128-bit values.
3. SHA-256 Keys
SHA-256 is referred to as Secure Hash Algorithm 256. It is a cryptographic hash function that takes an input of 20 bytes and rendered this value in hexadecimal format. The value generated is known as the message digest. The generated hexadecimal value is around 40 digits long.
Uses of SHA-256 key:
- SHA-256 keys are used in Cryptography.
- They are also used in Data Integrity.
Step by Step Guide to Generate SHA1, MD5, and SHA-256 Keys in Android Studio
Step 1: For creating these keys you have to, first of all, create a new project in Android Studio or you can generate these keys in your existing projects as well. If you want to create a new project then check the article on How to Create a new Project in Android Studio.
Step 2: Now inside Android Studio Click on Gradle Tab as shown in the below image.

Step 3: After clicking on Gradle Tab you will get to see the below screen on which click on your “AppName”. After clicking on your App Name then you will get to see three options inside that click on the last options “app“. After clicking on the app, Navigate to “Tasks”. Inside Tasks, navigate to “android” and double click on the “signingreport” option.

After clicking on the “signing report” your keys will be generated as shown in the below screenshot.

You can use these keys while integrating Firebase into your App. When you want to add Google APIs inside your app then these keys are very important.
Источник


