- How to Add a Library Project to Android Studio?
- Different Ways To Add Library Project to Android Studio
- Method 1
- Method 2
- Method 3
- Method 4
- How to Add External Library in Android Studio?
- Method 1: Copy external library to the libs folder
- Method 2: Using the module library
- Generate an Android Archive( AAR) Using Android Studio and Add to an Android Project
- Create an Android Library and use in your Android Project
- This blog is providing information that why modular code structure is important and how the android library can play an…
- Please follow the steps>>
- Публикация Android библиотеки
- Регистрация на Sonatype JIRA и создание Issue
- Создаем Android библиотеку в Android Studio
- Генерации GPG ключа
- Настройка библиотеки для публикации:
- Публикация
- Первый
- Второй
- Заключение
How to Add a Library Project to Android Studio?
Adding an external library in Android Studio is a very common thing but still, most beginners or freshers find it difficult to do. Some of you must have gone through this. Whenever you want to add some external library and you try to do that with maven(File > Project Structure > Dependencies) and try to add your dependencies there but when you hit Gradle sync, it fails. So now, without fixing this, you want to go for building your app then you will get the error: Error: A problem occurred configuring project ‘:app’. There are many external libraries available that make many specific tasks simple and easy with the APIs and Classes they provide. So including all those libraries in our project is really going to help you a lot. Many developers are often confused about how to add these libraries to their projects. This article is helpful for all such people.
In this article, we will see different ways to add library projects to our project. But before jumping to that let’s have a quick look at this: We can use Gradle, to add library projects with a single line code. Android Studio Project has a modular structure and we have a main module called “app”. There may be multiple modules in a Project. We can connect them together through Gradle, this connection is known as Dependency. Now Let’s get back to our main agenda.
Different Ways To Add Library Project to Android Studio
Method 1
Almost every well-known Android library is available in a Maven repository and its installation takes only one line of code in the app/build.gradle file:
Let’s add the external library to our project:
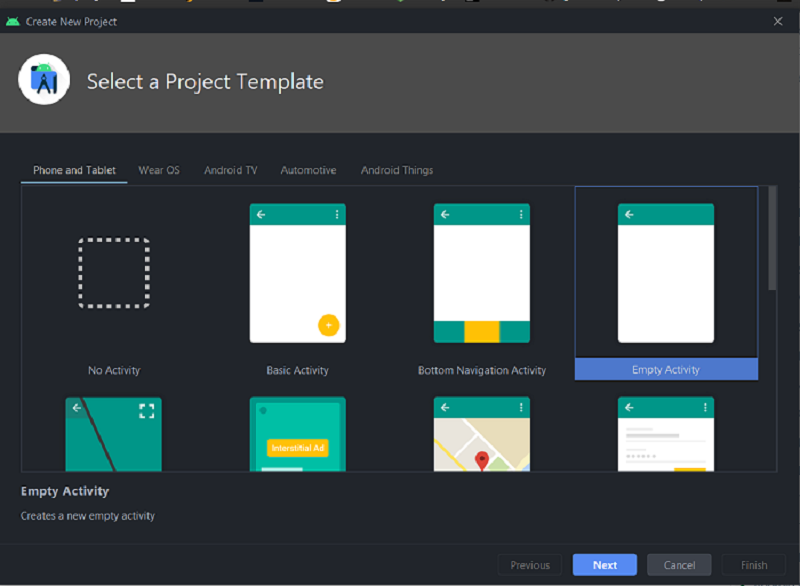
Step 1: Create a new project using Android Studio and name it anything you want (GFG in this example) and hit the finish button.
Step 2: The original project structure created by Android Studio looks like this:
Step 3: In the root directory (GFG/), create a new folder: /libs in which we’ll place our external libraries (this step is not required – only for keeping a cleaner project structure).

Step 4: Paste your library in the newly created /libs folder. For this example, we are using the PagerSlidingTabStrip library (you just need to download ZIP from GitHub, rename the library directory to “PagerSlidingTabStrip” and copy it). The new structure of our project should look like this:

Step 5: Edit settings.gradle by adding your library to include. If you use a custom path like I did, you have also to define the project directory for our library. A whole settings.gradle should look like below:
project(‘:PagerSlidingTabStrip’).projectDir = new File(‘libs/PagerSlidingTabStrip’)
Step 5.1: If you face “Default Configuration” error, then try this instead of step 5,
Step 6: In app/build.gradle add our library project as a dependency:
compile fileTree(dir: ‘libs’, include: [‘*.jar’])
Step 6.1: If you followed step 5.1, then follow this instead of 6,
compile fileTree(dir: ‘libs’, include: [‘*.jar’])
Step 7: If your library project doesn’t have build.gradle file you have to create manually.
Step 8: That’s all. Just click‚ synch the project with Gradle. Your library should be available for your project.
Method 2
Step 1: Follow to File > New Module
Click on “Import Existing Project“.
Step 2: Select the desired library and the desired module. Then click finish. Android Studio will import the library into your project and will sync Gradle files.
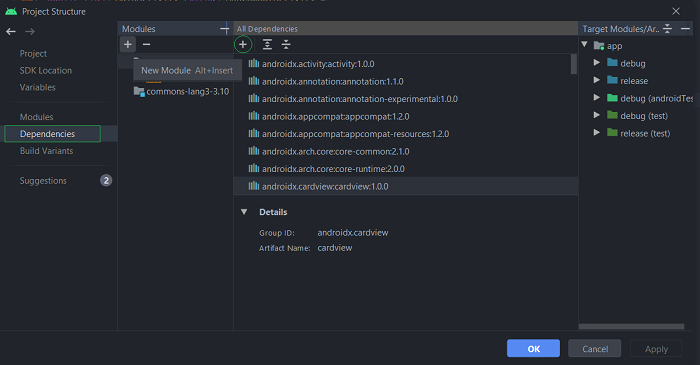
Step 3: In the next step you need to add the imported module to your project’s dependencies. Right-click on the app folder > Open Module settings
Step 4: Navigate to the dependencies tab > Click on the ‘+’ button -> click on Module Dependency. The library module will be then added to the project’s dependencies.
Method 3
Step 1: Navigate to File > Project Structure

Step 2: Then click on Modules.
To import the library using Gradle, you can have to add it to the dependencies section of your build.gradle (the module’s one).
Method 4
Just go to Project Structure > under Modules (see below images) just click the plus button and select Import Existing Project and import. Then sync your Gradle files. There are chances to face the error
Error: The SDK Build Tools revision (xx.x.x) is too low. Minimum required is yy.y.y
Then just open the build.gradle file in your library project directory and update the buildToolsVersion to the suggested one.
then try importing the module by clicking on File > Project Structure
Module > Import Module
After importing the library module, select your project module and add the dependency and then select the imported module.
Источник
How to Add External Library in Android Studio?
Android Studio is the official IDE (Integrated Development Environment) for Android app development and it is based on JetBrains’ IntelliJ IDEA software. Android Studio provides many excellent features that enhance productivity when building Android apps. In this article, we will learn how to add external libraries to our android project.
Method 1: Copy external library to the libs folder
Let us have an external library that we want to use in our project i.e a jar file.
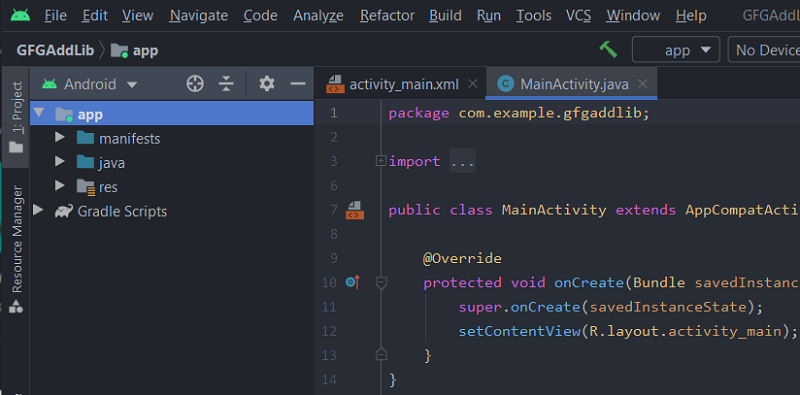
Create a new project named GFGAddLib.
Now, our project has been created.
Now click on the Android drop-down and change to Project files.
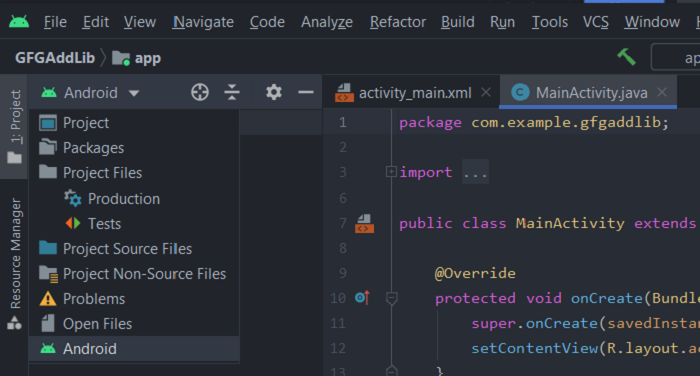
Click on Project files.
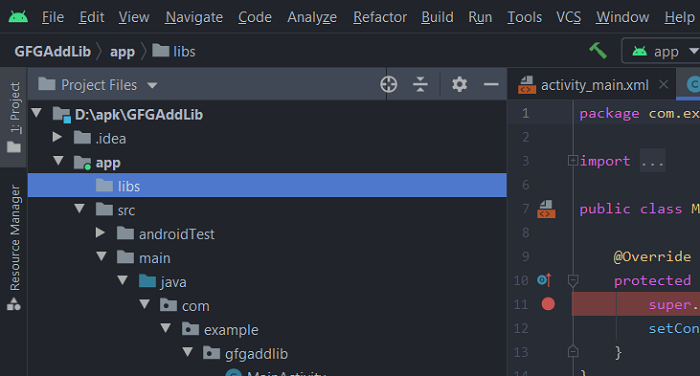
Copy the jar file to the libs folder.
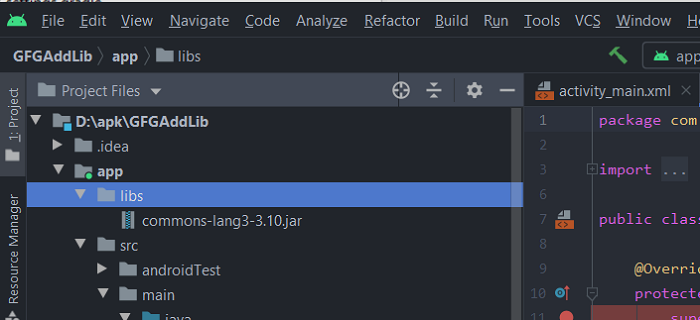
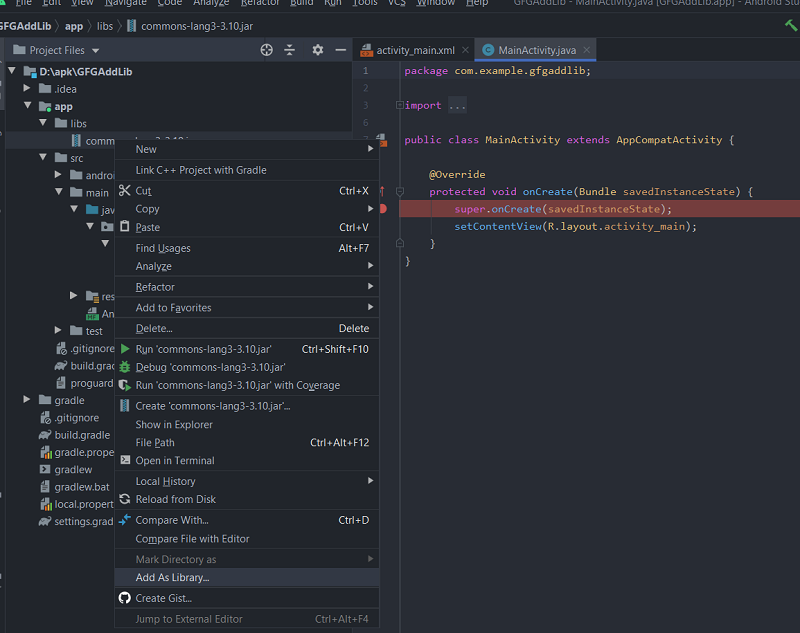
Here, you can see our added jar file under the libs folder. Right-click on the jar file and select Add As Library.
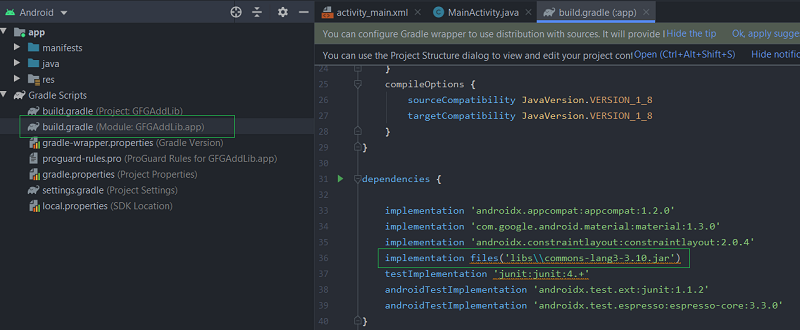
Now come back to the Android tab, you can see that your library has been already declared in build.grade (Module: GFGAddLib.app)
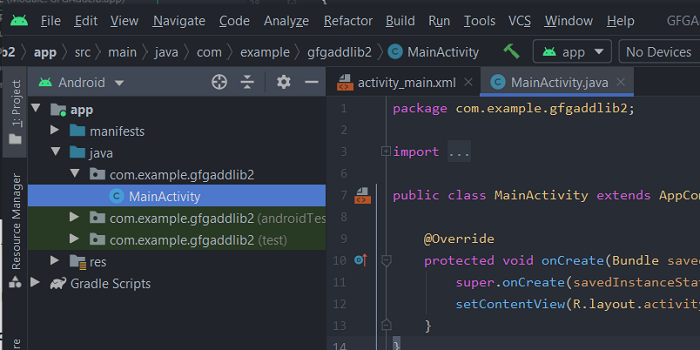
The library is successfully added to our project.
Method 2: Using the module library
Let us have a new project GFGAddLib2 and we want to use the same common-lang3-3.4.jar library for this project.
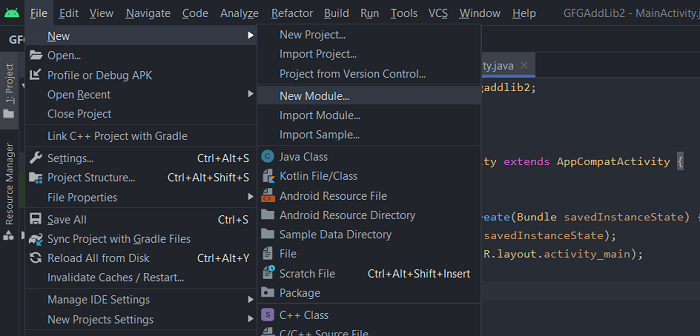
Create a new Android Module. Go to the File -> New -> New Module
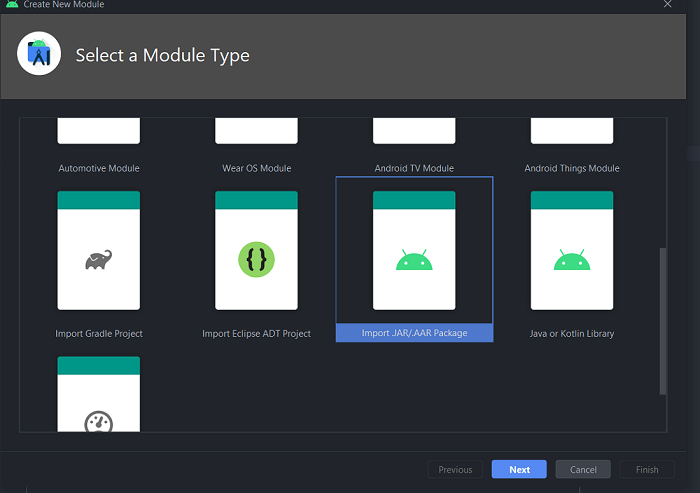
Select Import JAR/.AAR Package and click Next.
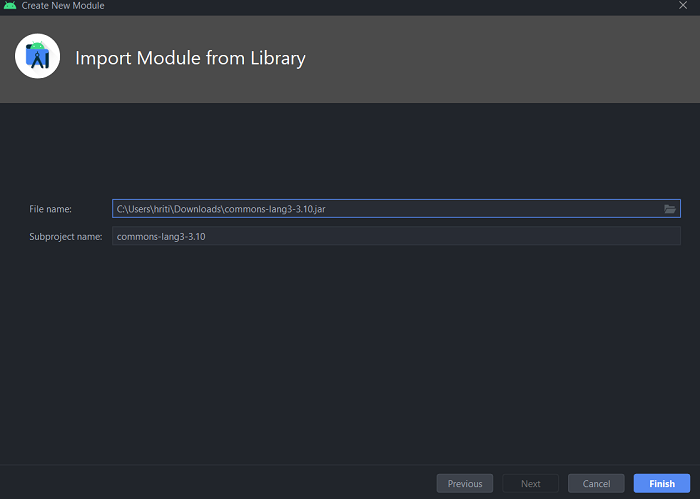
Select the location of your JAR file and click on Finish.
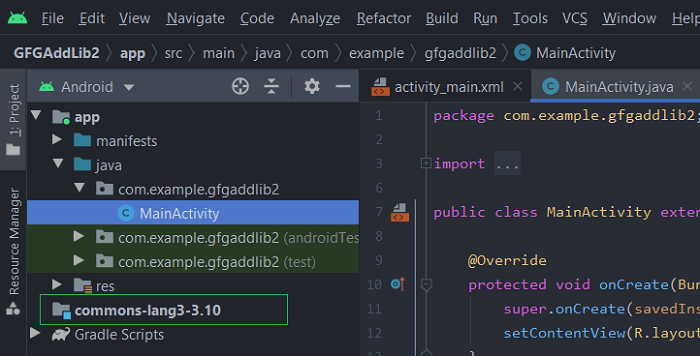
Module library has been created. Next, we need to declare the dependency of the main project on the newly created module. Now go to the File and click on Project structure.
Now click on circled + sign and select Module Dependency
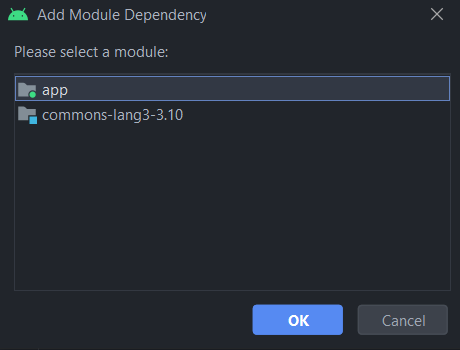
Click OK, a new dialogue box will appear, select the jar file and click OK.
Источник
Generate an Android Archive( AAR) Using Android Studio and Add to an Android Project

This article provides Information for creating AAR for an Android Library module and use It with another android Project.
I have posted an article for creating an Android Library module in an Android Project and use that with the UI app module.
Please see the article if you need to know about creating the Library module in Android Project.
Create an Android Library and use in your Android Project
This blog is providing information that why modular code structure is important and how the android library can play an…
In this article, I will explain how we can generate the Android Archive( AAR) file for an Android Library module and Use that in different Android projects so that we can understand the Library creation can really save our redevelopment time cost by using the same module in different projects.
I will use Android Studio 4.0.2 and the same Project mention in the above-attached article.
I have created a project and a Library module It is shown below.
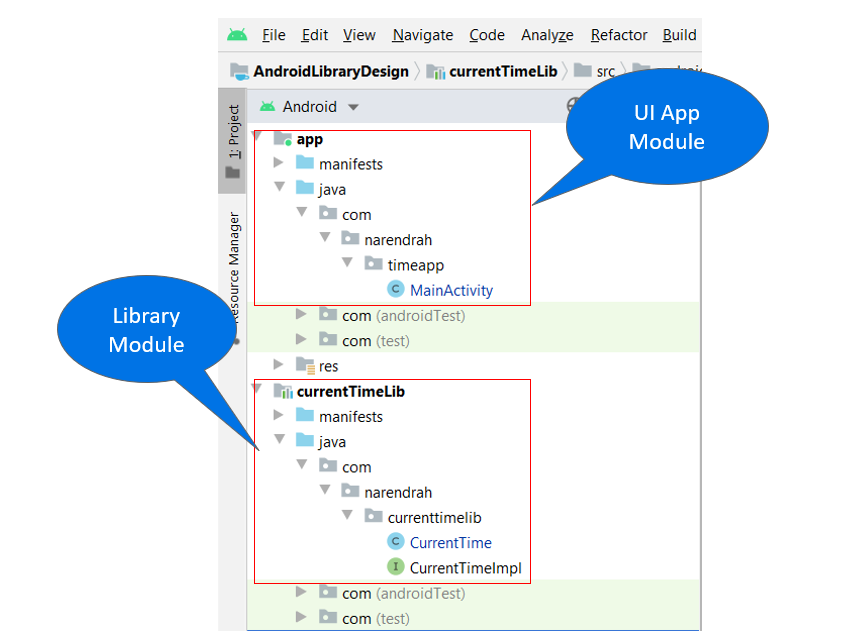
It is mentioned that I have created a Library Module named as currentTimeLib and I am using that module successfully within the project, now I will generate the AAR file and I will Import the AAR file into a different Android Project.
If you already know about creating the Library module then you can follow the steps directly.
If you want to Implement it then either complete the previous article (Click here) or pull the code from Git and try on that(Click here).
Please follow the steps>>
Step1: Start the Android Studio and open the project where you want to generate the AAR file.
Step2: Click the Gradle option in right most corner of android studio.
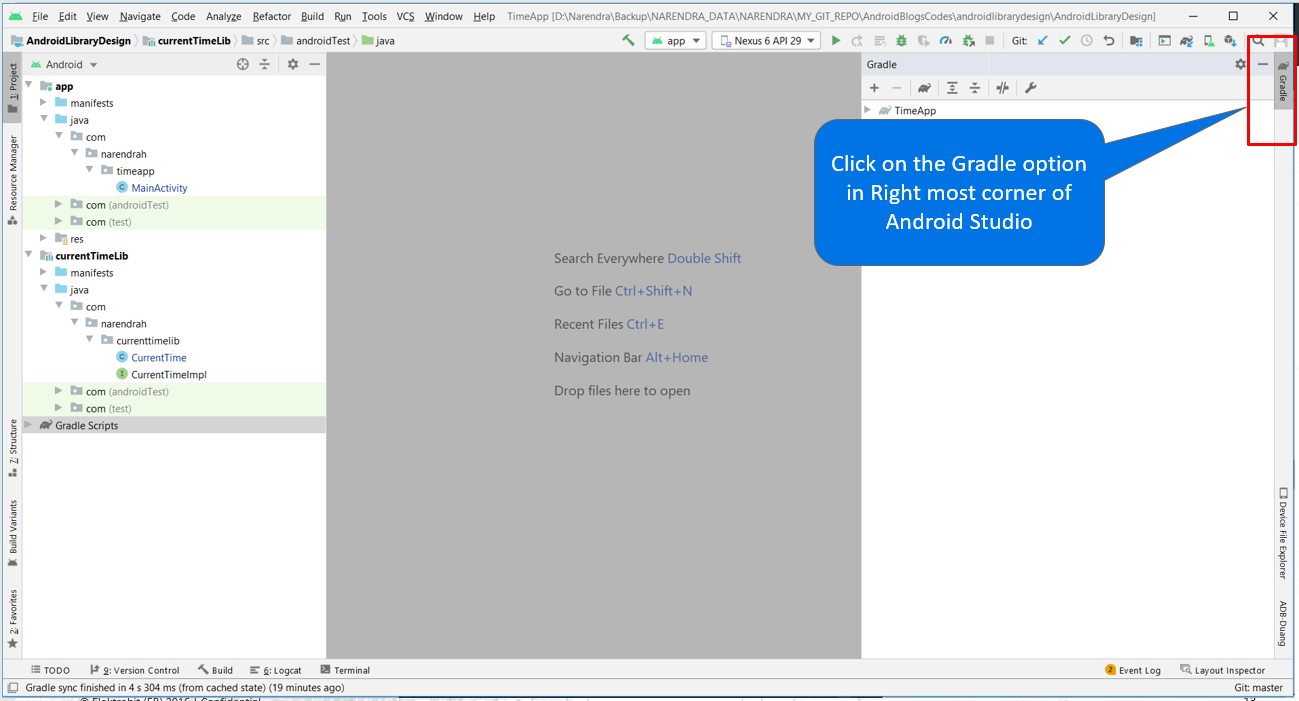
Step3: You will see the App name in the window, please unfold the options in the sequence shown below.
Источник
Публикация Android библиотеки

Недавно у меня появилось желание попробовать создать свою собственную Android библиотеку и выложить ее на Maven Central репозиторий.
Это оказалось не так просто, как я думал. В интернете полно непонятных статей на эту тему, в которых легко запутаться.
Я решил поделиться процессом публикации моей библиотеки Awesome-Buttons.
Ну что ж, приступим.
Регистрация на Sonatype JIRA и создание Issue
Перейдите на сайт Sonatype JIRA и создайте себе аккаунт.
Теперь войдите в аккаунт и создайте новый Issue :
Заполните всю необходимую информацию.
Обратите внимание на Group Id . Обычно в качестве его указывается доменное имя в обратном порядке.
Если у вас есть свой сайт или сайт библиотеки, то вы можете использовать его доменное имя (например: ru.freeit256 ), но для этого нужно будет дополнительно прописать запись в вашем регистраторе домена (после создания Issue вы увидите информацию как это сделать).
Я использовал другой подход: указал свой Github в качестве Group Id
Также для того, чтобы использовать Github в качестве Group Id вам нужно создать пустой репозиторий с именем OSSRH-74088
Не забудьте отправить ваше Issue на проверку и дождаться статуса CLOSED
Создаем Android библиотеку в Android Studio
Сначала создайте любое пустое приложение с app модулем.
Затем вы можете либо добавить модуль Android библиотеки, либо изменить текущий модуль на библиотечный. Читайте об этом на официальном сайте
Генерации GPG ключа
Перед публикацией необходимо сгенерировать пару GPG ключей.
Для генерации ключей выполните следующую команду:
Основные параметры при создании ключей:
формат шифрования: RSA and RSA
размер: 4096 бит
срок годности ключа можно указать 0 (никогда не истечет)
имя, email и комментарий укажите свои
Чтобы посмотреть все сгенерированные ключи выполните команду:
Обратите внимание, последние 8 символов это ID ключа:
Для подписи библиотеки мы будем использовать приватный ключ, а чтобы пользователи смогли удостовериться, что библиотека принадлежит нам, мы должны выложить публичный ключ на общедоступный сервер, например keyserver.ubuntu.com:
Чтобы получить приватный ключ для подписи нужно выполнить:
Вуаля! Позже он нам понадобится.
Настройка библиотеки для публикации:
Добавляем плагин io.github.gradle-nexus в корневой файл build.gradle :
Далее нам нужно создать два скрипта для модуля и корня нашей библиотеки.
Создадим в корне проекта папку scripts , и добавим новый скрипт publish-module.gradle :
Также нам нужно добавить скрипт publish-root.gradle :
Теперь нам нужно добавить maven-publish плагин и некоторые константы в начало build.gradle файла нашего модуля:
И самый важный момент, файл local.properties :
Публикация
После основных настроек, зайдите на Nexus Repository Manager и войдите под учетными данными JIRA Sonatype.
Далее переходим во вкладку Staging Profiles и выбираем необходимый профиль.
Копируем sonatypeStagingProfileId из адреса сайта и указываем его в local.properties файле:
Переходим к публикации.
Далее у вас есть два варианта зарелизить либу: вручную через графический интерфейс или с помощью gradle задачи.
Первый
Зайдите на сайт Nexus Repository Manager , перейдите во вкладку Staging Repositories и выберите необходимый репозиторий.
Чтобы выпустить релиз библиотеки нужно воспользоваться двумя командами close и release .
Для отмены релиза юзайте drop
Второй
Выполните команду, которая сама закроет и зарелизит вашу либу:
Заключение
Вы уже убедились, что процесс публикации Andorid либы весьма затратный и рутинный.
Я постарался изложить только основные моменты. Возможно у вас возникнут какие-либо ошибки, которые вам придется самим решать ну и конечно же гуглить!
Такова жизнь прогера: постоянно гуглить. 🙂
Надеюсь, что статья оказалась вам полезной.
Желаю всем хорошего кода и побольше успешных релизов! 🙂
Источник


