- Add an email account to your iPhone, iPad, or iPod touch
- How to set up your email account automatically
- How to set up your email account manually
- Enter account settings manually
- Do more with Mail
- If you can’t send email on your iPhone, iPad, or iPod touch
- Before you begin
- Check the Outbox for unsent email
- Check your email address and password
- Contact your email provider or system administrator
- Remove your email account and set it up again
- How to Send a New Email With iPhone Mail
- Send emails from your iPhone as easily as from your computer
- How to Send a New Email on iPhone
- How to Use CC and BCC in the iPhone Mail App
- How to Use Siri to Send Email on iPhone
- How to Send Attachments in iPhone Mail
- Using Third-Party Email Provider Apps
- How to Access Gmail in iPhone Mail
- Use the correct Gmail server settings to log in on your phone
- What to Know
- How to Access Gmail in iPhone Mail Using IMAP
- How to Access Gmail in iPhone Mail Using POP
Add an email account to your iPhone, iPad, or iPod touch
There are two ways that you can set up an email account in the Mail app on your iOS device — automatically or manually. Learn which option is best for you.
How to set up your email account automatically
If you use an email provider like iCloud, Google, or Yahoo, Mail can automatically set up your email account with just your email address and password. Here’s how:
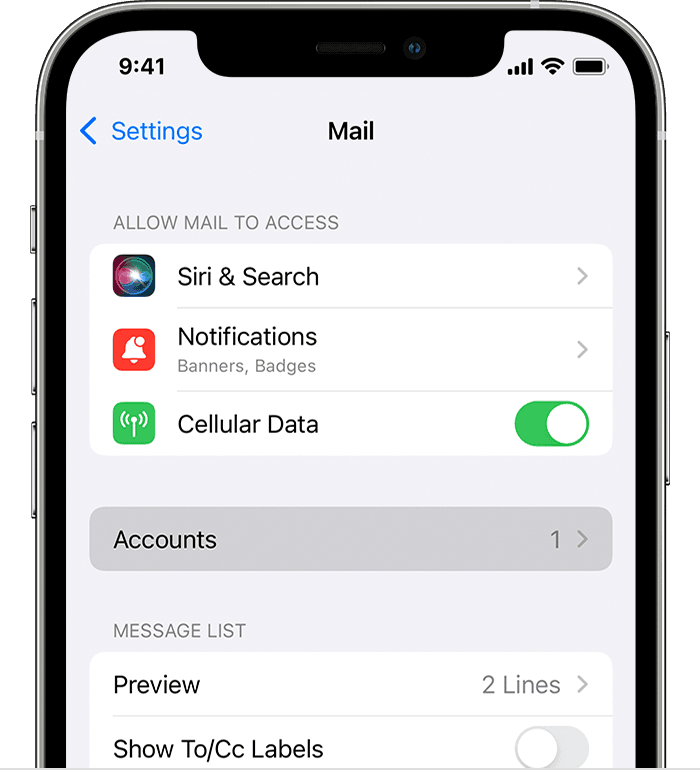
- Go to Settings > Mail, then tap Accounts.

- Tap Add Account, then select your email provider.
- Enter your email address and password.
- If you see Next, tap Next and wait for Mail to verify your account.
- If you see Save, tap Save.
If you don’t see your email provider, tap Other to add your account manually.

How to set up your email account manually
If you need to set up your email account manually, make sure that you know the email settings for your account. If you don’t know them, you can look them up or contact your email provider. Then follow these steps:
- Go to Settings > Mail, then tap Accounts.
- Tap Add Account, tap Other, then tap Add Mail Account.
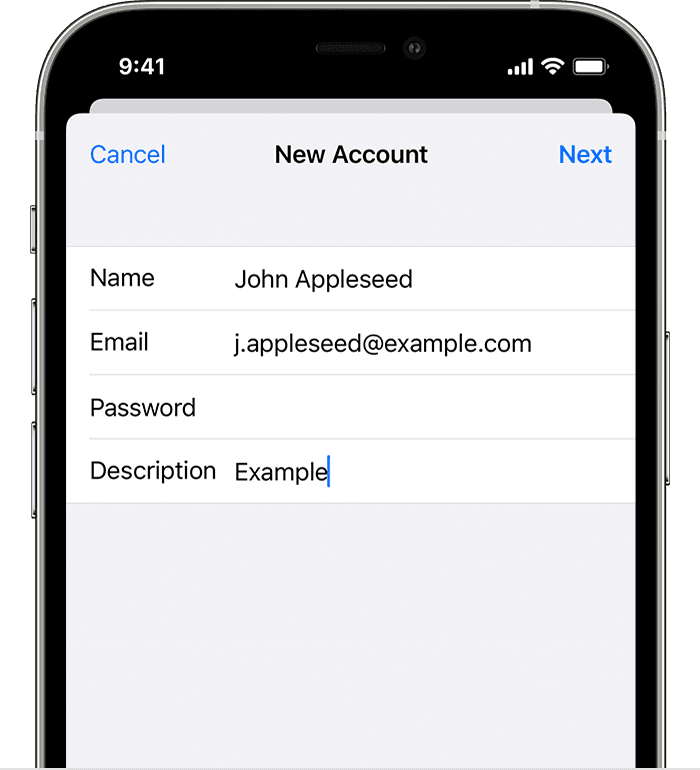
- Enter your name, email address, password, and a description for your account.
- Tap Next. Mail will try to find the email settings and finish your account setup. If Mail finds your email settings, tap Done to complete your account setup.
![]()
Enter account settings manually
If Mail can’t find your email settings, then you need to enter them manually. Tap Next, then follow these steps:
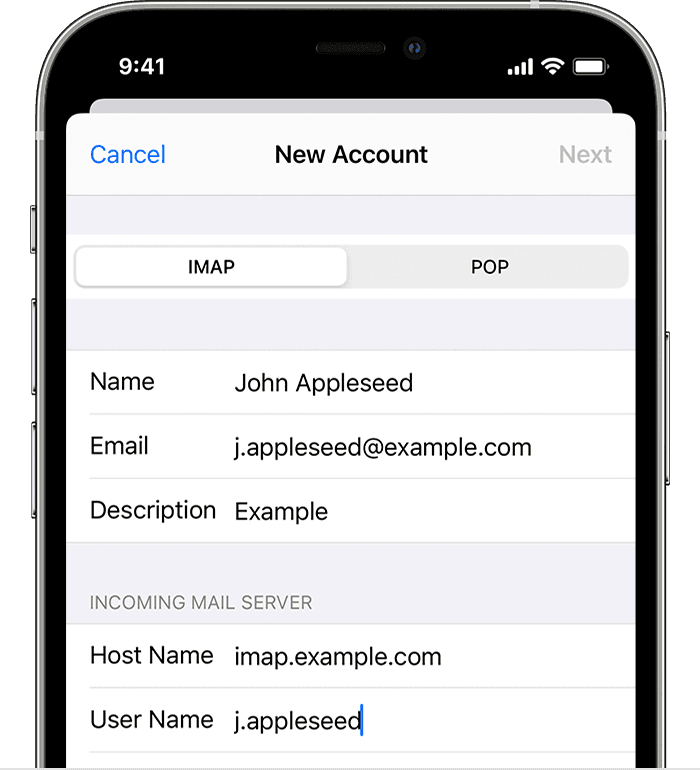
- Choose IMAP or POP for your new account. If you aren’t sure which one to choose, contact your email provider.
- Enter the information for Incoming Mail Server and Outgoing Mail Server. Then tap Next. If you don’t have this information, try to look it up.
- If your email settings are correct, tap Save to finish. If the email settings are incorrect, you’ll be asked to edit them.
If you still can’t set up your email account or save your email settings, contact your email provider.
Do more with Mail
Information about products not manufactured by Apple, or independent websites not controlled or tested by Apple, is provided without recommendation or endorsement. Apple assumes no responsibility with regard to the selection, performance, or use of third-party websites or products. Apple makes no representations regarding third-party website accuracy or reliability. Contact the vendor for additional information.
Источник
If you can’t send email on your iPhone, iPad, or iPod touch
If you can’t send email from the Mail app on your iPhone, iPad, or iPod touch, there are a few things you can try.
Before you begin
There are a few things to keep in mind and check:
- When you make an iOS or iPadOS backup in iCloud or iTunes, it backs up your mail settings, but not your email. If you delete or change your email account settings, previously downloaded email might be removed from your device.
- Make sure that your device is connected to the internet.
- Check with your email service provider to find out if there’s a service outage.
- If you can’t access your email, or you can’t send and receive messages with your @icloud.com email address, learn what to do.
Check the Outbox for unsent email
If you get a message that says your email wasn’t sent, then that email goes to your Outbox. Check your Outbox and try to send the email again with these steps:
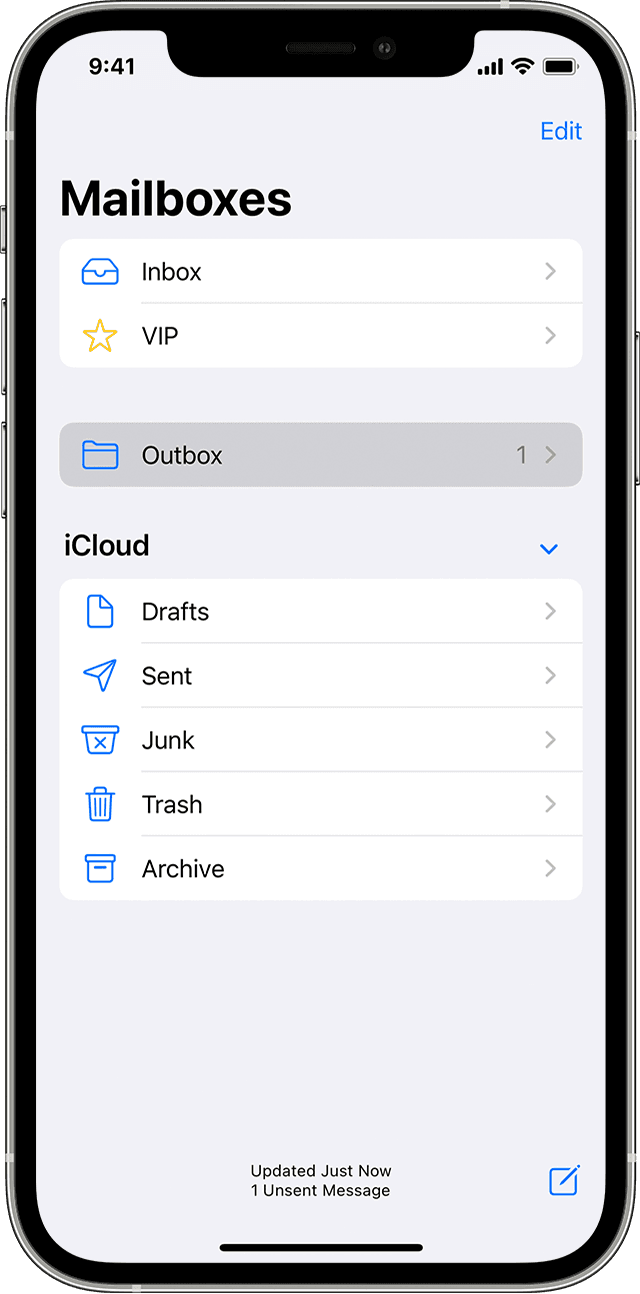
- In Mail, go to your list of mailboxes.
- Tap Outbox. If you don’t see an Outbox, then your email was sent.
- Tap an email in the Outbox. Make sure that the recipient’s email address is correct.
- Tap Send.
Check your email address and password
If Mail asks you to enter a password for your email account, make sure that your password is correct. To check your email address and password, sign in to your email provider’s website.
If you still get a user name or password error, contact your email provider or system administrator.
Contact your email provider or system administrator
- Contact your email provider or check their status webpage to see if there’s a service outage.
- Ask your email provider or system administrator if you turned on any security features or restrictions, like two-step verification, for your email account. You might need a special password or might need to request authorization from your email provider to send and receive email on your device.
- Check your email account settings with your email provider or system administrator to make sure that they’re correct.
Remove your email account and set it up again
- On your computer, sign in to your email provider’s website. Make sure that all of your email is there or make sure that your email is saved somewhere other than on your iOS or iPadOS device.
- On your device, go to Settings > Mail, then tap Accounts.
- Tap the email account that you want to remove.
- Tap Delete Account.
- Add your account again.
If the steps in this article don’t help, contact your email service provider for more information.
Источник
How to Send a New Email With iPhone Mail
Send emails from your iPhone as easily as from your computer
:max_bytes(150000):strip_icc()/SamCostello-d7fcf106ec2048ccb06d1e2190b3396d.jpg)
The iPhone makes it easy to use the most popular email services, including iCloud, Microsoft Exchange, Google, Yahoo, AOL, and Outlook. Thanks to built-in support for these email options, you can set up the Mail app to access email from all your accounts in one place. After you add your email accounts to the iPhone Mail app, you’ll you’ll want to start sending emails. Here’s what you need to know.
Instructions in this article apply to the Mail app on iPhones running iOS 6 through iOS 14.
How to Send a New Email on iPhone
To send a new email message from the pre-installed Mail app, follow these steps:
Tap the Mail app to open it.
In the lower-right corner of the screen, tap the Compose icon. It’s a square with a pencil in it. This opens a new, blank email.
:max_bytes(150000):strip_icc()/001_write-email-on-iphone-4103856-687dcbc8fbb84972a66d4a545d904f7b-1aba924cab9a45fbac96d588301a980d.jpg)
Enter the email address of the person you’re writing to in the To field in one of three ways:
- Begin typing the recipient’s name or address. If the person is in your address book, options appear. Tap the name and address you want to use.
- Tap the + icon at the end of the To field. In your Contacts list, tap the person.
- For recipients who are not in your Contacts list, type the full email address.
Tap the Subject line and type a subject for the email.
Tap the body of the email and write the message.
When you’re ready to send the message, tap Send.
Email providers that aren’t preconfigured on the iPhone can be added to the Mail app manually. However, you must provide information from the provider, including the hostname and incoming and outgoing mail settings.
How to Use CC and BCC in the iPhone Mail App
Just like with desktop and web-based email programs, you can CC or BCC people on emails sent from your iPhone. To use either of these options, create a new email following the steps from the last section. After filling in the To line, tap the Cc/Bcc, From line to expand it to three fields.
Add a recipient to the CC or BCC fields in the same way that you add the original recipient in the To line.
If you have more than one email address configured on your phone, you can choose which one to send email from. Tap the From line to display a list of your email accounts. Tap the one you want to send the email from.
How to Use Siri to Send Email on iPhone
In addition to writing an email with the onscreen keyboard, you can use Siri to dictate an email.
Activate Siri by holding down your iPhone’s Home button or Side button (depending on your model). Say «Send a new email» (or a similar phrase) or «Send a new email to [person’s name].» Siri will ask for the subject line and then the body text of the email. Just speak what you want to say and, when it’s done, send the message. Pretty easy!
If you’ve already got a new email open, and prefer to dictate the message instead of type it, you can do that, too. With the new email ready, tap into the body and then tap the microphone icon at the bottom right. Speak your email and wait for the iPhone to transcribe it. You may need to edit the text, depending on the accuracy.
How to Send Attachments in iPhone Mail
You can send attachments—documents, photos, videos, etc.—from the iPhone, just like from a desktop email program. On iPhones running iOS 6 or higher, you can send an email with a photo or video attachment right from the Mail app. Here’s what to do:
Open a new email and type the message.
Tap and hold the message area of the email.
:max_bytes(150000):strip_icc()/002_write-email-on-iphone-4103856-d24eb0b1692b4f03a28f02507de23db2-95c3e9f79fc24c309942990568bd0022.jpg)
When the magnifying glass or blue cursor (depending on your version of the iOS) appears, let go.
In the pop-up menu, tap the right arrow to reveal additional choices.
Tap Insert Photo or Video to open the Photos app. (Later versions of iOS include options like Add attachment and Insert drawing, which work in the same way.)
Find and select the photo or video you want to attach.
Tap Choose to attach the photo or video to the email message.
With the attachment added to the email, tap Send.
Using Third-Party Email Provider Apps
If you aren’t interested in using the Mail app, download apps developed by your preferred email provider and use those instead. Popular email provider apps in the App Store include:
Источник
How to Access Gmail in iPhone Mail
Use the correct Gmail server settings to log in on your phone
:max_bytes(150000):strip_icc()/Heinz-Tschabitsche-c6d01096ad5f47b8800846cebc7d99b1.jpg)
What to Know
- To use IMAP, go to Settings >Passwords & Accounts >Add Account >Google.
- To use POP, enable POP for Gmail, then go to Settings >Passwords & Accounts >Add Account >Other >Add Mail Account.
- The Gmail POP server settings are pop.gmail.com for the incoming mail server and smtp.gmail.com for the outgoing mail server.
This article explains how to get Gmail on an iPhone by adding your email account details to your phone settings. Instructions apply to any Gmail email account on any personal use or Workspace tier on any iPhone with iOS 11 or above.
How to Access Gmail in iPhone Mail Using IMAP
There are two ways to download email to your iPhone: IMAP and POP. You can use whichever you prefer, but IMAP excels in its synchronization features. Previous Gmail messages will download to your phone and be stored in the built-in Mail app, which is also where you can get new emails and send messages to your contacts.
Use the following steps to get Gmail on your phone using the Gmail IMAP server settings:
On the iPhone home screen, open Settings.
Go to Passwords & Accounts > Add Account, then choose Google.
:max_bytes(150000):strip_icc()/002_how-to-access-gmail-in-iphone-mail-1172491-5c10472046e0fb00011ec590.jpg)
These screens are named differently on older versions of the Mail app. Choose Mail > Contacts > Calendars, then go to Add Account > Google Mail.
Enter your Gmail email address, then choose Next.
Enter your Gmail password, then select Next.
:max_bytes(150000):strip_icc()/003_how-to-access-gmail-in-iphone-mail-1172491-5c1048704cedfd00014c4736.jpg)
If you don’t know your password, reset your Gmail password to make a new one.
If a message about two-factor authentication (2FA) appears, follow the directions on the screen. You’ll only see this if 2FA is enabled for your Gmail account.
Turn on the Mail toggle switch to ensure that your email can be used. You can also enable other items to sync contacts, calendar events, and notes.
Choose Save.
Press the home button to exit to the home screen.
If you set up your Gmail account to work with other email addresses, use these to send from iPhone Mail.
How to Access Gmail in iPhone Mail Using POP
The Gmail POP server settings are needed to use Gmail on your phone over POP.
Enable POP for Gmail if it’s not already turned on. Do this from a web browser using the Forwarding and POP/IMAP tab of your Gmail account.
Open the Settings app and go to Passwords & Accounts > Add Account > Other > Add Mail Account.
Enter your name, email address, and password, then tap Next.
:max_bytes(150000):strip_icc()/004_how-to-access-gmail-in-iphone-mail-1172491-5c104a5cc9e77c0001ffac53.jpg)
Select POP.
In the Incoming Mail Server section, enter the Gmail POP server settings:
- Host Name: pop.gmail.com
- User Name: Your full email address
- Password: The password to your email account
If 2-step verification is enabled, generate an app password for your Gmail account and use the app password instead of your account password.
In the Outgoing Mail Server section, enter the Gmail SMTP server settings:
- Host Name: smtp.gmail.com
- User Name: Your full email address
- Password: The password to your email account
Tap Save.
Select the Gmail account you just added.
Tap smtp.gmail.com towards the bottom of the page, and then again at the top of the next page.
Turn on the Use SSL toggle switch.
In the Server Port text box, delete the existing number and enter 465.
:max_bytes(150000):strip_icc()/001-how-to-access-gmail-in-iphone-mail-1172491-bf175f74dae7445c921a3bb2c7bb5447.jpg)
Select Done.
Depending on the POP download settings in your Gmail account, you may be able to delete an email on your iPhone and have it remain in your Gmail account. Adjust this feature by changing the When messages are accessed with POP setting on this page of your Gmail account.
Источник


