- How to put your iPhone on vibrate, ring, or silent mode
- Turn Ring/Silent mode on or off on your iPhone
- Use Ring mode
- Use Silent mode
- Change ringtones, sounds, and vibrations
- Change ringtone and alert volume with buttons
- How to turn off or restart your Apple TV
- Put your Apple TV to sleep
- Restart your Apple TV
- Unplug your Apple TV
- Move apps and create folders on your iPhone, iPad, or iPod touch
- How to organize your apps
- How to put apps in a folder
- How to move an app to a different page
- How to Put Music on an iPod
- Load your iPod Classic, Nano, Mini, and Shuffle with music
- What to Know
- How to Put Music on an iPod Classic, Mini, Nano, and Shuffle
- How to Put Music on an iPhone or iPod Touch
- iPods Sync With iTunes, Not iCloud
- Add, use, and share boarding passes, tickets, and other passes in Apple Wallet
- How to add a boarding pass, ticket, or other pass to Apple Wallet on your iPhone
- Use a boarding pass, ticket, or other pass in Apple Wallet
- How to use a boarding pass, ticket, or other pass on your iPhone
- How to use a boarding pass, ticket, or other pass on your Apple Watch
- How to share a pass or ticket in Apple Wallet
How to put your iPhone on vibrate, ring, or silent mode
The Ring/Silent switch is on the left side of your iPhone. You can use it to control which sounds play through your iPhone speaker.
Turn Ring/Silent mode on or off on your iPhone
In Ring mode, you hear ringtones and alerts. In Silent mode, you don’t, but your iPhone can still play sounds, like when you play music or videos.
Use Ring mode

To put your iPhone in Ring mode, move the switch so that orange isn’t showing.
Use Silent mode
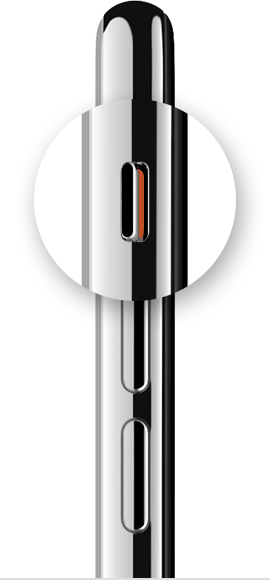
To put your iPhone in Silent mode, move the switch so that orange is showing.

Change ringtones, sounds, and vibrations
- On iPhone 7 and later, go to Settings > Sounds & Haptics. On earlier iPhone models, go to Settings > Sounds.
- Choose what you want to adjust, like Ringtone or New Mail.
- Tap the alert tone that you want. You can also tap Vibration and choose a vibration pattern or make a custom vibration.
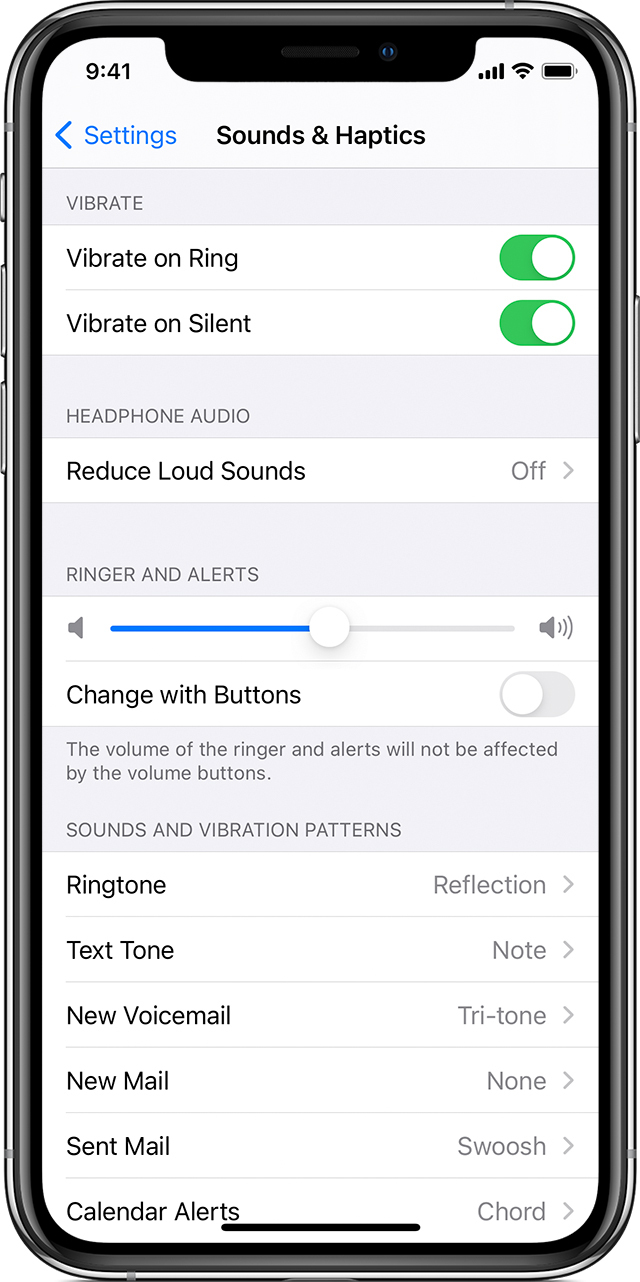
Change ringtone and alert volume with buttons
If you want to control your ringtone and alert volume separately from other apps, turn off Change with Buttons. Then you need to manually adjust your ringtone and alert volume in Settings > Sounds & Haptics or Settings > Sounds.
Источник
How to turn off or restart your Apple TV
Learn how to put your Apple TV to sleep, restart it, or unplug it from power.
Put your Apple TV to sleep
After a period of inactivity, your Apple TV automatically goes to sleep. You can also select Sleep Now in Settings, or put your Apple TV to sleep with your remote:
- With your Siri Remote (2nd generation) or Apple TV Remote (2nd generation):* Press and hold the Power button.
- With your Siri Remote (1st generation) or Apple TV Remote (1st generation):* Press and hold TV/Control Center for three seconds to bring up Control Center, then select Sleep .
- With your Apple Remote (aluminum or white): Press and hold Play/Pause for five seconds.
To wake your Apple TV, press Menu or TV/Control Center on your remote.
Restart your Apple TV
If your Apple TV isn’t responding, restart it with your remote:
- With your Siri Remote (2nd generation) or Apple TV Remote (2nd generation):* Hold down the Back and TV/Control Center buttons. Let go when the light on your device flashes.
- With your Siri Remote (1st generation) or Apple TV Remote (1st generation):* Hold down the Menu and TV/Control Center buttons. Let go when the light on your device flashes.
- With your Apple Remote (aluminum or white): Hold down the Menu and Down buttons. Let go when the light on your device flashes.
Unplug your Apple TV
If the Settings menu and your remote don’t restart your device, unplug your Apple TV from power. Wait six seconds, then plug it back in.
*Apple TV 4K and Apple TV HD ships with the same remote everywhere. In countries and regions that support Siri, the remote is called Siri Remote. Elsewhere, it’s called Apple TV Remote. Siri works on either remote as long as you’re in a country or region that supports Siri.
Источник
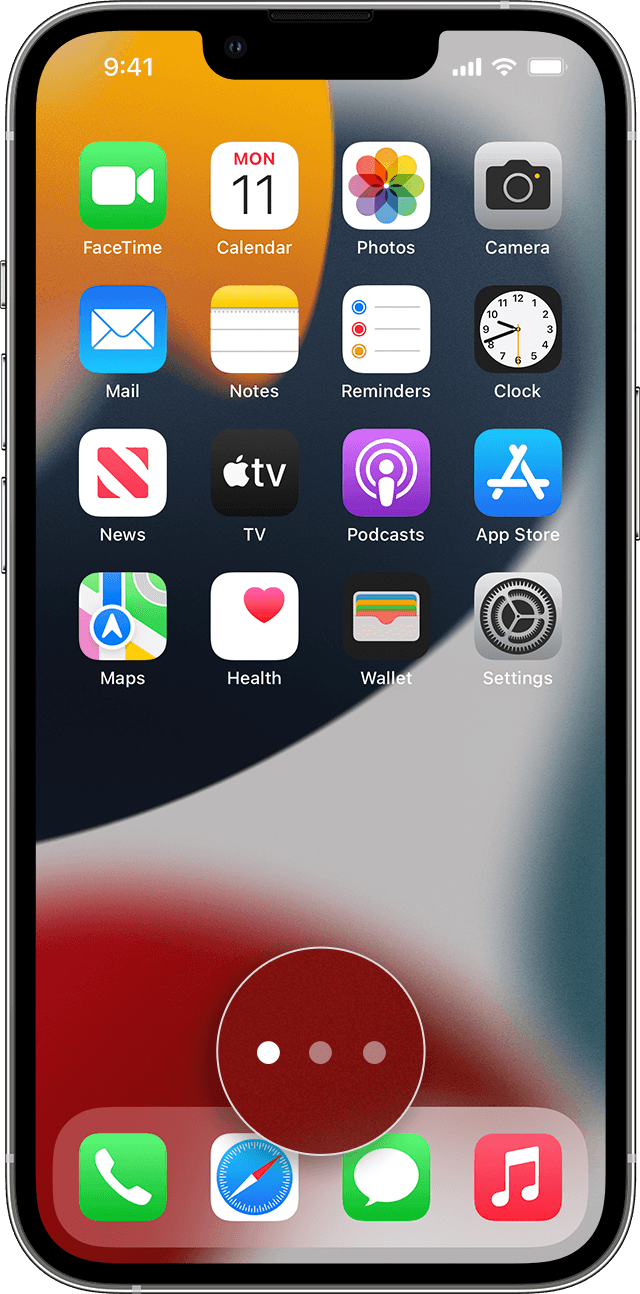
Move apps and create folders on your iPhone, iPad, or iPod touch
You can organize the apps on your Home Screen, put them in folders, and move them to other pages, or screens. You can also reorder your pages.
How to organize your apps
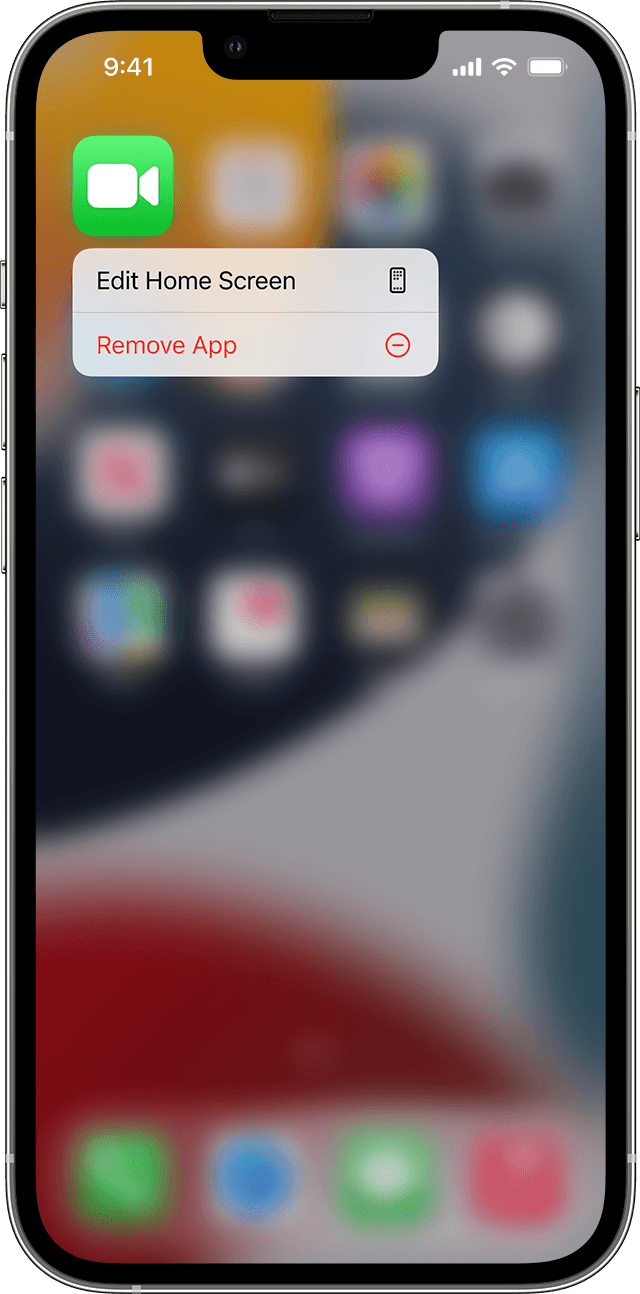
- Touch and hold any app on the screen, then tap Edit Home Screen .
- Drag the app to another spot, like the Dock at the bottom of the screen.
- On iPhone X and later, tap Done to save. On iPhone 8 and earlier, press the Home button.
How to put apps in a folder
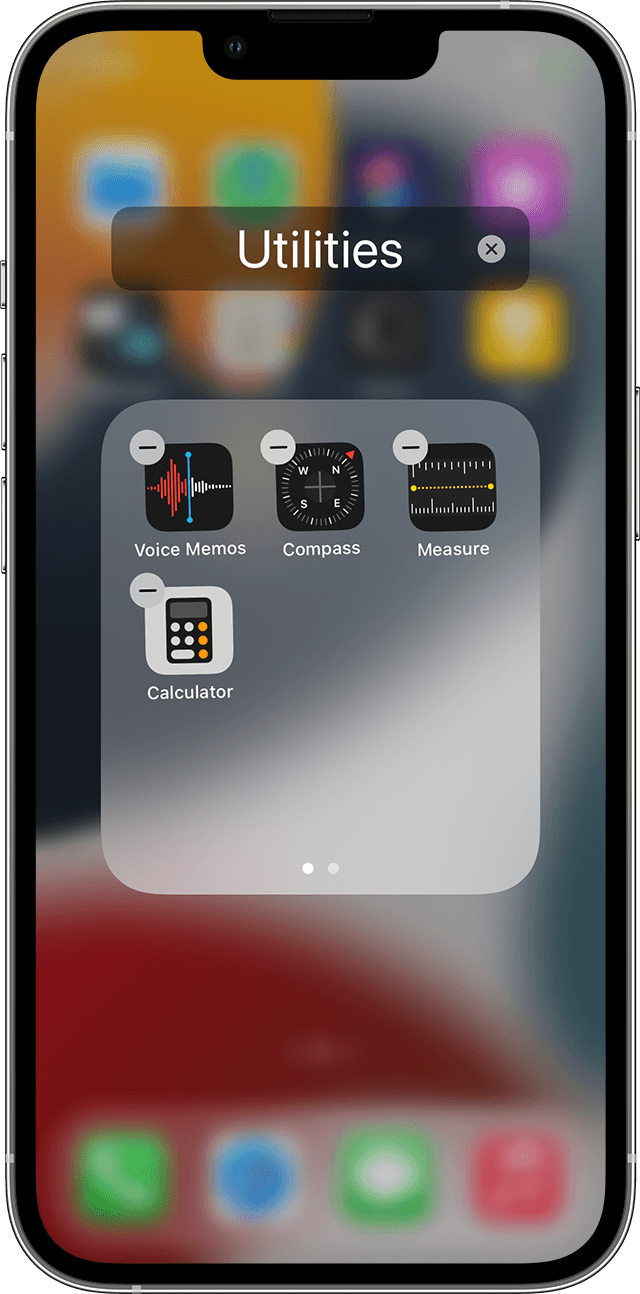
If you have a lot of apps, you can put your related apps in folders. Here’s how:
- To make a folder, drag an app onto another app.
- To rename the folder, tap the name field or the Close button , then enter the new name.
- Drag apps into the folder. Folders can have more than one page.
How to move an app to a different page
You start with one page of apps. To make a new page, touch and hold an app until the apps jiggle, then drag an app to the right edge of the screen. You might need to wait a second for the new page to appear. To delete a page, consolidate all of your apps to another Home Screen. When there are no apps present the page will delete.
When you have more than one page, a bright dot in a row of dots above the Dock shows you which page you’re on. You can move an app to a different page and create new pages:

If there are dots to the left or right of the bright dot, you can drag an app to the right side of the screen to move the app to the next page in that direction. Or swipe left to see the apps on that page.

If there are no dots to the right of the bright dot, dragging an app to that side of the screen makes a new page.
Источник
How to Put Music on an iPod
Load your iPod Classic, Nano, Mini, and Shuffle with music
:max_bytes(150000):strip_icc()/SamCostello-d7fcf106ec2048ccb06d1e2190b3396d.jpg)
What to Know
- iTunes: Go to the Music tab, select the Sync Music check box, choose the songs you want, then select Apply.
- Newer Macs: Your iTunes music library is located in the Music app, and you can transfer music to your iPod using the Finder.
- iPod touch: Sync music from iCloud and download music apps for iOS like Pandora, Spotify, and Apple Music.
This article explains how to put music on an iPod that doesn’t connect to the internet, including the iPod Classic, iPod Mini, iPod Nano, and iPod Shuffle.
How to Put Music on an iPod Classic, Mini, Nano, and Shuffle
Make sure you have iTunes installed on your computer and have added music to your iTunes library. You can get music by ripping songs from CDs, downloading it from the internet, and buying it at online stores like the iTunes Store, among other means.
Apple replaced iTunes for Mac in 2019 with the release of macOS Catalina. Your iTunes music library is now located in the Music app, but you transfer music to your iPod using the Finder. When you connect your iPod to the Mac, it appears in the Finder. Just drag and drop files onto the device. Windows PC users can still use iTunes for Windows.
Connect your iPod to your computer using the USB cable that came with it. You can’t use just any cable; you need one that fits Apple’s Dock Connector or Lightning port, depending on your model. If iTunes isn’t already open on your computer, it opens now. If you haven’t set up your iPod yet, iTunes walks you through the setup process.
After you go through the setup process or if your iPod has already been set up, you see the main iPod management screen. If you don’t see it, click the iPod icon in iTunes to get to this screen. The screen shows a picture of your iPod and has a set of tabs along the side or across the top, depending on the version of iTunes you have. The first tab menu is Music. Select it.
The first option in the Music tab is Sync Music. Check the box next to it. If you don’t, you won’t be able to download songs.
The options that become available are:
- Entire Music Library does what it says. It syncs all the music in your iTunes library to your iPod (space permitting).
- Sync Selected playlists, artists, and genres allows you to choose the music that goes on your iPod using those categories. Check the boxes next to the items you want to sync.
- Include music videos syncs any music videos in your iTunes library to your iPod (assuming it can play video).
For more precise control over the songs that sync to your iPod, make a playlist and sync only that playlist or uncheck songs to prevent them from being added to your iPod.
Select Apply at the bottom of the iTunes window after you change the settings and determine which songs you want to download.
This begins the process of syncing songs to your iPod. How long it takes depends on how many songs you’re downloading. When syncing is complete, you have successfully added music to your iPod.
To add other content, such as audiobooks or podcasts (if your iPod supports these), look for other tabs in iTunes, near the Music tab. Click the appropriate tabs and choose your options on those screens. Sync again, and that content is transferred to your iPod, too.
Some older versions of iTunes allowed you to sync music to MP3 players that were made by companies other than Apple. Learn about all the non-Apple MP3 players that were compatible with iTunes.
How to Put Music on an iPhone or iPod Touch
The early iPods were all limited to syncing with iTunes, but that’s not the case with the iPhone and iPod touch. Because those devices can connect to the internet and can run apps, they have many more options for adding music.
:max_bytes(150000):strip_icc()/GettyImages-106452140-5a3d2a35beba33003788b070.jpg)
iPods Sync With iTunes, Not iCloud
The iPod Classic, iPod Mini, iPod Nano, and iPod Shuffle don’t have an internet connection of their own. When you want to put media on them, you use the iTunes program on your desktop or laptop computer to download songs to the iPod, using a process called syncing, not iCloud. These iPods don’t support streaming music services like Spotify or Apple Music.
When you connect your iPod to a computer running iTunes, you can add almost any music and—depending on the model you have—other content such as video, podcasts, photos, and audiobooks that’s on that computer to the iPod.
Источник
Add, use, and share boarding passes, tickets, and other passes in Apple Wallet
With the Wallet app, you can add and use resort passes, boarding passes, movie tickets, coupons, rewards cards, and more. You can also share some passes and tickets.
How to add a boarding pass, ticket, or other pass to Apple Wallet on your iPhone
- Open the app, email, notification, or other communication that contains your boarding pass, ticket, or other pass.
- Tap Add to Apple Wallet.
- Follow the instructions on the screen.
- If necessary, tap Add in the upper right corner.
If you don’t see an option to add your boarding pass, ticket, or other pass to the Wallet app, contact the merchant or company that issued it to make sure they support passes in the Wallet app.
When you add a boarding pass, ticket, or other pass to the Wallet app on your iPhone, you automatically add it to the Wallet app on your paired Apple Watch.

Use a boarding pass, ticket, or other pass in Apple Wallet
When you add a boarding pass, ticket, or other pass to the Wallet app, you can use it with your iPhone or Apple Watch.
How to use a boarding pass, ticket, or other pass on your iPhone
- To open the boarding pass, ticket or other pass:
- If your iPhone has Face ID, double-click the side button. Authenticate with Face ID or enter your passcode.
- If your iPhone has Touch ID, rest your finger on the Touch ID sensor.
- Tap your default payment card to see your other cards.
- Tap your boarding pass, ticket, or other pass and authenticate.
- Scan or tap your device at the contactless reader, or present it to the attendant.
How to use a boarding pass, ticket, or other pass on your Apple Watch
- Double-click the side button.
- Scroll down to find the boarding pass, ticket, or other pass that you want to use and tap it.
- Hold your Apple Watch display near the contactless reader.
You might need to unlock your device to show your pass or ticket before scanning or tapping it.
How to share a pass or ticket in Apple Wallet
You can share some passes and tickets in the Wallet app with other iPhone or Apple Watch users.
- On your iPhone, open the Wallet app.
- Tap the pass or ticket that you want to share.
- Tap the More button .
- Tap the Share icon .
If you don’t see the share icon, the merchant or company that issued the pass or ticket hasn’t enabled sharing in the Wallet app. Check their app or website to see if they provide options to share a pass or ticket.
Information about products not manufactured by Apple, or independent websites not controlled or tested by Apple, is provided without recommendation or endorsement. Apple assumes no responsibility with regard to the selection, performance, or use of third-party websites or products. Apple makes no representations regarding third-party website accuracy or reliability. Contact the vendor for additional information.
Источник


