- How to make an iPhone screen recording with and without sound
- Add Screen Recording to the iPhone Control Center
- Make your iPhone screen recording
- Make your iPhone screen recording with sound
- Record both internal and external sound
- Record internal sound only
- Use a third-party screen recorder
- Use QuickTime Player on Mac
- Wrapping it up
- How to Screen Record on iPhone
- What is Screen Recording?
- Why Would You Use Screen Recording?
- Here’s how to use Loom to record your screen on iPhone
- Effective communication that’s as mobile as you are
- Screen Recording with Loom
How to make an iPhone screen recording with and without sound
Do you need to record your iPhone screen? Maybe it’s a step-by-step how-to for work or a way to show your mom how to do something on her device. No matter why you need or want to record your iPhone screen, it’s extremely easy to do. This short tutorial shows you how to make an iPhone screen recording with and without sound.
Add Screen Recording to the iPhone Control Center
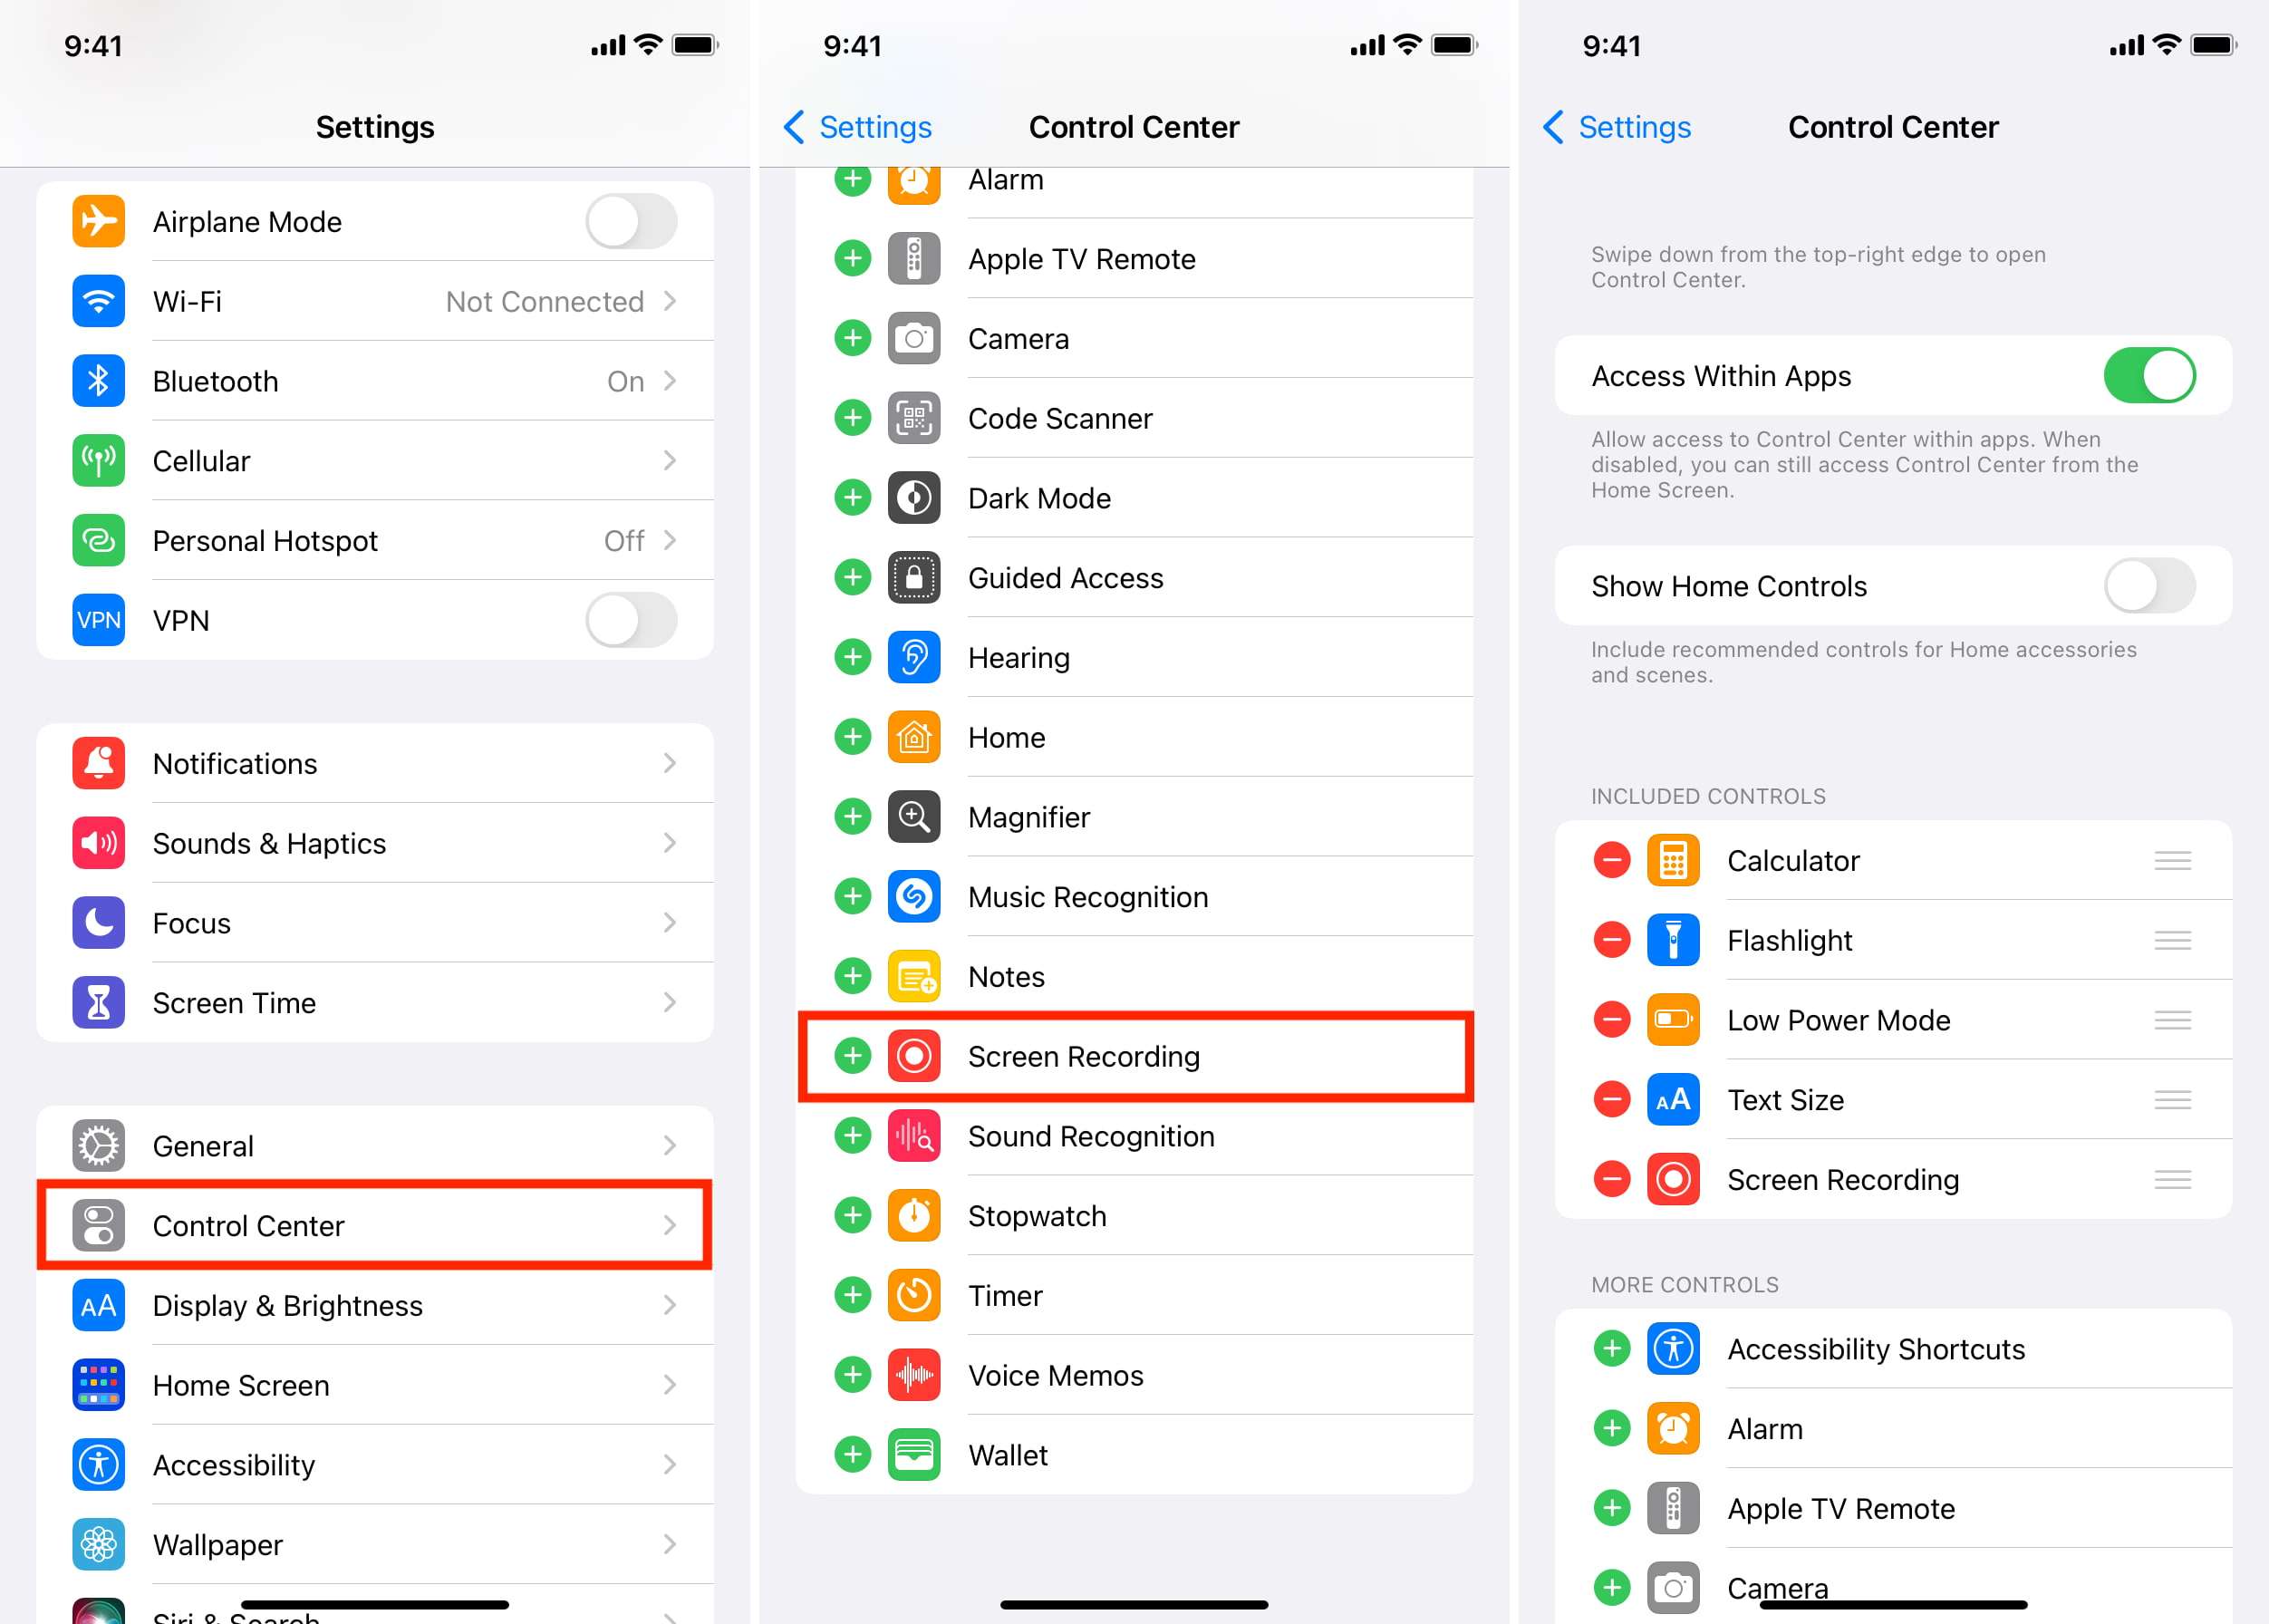
First things first, if you don’t have the Screen Recording option in your Control Center, you can add it easily. Here’s how:
1) Open Settings and tap Control Center.
2) Under More Controls, tap the green plus sign next to Screen Recording.
Now, you’ll see Screen Recording at the top under Included Controls. It’ll be at the bottom of the list, but you can drag it to move it to a new spot if you like.
Make your iPhone screen recording
When you’re ready to record your iPhone screen, follow these simple steps:
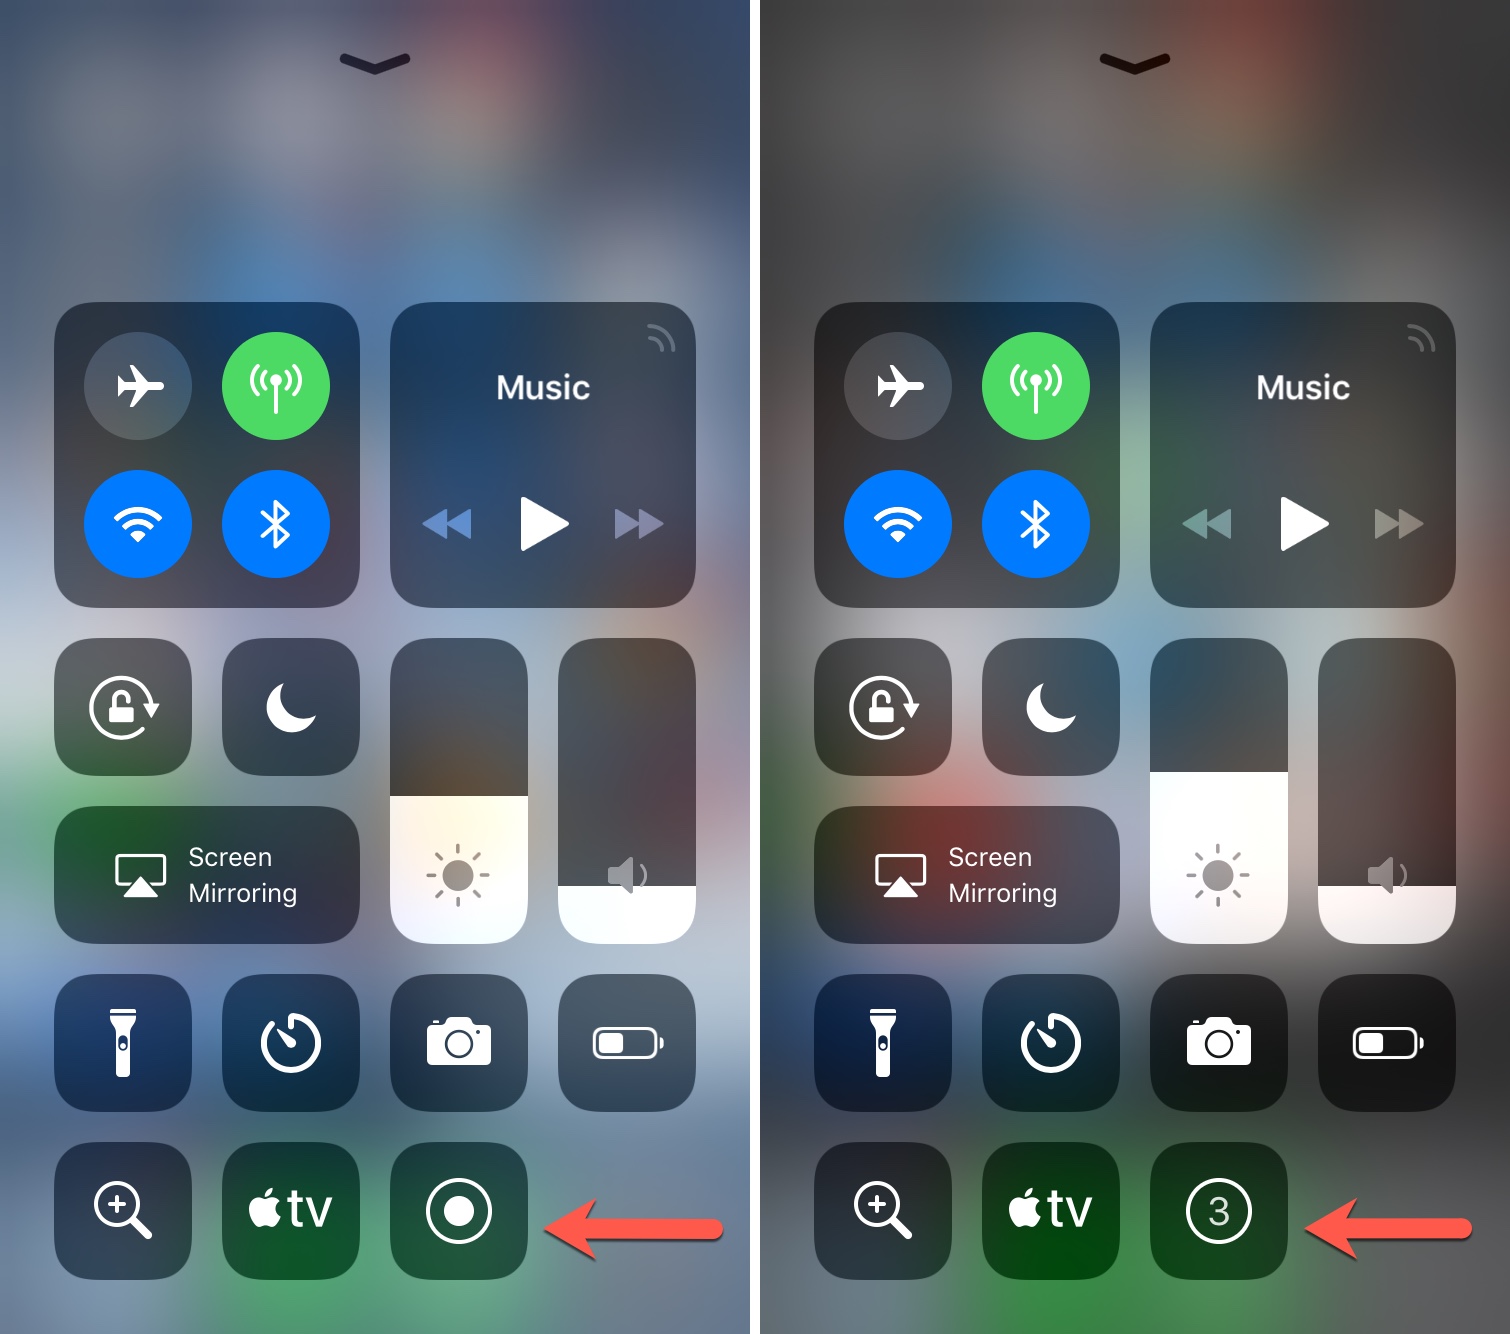
1) Open Control Center. On iPhone with Face ID, swipe down from the top-right corner of the screen. On iPhone with the front Home button, swipe up from the bottom of the screen.
2) Tap the Screen Recording button.
You’ll then see a countdown of three seconds on the button. This gives you a small window of time to navigate to what you want to record on your screen. So, do what you can to be ready ahead of time, whether it’s having an app open or moving to a different screen.
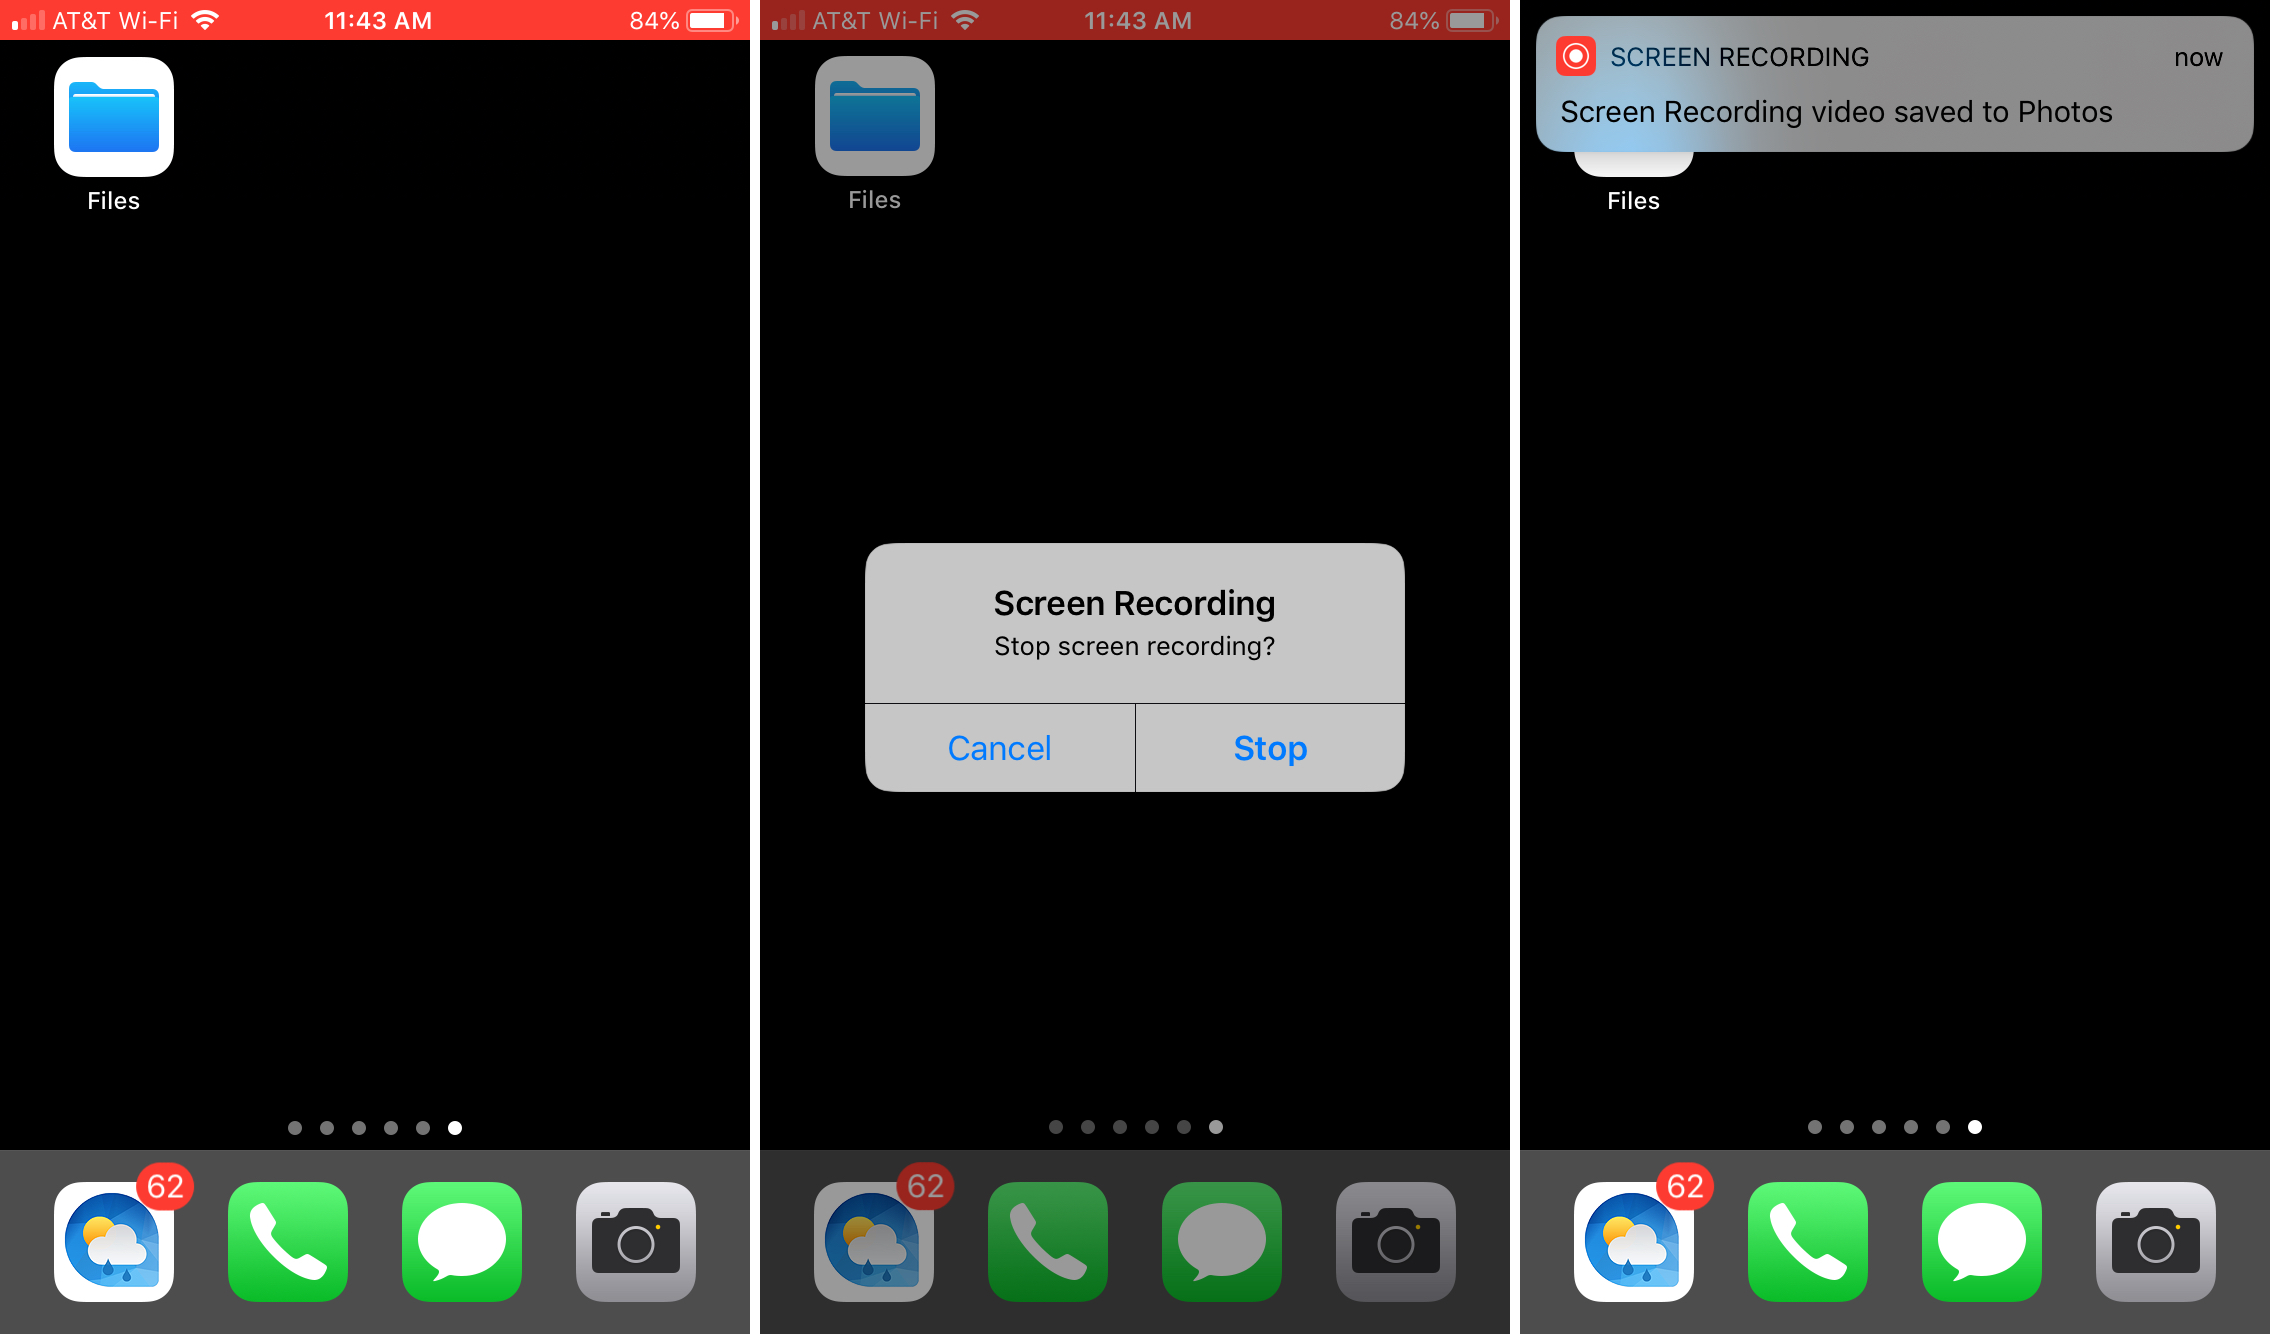
Once the recording starts, you will see a red bar across the top of your screen, letting you know that it’s recording. You can stop recording by simply tapping that red bar. You’ll then see a confirmation to end recording, so tap Stop. If you prefer to continue recording, tap Cancel.
When you do stop recording, you’ll see a brief notification that your recording is saved to Photos.
Make your iPhone screen recording with sound
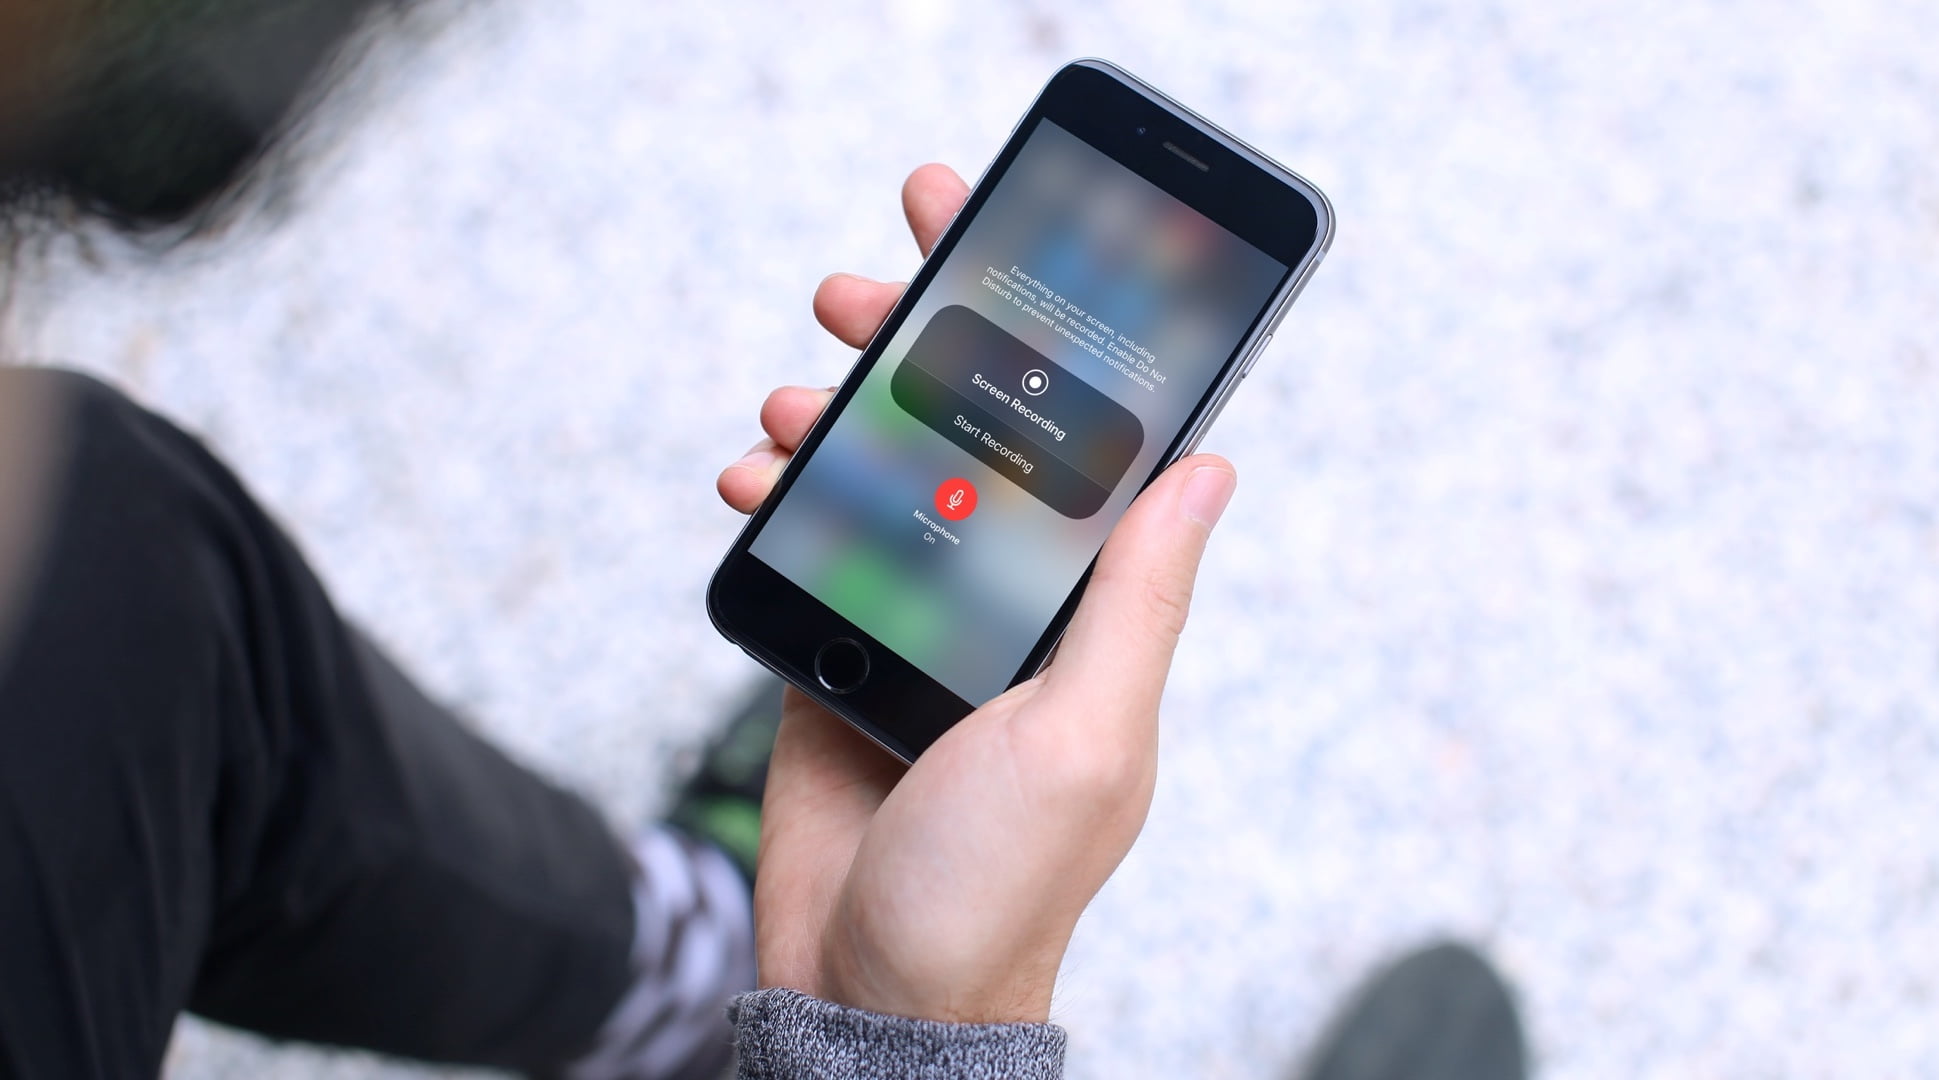
Maybe you need to make a screen recording that includes audio. This is also easy to do, and you have two options. You can record just the sound from your iPhone internal microphone or the sound from your iPhone as well as your external microphone.
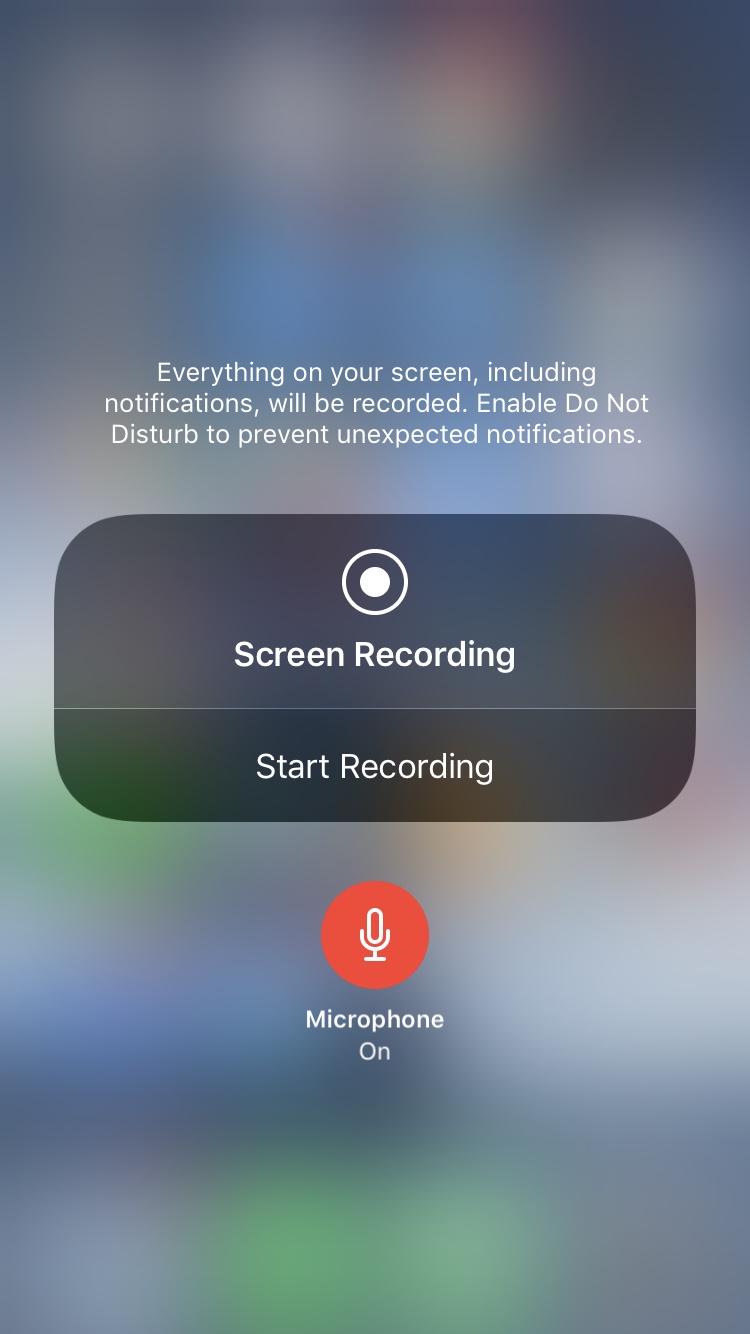
Record both internal and external sound
This is a good way to go if you are creating a recording where you want to explain what you’re doing and also bring the sounds taking place on your iPhone into the video.
1) Open the iPhone Control Center.
2) Press firmly (or tap and hold) the Screen Recording button.
3) Tap the red microphone icon to turn On the external audio.
4) Tap Start Recording.
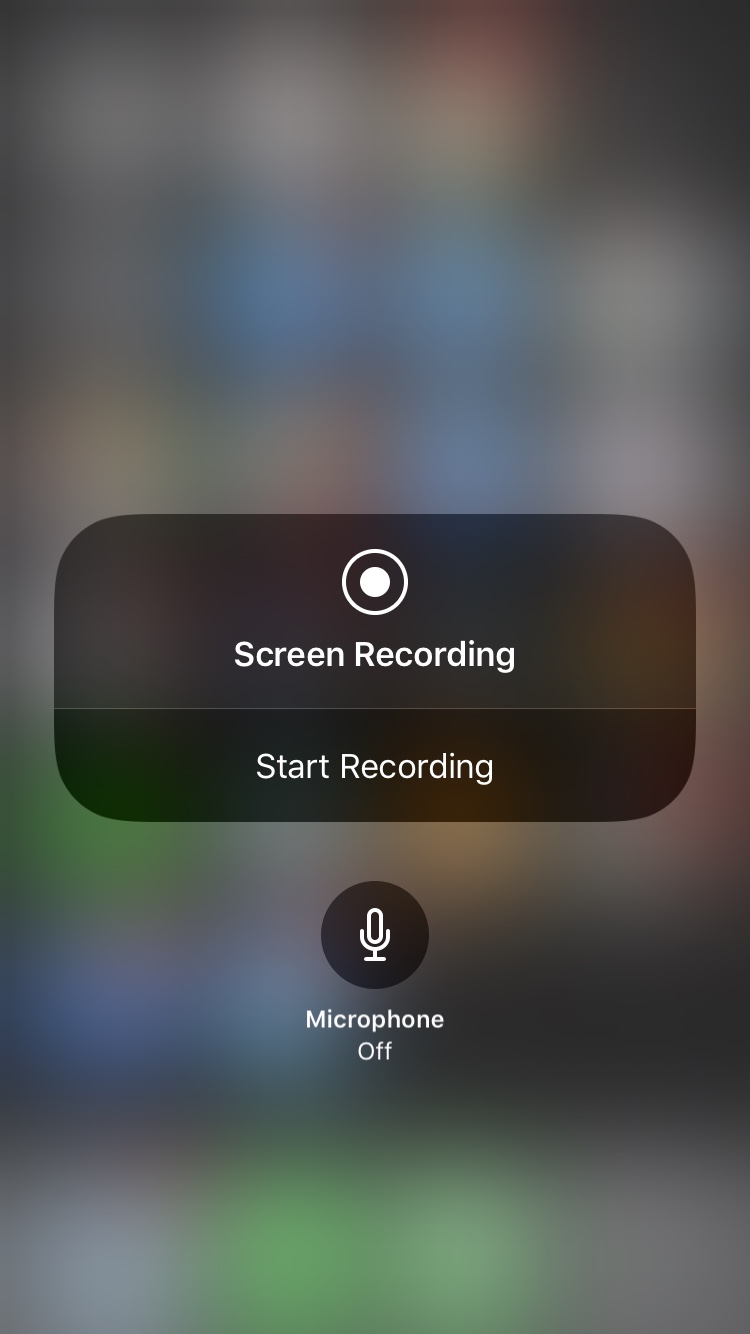
Record internal sound only
If you don’t want any outside noise in your video and just the sounds from your iPhone, then this is the option you need.
1) Slide up to access the Control Center.
2) Press firmly (or tap and hold) the Screen Recording button.
3) Tap the red microphone icon to turn Off the external audio.
4) Tap Start Recording.
Regardless of the audio option you select, you’ll still see the red bar at the top, can tap and confirm to stop, and have the video saved to your Photos.
Use a third-party screen recorder
Of course, you can search the App Store for screen recording tools and find plenty. But if you’re looking for a recommendation, check out TechSmith Capture. This is a free tool made by the creators of Snagit. So if you happened to use Snagit on your Mac, you’ll like this option.
TechSmith Capture works similar to the Screen Recording tool on your device. But we’ll walk you through the steps just the same.
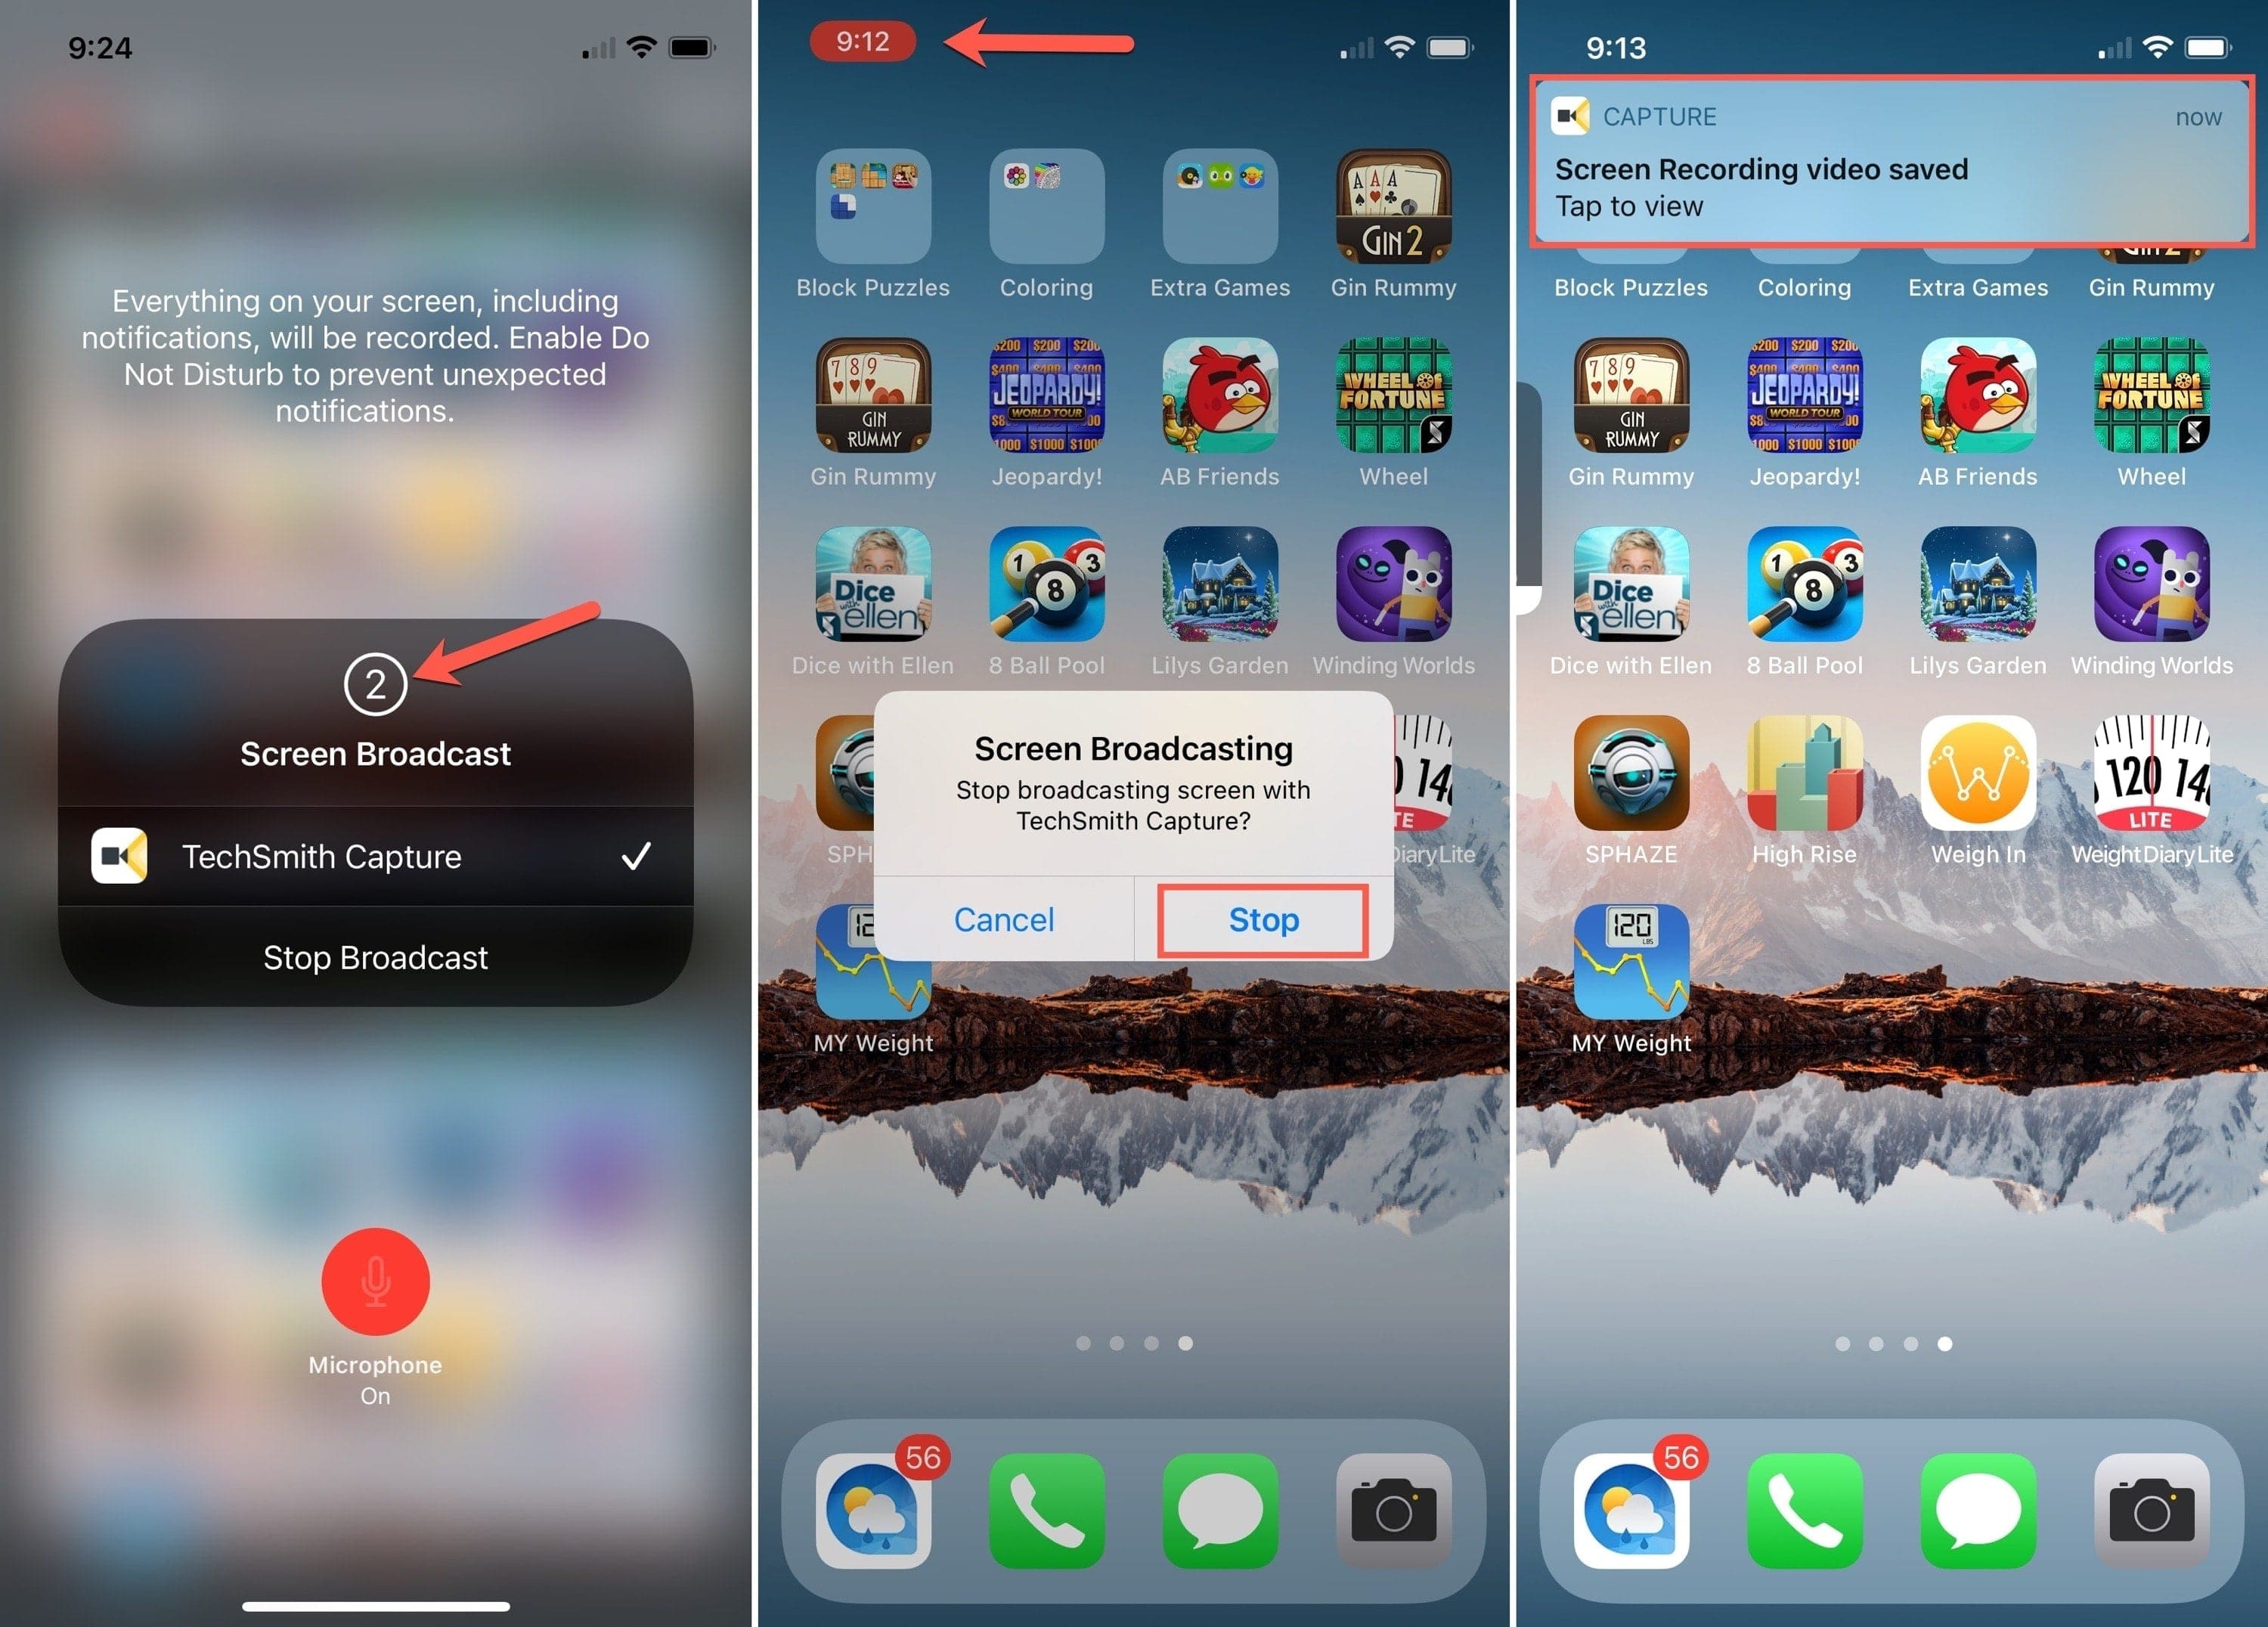
1) Once you download the app, open and tap the Record button on the top left.
2) Make sure TechSmith Capture has a checkmark and tap Start Broadcast. Optionally, you can turn the microphone on to record your device sound too.
3) You’ll see a three-second countdown above Screen Broadcast, giving you time to prepare to record. Move about your device capturing what you need to and tap the red indicator at the top when you finish.
4) Confirm that you want to Stop recording. You’ll see a message that the video was saved to the app.
When you open TechSmith Capture, you can view your recording, save it, share it via AirPlay, Facebook, Mail, or another service, or export it to companion apps like Snagit and Camtasia.
TechSmith Capture is designed for iPhone and iPad and is available for free on the App Store. If you use a different free third-party app for screen recordings that you’d like to recommend, leave us a comment below!
Use QuickTime Player on Mac
If you plan to use the video on your Mac, maybe for editing or uploading, then you can record your iPhone or iPad screen with QuickTime Player on Mac. This way, you have the video right on your computer screen.
1) Connect your iOS device to your Mac with your Lightning cable and open QuickTime Player.
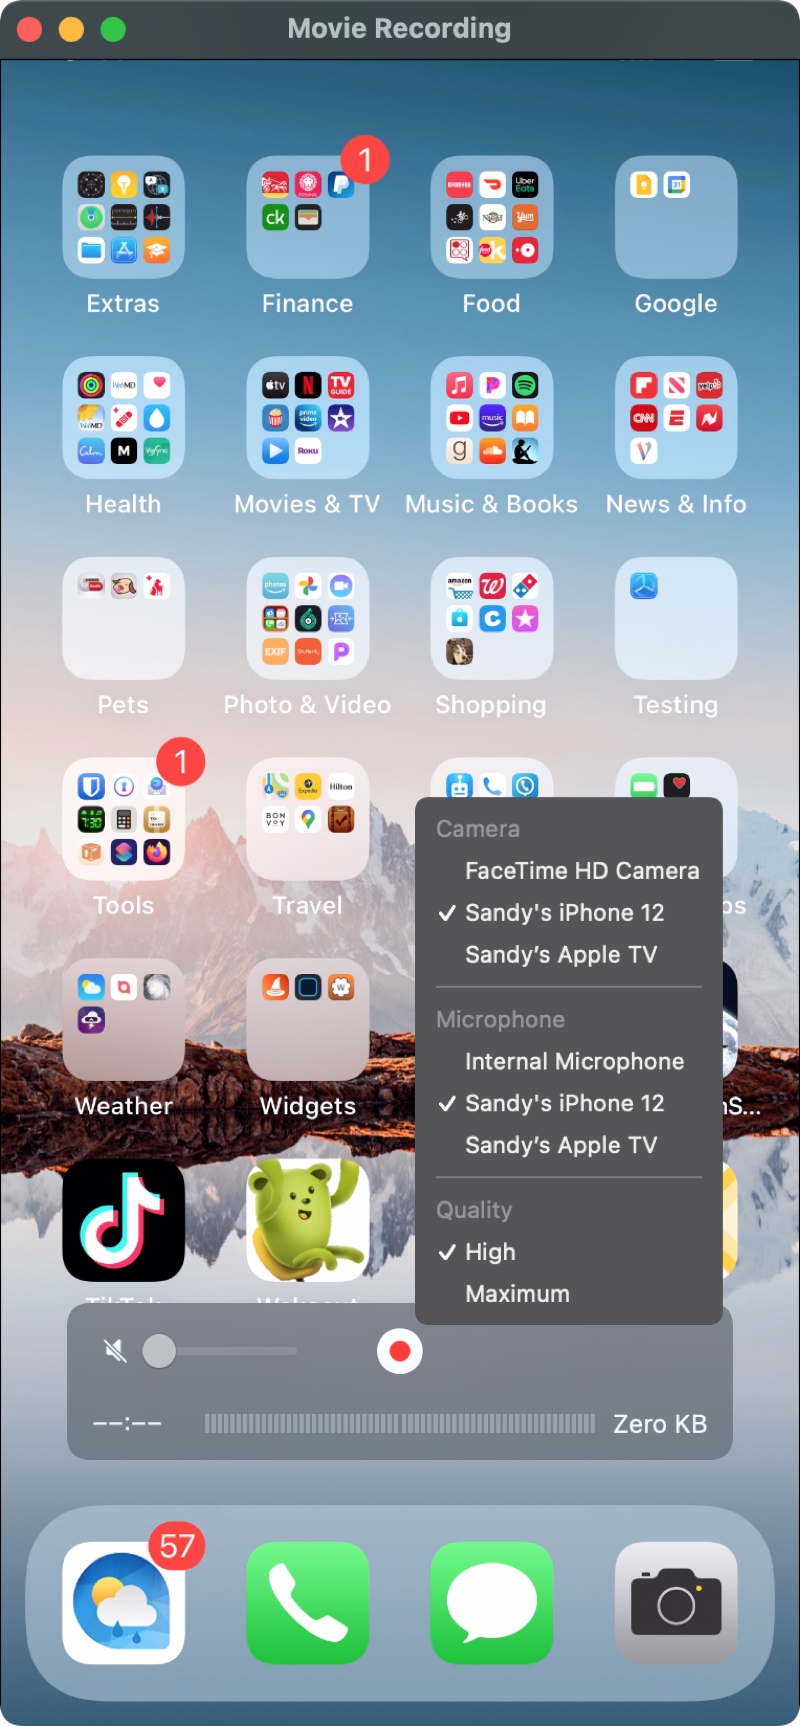
2) Click File > New Movie Recording from the menu bar.
3) In the QuickTime window, click the arrow next to the Record button. Select your iOS device for the Camera and optionally for the Microphone input too. You can also choose High or Maximum for the Quality.
4) Click the Record button and jump over to your iPhone or iPad to perform whatever actions you want to capture.
5) When you’re done recording, hit the Stop button in QuickTime.
You’ll then have your video right there in QuickTime on your Mac for editing, reviewing, saving, or uploading.
Pro Tip: You can use this method to record FaceTime calls from your iPhone or iPad.
Wrapping it up
Things just get easier all the time on our Apple devices, and the Screen Recordings feature is just another example. You can use it for articles, presentations, how-tos, and so much more. When you want to record your iPhone or iPad screen, you have these three easy ways to do it. Use whichever is most convenient or appropriate for what you want to accomplish. Which one will you use and why? Let us know!
Источник
How to Screen Record on iPhone
![]()
Now more than ever, people are relying on video communication to record what’s on their screens to document and share information at work. But when it comes to your iPhone screen, there are times when you may want a more efficient or powerful option for your video message than the screen recording tool Apple pre-installs on your phone.
Since work happens everywhere you are, with the Loom app for iPhone you can easily screen record –– as well as watch and send videos from Loom –– directly from the app. The Loom for iOS app makes everything you know and love about Loom available wherever your work day takes you. Here’s a quick tutorial.
What is Screen Recording?
It’s well-known that the iPhone has one of the best cameras in the world. However, figuring out how to screen record on iPhone 11 and up isn’t immediately obvious. Take advantage of screen record on iPhones and send a powerful message. Learning how to add screen record to iPhones and shooting on the go allows you to stay connected at all times. Even in the post-pandemic world, you can now record a screen on iPhones to make remote working simpler and more convenient at the click of a button.
Why Would You Use Screen Recording?
So, why is knowing how to add screen record on iPhones so important? Here are some of the reasons why learning how to video your iPhone screen can transform the way you do things.
Send a Message – Need to fire off a message quickly but you’re away from your computer? The screen recorder for iPhone is free and the easiest way to do it.
Shoot a Tutorial – Show a trainee how to do something on the go and always stay in contact when they need help.
Show Off Your Portfolio – Impress a prospective client by showing off your portfolio with ease by knowing how to get a screen record on iPhone.
Stay Connected – With the screen record on iPhone feature, you can stay connected wherever you are and whatever you’re doing. Never go off the grid again.
As you can see, there are so many reasons why knowing how to screen record on iPhones can be a useful tool to have in your arsenal.
Here’s how to use Loom to record your screen on iPhone
There are two ways to record your screen with Loom on your iPhone.
This Loom video shows a step-by-step process for two ways that you can take to set and to make Loom the default screen recorder on your phone.
1. Record your screen with Loom from the Control Center
The quickest way to start a screen recording with Loom is from the Screen Recorder in the Control Center on your phone.
First, download Loom for iOS on your phone. Then, go to your iOS Control Center by swiping down from the top-right edge of your screen. Once there, press and hold the Screen Recording icon. Options for how to record your screen will appear. Select Loom. If the Screen Recording tool is not available in your Control Center, go to Settings > Control Center > Customize Controls, then tap “+” next to Screen Recording.

This screenshot shows how to select Loom as your screen recorder from your iPhone’s Control Center.
To start recording, press “Start Broadcast” (the record button). Don’t worry, there’s a three-second countdown to exit out of that screen and open the content you want to record.
Pro tip: Confirm your screen is recording by looking for the red record button (or red status bar across the top, depending on the model of iPhone you have) at the top-left of your phone screen.
To stop recording, simply press the red screen recording button and then tap, “Stop Broadcast.” From there, tap the push notification to finish uploading and to edit and share your video.
2. Start a screen recording from the Loom for iOS app
The second screen recording option is from the Loom for iOS app. Here’s how:
1. Open the Loom app and select Screen from the bottom bar.
2. Click Record Screen. Make sure your microphone is enabled to record audio and tap the microphone.
Pro tip: Turn on Do Not Disturb in your iOS menu to help avoid unwanted disruptions.
3. Tap Start Broadcast to start your screen recording. The red bar at the top of your screen indicates that you’re recording.
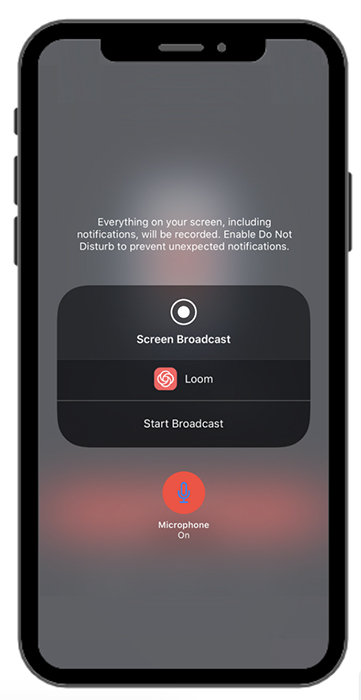
This screenshot shows how to start your screen recording from the Loom for iOS app by pressing Start Broadcast.
Pro tip: The Loom for iOS app will automatically capture microphone audio. If you don’t want to include sound in your screen recording, press the microphone icon on and off (the icon will turn red when on).
4. To end your recording, tap the red status bar at the top of your screen. You’ll be prompted to confirm that you want to stop recording.
5. From here, your video will process to your My Videos page. Open your Videos tab to see it.
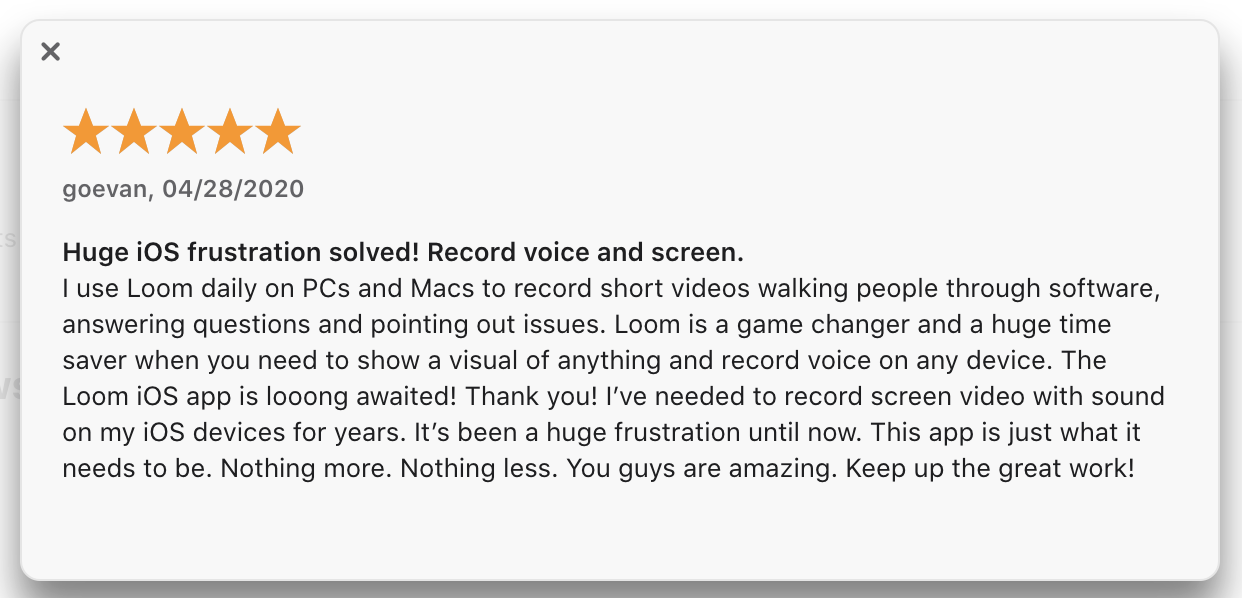
A review from a user about how they use the Loom iOS mobile app to record their screen with sound for pointing out issues or to walk through software.
Once you finish recording your video message, Loom uploads your video and you can instantly share it via a link or through any of your favorite apps: GitHub, Slack, Gmail, Notion, to name a few. Your video won’t take up any of your phone’s memory space and you wont need to manually upload the video every time you want to share it. Just go to your videos in the Loom app, send the link, and you’re done!
Effective communication that’s as mobile as you are
Your day is planned out, your to-do list formidable; suddenly, life has other plans for you.

In this screenshot, Brooks, Brand Strategy Lead at Loom, shares in a Slack message that he’ll be working on the go from his phone due to car troubles.
Whether you need to stay in the loop while on-the-go or want to document bugs to share with your team. Loom for iOS helps you get your message across wherever you are.
Some other examples of how you can use Loom to stay current on projects or contribute to them is to review and give feedback on assignments, record questions about an assignment, or to introduce yourself to a customer or a new colleague.
Staying connected when working remotely doesn’t mean lugging your entire work set up with you. With the right communication tools, you can work from anywhere.
Screen Recording with Loom
With screen video capture for iPhone, juggling work and personal lives has never been simpler. Loom is a free app that unifies everything from your iPhone to your desktop computer. Work with the top talent in your industry around the world and use screen record on iPhone to take your business forward today.
Источник


