- Как получить Root-права на Samsung Galaxy Note?
- Root права на Samsung через кастомное recovery (рекавери)
- How to Root Samsung GALAXY Note 2 with KingoRoot Android
- Root your GALAXY Note 2 without PC by KingoRoot APK
- Root your Samsung GALAXY Note 2 using KingoRoot Android (Windows)
- ROOT Succeeded!
- KingoRoot on Windows
- KingoRoot for Android
- How to Root Samsung Galaxy Note 9
- Root Galaxy Note 9 in TWRP
- Requirements
- How to Root Samsung Galaxy Note 5 running Android 7/6 or Nougat
- Root Galaxy Note 5 using CF-Root and Odin
- Recover Lost Data on a Samsung Galaxy Note 5
- Extra Tip: Unroot the Samsung Galaxy Note 5 by Flashing Stock Firmware
Как получить Root-права на Samsung Galaxy Note?


Вообще, существует два наиболее распространенных способа получения прав root-пользователя для этого устройства. Второй способ предпочтительнее, ибо после него следов манипуляции не остается — счетчик прошивок девственно чист, и ни в одном сервисе не догадаются о том, что кто-то стал суперпользователем этого девайса. Чтобы им воспользоваться, нужна SD-карта памяти.
И традиционное предупреждение: то, что вы намерены сделать со своим смартфоном — а именно, получить права root-пользователя, изменив прошивку устройства — вы делаете под свою ответственность.
Способ №1
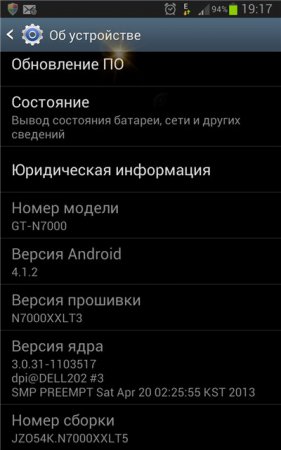
1. Воспользовавшись ссылкой , выберите отсюда соответствующий номеру сборки вашего смартфона файл и скачайте его (проверить версию устройства можно в меню Настройки → О телефоне). Например, для Note JZ054K.N7000XXLT5 нужно скачать файл PhilZ-cwm6-XXLT5-OXX-5.03.0.tar.md5. Zip–архив нужно распаковать.
2. Скачайте программу Odin 3.04 , распакуйте и запустите.
3. Выключите смартфон и перезагрузите его в режиме Download. Для этого после вибрации, сигнализирующей о выключении устройства, необходимо нажать кнопки «Включение», «Home» и «Убавить громкость».
4. Посредством USB-кабеля подключите смартфон к компьютеру, дождитесь опознания устройства системой Windows (слева в верхней части экрана появится голубое окошко).
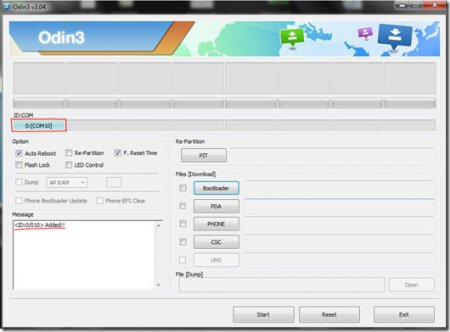
5. Кликнув на PDA в программе Odin, выберите скачанный в ходе выполнения первого шага файл. Параметры программы не меняйте.
6. Чтобы перезагрузить Galaxy Note, нажмите Start.
7. Цель достигнута — у вас есть root-права на смартфон.
Способ №2
1. Вставьте приготовленную SD-карту памяти в смартфон Galaxy Note.
2. С предлагаемого здесь сайта скачайте соответствующий номеру сборки смартфона файл с разрешением Zip (пример выбора нужного файла: для Note JZ054K.N7000XXLT5 это PhilZ-cwm6-XXLT5-OXX-5.03.0-signed.zip).
3. Посредством USB-кабеля подключите смартфон к компьютеру, скачанный файл скопируйте на SD-карту памяти.
4. Выбрав параметр “Безопасное отключение устройства», отсоедините от компьютера смартфон.
5. Выполните перезагрузку аппарата в режиме Recovery. Для этого сначала выключите его, а затем на 10 секунд одновременно зажмите кнопки «Включение», «Home» и «Убавить громкость».
6. Перемещаясь в этом режиме по пунктам меню с помощью регулятора громкости, отыщите позицию Update from external storage и выберите ее (подтверждение выбора производится нажатием кнопки включения).
Источник
Root права на Samsung через кастомное recovery (рекавери)
Здесь размещаете любое содержание.
Я думаю, что самый легкий и надёжный способ получить root права на Samsung, с помощью кастомного recovery CWM (ClockWorkMod) или TWRP (Team Win Recovery Project) .
Способы работают практически на всех Samsung устройствах.
1 Способ — CWM (ClockWorkMod)
- Скачиваем и копируем на внешнюю SDCardSuperSU (CWM/TWRP).
- Теперь нам нужно прошить кастомное рекавери CWM.
- После прошивки, войти в него. (Как войти в меню recovery)
- Идем чётко по пунктам:
1) Install zip
2) Choose zip
3) SuperSU.zip
4) Подтверждаем установку и ждем пока установится суперпользователь.
5) Reboot system now
После перезагрузки, появится программа SuperSU, она и будет отвечать за root права на вашем устройстве.
2 Способ — TWRP (Team Win Recovery Project)
- Скачиваем и копируем в память устройстваSuperSU (CWM/TWRP).
- Теперь нам нужно прошить кастомное рекавери TWRP.
- После прошивки, войти в него. (Как войти в меню recovery)
- Идем чётко по пунктам:
1) Install (Установить)
2) Выбираем из памяти устройства архив с SuperSU.zip.
3) Подтверждаем установку и ждем пока установится суперпользователь.
4) Reboot (Перезагрузка).
После перезагрузки, появится программа SuperSU, она и будет отвечать за root права на вашем устройстве.
Если по какой-то причине, телефон/планшет не влючается, попробуйте его перепрошить.
Вот и всё, на этом процесс получения root прав завершён, как вы уже, наверное, успели заметить, в этом нет ничего сложного.
Источник
How to Root Samsung GALAXY Note 2 with KingoRoot Android
GALAXY Note 2 is quite a star model of Samsung and it is one of the most popular Android device this year. To experience a wonderful Android device, you must get the highest permission first. How are you gonna do that? KingoRoot will guide your through step by step.
Root your GALAXY Note 2 without PC by KingoRoot APK
Please try KingoRoot Apk first. Your device may rooted without computer by using this app.
- Check «Unknown sources» from Security in Settings.
Settings > Security > Unknown Sources
Root your Samsung GALAXY Note 2 using KingoRoot Android (Windows)
- Download KingoRoot and install it on your Windows.
- Make sure your device is powered ON.
- At least 50% battery level.
- USB Cable (the original one recommended).
- Enable USB Debugging on your device.
Start rooting process
- First, double-click the desktop icon to launch Android ROOT.
Below is what you are gonna see after you launch it.
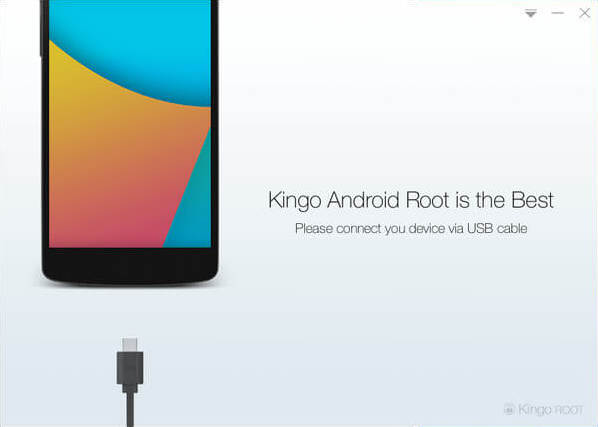
Next, connect your Note 2 to computer via USB cable.
As you can see, there are instructions that you could follow. It may take a little longer if this is the first time you connect your device to computer. Driver software installation should be done automatically.

Then, enable USB debugging mode on your GALAXY Note II.
If you have already done this, skip this step and move on. If not, please follow the instructions as shown on the software interface according to your Android version.
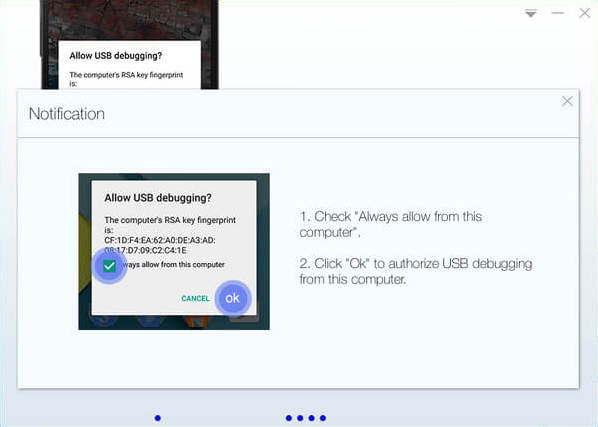
Read the notifications carefully before proceeding.
Rooting has its advantages for sure, however, it may also lead to certain consequences. So before jumping into this, please be sure you know what you are doing.
Click ROOT to start the process when you are ready.
It will take 3 to 5 minutes to complete the process. Once you started, do not move, touch, unplug USB cable, or perform any operation on your device anyhow!

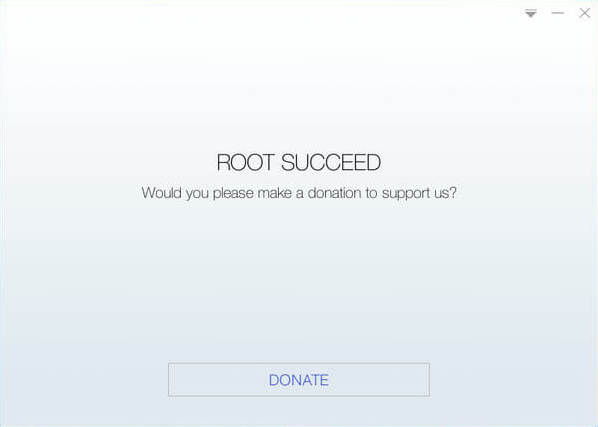
ROOT Succeeded!
Your device is now successfully rooted. Check your device and find out SuperUser icon, which is the mark of a successful ROOT.
One more thing, you could remove root from your GALAXY Note 2 with Android ROOT by one-click. Click to see how to remove root from Android.
KingoRoot on Windows
KingoRoot Android on Windows has the highest success rate. It supports almost any Android device and version.

KingoRoot for Android
KingoRoot for Android is the most convenient and powerful apk root tool. Root any Android device and version without connecting to PC.
Источник
How to Root Samsung Galaxy Note 9
The Samsung Galaxy Note 9 had a TWRP root method made available a couple months ago, but we held back on posting a guide until several issues were worked out. Most notably, Samsung introduced remote OEM Unlock control with the Galaxy 8. This causes the Galaxy 8 and Galaxy 9 to boot with a binary error and force the user to flash stock firmware in the event a custom recovery was detected (such as TWRP).
Thankfully, the issues have been sort of worked out, and there is a method of getting around this recovery “protection”. We will therefore be posting two methods of rooting the Galaxy Note 9. One method is for rooting through TWRP, the other method is for rooting through stock recovery.
Most users should root through TWRP, because rooting through stock recovery is not advisable for users affected by the OEM patch. You will know your Galaxy Note 9 shipped with the OEM protection patch if the OEM Unlock function was unavailable until after 7 days of device usage.
Note: Before proceeding, backup all of your important files and data, as part of this guide involves wiping your data.
Root Galaxy Note 9 in TWRP
Requirements
- Enable Developer Options on your Galaxy Note 9 through Settings > About Phone > Software Information > tap Build Number 7 times.
- Go to Settings > Developers Options > enable OEM Unlock. If the OEM Unlock switch is unavailable, there is currently nothing you can do.
- Copy the N9_S9_root .zip to your external SD card.
- Download TWRP to your computer.
- Turn off your Galaxy Note 9, then hold Vol Down + Bixby while connecting it via USB to your computer. This will boot your Galaxy Note 9 into Download Mode.
- Launch Odin on your computer, and disable the “Auto Reboot” checkbox.
- Click the AP tab in Odin, and choose the TWRP .tar image. Click the Start button.
- Odin will now flash TWRP onto your Galaxy Note 9. You can now disconnect your phone from your PC.
- Hold Volume Down + Power until the screen turns off, then hold Volume Up + Bixby + Power to reboot into TWRP.
- Swipe to allow modifications when prompted by TWRP.
- In the TWRP main menu, go to Wipe > Format Data > type ‘Yes’. This will erase all data from your Galaxy Note 9.
- Once it is finished, choose “Reboot > Recovery”, and your Galaxy Note 9 will reboot back to TWRP.
- Now go to Install > SD Card > choose the N9_root_OEM_issue .zip file you copied earlier. Choose your desired root method, and also choose the “OEM Patch” option if you own an OEM patch affected device. If you are unsure, it is better to choose it.
- You should also choose to allow the kernel patch for OEM patched devices.
- When TWRP has flashed the .zip successfully, choose Reboot to System.
You can now check in Developer Options to see if the OEM Unlock option is available. You should also find the Magisk Manager app installed on your device, if that was your chosen root method.
Источник
How to Root Samsung Galaxy Note 5 running Android 7/6 or Nougat
by Jenefey Aaron Updated on 2020-02-27 / Update for Android Root
It is now well known that the true flexibility and power of Android OS can be experienced only if you root it. Even if you have a premium phone like Samsung Galaxy Note 5 on Android 7/6, it can be rooted to unlock features you would have never seen in the original version of the OS installed.
In the following guide, we’ll teach you how to root Galaxy Note 5 on Nougat or Android 7/6 and offer ideas on how you can get the most out of rooting your device.
Root Galaxy Note 5 using CF-Root and Odin
This is the easiest way to root your Samsung Galaxy Note 5. You need to download a Samsung flashing tool called Odin which will then flash CF-Root to root your device.

- 1. Download Odin and CF-Root on your computer and extract their archives.
- 2. Head to Menu > Settings > About phone on your device and tap on Build number for seven times. Then, head to Menu > Settings > Developer options and turn on USB debugging and OEM unlock options.
- 3. Turn off your device and turn it back on in download mode by pressing and holding down Volume Down + Home + Power buttons at the same time. Plug in your device to your PC using a USB cable.
- 4. Launch the Odin tool on your computer and click on PDA and select the CF-Root file.
- 5. Click on the Start button to start flashing CF-Root on your device.
Once the CF-Root file has been flashed on your device, your Note 5 will be rooted on Android 7/6 or Nougat. You may now unplug your device from your computer.
The above procedure should have successfully rooted your device and you can confirm the root status by downloading and installing a root checker app on your Note 5.
In case you find that the rooting caused some of the data files in your Note 5 to go missing, then you need not worry as there are apps like Samsung Data Recovery to help you out.
Recover Lost Data on a Samsung Galaxy Note 5
With the Android Data Recovery app from Tenorshare, you can recover files that have been lost due to several reasons such as rooting, or deleted files by mistake, and so on.
All you need to do is download and install Tenorshare Android Data Recovery on your computer, and then, plug-in your Android device to your computer and select an appropriate option in the tool to recover your lost files. Based on what you have selected to be scanned, the search results will appear on your screen letting you know what can be recovered.
If you have recovered files using the above app and you no longer wish to keep the rooted version on your device, you can have it removed by flashing the stock firmware on your device. Remember that flashing the firmware will remove all the data stored on your device.
Extra Tip: Unroot the Samsung Galaxy Note 5 by Flashing Stock Firmware
It’s easy to unroot Note 5 as all you need to do is download a stock firmware for your device and flash it off on your device.
- 1. Head over to the SamFirmware website and download a stock firmware for your device and extract it on your computer. Also, download the Odin tool if you don’t already have it.
- 2. Turn off your Note 5 and reboot it into the download mode by pressing and holding down Volume Down + Home + Power buttons together. Connect your phone to your PC using a USB cable.
- 3. Open the Odin tool, click on PDA, and select the stock firmware file to be flashed on your device.
- 4. Hit Start in the Odin and it’ll begin flashing stock firmware on your device.
Once the firmware’s been flashed, your device should reboot and your root-access will be removed.
We hope the above guide made it easy for you to root the Galaxy Note 5 on Android 7/6 or Nougat and let you enjoy many exciting features. Also, there is no space for concern in data loss as we have covered the handy Android Data Recovery tool to aid you in such a scenario. Last but not the least, if you don’t want the root, then simply unroot it as we have mentioned above.


Updated on 2020-02-27 / Update for Android Root
Источник


