- How to save photos to SD card on your Android phone
- Shortcuts:
- How to save photos to SD card on Android 11
- How to save photos to SD card on Oreo, Pie, or Android 10
- How to save photos to SD card on Android Nougat
- How to save photos to SD card on Android Marshmallow
- How to save photos to SD card on Android 5.0 Lollipop
- How to save photos to SD card on Android 4.4 KitKat
- How to save photos to SD card on Samsung devices
- How to save photos to SD card on old Samsung devices
- Save, share, and export photos with Lightroom for mobile (Android)
- Save to device
- Share an Album
- Create a shared album and invite others to contribute
- View or contribute to a shared album as an invitee
- Add likes or comments to shared photos
- Leave a shared album
- Add a text watermark
- Add a graphical watermark
- Message or mail photos
How to save photos to SD card on your Android phone

Did you know that you can save the photos you take with your Android phone directly to the SD card? Whether you’re rocking an old-school Galaxy S3, or a (relatively) new Galaxy S10, you can save storage space on the phone by pushing your shots straight to the SD card. Some versions of Android and certain Android skins don’t officially let you do this, but it’s still possible. Read on to find out how.
The process for most phones is fairly similar, so it can be applied to almost any Android phone with a MicroSD card slot. While the steps may differ a bit from phone to phone, or between Android versions, you’ll usually find your way if you dig around a bit.
Shortcuts:
How to save photos to SD card on Android 11
Phones running a stock version of Android 11 may suffer from the lack of an option to save photos to microSD cards. That being said, it is always a good option to check your camera settings before you start looking for solutions.
This is because, on some phones running stock Android, the option to save photos to the SD card may not show up unless you insert an SD card in the first place. It is, therefore, always a good idea to insert the card and then check for the option within the camera settings.
Here’s how we saved the default storage space to an SD card on a phone running MIUI 12 based on Android 11.
- Open the ‘Camera’ app.
- Tap the three lines to open camera options.
- Tap ‘Settings’.
- Make sure the ‘Save to SD card’ option is selected.
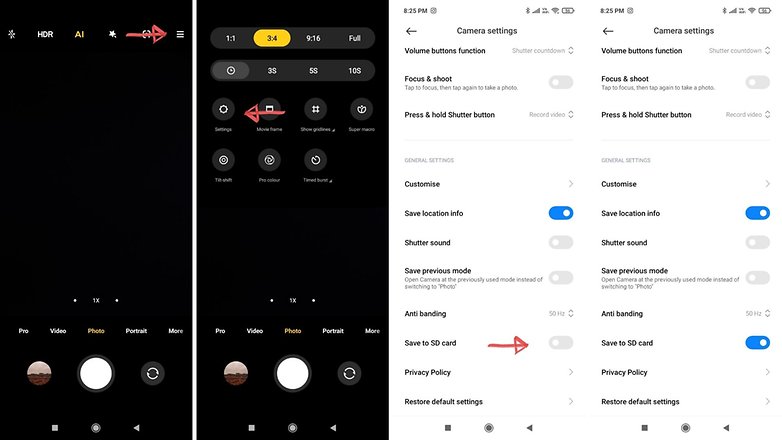 Here’s how to save photos to SD card on Android 11 / © NextPit
In case you still do not see the option to save to SD card, you might want to explore the options given below.
How to save photos to SD card on Oreo, Pie, or Android 10
Google is not a fan of microSD cards and so the default Android camera app won’t let you save to SD card on Android phones running Android Oreo, Android Pie, or Android 10. But there are workarounds for this. While it is possible to set a microSD card as internal storage, it’s easier just to download a camera app that will let you save to microSD by default. One of the apps we recommend is the one called CameraMX.
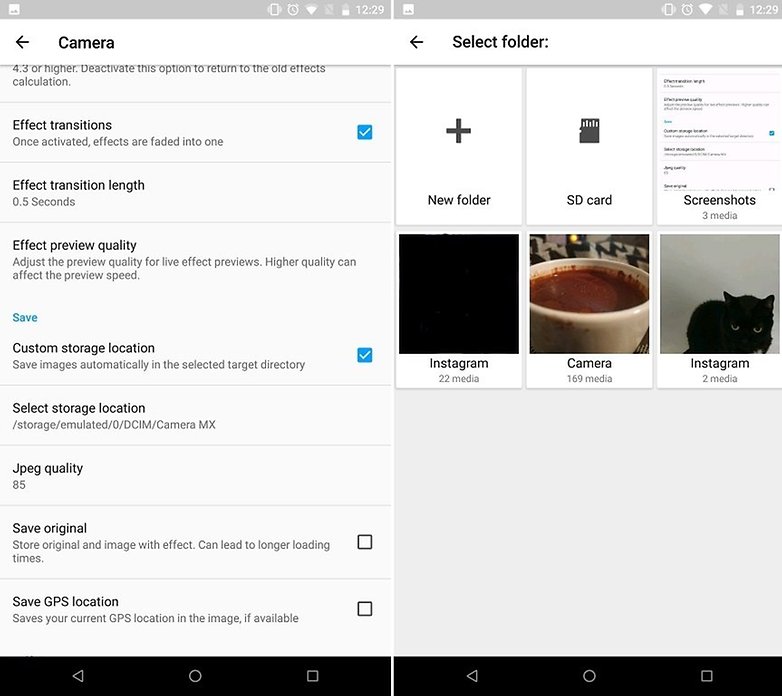 It’s just a matter of having the right camera app. / © NextPit
Just open the app, open the settings with the gear icon, check Custom storage location and choose your SD card.
How to save photos to SD card on Android Nougat
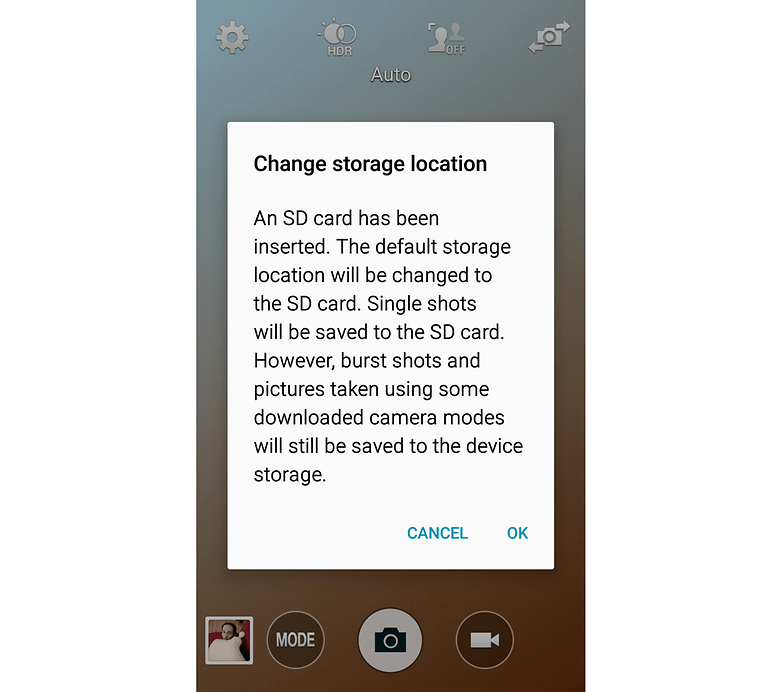
Phones with Android Nougat already can save photos directly to a MicroSD card instead of the internal storage. There are two ways to enable this, and the first step for both is to insert the MicroSD card and then open the default camera app of your device.
Then, you may be presented with a prompt that offers to change your storage settings so that photos will go to the MicroSD card from now on. If you don’t see a pop-up box like the one in the left image below, don’t worry. You can also select the MicroSD card as your preferred photo storage method in your camera app’s settings menu.
In the below image on the right, you can see what the menu looks like on the LG G6. It should be similar to what you’ll find on any Nougat phone, though. Just go to the camera settings and look for storage options, then select the SD card option.
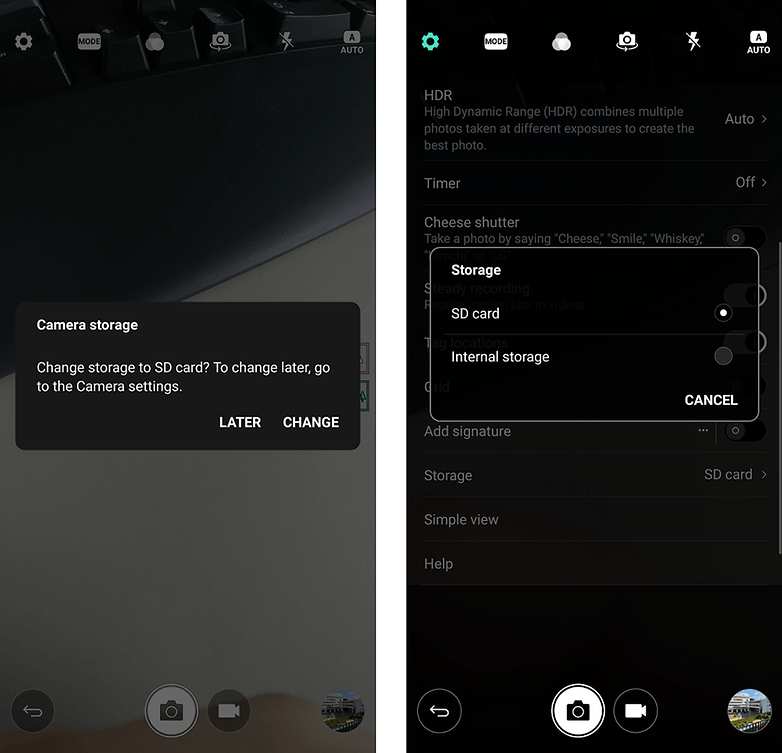 Choose to save photos to the microSD card once it’s inserted, via the prompt (left) or the storage section of the camera settings menu (right). / © NextPit
How to save photos to SD card on Android Marshmallow
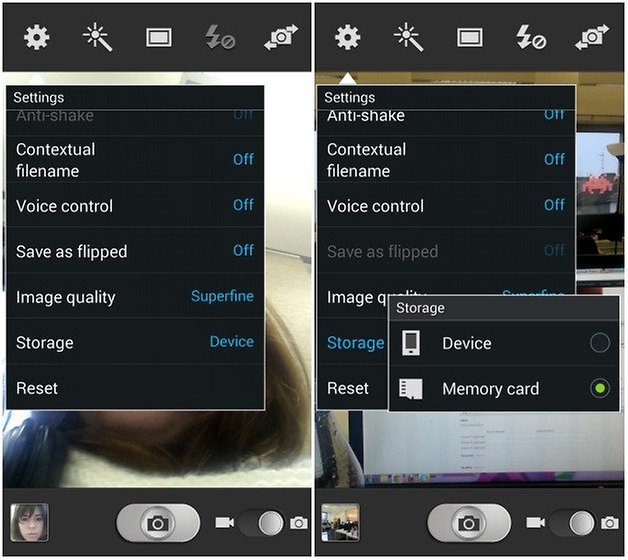
The first thing you need to store images directly in the external memory is an SD card. Insert it into your phone, open the camera application and a message will appear asking if you want to change the storage location to the SD card. The same popup occurs on most devices when opening the camera app after inserting an SD card. Agree to your phone’s request and all future pictures will be stored in the external memory card. Simple.
If by some chance this message doesn’t appear, or you have an SD card in your phone already, you need to configure it manually. To do this, you go to Settings in the camera app and scroll down to Storage. That’s where you are able to choose between Device and Memory Card.
Be aware, that on Marshmallow, you now also have the option to format an SD card as internal storage, meaning your photos will automatically be stored on it without doing any of the above. But if you do this, the card will only work on the phone you formatted it on. That means you have to connect your phone to a computer via USB if you want to manually transfer files. The card itself will not be recognized by any other devices. Read more about this here:
- Why internal storage still beats a microSD card
 Open up Settings when in the camera app and select Storage. / © NextPit
How to save photos to SD card on Android 5.0 Lollipop
Android 5.0 Lollipop changed things again, making it easier to set the save location for photos (as well as safer). Apps once again have read and write access to directories on removable storage. All you need to do is make sure your phone has a camera app with an API that makes use of the new permissions. If your stock camera won’t let you save to the SD card, you can download a different camera app. Check the settings in the app and look for a storage option.
How to save photos to SD card on Android 4.4 KitKat
Android 4.4 KitKat doesn’t like SD cards so much and images are saved in the internal memory by default with no easy way to change the save location. One simple solution is to download the MX Camera application in which you’ll find options to select the storage destination for pictures. The app is able to override KitKat’s preferences.
Simply open the application and go to Settings, then Camera and finally Custom save location.
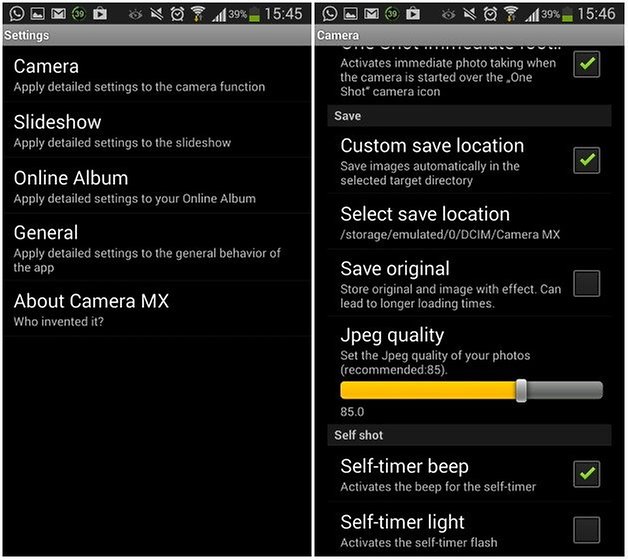 Choose Camera and then Custom save location. / © NextPit
How to save photos to SD card on Samsung devices
Samsung has gradually started retiring the SD card slot on most of its high end devices. On its lower-end models, the option still remains. Here’s how you can save photos to SD cards on newer Samsung devices running OneUI.
- Insert the SD card properly.
- Once the card is inserted, open the Settings menu and tap Device care’.
- Make sure that the SD card shows up at the bottom.
Note: If the card doesn’t show up here, you won’t be able to proceed further.
Once this is done, proceed to the second step.
- Open the Camera app and then tap the Settings icon on the top left corner.
- Scroll down and look for the Storage location option and select SD card.
How to save photos to SD card on old Samsung devices
On older Samsung phones, just insert an SD card and open the camera app. All being well, you will be presented with a window offering you the option to use the SD card as your storage option of choice.
 You should see this dialog the first time you open the camera app after inserting an SD card./ © NextPit
If you don’t happen to see this window, then you can open the Settings menu in the camera app (the gear icon) and scroll down to Storage location, press it and selected Memory card. Job done.
 Alternatively, find the option in the camera app’s settings. / © NextPit
- Best camera apps on Android
- Best photo editing apps on Android
Do you save your photos to an SD card? What do you feel are the benefits and dangers? Let us know in the comments.
Источник
Save, share, and export photos with Lightroom for mobile (Android)
Use the share option to send photos over email or share photos to web. Save your edited photos and export originals in full resolution. You can save and share your photos with a custom text watermark.
Starting from Lightroom for mobile (Android) version 5.0, you can export edited photos as JPEG, DNG, TIF, or Original. Lightroom also provides export options for JPG Quality, Output Sharpening, Color Space, and more.
To export photos, follow these steps:
Do one of the following:
- Open the image, that you want to export, in the Loupe view.
- In the Grid view, long press any photo to select it and bring up the multi-selection view. Select all the photos that you want to export.
Tap icon in the upper-right corner.

In the pop-up menu that appears, tap Export as .
In the Export dialog box, select the following options:
Select the preset option to quickly export your photo(s) as JPG (Small) , JPG (Large) , or as Original .
Choose from JPG , DNG , TIF , and Original (exports the photo as full size original).
These options are applicable for JPG and TIF file formats. You can choose from the following options:
- Largest Available Dimensions : Exports the selected photos in largest available dimension in JPG and TIF format.
- Small : Limits the length of the saved JPG and TIF photos to 2048 pixels. The breadth is scaled accordingly to maintain the original aspect ratio.
- Custom : Applies the specified pixel value to the long edge of the photo and uses the original aspect ratio of the photo to calculate the other edge. The long edge value can’t exceed 15,000 pixels.
Choose an option from 10% to 100%.
Turn on this option to include watermark text in your exported photos.

Tap More Options to access:
- Option to Include Metadata .
- Option to include Caption , Camera & Camera Raw info , and Location info along with copyright metadata.
- File Naming You can choose to name your exported photo(s) as the original name, custom name, or in ‘date-filename’ format.
- Output Sharpening Set the sharpening settings based on the medium in which you want to view the photo(s) and amount of sharpening you want.
- Color Space Choose a color space based on the intended output.

Tap  icon. The number of selected photos to be exported is displayed in the upper-left corner.
Save to device
When you are done with your edits on a photo, you can save a copy of the modified photo(.JPG format) to your device. Do one of the following:
Do one of the following:
- Open the image, that you want to export, in the Loupe view.
- In the Grid view, long press any photo to select it and bring up the multi-selection view. Select all the photos that you want to save to your mobile device.
Tap icon in the upper-right corner.
In the pop-up menu that appears, tap Save to Device .
If Camera Roll photos are set for automatic import in albums, the saved images are automatically added to the album and synced with Lightroom on desktop .
Lightroom allows you to retry saving your photos if the export process fails. Do the following if the Export dialog displays these error messages:
- No Internet connection: Ensure that your device is connected to the Internet. Switch back to Lightroom for mobile (Android) and tap Retry .
- Not enough storage to perform export: Free up some storage space in your device Gallery. Switch back to Lightroom for mobile (Android) and tap Retry .
- Lightroom does not have permissions to save photos in the Gallery: Provide permissions to Lightroom for mobile (Android) in your device settings. Switch back to Lightroom for mobile (Android) and tap Retry .
Share an Album
Create a shared album and invite others to contribute
You can now share and invite others to view, edit, or contribute to an album. You can also select photos which aren’t a part of any album, share them through an invite, and request others to contribute to the album. This way, you can easily access all your desired photos in one place.
To share and invite others to an album, follow these steps:
While in the Albums view, tap icon on any album that you want to share to bring up the options menu.
While in the Grid view, long press any photo in the grid to enter multi-select mode, select all the photos that you want to share, and tap icon to bring up the pop-up menu.
Tap Share & Invite .
Tap Get Shareable Link if the album is private.
In the Share & Invite panel specify the following options:
Tap to specify the following options:
Invite Only : The Link Access field is set to Invite only , by default. This creates a private link that only people whom you invite can access or contribute to your album.
Anyone Can View : Change the Link Access setting to Anyone Can View to allow anyone with the album’s shared link to view or contribute to the album.
Tap to enter the email addresses of the people to send the invite. You can also view the list of the email addresses you have already sent the invite to. Next to each email address, tap  to set the album access setting of that person. You can select from one of the following settings:
Can View: The invitee can only view the shared album.
Can Contribute: The invitee can add photos to the shared album.
Can Edit and Contribute: The invitee can edit photos in the shared album and add more photos. They can also export the photo in JPG, DNG, TIF, or Original format.
Remove Access: Removes the invitee from the shared album list.
Tap to specify the following link settings:
Show Metadata: Turn on to allow others to view metadata of the shared album photos.
Show Location Info: Turn on to allow others to view location info of the shared album photos.
Allow Comments and Likes: Turn on to allow others to add comments and like the shared album photos.
Allow JPG Downloads: Turn on to allow others to download the shared album photos.
Allow Access Requests: Turn on to allow other users to request access to view your shared album.
Tap to specify the following display options:
Show Title: Turn on to make the album title visible on the top of the shared album.
Show Author: Turn on to make the author name visible on the shared album.
Theme : Select Photo Grid, Column, or One-up to choose the layout of photos in a shared album. By default, Photo Grid is selected.
Appearance: Select Dark or Light to choose the background of photos displayed in a shared album. By default, Dark is selected.
Tap  to copy the link to share it with others.
- To modify the share settings of a shared album, open the shared album in the Albums panel and click Share & Invite icon in the upper-right corner.
- The settings to allow invitees to edit and contribute is introduced from Lightroom for mobile version 6.3. If multiple people are editing the same photo, you can find all the different edits in to Auto tab of the Versions panel.
View or contribute to a shared album as an invitee
If you have the shared group album link or invite by email, follow these steps to access it:
- Starting from Lightroom for mobile (Android) version 5.1, you can contribute photos using Lightroom for mobile (Android), in addition to Lightroom on the web, to any shared group album where you are invited as a contributor.
If you’re using an earlier version of Lightroom for mobile (Android), you can contribute photos to shared group albums using the Lightroom on the web link, which is sent to you in an email invite. - You can view and contribute photos to shared albums even if you haven’t subscribed to the premium features. The album owner, however needs to have a valid trial or paid subscription for premium features to invite people to shared albums.
- If a Lightroom shared album owner has sent you an email invitation, tap the View Album link in the body of the email. This directs you to Lightroom on the web where you can sign into your Adobe account and view the shared album.
- If you’ve received the URL of a Lightroom shared album from another source, sign into your Adobe account to view the shared album using the given link
In case the shared album owner has restricted your access to contribute photos, you can request access once you sign into your Adobe account. The shared album owner will be notified of your access request by email and may grant you access to contribute.
When you accept the invitation using the email, you can create or sign into any Adobe ID that you have. It does not have to be the same email address to which the invitation was sent.
Launch Lightroom for mobile (Android) and tap the icon.
Tap Shared with You to view the list of group albums that are shared with you.
If the group album owner has provided contribution access to you, you can add photos to the album. To add photos, do one of the following:
- In the list of group albums, tap the icon next to the desired album and choose Add Photos .
- Tap the desired group album and then tap the Add Photos icon in the lower-right corner of the screen.
Alternatively, select photos from All Photos or another album, tap the icon in the upper-right corner of the screen, select Add To , and then select Albums shared with you .
Once you’ve selected the photos to add, in the Add Photo dialog box, you can choose to include metadata such as keywords, star and flag ratings, and GPS coordinates. These toggle buttons are turned off by default.
- Alternatively, you can use the link in the email invite that you receive to view or contribute to a shared group album. Click the View album button in the body of the email to view the shared album on Lightroom on the web. If you have access to contribute (which is granted by the shared group album owner), click the Add Photos button to contribute photos.
- The photos you contribute to shared group albums can be deleted within 48 hours of adding them.
- Starting from the February 2020 release (version 5.2), you can export photos that were contributed by others in shared albums. Ensure that the album owner has provided download access to you to do this.
Add likes or comments to shared photos
Starting from Lightroom mobile 4.4 (August 2019 release), you can view and add likes and comments on shared photos of a group album in the Activity panel. To access this panel, open a group album, tap the ( ) icon in the upper-right corner, and select Activity . You can then view the likes or comments on the shared photos. If you want to post a like or comment on a shared photo:
Open a photo from a group album in Loupe view.
Select Activity in the drop-down menu in the upper-left corner of the screen.
Tap in the lower-left corner to like the photo.
Tap in the lower-right corner to enter a comment on the selected photo.
Leave a shared album
To leave a shared album, do the following:
While in the Albums view, tap the icon on the desired album to bring up the options menu
Tap Leave Album from the pop-up menu.
Add a text watermark
Follow these steps to add a customizable text watermark while sharing your photos.
Do one of the following:
- Open the image, that you want to export, in the Loupe view.
- In the Grid view, long press any photo to select it and bring up the multi-selection view. Select all the photos that you want to save to your mobile device.
Tap icon in the upper-right corner.
In the pop-up menu that appears, tap .

In the Export Settings , turn on the Include Watermark option.
Tap Customize . On the Customize Watermark screen, tap Text, and modify any of the following settings:
- Tap the text field to modify the watermark text as required. By default, the watermark text displays a copyright symbol followed by your Adobe account name.
- To position the watermark, tap any of the nine placement circles displayed around and at the center of the image.
- T : Tap to select a font.
- B : Tap to make the text bold.
- I : Tap to italicize the text.
- To rotate the text clockwise by 90 degrees, tap the rotate icon.
- To choose a text color (black or white), tap the desired color swatch.
- Turn on Use Drop Shadow option to apply drop shadow to your watermark text.
- Size : Move the slider control to proportionally scale the watermark text larger or smaller.
- Opacity : Move the slider control to adjust the level of transparency of the watermark text.
- Horizontal Offset : Move the slider to position the watermark text horizontally from the selected placement circle.
- Vertical Offset : Move the slider to position the watermark text vertically from the selected placement circle.
After customizing your watermark text, tap the ( Export Settings screen.
The text watermark will now be added when you share photos or export photos to your mobile device.
Add a graphical watermark
Introduced in the Lightroom for mobile version 6.0 (October 2020 release)
Add a graphical watermark to your photos by following these steps:
Do one of the following:
- Open the image, that you want to export, in the Loupe view.
- In the Grid view, long press any photo to select it and bring up the multi-selection view. Select all the photos that you want to save to your mobile device.
Tap icon in the upper-right corner.
In the pop-up menu that appears, tap .
In the Export Settings , turn on the Include Watermark option.
Tap Customize . On the Customize Watermark screen, tap Graphic , and modify any of the following settings:
- Tap the folders icon to choose a file that you want to use as a watermark.
- To position the watermark, tap any of the nine placement circles displayed around and at the center of the image.
- To rotate the watermark clockwise by 90 degrees, tap the rotate icon.
- Size: Move the slider control to proportionally scale the watermark graphic larger or smaller.
- Opacity : Move the slider control to adjust the level of transparency of the watermark graphic.
- Horizontal Offset : Move the slider to position the watermark graphic horizontally from the selected placement circle.
- Vertical Offset : Move the slider to position the watermark graphic vertically from the selected placement circle.
After customizing your watermark graphic, tap the ( Export Settings screen.
The graphic watermark will now be added when you share photos or export photos to your mobile device.
Message or mail photos
If you’re in Loupe view (viewing an individual photo), tap the Share icon ( ) at the top of the screen.
If you’re in Grid view (viewing all photos in an album), follow these steps:
- Long-press on a photo to select it. Select multiple photos, if required.
- Once you’ve selected the photos, tap the Share icon ( ) at the top of the screen.
From the pop-up menu that appears, tap Share to .
The menu that now appears displays a list of apps installed on your mobile device that you can use to share your photos.
Choose an app to share with and follow the onscreen instructions.
Источник


