- Saving Files
- This lesson teaches you to
- You should also read
- Choose Internal or External Storage
- Obtain Permissions for External Storage
- Save a File on Internal Storage
- Save a File on External Storage
- Query Free Space
- Delete a File
- How to Recover Deleted Photos on Android
- How to Recover Photos from the Cloud
- Method 1: From Google Photos
- Method 2: Recover from Microsoft OneDrive
- Method 3: Recover lost photos from Dropbox
- Method 4: Recover photos from Google Drive
- Recover Deleted Photos from an SD Card Inside Your Android Device
- Restore Deleted Images from Android Internal Storage with Data Recovery Software
- Method 1: For Mac OS X Users
- Method 2: For Windows PC 10, 8, 7 Users
- How to Recover Deleted Photos with an Android App
- Recover Deleted Photos from Android Phone Without Root
- Variant 1: Backup and Restore
- Variant 2: Restore from SD Card Directly
- Retrieve Deleted Photos on Android Tablet
Saving Files
This lesson teaches you to
You should also read
Android uses a file system that’s similar to disk-based file systems on other platforms. This lesson describes how to work with the Android file system to read and write files with the File APIs.
A File object is suited to reading or writing large amounts of data in start-to-finish order without skipping around. For example, it’s good for image files or anything exchanged over a network.
This lesson shows how to perform basic file-related tasks in your app. The lesson assumes that you are familiar with the basics of the Linux file system and the standard file input/output APIs in java.io .
Choose Internal or External Storage
All Android devices have two file storage areas: «internal» and «external» storage. These names come from the early days of Android, when most devices offered built-in non-volatile memory (internal storage), plus a removable storage medium such as a micro SD card (external storage). Some devices divide the permanent storage space into «internal» and «external» partitions, so even without a removable storage medium, there are always two storage spaces and the API behavior is the same whether the external storage is removable or not. The following lists summarize the facts about each storage space.
- It’s always available.
- Files saved here are accessible by only your app by default.
- When the user uninstalls your app, the system removes all your app’s files from internal storage.
Internal storage is best when you want to be sure that neither the user nor other apps can access your files.
- It’s not always available, because the user can mount the external storage as USB storage and in some cases remove it from the device.
- It’s world-readable, so files saved here may be read outside of your control.
- When the user uninstalls your app, the system removes your app’s files from here only if you save them in the directory from getExternalFilesDir() .
External storage is the best place for files that don’t require access restrictions and for files that you want to share with other apps or allow the user to access with a computer.
Tip: Although apps are installed onto the internal storage by default, you can specify the android:installLocation attribute in your manifest so your app may be installed on external storage. Users appreciate this option when the APK size is very large and they have an external storage space that’s larger than the internal storage. For more information, see App Install Location.
Obtain Permissions for External Storage
To write to the external storage, you must request the WRITE_EXTERNAL_STORAGE permission in your manifest file:
Caution: Currently, all apps have the ability to read the external storage without a special permission. However, this will change in a future release. If your app needs to read the external storage (but not write to it), then you will need to declare the READ_EXTERNAL_STORAGE permission. To ensure that your app continues to work as expected, you should declare this permission now, before the change takes effect.
However, if your app uses the WRITE_EXTERNAL_STORAGE permission, then it implicitly has permission to read the external storage as well.
You don’t need any permissions to save files on the internal storage. Your application always has permission to read and write files in its internal storage directory.
Save a File on Internal Storage
When saving a file to internal storage, you can acquire the appropriate directory as a File by calling one of two methods:
getFilesDir() Returns a File representing an internal directory for your app. getCacheDir() Returns a File representing an internal directory for your app’s temporary cache files. Be sure to delete each file once it is no longer needed and implement a reasonable size limit for the amount of memory you use at any given time, such as 1MB. If the system begins running low on storage, it may delete your cache files without warning.
To create a new file in one of these directories, you can use the File() constructor, passing the File provided by one of the above methods that specifies your internal storage directory. For example:
Alternatively, you can call openFileOutput() to get a FileOutputStream that writes to a file in your internal directory. For example, here’s how to write some text to a file:
Or, if you need to cache some files, you should instead use createTempFile() . For example, the following method extracts the file name from a URL and creates a file with that name in your app’s internal cache directory:
Note: Your app’s internal storage directory is specified by your app’s package name in a special location of the Android file system. Technically, another app can read your internal files if you set the file mode to be readable. However, the other app would also need to know your app package name and file names. Other apps cannot browse your internal directories and do not have read or write access unless you explicitly set the files to be readable or writable. So as long as you use MODE_PRIVATE for your files on the internal storage, they are never accessible to other apps.
Save a File on External Storage
Because the external storage may be unavailable—such as when the user has mounted the storage to a PC or has removed the SD card that provides the external storage—you should always verify that the volume is available before accessing it. You can query the external storage state by calling getExternalStorageState() . If the returned state is equal to MEDIA_MOUNTED , then you can read and write your files. For example, the following methods are useful to determine the storage availability:
Although the external storage is modifiable by the user and other apps, there are two categories of files you might save here:
Public files Files that should be freely available to other apps and to the user. When the user uninstalls your app, these files should remain available to the user.
For example, photos captured by your app or other downloaded files.
Private files Files that rightfully belong to your app and should be deleted when the user uninstalls your app. Although these files are technically accessible by the user and other apps because they are on the external storage, they are files that realistically don’t provide value to the user outside your app. When the user uninstalls your app, the system deletes all files in your app’s external private directory.
For example, additional resources downloaded by your app or temporary media files.
If you want to save public files on the external storage, use the getExternalStoragePublicDirectory() method to get a File representing the appropriate directory on the external storage. The method takes an argument specifying the type of file you want to save so that they can be logically organized with other public files, such as DIRECTORY_MUSIC or DIRECTORY_PICTURES . For example:
If you want to save files that are private to your app, you can acquire the appropriate directory by calling getExternalFilesDir() and passing it a name indicating the type of directory you’d like. Each directory created this way is added to a parent directory that encapsulates all your app’s external storage files, which the system deletes when the user uninstalls your app.
For example, here’s a method you can use to create a directory for an individual photo album:
If none of the pre-defined sub-directory names suit your files, you can instead call getExternalFilesDir() and pass null . This returns the root directory for your app’s private directory on the external storage.
Remember that getExternalFilesDir() creates a directory inside a directory that is deleted when the user uninstalls your app. If the files you’re saving should remain available after the user uninstalls your app—such as when your app is a camera and the user will want to keep the photos—you should instead use getExternalStoragePublicDirectory() .
Regardless of whether you use getExternalStoragePublicDirectory() for files that are shared or getExternalFilesDir() for files that are private to your app, it’s important that you use directory names provided by API constants like DIRECTORY_PICTURES . These directory names ensure that the files are treated properly by the system. For instance, files saved in DIRECTORY_RINGTONES are categorized by the system media scanner as ringtones instead of music.
Query Free Space
If you know ahead of time how much data you’re saving, you can find out whether sufficient space is available without causing an IOException by calling getFreeSpace() or getTotalSpace() . These methods provide the current available space and the total space in the storage volume, respectively. This information is also useful to avoid filling the storage volume above a certain threshold.
However, the system does not guarantee that you can write as many bytes as are indicated by getFreeSpace() . If the number returned is a few MB more than the size of the data you want to save, or if the file system is less than 90% full, then it’s probably safe to proceed. Otherwise, you probably shouldn’t write to storage.
Note: You aren’t required to check the amount of available space before you save your file. You can instead try writing the file right away, then catch an IOException if one occurs. You may need to do this if you don’t know exactly how much space you need. For example, if you change the file’s encoding before you save it by converting a PNG image to JPEG, you won’t know the file’s size beforehand.
Delete a File
You should always delete files that you no longer need. The most straightforward way to delete a file is to have the opened file reference call delete() on itself.
If the file is saved on internal storage, you can also ask the Context to locate and delete a file by calling deleteFile() :
Note: When the user uninstalls your app, the Android system deletes the following:
- All files you saved on internal storage
- All files you saved on external storage using getExternalFilesDir() .
However, you should manually delete all cached files created with getCacheDir() on a regular basis and also regularly delete other files you no longer need.
Источник
How to Recover Deleted Photos on Android


Smartphones give us the ability to conveniently capture the most memorable moments in our lives, but there are consequences for storing our memories on mobile devices, and data loss is one of them. If you’ve accidentally deleted photos from your mobile device or wiped its memory clean, you’re now probably wondering if there’s a way to recover deleted photos on Android.
Don’t worry, it’s not too late to undelete photos Android can’t see after a hard reset, but you also don’t have much time before they become unrecoverable. This article is here to teach you several ways how to recover deleted photos on Android so you can pick the one that works best for you.
How to Recover Photos from the Cloud
Like most Android users, you’re probably using some kind of cloud storage service to back up your photos. If that’s really the case, you’re in luck because you would be hard-pressed to find an easier way how to recover deleted photos on Android.
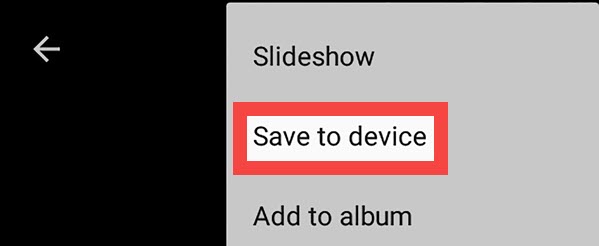
Method 1: From Google Photos
Google Photos is a popular photo-sharing and storage app developed by Google. The app can safely back up all images that you keep on your Android smartphone to the cloud and restore them when needed. It can also automatically remove backed up images, which sometimes causes users who are not familiar with this feature to panic. But fear not, recovering photos from Google Photos is simple.
Follow these steps:
- Open the Google Photos app on your Android device.

- Select the deleted photos.
- Tap More (three dots) and select Save to device.
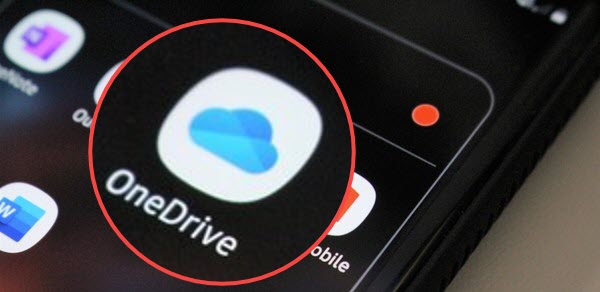
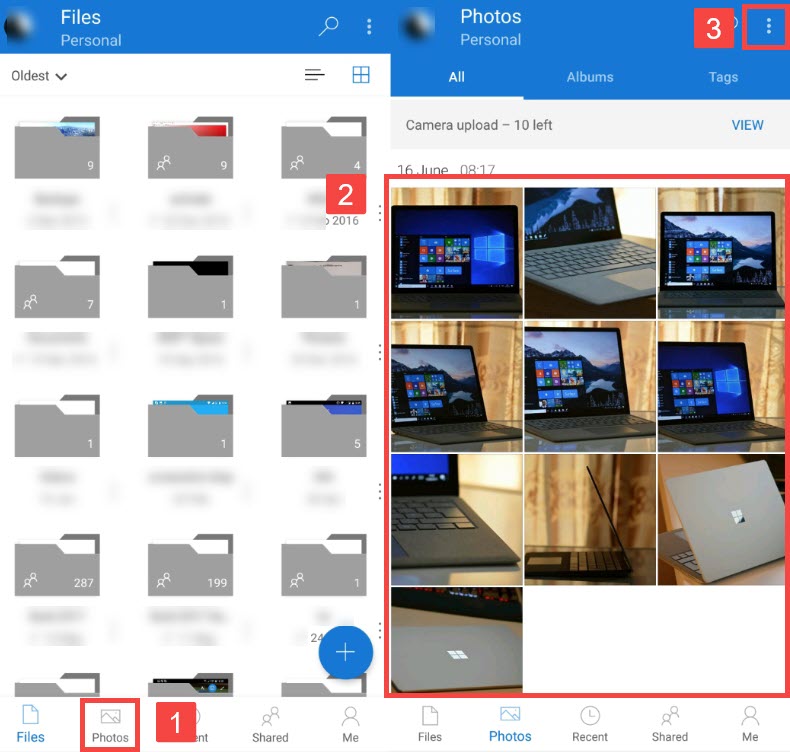
Method 2: Recover from Microsoft OneDrive
Microsoft’s cloud storage service, OneDrive , offers an automatic photo backup and delete feature, which frees up internal memory by uploading pictures to the cloud and deleting them from the phone. All images uploaded to OneDrive can be recovered from any device, including the device with which they were taken.
Steps to recover deleted photos on Android:
- Open the OneDrive app on your Android device.
- Select Photos from the bottom menu.
- Select the photos you want to restore.
- Tap More (three dots) and select Save.
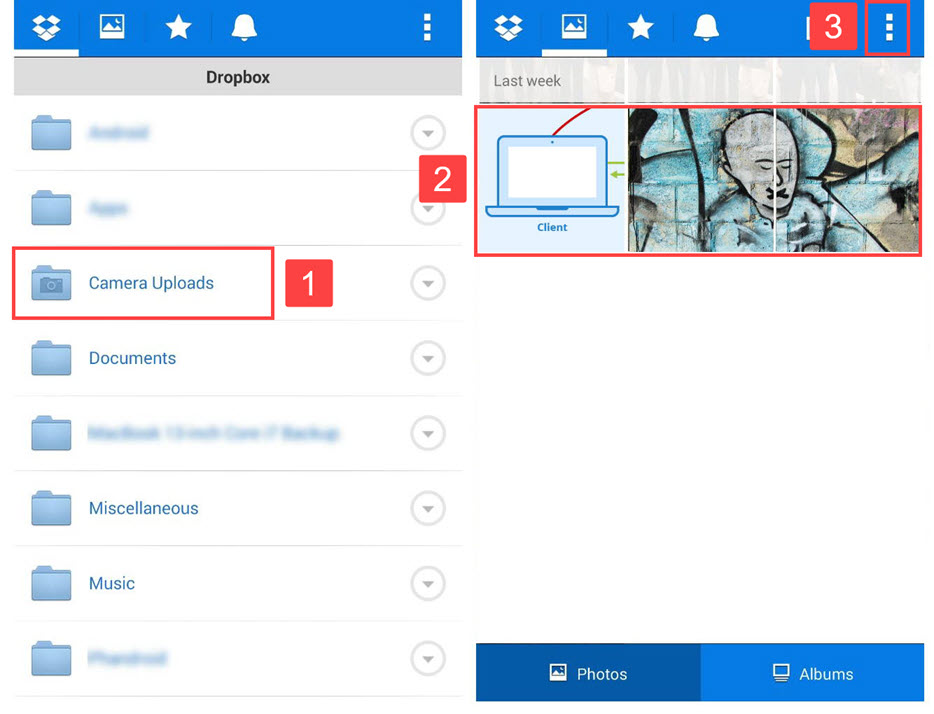
Method 3: Recover lost photos from Dropbox
If you’re a Dropbox user and had activated the automatic photo backup feature before you lost or accidentally deleted your photos, you can now easily recover them without a computer to the phone memory with just a few taps.
Follow these steps to recover photos on Android:
- Open the Dropbox app on your Android device.
- Navigate to the Camera Uploads folder. If you remember moving the images to a different folder, navigate to it instead.
- Select the photos you want to restore.
- Tap More (three dots) and select Save to Device.
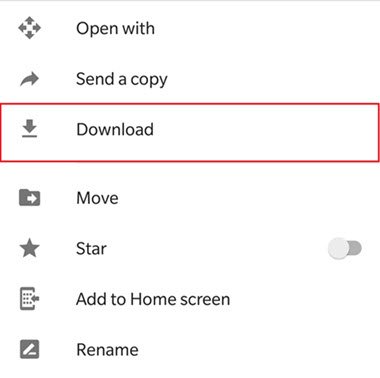
Method 4: Recover photos from Google Drive
Since July 2019, photos stored in Google Drive don’t automatically show in Google Photos, which means there’s one more way how to recover deleted photos from the Android gallery. However, it’s worth noting that the automatic photo backup feature uploads photos to Google Photos regardless of whether you activate it from Google Drive or Google Photos.
Follow these steps:
- Open the Google Drive app on your Android device
- Select the photos you want to restore.
- Tap More (three dots) and tap Download.
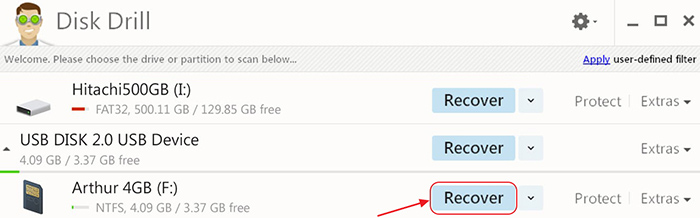
Recover Deleted Photos from an SD Card Inside Your Android Device

Using an SD card as secondary storage gives you the ability to store far more photos than you ever could by relying on the internet memory alone. However, it also exposes you to the danger of losing thousands of photos at the same time, which is why we need to take a closer look at how to recover deleted photos from SD card on Android phones with SD card recovery software applications.
Users who want to recover deleted photos on Android from an SD card can use what’s arguably the most user-friendly and powerful photo recovery software application currently available, Disk Drill, and recover deleted photos and images even without a cloud or third-party backup.
Follow these steps to recover photos on Android:
- Download and install Disk Drill.
- Connect the SD card to your computer and scan the card for recoverable photos.
- Use the preview feature to help you decide which photos to select.
- Click the Recover button.
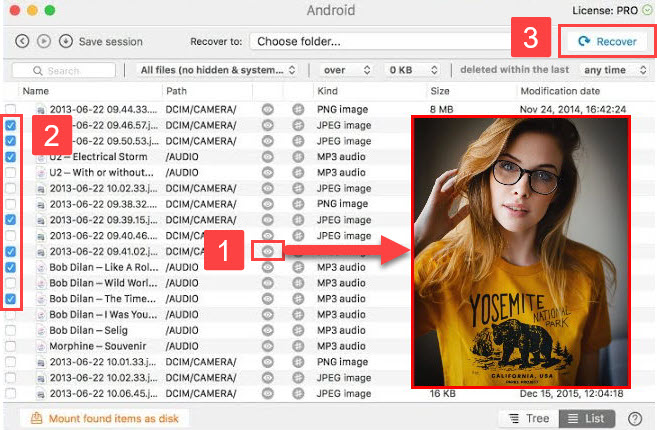
Restore Deleted Images from Android Internal Storage with Data Recovery Software
By default, most Android devices save images to internal storage, and such images are automatically displayed in the Android gallery. Based on your operating system, pick one of the two methods provided in this chapter to learn how to recover deleted photos from Android gallery.
The process itself is straightforward as long as your device is rooted and you’ve enabled USB debugging. If neither rings any bells and you just want to get your photos back as quickly as possible, you can also follow the instructions in the next chapter.
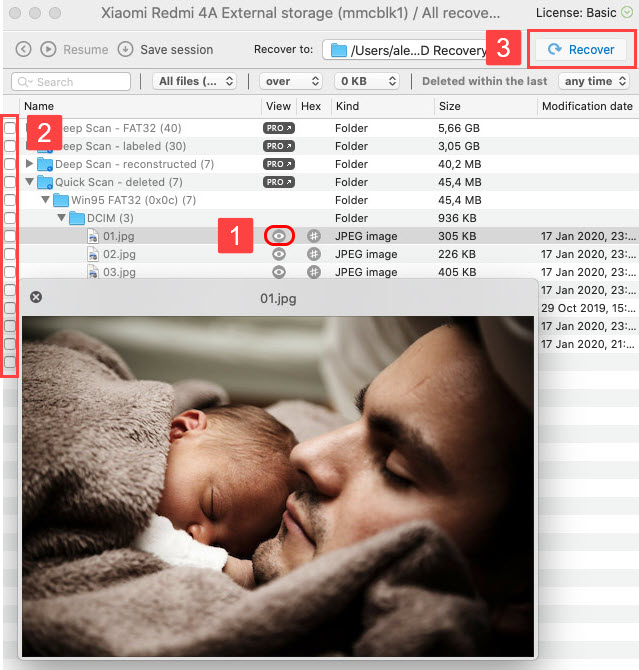
Method 1: For Mac OS X Users
Disk Drill for Mac has been helping Android users recover deleted photos from Android phones for quite some time now, and it can help you too if you follow the instructions below even though you might not need them because Disk Drill is easy to figure out.
Follow these steps to recover deleted photos from Android:
- Download Disk Drill for macOS
- Install Disk Drill and connect your Android device.
- Allow USB debugging to grant software access to your device
- Click the Recover button next to your Android device.
- Select which deleted photos you want Disk Drill to recover and click Recover again.
Method 2: For Windows PC 10, 8, 7 Users
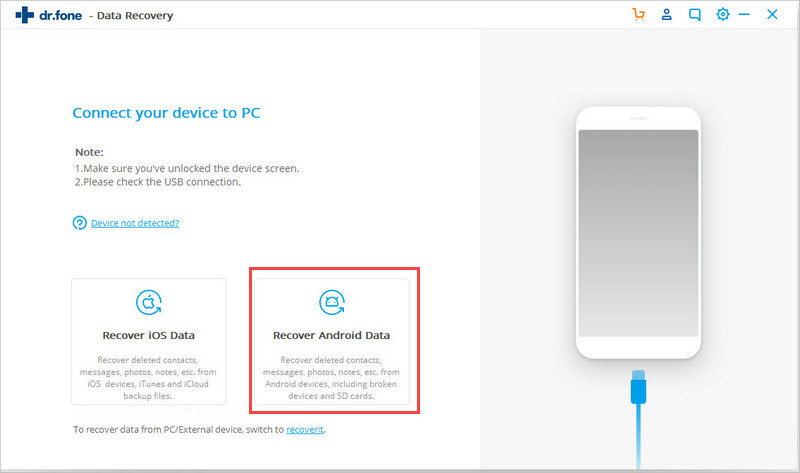
Unfortunately for Windows users, they can’t recover deleted photos from the Android internal storage with Disk Drill (at least not yet!), but they can use another image recovery software application, Wondershare’s dr.Fone , and still complete the recovery without too much extra effort.
Follow these steps:
- Visit dr.fone’s website and download the Windows version.
- Install and launch dr.fone but don’t connect your device to your computer just yet.
- Select Data Recovery on the main screen and connect your Android device.
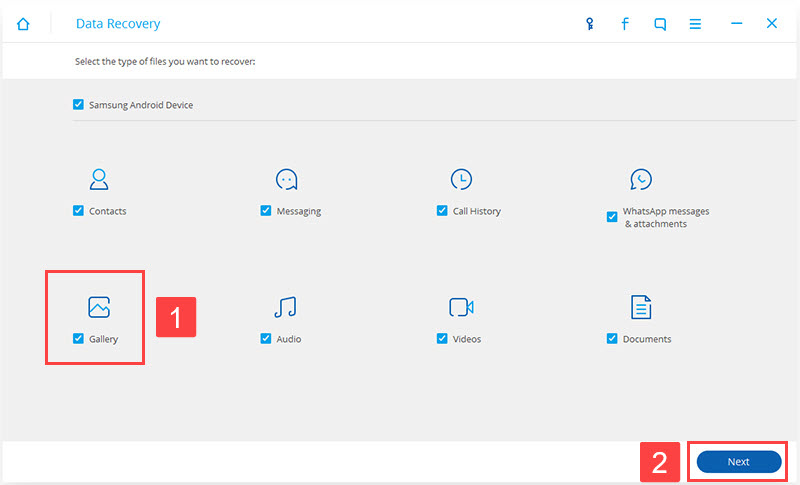
- Select photos as the type of files you want to recover, click next, and select a storage scanning mode.
- Wait for dr.fone to finish scanning, select which photos you want to recover, and click either Restore to Device or Recover to Computer.
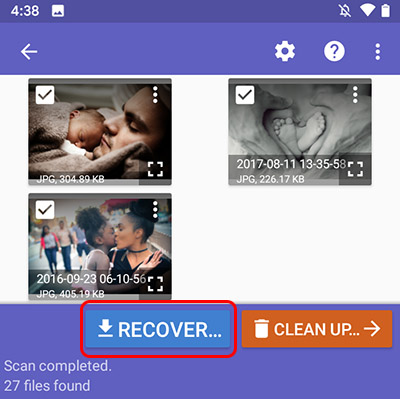
How to Recover Deleted Photos with an Android App
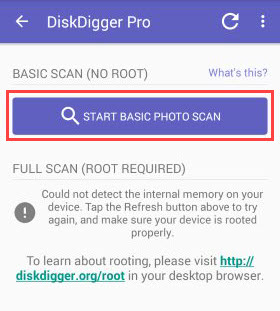
Photo recovery apps for Android don’t recover deleted pictures that Android users want to get back nearly as well as Disk Drill and other photo recovery apps for Windows and Mac, but they do come in handy for more straightforward photo recovery jobs. Just like when recovering photos on a computer, your Android device should be rooted, but some Android photo recovery apps work even without root, including our pick, DiskDigger .
Follow these steps to recover lost photos on Android:
- Install DiskDigger from the Google Play Store .
- Launch DiskDigger select one of the two supported scan methods.
- Wait for DiskDigger to find your deleted pictures.
- Select pictures for recovery.
- Click the Recover button.
Recover Deleted Photos from Android Phone Without Root
 To get the best results when recovering deleted photos from an Android phone, you need root access to the entire file system. However, there are ways how to recover deleted photos on Android even without root. Use these methods if you don’t like the idea of rooting your device and possibly losing the warranty.
Variant 1: Backup and Restore
If you have taken the time to back up your Android phone, you’re in luck now because you can recover deleted photos using the built-in backup and restore feature. Keep in mind that you might not be able to recover every single lost photo depending on the age of your backup. Also, this option may not be available at all, or it may be called differently depending on the make and model of your Android smartphone. Still, it’s always better to recover some photos than none at all.
- Go to Settings on Android phone, tap on Account.
- Sign in with your account and password if prompted.
- Look for an option called Backup and Restore.
- Click Restore.
Variant 2: Restore from SD Card Directly
Many Android smartphones come with a slot for a microSD card that can be used to significantly expand the internal storage space. The chances are that you’ve been saving photos to it without even realizing it, which is great news because you can now remove it from your Android smartphone and use a photo recovery software application like Disk Drill to recover lost photos directly from it even without root.
We’ve already described how to restore deleted pictures directly from the SD card in the chapter titled Recover Deleted Photos from SD Card Inside Your Android Devices, so feel free to jump back to it if you think that this is the right recovery method for you.
Retrieve Deleted Photos on Android Tablet
 The good news is that Android tablets are essentially just larger Android smartphones, so you can use the same tools to retrieve deleted photos from them. We recommend Disk Drill for Mac because of its proven reliability and exceptional ease of use.
Источник


