- Use Quick Start to transfer data to a new iPhone, iPad, or iPod touch
- Set up your new device with Quick Start
- Set up your iPhone, iPad, or iPod touch
- If you’re switching to a new device
- If you’re setting up your first iOS device
- Turn on your device
- If you have another device, use Quick Start
- Activate your device
- Set up Face ID or Touch ID and create a passcode
- Restore or transfer your information and data
- Sign in with your Apple ID
- Turn on automatic updates and set up other features
- Set up Siri and other services
- Set up Screen Time and more display options
- Finish up
- How to Set Up and Activate New iPhone 13
- Switch to New iPhone
- AnyTrans – #1 iOS Data Transfer Tool
- Preparation before New iPhone 13В Activating and Setup
- How to Activate and Set up New iPhone
- How to Use Quick Start to Set up A New iPhone
- How to Transfer Data fromВ Phone to New iPhone
Use Quick Start to transfer data to a new iPhone, iPad, or iPod touch
Set up your new iOS device automatically using an iPhone, iPad, or iPod touch.
Set up your new device with Quick Start
Quick Start occupies both devices, so make sure that you choose a time when you won’t need to use your current device for several minutes.
- Turn on your new device and place it near your current device.
- A screen appears on your current device that offers the option of using your Apple ID to set up your new device. Make sure that it’s the Apple ID that you want to use, then tap Continue. If you don’t see the option to continue on your current device, make sure that Bluetooth is turned on.
- Wait for an animation to appear on your new device. Hold your current device over the new device, then center the animation in the viewfinder.
- Wait for a message that says Finish on New [Device]. If you can’t use your current device’s camera, tap Authenticate Manually, then follow the onscreen steps.
- When asked, enter your current device’s passcode on your new device. Then follow the instructions to set up Face ID or Touch ID on your new device.
- When you see the Transfer Data from [Device] screen, tap Continue to begin transferring your data from your previous device to your new device. Or you can tap Other Options to transfer apps, data, and settings from your most recent iCloud backup or transfer from a backup on your computer.
Keep your devices near each other and plugged in to power until the data migration process is complete. Transfer times can vary based on factors such as network conditions and the amount of data being transferred.
Источник
Set up your iPhone, iPad, or iPod touch
Learn how to set up your iPhone, iPad, or iPod touch.
If you’re switching to a new device
If you want to transfer your information from another device to your new iPhone, iPad, or iPod touch, follow these steps:
Make sure that you back up your previous iOS device so that you can transfer the content to the new device.

If you’re setting up your first iOS device
If you already set up your new device but want to start over, learn how to erase your iPhone, iPad, or iPod touch.
Otherwise, follow these steps:
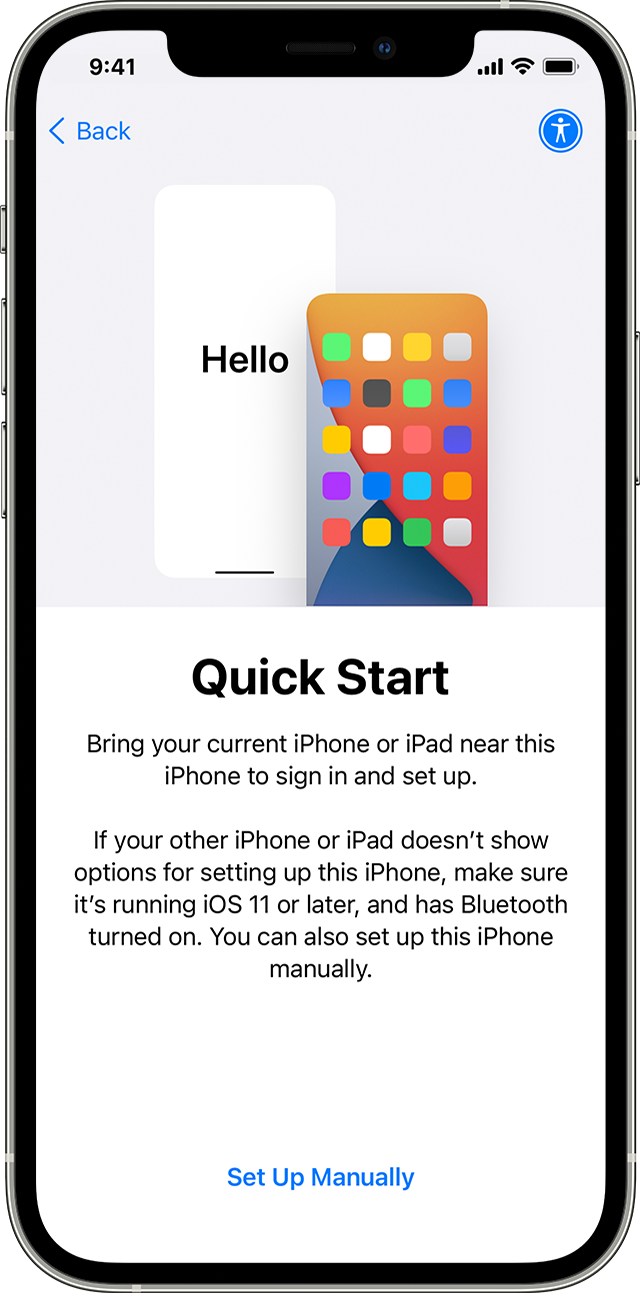
Turn on your device
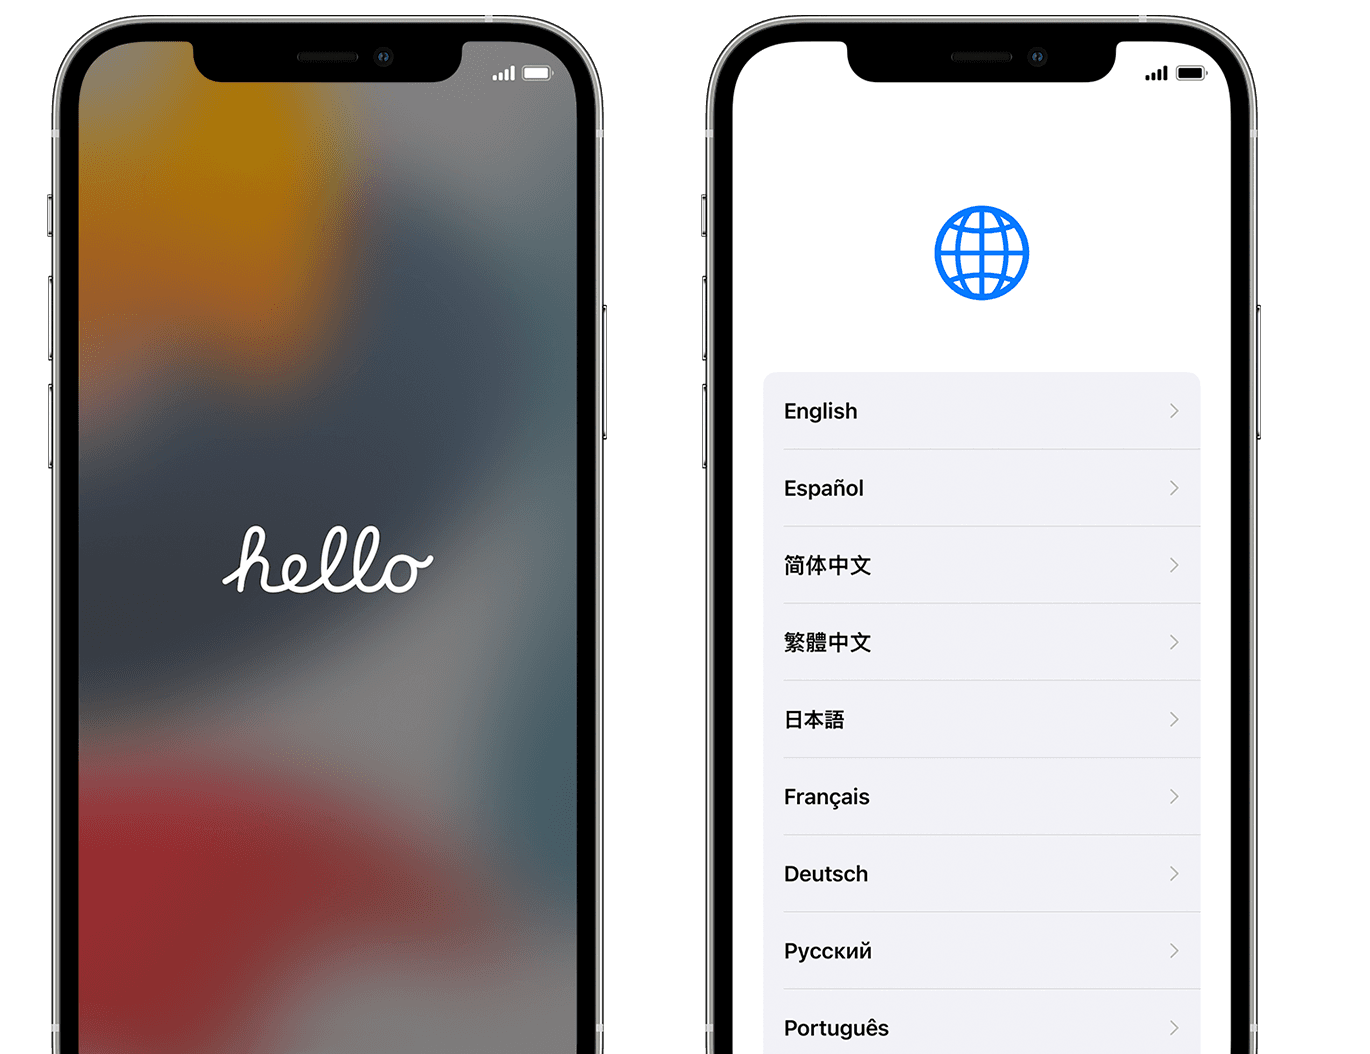
Press and hold the device’s power button until you see the Apple logo. You’ll then see «Hello» in many languages. Follow the steps to get started. If you’re blind or have low vision, you can turn on VoiceOver or Zoom from the Hello screen.
When asked, choose your language. Then tap your country or region. This affects how information looks on your device, including date, time, contacts, and more. At this point, you can tap the blue accessibility button to set up Accessibility Options that can optimize your setup experience and the use of your new device.
If you have another device, use Quick Start
If you have another device, you can use it to automatically set up your new device with Quick Start. Bring the two devices close together, and then follow the instructions.
If you don’t have another device, tap «Set Up Manually» to continue.

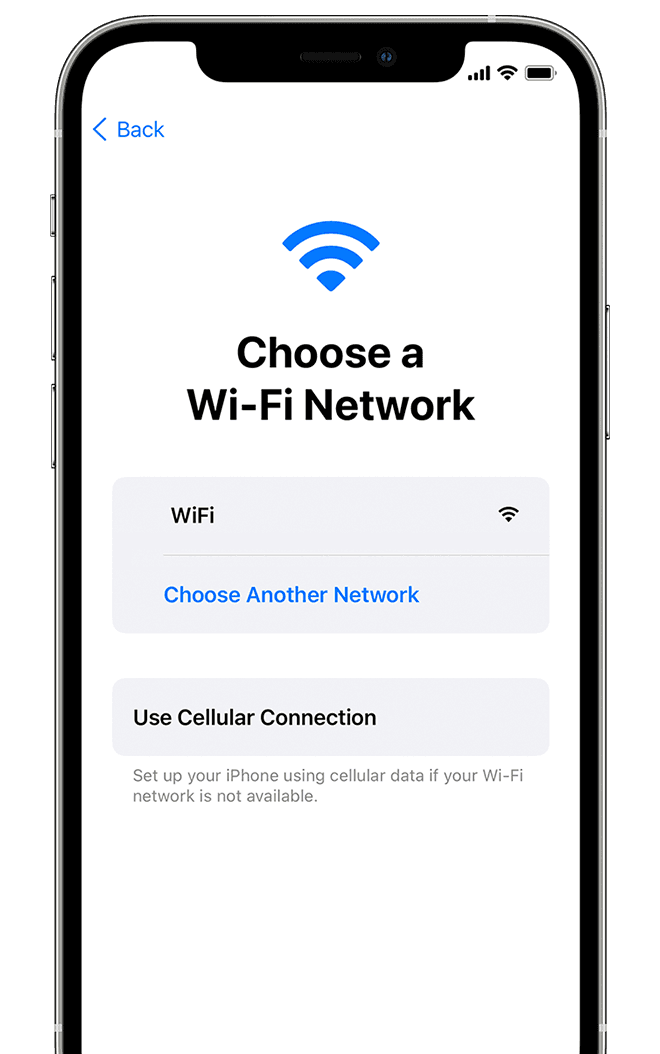
Activate your device
You need to connect to a Wi-Fi network, a cellular network, or iTunes to activate and continue setting up your device.
Tap the Wi-Fi network that you want to use or select a different option. If you’re setting up an iPhone or iPad (Wi-Fi + Cellular), you might need to insert your iPhone SIM card or iPad SIM card first.
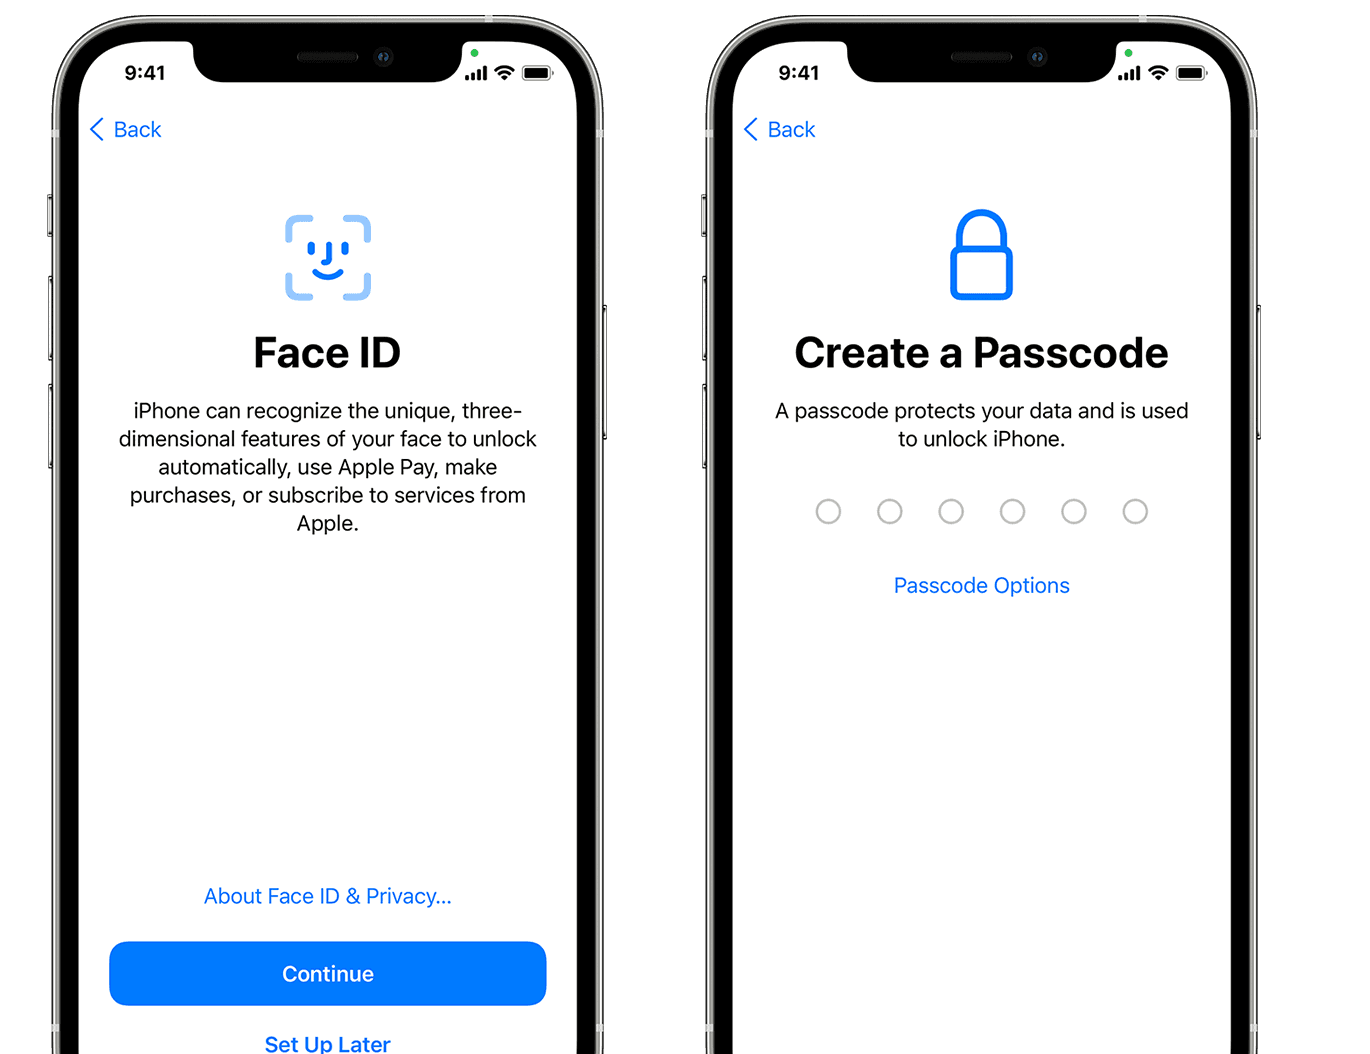
Set up Face ID or Touch ID and create a passcode
On some devices, you can set up Face ID or Touch ID. With these features, you can use face recognition or your fingerprint to unlock your device and make purchases. Tap Continue and follow the instructions, or tap «Set Up Later in Settings.»
Next, set a six-digit passcode to help protect your data. You need a passcode to use features like Face ID, Touch ID, and Apple Pay. If you’d like a four-digit passcode, custom passcode, or no passcode, tap «Passcode Options.»
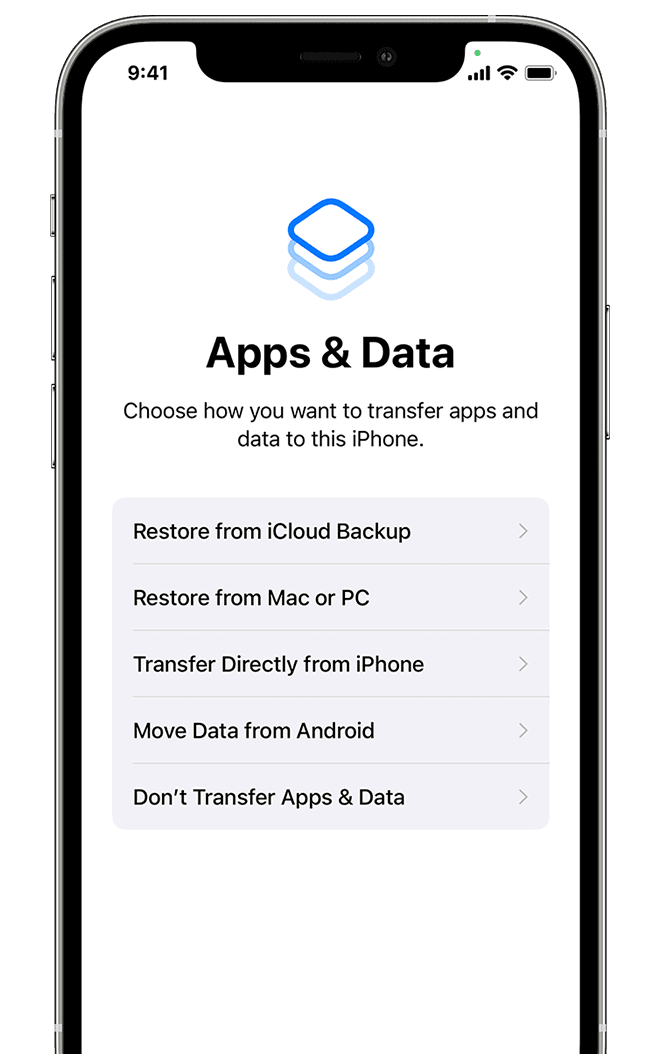
Restore or transfer your information and data
If you have an iCloud backup or a backup made from your computer or an Android device, you can restore or transfer your data from your old device to your new device.
If you don’t have a backup or another device, select Don’t Transfer Apps & Data.
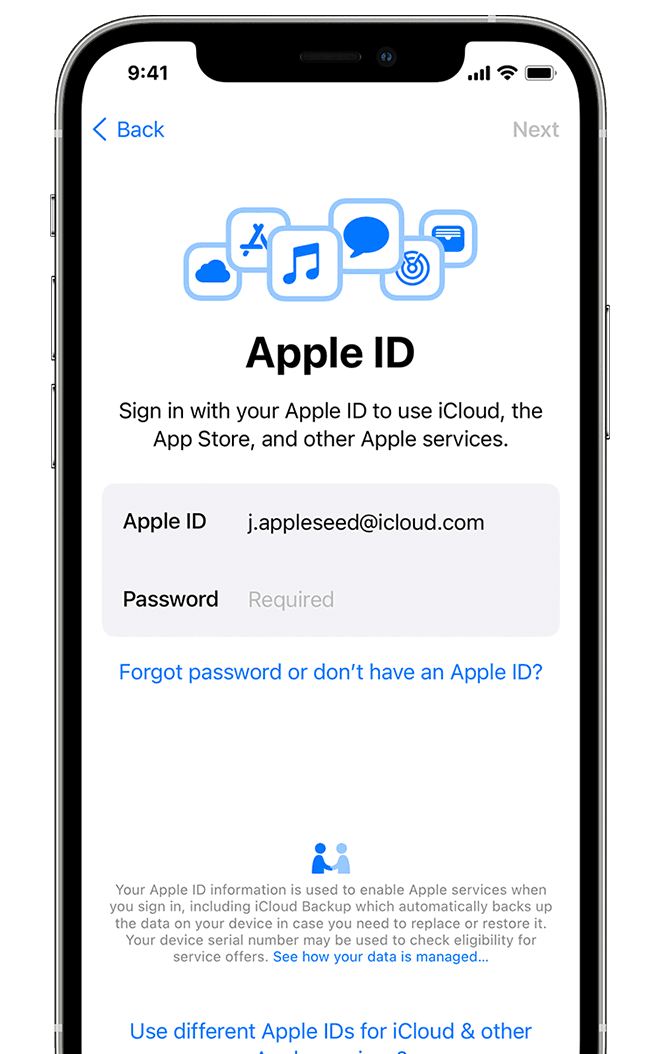
Sign in with your Apple ID
Enter your Apple ID and password, or tap «Forgot password or don’t have an Apple ID?» From there, you can recover your Apple ID or password, create an Apple ID, or set it up later. If you use more than one Apple ID, tap «Use different Apple IDs for iCloud and iTunes?»
When you sign in with your Apple ID, you might be prompted for a verification code from your previous device.
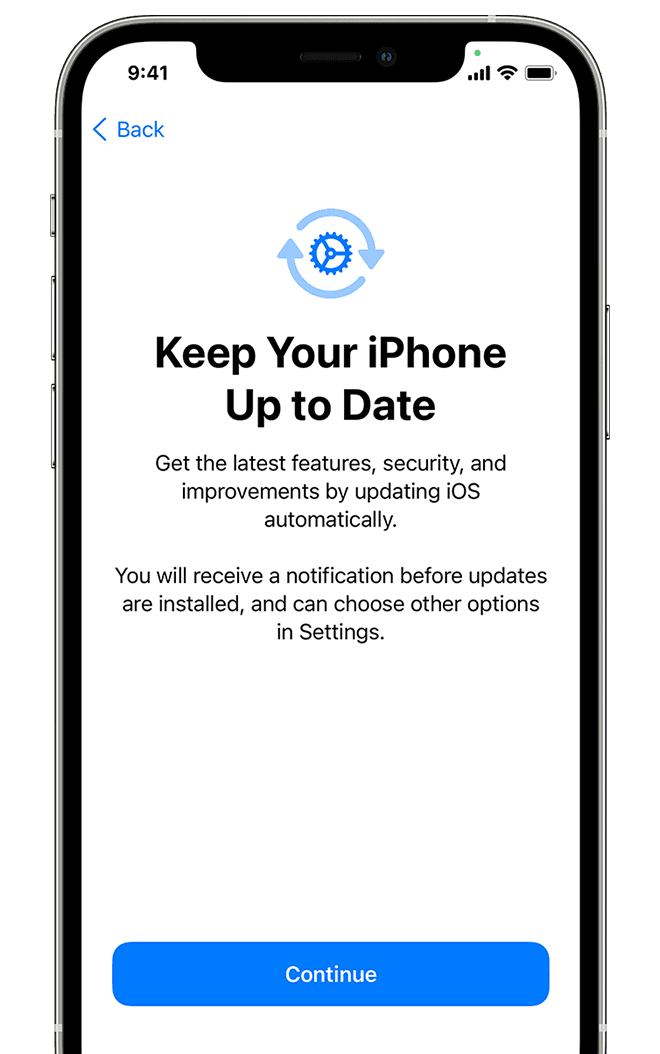
Turn on automatic updates and set up other features
On the next screens, you can decide whether to share information with app developers and allow iOS to update automatically.
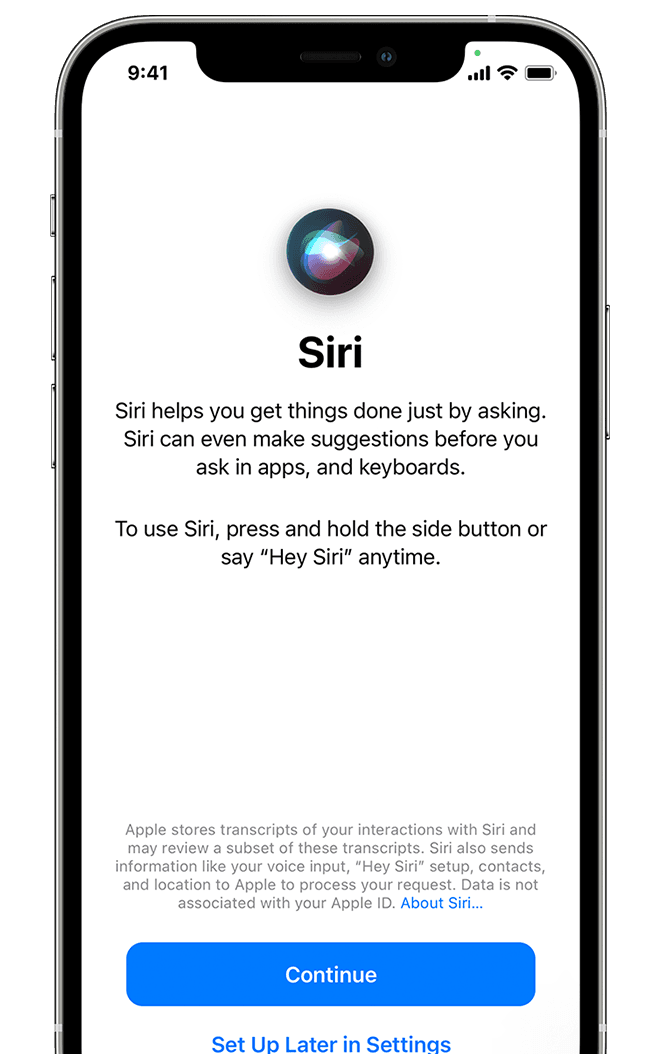
Set up Siri and other services
Next, you’ll be asked to set up or enable services and features, like Siri. On some devices, you’ll be asked to speak a few phrases so that Siri can get to know your voice.
If you signed in with your Apple ID, follow the steps to set up Apple Pay and iCloud Keychain.
Set up Screen Time and more display options
Screen Time gives you insight into how much time you and your kids spend on your devices. It also lets you set time limits for daily app use. After you set up Screen Time, you can turn on True Tone if your device supports it, and use Display Zoom to adjust the size of icons and text on your Home screen.
If you have an iPhone X or later, learn more about using gestures to navigate your device. If you have an iPhone with a Home button, you can adjust the click for your Home button.

Finish up
Tap «Get Started» to begin using your device. Make a safe copy of your data by backing up, and learn about more features in the user guide for your iPhone, iPad, or iPod touch.
Information about products not manufactured by Apple, or independent websites not controlled or tested by Apple, is provided without recommendation or endorsement. Apple assumes no responsibility with regard to the selection, performance, or use of third-party websites or products. Apple makes no representations regarding third-party website accuracy or reliability. Contact the vendor for additional information.
Источник
How to Set Up and Activate New iPhone 13
This is a complete guide about how to set up and activate a new iPhone. Just follow the detailed steps to activate your new iPhone (iPhone 13 included) easily, no matter you are switching from an Android or iPhone, this guide can be both helpful. Works for iPad/iPod touch activation and setup, too.
Switch to New iPhone
Basic Tips for New iPhone
Transfer Data to New iPhone
Phone Comparison Tips
AnyTrans – #1 iOS Data Transfer Tool
This reliable iOS data transfer tool can help you manage and transfer various types of files from phone to iPhone (iPhone 13 & iOS 15 Supported ) in a simple process. Free Download it to have a try.
Users need to activate and set up a new iPhone under various situations: switching to a new iPhone at iPhone launching season, get an iPhone as a gift, etc. For someone who is new to the Apple ecosystem,В activate the new iPhone might become the first stumbling block. So here in this article, we would introduce the methods of how to set up new iPhones. No matter you are an Android user before or already familiar with the iPhone, you can check this article and see what’s new about how to set up a new iPhone.
This article includes 3 parts:
Please keep reading, and do as the following steps say.
Preparation before New iPhone 13В Activating and Setup
- If you upgrade from an old iPhone, you can backup your old iPhone with iCloud or iTunes firstly. In this way, you can directly restore from backup when activating new iPhone.
- If you upgrade from an Android phone, you can refer to this How to Switch from Android to iPhone guide to see how to transfer data to your new iPhone.
- If you have set up your new iPhone already but want to start over, you can go to Settings > General > Reset > Erase All Content and Settings to make it.
How to Activate and Set up New iPhone
How to activate iPhone 13? No matter you are an amateur or a dab on the iPhone, you could try the following steps as a startup.
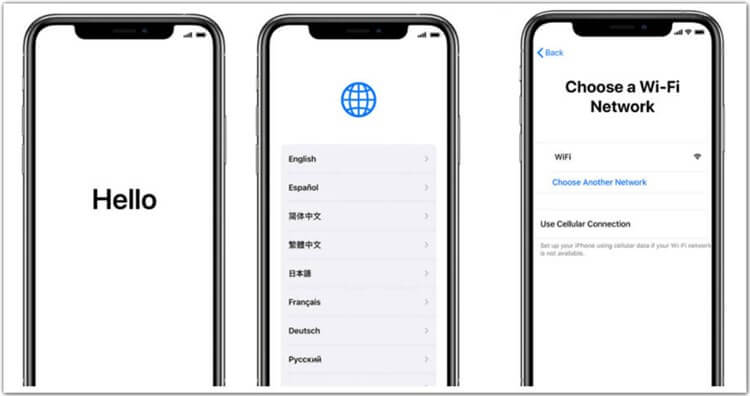
Step 1. Turn on your new iPhone, and you will see the “Hello” screen in many languages, English, Spanish, French, Chinese, etc. Then please slide your finger across the screen to continue.
Step 2. Choose the right language, and chooseВ your country or region on your new iPhone.
If you own an old iPhone running iOS 11 or later, you can choose to use Quick Start. Just hold your two devices close to each other and follow the screen to transfer Apple ID, preferred settings, Wi-Fi info, and iCloud Keychain passwords. If not, please tap “Set Up Manually” to continue the process.
Step 3. Choose a “Wi-Fi network” and enter its password on your new iPhone. You can also use the cellular network by tapping Use Cellular Connection if the Wi-Fi is not available (if you are setting up your iPhone via Wi-Fi + Cellular, you need to insert your SIM card first.)
Step 4. Choose “Data & PrivacyВ > Create a Passcode ” or not. You can change it later anytime you want on your new iPhone.
Set Up New iPhone 13
Step 5. For iPhone X, iPhone XS(Max), iPhone XR, and iPhone 11, iPhone 13 users set your Face ID on your new iPhone.
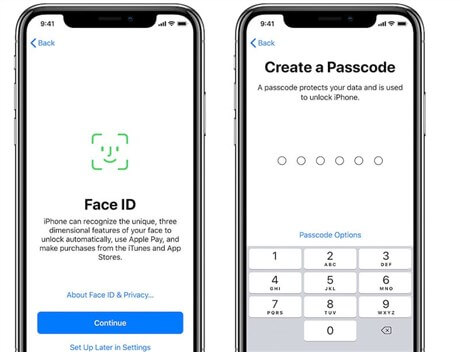
Set up Face ID and Passcode on iPhone 13
For iPhone 8 orВ earlierВ iPhone models users, set your Touch ID. Then create a passcode, you can set a four or six-digit passcode, tap Passcode Options to make it.
Step 6. Then you will access the App & Data screen, for options are listed. Please choose one option as per your needs.
Step 7. Sign in with Apple ID and password. If you have no Apple ID, you can create a new one. Or you can just skip this step, and make it later in the Settings app at any time.
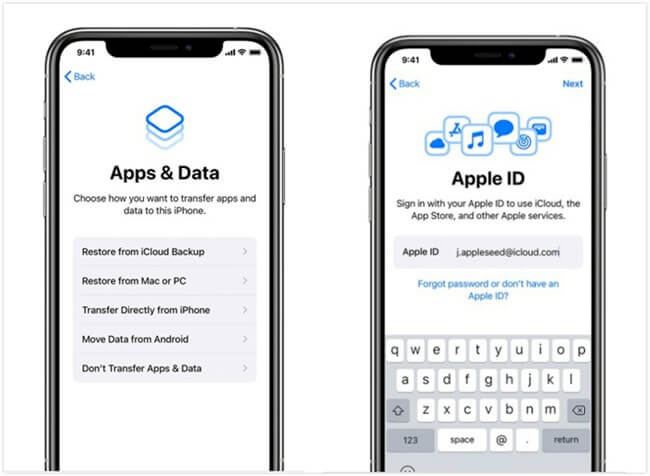
Sign in Apple ID to Activate iPhone
Step 8. Set up iCloud Drive, Apple Pay,В and iCloud keychain. Then agree to the Terms and Conditions on your new iPhone.
Step 9. Choose whether to use Siri or not. Whatever you choose, you can always enable or disable Siri easily later on the new iPhone.
Step 10. Choose settings for app analytics and True Tone. Decide whether to share information with Apple.
Step 11. Tap Choose a View, and then choose Standard or Zoomed and tap Next.
Step 12. Tap Get Started to start using your new iPhone.
How to Use Quick Start to Set up A New iPhone
Just as we have mentioned above, if you have another iDevice that’s running iOS 11 or later, then you can try the Quick Start function to set up your new device easily and automatically. Here’s how to do it:
Step 1. Turn on your new iPhone and bring it near your old device. The QuickStart screen will appear on your old device and offers the option of using your Apple ID to set up your new device.
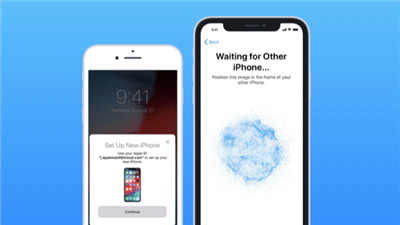
iPhone Quick Start
Step 2. Make sure that it’s the Apple ID that you want to use, then tap Continue. Wait for an animation to appear on your new device.
Step 3. Hold your old device over the new device, then center the animation in the viewfinder. Wait for a message that says Finish on New [Device Name], and then enter your old device’s passcode on your new device.
Step 4. Follow the instructions to set up Face ID or Touch ID on your new iPhoneпјЊ then enter your Apple ID password on your new device. If you have multiple iDevices, you need to enter all their passcodes.
Step 5. The new device will give you the choice of restoring apps, data, and settings from your most recent iCloud backup or updating your current device’s backup and then restoring. Just select a backup you prefer.
Step 6. You can also choose whether to transfer some settings related to location, privacy, Apple Pay, and Siri.
How to Transfer Data fromВ Phone to New iPhone
Although QuickStart and Move to iOS are convenient enough for iPhone new users, there are some third-party tools that are able to offer a better experience in transferring data to the iPhone. AfterВ activating and setting up a new iPhone, you may also want to move important data from your old phone, especially Android phones, toВ the new iPhone, as Move to iOS would only transfer part of Android data to the iPhone. If you prefer an easy and quick solution, thenВ AnyTransВ can help you make it. It supports all iPhone models (iPhone 13 included) as well as iOS 15.
Источник


