- How to Share A WiFi Hotspot on Android Phone
- Part 1: How to Enable WiFi Hotspot on Samsung & Configure WiFi Hotspot on Samsung
- Part 2: Set up WiFi Hotspot on Other Android Devices & Configure WiFi Hotspot on Android
- Part 3: Tips and Considerations When Sharing A WiFi Hotspot on Android
- Words in the End:
- How to Share a Wi-Fi Password From iPhone to Android
- It’s a bit more complicated than an AirDrop from iPhone to Android
- What to Know
- How to Share Wi-Fi Password From iPhone to Android
- How to Share an Android Internet Connection with Wi-Fi Hotspot or USB Tethering
- How to Enable Wi-Fi Hotspot on an Android Smartphone
- Android Hotspot Setup with AT&T & T-Mobile
- Configuring Mobile Hotspot with an Android on Verizon
- How to Set Up USB Internet Tethering from Android to Mac OS X
- Wi-Fi Hotspot vs USB Tethering
How to Share A WiFi Hotspot on Android Phone

Because people do so many things with their mobile devices, it is essential that everyone knows how to stay connected. Since the internet is a wealth of information that visitors use to take care of different things, keeping connected is no longer a luxury but a necessity. Therefore, if you are one of the ones who want to know exactly how to share a Wi-Fi hotspot on Android phone, here are something that you should know.
Part 1: How to Enable WiFi Hotspot on Samsung & Configure WiFi Hotspot on Samsung
How to Enable WiFi Hotspot on Samsung Galaxy
Enabling a WiFi hotspot on a Samsung Galaxy phone does not have to be difficult for users to do. Especially, if they know how to configure their WiFi hotspots on phones like Samsung. So, for those of you who are interested in learning what steps should be taken, here are the steps that you should follow.
If you are looking to share your data connection on your laptop, tablet or any other device that you or someone you know has access to, you should follow the steps provided for you below.
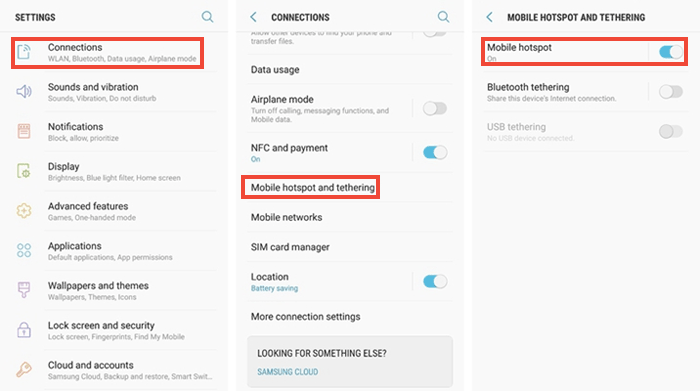
1. From your home screen on your Samsung phone or the app drawer, you should make sure that you are selecting the option Setting.
2. Once the setting has been selected, you will need to choose the option Connections > Mobile hotspot and tethering.
3. Then tap on the selection Mobile hotspot, when this step is complete, view the top of the screen so that you can toggle from one screen to the next by tapping the toggle.
Or, you can also use this shortcut to perform the same functions.
1. This shortcut can be accessed by clicking on the quick setting area. Getting to this feature is made easy by simply swiping down from the top of the device screen.
2. If the Hotspot option is not available the first time, repeat the same steps.
3. Drag the mobile hotspot to the position of your choice on the desktop. After this step is complete, you can Edit these options by tapping on the 3 vertical dots.
How to Configure Your WiFi Hotspot on Samsung
If you want to secure your wi-hotspot so no one else can access it, you will need to configure it to keep others out. Here are some simple instructions that will guide you through it.
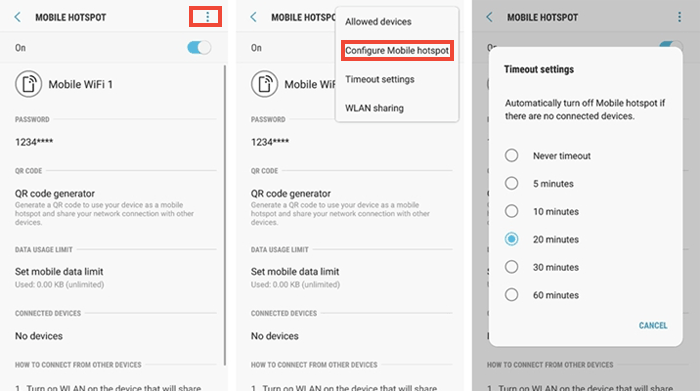
1. Tap More at the mobile Hotspot menu which is located at the top right corner of your screen.
2. Key in your networks name and password. This action can be done by tapping the password field and entering in the info.
3. Tap on the three vertical dots and change the Timeout settings to set the time that your phone will wait before turning off the Hotspot.
Part 2: Set up WiFi Hotspot on Other Android Devices & Configure WiFi Hotspot on Android
How to Set up WiFi Hotspot on Other Android Devices
To share a WiFi Hotspot on other Android devices, the user will need to:
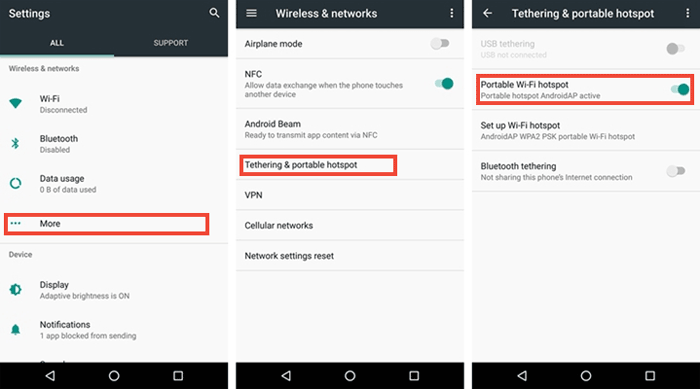
1. Go to their Android phone’s home screen or access the app drawer of their phones in order to select their Settings menu.
2. Next, the user will need to tap More under their Wireless & Networks option.
3. On their portable hotspot, the next step is to select Tethering and portable hotspot.
4. From the user’s Portable Wi-Fi hotspot, you should tap the toggle to enable it.
Or, if you want to take advantage of a short cut, use the steps below.
1. This shortcut can be accessed by clicking on the quick setting area. Getting to this feature is made easy by simply swiping down from the top of the device screen.
2. If the Hotspot option is not available the first time, you should tap Edit and then use the long press feature on the Hotspot icon and then drag it over to the grid that has the title name.
How to Configure Your WiFi Hotspot on Android Devices
If it is your first time using the WiFi hotspot feature on your Android phone, you can follow the steps below to set your own network name and password, or customize other settings.
1. Tap the Set up WiFi hotspot from the Tethering & portable hotspot menu.
2. Type in your networks name and password. This action can be done by tapping the password field and entering in the info.
3. You can select the AP Band as you like or you can leave it on the default 2.4 GHz.
Part 3: Tips and Considerations When Sharing A WiFi Hotspot on Android
— To keep from completely draining your battery of its charge, you will need to turn your wifi spot connection feature off when you are not using it.
— Portable wifi hot spots are usually set to a WPA2 security level and have a generic password that is set for the user. To prevent hackers from accessing your hotspot, make to change the password to a different password prior to broadcasting its signal.
— Not all carriers and devices are the same so each will have a different combination to activate the hotspots use. To find out how to access it, you need to find the specific instructions that have been provided by your manufacturer.
Words in the End:
Here we have told you how to set up WiFi hotspot on Samsung phone and other Android devices so that you can share WiFi hotspot on your Android with other devices easily. Setting up a Wi-Fi hotspot is an easy way to share your phone’s data connection with another device, like a tablet, Mac or PC. Just have a try now!
Источник
How to Share a Wi-Fi Password From iPhone to Android
It’s a bit more complicated than an AirDrop from iPhone to Android
:max_bytes(150000):strip_icc()/DaveJohnson-0f50cbe99ddd4ab29af14bcd523dffc9.jpg)
What to Know
- Install a QR code generator, such as Visual Codes, on your iPhone. In the app, tap Add Codes >Connect to Wi-Fi.
- Enter the network’s SSID, password, and security type (likely WPA). Then name the network, and tap Create Code.
- On the Android device, start the camera app and scan the code. Tap the Wi-Fi network pop-up message to connect to the network.
This article explains how to share a Wi-Fi password from an iPhone to an Android device by creating a QR code based on your Wi-Fi network settings.
How to Share Wi-Fi Password From iPhone to Android
On the iPhone, you start by installing a QR code generator that creates a QR code based on your Wi-Fi network settings. When scanned by the Android phone, the settings can be applied to the phone with a single tap. Here’s how to do it, step by step.
Find the network’s Wi-Fi settings. You need to know the SSID, which is the public name of the network, as well as the Wi-Fi password and type of wireless security (such as WPA, WEP, or none).
You might be able to find this information in your Wi-Fi router’s mobile app, or it might be on the router.
Install a QR code generator on your iPhone that can create codes based on your Wi-Fi settings. There are a number of apps that do this.
In the example below, we used Visual Codes, a highly recommended app, since it can save multiple Wi-Fi QR codes to your phone for use again later. The exact steps will vary slightly if you use a different QR code app.
Start the Visual Codes app.
Tap Add Codes.
At the bottom of the screen, tap Connect to WiFi.
Type the network’s SSID in the Name field.
:max_bytes(150000):strip_icc()/001_how-to-share-wifi-password-from-iphone-to-android-4768071-68eb99a28ebb4c4a8091716bc278a521.jpg)
Type the Wi-Fi password, and tap the correct security type (it’s almost always WPA).
Type a memorable name for this Wi-Fi connection in the Label field.
Tap Create Code.
Your new code will appear on the Codes page, as part of a list along with any other codes your create for other Wi-Fi networks. Tap an entry to display its QR code.
On the Android phone, start the camera and position the phone so it can scan the code.
:max_bytes(150000):strip_icc()/002_how-to-share-wifi-password-from-iphone-to-android-4768071-01f7e7fe5afc4c85a6e8b0a706b1bf43.jpg)
When the Wi-Fi network pop-up message appears, tap it to connect automatically to the network.
Источник
How to Share an Android Internet Connection with Wi-Fi Hotspot or USB Tethering
 Nearly every Android smartphone can share it’s cellular data connections and turn itself into an internet hotspot, an infinitely valuable feature that lets you connect Macs, PC’s, iPad, or Nexus tablets get online through the cell connection. Of course the iPhone has the Hotspot ability too, but we’re going to focus on getting this feature working with Android this time around, and we’ll also show how to get USB tethering working between Android and Mac OS X too, which, unlike Windows, is not a supported option by default on the Mac.
Keep in mind that wi-fi hotspot and internet tethering may be an additional fee service through your cellular carrier, and each data plan differs as to whether tethering is included in the standard bandwidth allocation or if it’s available at an additional cost. Since all carriers handle personal hotspot differently, the billing situation is up to you to figure out on your own, and if you don’t see any hotspot options on your phone it’s probably because you haven’t paid for the service or your carrier doesn’t offer it. It’s also worth pointing out that, despite the incredible conveniences of hotspot features, it’s very easy to use tons of bandwidth once you connect a computer to a smartphones internet connection, and thus you should learn some simple tips to reduce data usage any time a Mac or PC has been tethered to a smartphones cell plan.
How to Enable Wi-Fi Hotspot on an Android Smartphone
Setting up wireless hotspots in Android is super easy, but it’s actually slightly different on various carriers. Why this is different is not entirely clear to me, but it may have to do with certain carriers decisions on whether or not to offer hotspot as a standard feature, or as an added data plan feature that costs an additional fee. Nonetheless, we’ll show you how to enable it on AT&T, T-Mobile, Verizon, Sprint, and, theoretically at least, any other GSM or CDMA carrier.
Android Hotspot Setup with AT&T & T-Mobile
This should also be the same for AT&T, T-Mobile and any other GSM cellular network:
- On the Android, open “Settings”, then go to Wireless & Networks
- Choose “More” then select “Tethering and portable hotspot”
- Choose “Portable Wi-Fi hotspot” to enable the connection sharing
If you’ve never used it before you can select a password, share name, and other configuration details. Otherwise specific hotspot configuration is accessed through “Configure Wi-Fi hotspot” option under the “Tethering & portable hotspot” menu.
Now on the Mac (or iPad, or PC), you just need to join the Android hotspot network from the Wi-Fi menu, and you’ll be online.
Configuring Mobile Hotspot with an Android on Verizon
Verizon and some other CDMA networks have a slightly different approach to enabling the personal hotspot on Android phones:
- Go to Settings, then choose “More Settings” and go to “Wireless and networks”
- Flip “Mobile hotspot” to ON
With hotspot toggled on, you can now join the Android network from the Wi-Fi connection menus in OS X, iOS, Windows, or whatever else you’re trying to connect to the internet.
Again, why this is different is not entirely clear, but one of the two methods above should work on virtually any Android phone running 4.0 or newer. If for some reason the above options are not available, or tethering is not working after you’ve gone through the setup process, it may be a limitation from your cellular provider that requires the feature be added to your data plan before it becomes usable.
How to Set Up USB Internet Tethering from Android to Mac OS X
Windows supports USB tethering from Android devices immediately, but that’s not the case with Macs. Curiously, there is no native OS X support for Android-to-Mac USB tethering, but the good new is that it’s very easy to add with the help of a free kernel extension called HoRNDIS. You can think of kernel extensions (kexts) as drivers, and to get tethering working you will need to install one yourself:
- Download the Horndis package (free) and install it on the Mac
- Turn Wi-Fi OFF on the Mac by pulling down the menu and choosing “Turn Wi-Fi Off” – this is not necessary but makes the setup easier to determine when things are working or not
- Connect the Android to the Mac via USB cable
After the Android phone has been connected to the Mac, you need to enable USB tethering on the device itself. This can vary slightly per Android version, but it should follow the same basic steps as those described:
- Open Settings on the Android phone, and go to “Connections” and to “More”, choosing “Tethering & Portable Hotspot”
- Enable “USB tethering” at this menu, and within a moment or two the internet connection should now be shared through USB
At this point, the Mac should automatically detect the Android phone and set it as the primary internet connection. You can confirm this by trying to use the internet, or by going to > System Preferences > Network and look for the name of the Android device in the connection list. If you turned off wi-fi and are using the USB tethering it will have a icon next to it and say “Connected”, and you’ll find the IP address, DNS, and router info is all set.
If for some reason the package installer fails, you can install the kext using the traditional manual installation method described here, though it’s a bit more advanced. Likewise, you can uninstall the kext that way, and if you’re not certain if you have the extension installed at all, just use the ‘kextstat’ command to list every single kernel extension in OS X.
Wi-Fi Hotspot vs USB Tethering
Wi-Fi hotspot is obviously much easier to use and to set up, but some cell providers limit how many computers or devices can connect to an individual hotspot. That’s where USB tethering offers a huge advantage, because you can tether a Mac to the Android smartphone to use it’s internet connection, and then use internet sharing on the Mac to have the Macintosh turn into it’s very own wireless hotspot. This then broadcasts it’s own signal but routes it through a single MAC address, allowing a potentially infinite number of machines to connect to the tethered connection without being detected by a cellular provider. Cool eh?
Also, some people swear that USB tethering is more reliable than wireless tethering, though in our own testing we haven’t had issues with any wifi hotspot feature that doesn’t relate directly to the overall cellular connection strength, but your experience may vary here. Thus, use whatever works for your situation, which in most cases will probably be the simple wi-fi hotspot option.
Источник


